Table of Contents
Advertisement
Available languages
Available languages
Advertisement
Table of Contents

Related Manuals for Craftsman 917.378501


Summary of Contents for Craftsman 917.378501
- Page 1 Owner's Manual CRRFTSMFIH ° 5.5 Horsepower Power-Propelled 21" Multi-Cut Model No. 917.378501 Espahol, p. 19 Read and follow all Safety Rules and Instructions before operating this equipment Sears, Roebuck and Co., Hoffman Estates, IL 60179 U.S.A. Visit our Craftsman website:www.sears.com/craftsman...
- Page 2 Sears Service ......Back Cover LIMITED TWO YEAR WARRANTY ON CRAFTSMAN POWER MOWER For two years from date of purchase, when this Craftsman Lawn Mower is maintained, lubricated, and tuned up according to the operating and maintenance instructions in the...
- Page 3 L GENERAL OPERATmON H. SLOPE OPERATmON * Read, understand, and follow all Slopes are a major factor related to slip instructions on the machine and in the and fall accidents which can result in manual(s) before starting. Be thoroughly severe injury.
- Page 4 Repair Protection Agreements Congratulations on making a smart pur- Fast help by phone - phone support chase. Your new Craftsman® product from a Sears technician on products designed and manufactured for years requiring in-home repair, plus conve- dependable operation.
- Page 5 These accessorieswere availablewhen this lawn mowerwas produced. They are not shipped with your mower. They are also availableat most Sears retailoutlets and service centers. Some of these accessoriesmay not apply to your lawn mower. LAWN MOWER PERFORMANCE CLIPPING DEFLECTORS STABILIZER REAR DISCHARGE LAWN MOWERS CANS...
- Page 6 Read these instructions and this manual Operator presence controU bar its entirety before you attempt to assemble or operate your new lawn mower. Upper mMPORTANT: This lawn mower is shipped WITHOUT OIL OR GASOLINE in the engine. Your new lawn mower has been assem- bled at the factory with the exception...
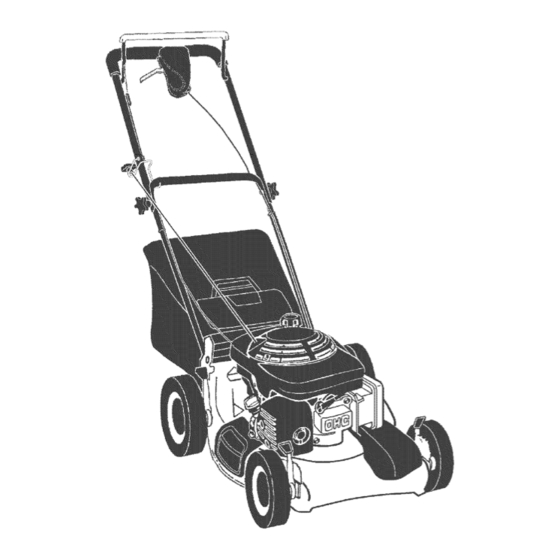
- Page 7 KNOWYOUR LAWN MOWER READ THIS OWNER'S MANUAL AND ALL SAFETY RULES BEFORE OPERATING YOUR LAWN MOWER. Compare the illustrations with your lawn mower to familiarize yourself with the location of various controls and adjustments. Save this manuat future reference. These symbols may appear on your...
- Page 8 1. Turn unit off and disconnect spark plug The operation of any lawn SA_ETYGLASSES mower can result in for- wire from spark plug. Pull drive control lever ALL THE WAY eign objects thrown into BACK to the handle. the eyes, which can result Push button on underside of drive in severe eye damage.
- Page 9 TO CONVERT MOWER Your lawn mower was shipped ready to be used as a mulcher. To convert to bagging or discharging: REAR BAGGING Lift rear door of the lawn mower place the grass catcher frame hooks onto the door pivot pins. To convert to mulching or discharging...
- Page 10 BEFORE STARTmNG ENGmNE Gasoline ADD OraL filler cap Your lawnmower is shipped without oil in the engine. For type and grade of oil to use, see "ENGINE" in the Maintenance section of this manual. CAUTmON: DO NOT overfill engine with oil, or it will smoke on startup.
- Page 11 MOWING TIPS I_IULCHmNG MOWmNG TraPS * Under certain conditions, such as very mMPORTANT: For best performance, tall grass, it may be necessary to raise keep mower housing free of built-up the height of cut to reduce pushing grass and trash. See "CLEANING" in the effort and to keep from overloading Maintenance...
- Page 12 MAINTENANCE SCHEDULE O o% FILL IN DATES _./_ _ __ZERVICE AS YOU COMPLETE REGULAR SERVICE f_F<C,"_)£x'F_.,'4yfb_ _" DATES Lubrication Check Tires Check Drive Wheeb (Power-Propelled Mowers) Check for Loose Fasteners Clean/Inspect Grass Catcher (If Equipped) Clean Lawn Mower Clean Under Drive Cover (Power-Propelled Mowers) Check drive belt/pulleys (Power-Propelled Mowers)
- Page 13 LAWN MOWER Be sure the trailing edge of blade (op- posite sharp edge) is up toward Alwaysobserve safety ruleswhen per- engine. forming any maintenance. Install the blade bolt with the lock washer and hardened washer into TmRES blade adapter and crankshaft. ,, Keep tires free of gasoline, oil, or insect Use block of wood between...
- Page 14 GEAR CASE oil from the container down the oil fill Tokeepyour drivesystem working spout into the engine. Wait one minute to allow oil to settle. properly,the gearcase and area around the drive should be keptclean and free Use guage on oil fill cap/dipstick of trash build-up.
- Page 15 MUFFLER Clean the underside of your lawn mower by scraping to remove build-up of grass Inspect and replace corroded muffler as it and trash. could create a fire hazard and/or damage. Clean engine often to keep trash from accumulating. A clogged engine runs SPARK...
- Page 16 TO ADJUST HANDLE The handle can be mounted in a high or Maintenance, repair, or replacement low position. The mounting holes in the the emission control devices and systems, bottom of lower handle are off center which are being done at the customers raising or lowering the handle.
- Page 17 IMPORTANT: When folding the handle Empty the fuel tank by starting the en- storage or transportation, be sure to fold gine and letting it run until the fuel lines the handle as shown or you may damage and carburetor are empty. the control cables.
- Page 18 TROUBLESHOOTmNG o See appropriate section in manuam unmess directed to a Sears Service Center. PROBLEi_I CAUSE CORRECTmON Does not start Spark plug wire disconnected. Connect wire to spark plug. (continued) Bad spark plug. Replace spark plug. Loose blade or broken Tighten blade bolt or blade adapter.
- Page 19 GARANTiA LIMITADA DE DOS ANOS PARA LA SEGADORA A MOTOR CRAFTSMAN Por dos (2) a_os, a partir de la fecha de compra, cuando esta Segadora Craftsman se mantenga, lubrique y afine segun las instrucciones para la operaci6n y el mantenimiento en el manual del due_o, Sears reparara"...
- Page 20 HACER: L OPERACION ° Antes de empezar, debe famHiarizarse compUe- Puede recortar a trav6s de [a superfic[e de tamente con [os controUes y e[ uso correcto de la cuesta, nunca hacia arriba y hacia abajo. [a maquina. Para esto, debe [eer y comprender Proceda con extrema precauci6n cuando todas [as [nstrucciones que aparecen en [a ma- cambie de direcci6n en las cuestas.
- Page 21 Congratulaciones por su buena compra. Ayuda r_pida pot tei_fono - soporte tele= nuevo producto Craftsman® estb, dise_ado f6nico por parte de un t6cnico Sears sobre y fabricado para funcionar de modo fiabb por productos que requieren un arreglo en casa, muchos aSos.
- Page 22 Estos accesorios estaban disponiMes cuando se produjo la segadora. No son facilitados junto al cortacesped. Est&n disponiMes en la mayoria de las tiendas de Sears y en los centros de servicio. Algunos de estos accesorios tal vez no se apHquen a su segadora. RENDIMIENTO DE LA SEGADORA DESVIADOR...
- Page 23 Lea estas instrucciones yeH manuaH compHeo Barra de control que sxig _ Ia presencia del operador tamente antes de tratar de montar u operar su segadora nueva. Mango superior IMPORTANTE: Este cortacesped viene SiN ACEHTE O GASOLHNA en el motor. Mango inferior Su segadora nueva ha sido montada en Ha LEVANTAR...
- Page 24 FAMILIARICESE CON SU SEGADORA LEA ESTE MANUAL DEL DUENOY LAS REGLAS DE SEGURUDAD ANTES DE OPERAR SU SEGADORA. Compare UasHustraciones con su segadora para famHiarizarse con Uaubicaci6n de Uosdiversos controUes y ajustes. Guarde este manuaU para referencia en eUfuturo. Estos s_mbolos pueden apareser sobre su segadora o en la literatura proporcionada...
- Page 25 Tirar la palanca de accionamiento TODO La operaci6n de cuaUqubr ATRAS HACIA el mango. segadora puede hacer que saUten Empujar el bot6n en la parte trasera del objetos extra_os dentro de sus mando. Con el bot6n apretado, revuelva la ojos, Io que puede producir da_os palanca de controles del mecanismo impul- graves en 6stos.
- Page 26 PARA CONVERTIR LA SEGADORA Su segadora fue enviada Hsta para usarse como acoUchadora de capa vegetal Para convertir Uaa una operaci6n de ensacado o de descarga: SEGADORAS CON DESCARGA TRASERA o Levantar Uapuerta trasera de cortac6sped y coUocar Uosganchos deUarmaz6n de Ua recoUectora de hierba en Uospasadores deU quicio de Uapuerta.
- Page 27 ANTES DE HACER ARRANCAR Tapa del rellenador _,_OTOR solina AGREGUE ACEtaTE Su segadora fue enviada sin aceite en ei motor. Para ei tipo y ei grado dell aceite a utHizar, vea ei "MOTOR" en Hasecci6n dell Mantenimiento de este manual AI:i_PRECAUCl6N: NO sobrellene el motor con Marca superior _ aceite, o fumar_, pesa demante del silenciador...
- Page 28 CONSEJOS PARA SEGAR Y PARA HACER ARRANCAR EL MOTOR ACOLCHAR AVlSO: Debido a Uascapas protectoras deUmo- tor, una cantidad peque_a de humo puede eso mI_IPORTANTE: Para obtener el mejor reno tar presente durante eUuso iniciaUdeUproducto dimiento mantenga la caja de la segadora sin y se debe considerar normal acumulacion de cesped y basura.
- Page 29 PROGRAMA DE MANTENIMIENTO J___ eo,o so SE V,O,O Lubricaci6n ControUar Uosneumaticos Controlar las ruedas motrices (segadoras con poder propulsor) Revisar si hay sujetadores sueltos Limpiar/inspeccionar el recogedor de c_sped (si viene equipado) Limpiar la segadora Limpiar debajo de la cubierta de la trans- misi6n (segadoras con poder propulsor) sadas (segadoras con poder propulsor) Revisar las correas y las poleas impul-...
- Page 30 PARA CAMBIAR LA CUCHILLA SEGAOORA Sbmpre observe UasregUas de seguridad cuo Ponga el adaptador de la cuchilla en el ando haga eUmantenimbnto. cigue_al del motor. Asegurese que la ranura del adaptador y que el chavetero del cigueo _al est6n alineados. LLANTAS Ponga la cuchilla en el adaptador de 6sta Mantenga UasHantas sin gasoHna, aceite o...
- Page 31 RECOGEDOR DE CESPED PARA CAMBIAR EL ACEITE DEL MOTOR o El recogedor de c6sped puede ser rociado AVISO: Antes de inclinar la segadora para dre- con el agua de la manguera pero tiene que nat el aceite, drene el tanque de combustible estar seco a usar.
- Page 32 BUJ[A FILTF{O DE AIF_E Su motor puede sufrir averias y funcionar de Cambie el bujia al comienzo de cada tempo- manera incorrecta con un fHtro deUaire sucio. rada de siega o despu6s de cada 100 horas Sustituir eUpapeUdeUcartucho una vez aUa_o o de operaci6n, Io que suceda primero.
- Page 33 PARA CAMBmAR LA CORREA DE mMPUL- Posici6n SlON segar / instale Hacorrea nueva en Hapolea dell mo° tor. Reinstale Hadefensa en contra dell desperdi- do y HacuchHi& Vueiva ei cortac6spedes a Haposici6n verti- instale Hacorrea nueva en Hapolea de Ha caja de engran_es.
- Page 34 Inmediatamente prepare su segadora para el Barra de control que almacenamiento al final de cada temporada o si exige Ia presencia la unidad no se va a usar pot 30 dias o ma's. operador HACIA ADELANTE Mango SEGADORA Cuando se va a guardar la segadora pot cierto Mango periodo de tiempo, limpiela cuidadosamente, remueva toda la mugre, la grasa, las hojas, etc.
- Page 35 ClLINDRO o Si es posiMe, guarde su unidad en un recinto Remueva Uabujia. cerrado y cObraUapara protegerUa contra eU Vacie 29 mU(una onza) de aceite a trav6s poUvoy Uamugre. deUagujero de Uabujia en eUcHindro. o Cubra su unidad con un forro protector Tire UamanHUade arranque Uentamente unas adecuado que no retenga Uahumedad.
- Page 36 SOLUCI6N DE PROBLEiViAS oYea la secci6n apropiada en el manual amenos est_ dirigido a un centro de servico Sears. PROBLEIV1A CAUSA CORRECCION Falta de Eleve la altura de corte. CucMHa desgastada, dobiada fuerza o sueita. Eleve la altura de corte. Aitura de [as ruedas dispareja.
- Page 37 CRAFTSMAN ROTARY LAWN MOWER ° ° MODEL NUMBER 917.378501 GEAR CASE ASSEMBLY o o PART NUMBER 187212 PART DESCRIPTION 187525 Case, Lower 187526 Case, Upper 183499 Gear, 27Teeth 187527 Shaft, input 187528 Spacer 183505 Wire, Formed 183506 Bearing, Ball 183508...
- Page 38 CRAFTSMAN ROTARY LAWN MOWER o- MODEL NUMBER 917.378501...
- Page 39 CRAFTSMAN ROTARY LAWN MOWER o - MODEL NUMBER 917.378501 KEY PART PART DESCRIPTION NO. NO. DESCRIPTION 182724 Bolt Upper Handle, with Grip 184193 151721X479 Lower Handle 850733X004 Bracket, Bpstop 182726 Control Bar 176185 Washer 182755 Pushnut Engine Zone Control Cable...
- Page 40 CRAFTSMAN ROTARY LAWN I_,/IOWER o" MODEL NUMBER 917.378501...
- Page 41 CRAFTSMAN ROTARY LAWN MOWER o - MODEL NUMBER 917.378501 PART PART DESCRtPT_ON DESCRIPTION 181048 Kit, Wheel Adjuster, LH Drive Control Assembly 180915 181233 DecaI, Drive ControI Operation dncludes Knob and Bearing) 175262 Gear Case Assembly (See Breakdown) Pan Head Tapping Screw #10-24 x 2_3/4...
- Page 42 HONDA 4-CYCLE ENGmNE t4ODEL NUt4BER GCV-160-AS3A LABEL °4 CAMSHAFT PULLEY.] o.<©_-oT o 7" CARBURETOR]...
- Page 43 HONDA 4-CYCLE ENGmNE I_IODEL NUMBER GCV-160-AS3A LABELS CARBURETOR PART PART DESCR{PTION DESCRmPTION 7400187 Mark, Choke hdication 3088416 Packing Set 5580162 F!oat Set 3465879 Chamber Set, Fioat CHOKE 1441518 Screw Set 7301138 Carburetor Asssembly (BB62G A) PART 5580212 Valve, Float DESCRIPTION 5580220 Nozzle, Main 5580238...
- Page 44 HONDA 4oCYCLE ENGmNE MODEL NUMBER GCV-160oAS3A FAN COVER RECOIL STARTER AIR CLEANER FLYWHEEL...
- Page 45 HONDA 4=CYCLE ENGmNE I_IODEL NUMBER GCV-160=AS3A FAN COVER RECOIL STARTER PART PART DESCRiPTiON DESCRmPTION 3683646 Rubber Supporter (107 mm) 6092886 Starter Assembly, Recoil 7357379 Cock Assembly, Fue! 5580634 Grip, Starter 5189352 Bracket, Fuel Cock 5580642 Rope, Recoil Starter 6478812 6673289 Cap Assembly, Fuel Tank Nut, Flange 6 mm...
- Page 46 HONDA 4=CYCLE ENGmNE MODEL NUMBER GCV-160=AS3A CYL_NDERBARREL! PISTON CONNECTING ROD l CRANKSHAFT [MUFFLER...
- Page 47 HONDA 4=CYCLE ENGmNE I_vIODEL NUMBER GCV-160=AS3A CYUNDER BARREL OIL PAN PART PART DESCRiPTiON DESCRmPTION 6771489 6842413 Barre! Assembly, Cylinder Pan AssembIy, Oil 5716915 2399780 Clip, VaIve Guide Gauge AssembIy, Oil Level 1452754 5579990 Cover, Head Packing, Oil Filler cap 5664503 Extension, Oil Filler 5580006 Cover Comp.
- Page 48 Your Home For repair - in your home - of all major brand appliances, lawn and garden equipment, or heating and cooling systems, no matter who made it, no matter who sold it! For the replacement parts, accessories owner's manuals that you need to do-it-yourself. For Sears professional installation of home appliances...