Table of Contents
Advertisement
Quick Links
- 1 User Manual
- 2 Installing the Batteries
- 3 Starting Your Camera
- 4 Taking Photos
- 5 The Camera Modes
- 6 Installing the Vivitar Experience Image Manager Software and Camera Driver
- 7 Connecting Your Camera to the Computer
- 8 Getting Photos and Videos from Your Camera to Your Computer
- Download this manual
See also:
Instruction Manual
Advertisement
Table of Contents

Related Manuals for Vivitar V69379M


Summary of Contents for Vivitar V69379M
-
Page 1: User Manual
V69379M Digital Camera User Manual © 2011 Sakar International, Inc. All rights reserved. Windows and the Windows logo are registered trademarks of Microsoft Corporation. All other trademarks are the property of their respective companies. -
Page 2: Table Of Contents
Taking Photos .......................... 6 The Camera Modes ......................... 7 Installing the Vivitar Experience Image Manager Software and Camera Driver ....11 Connecting your Camera to the Computer ................11 Getting Photos and Videos from your Camera to your Computer .......... 12 Getting Started!........................ -
Page 3: Introduction
3-in-1 Digial Camera Takes over 200 photos Vivitar Experience Image Manager Software for uploading and managing photos and videos to or from the most popular photo sharing and social network websites. Works as a Webcam on Windows and Macintosh computers What‟s Included... -
Page 4: Computer System Requirements
Computer System Requirements To be able to download photos and videos to your PC or Macintosh, you will need the following minimum configuration: WINDOWS OS Microsoft® Windows XP with Service Pack 3, Windows Vista with Service Pack 1 or Windows 7 Pentium®... -
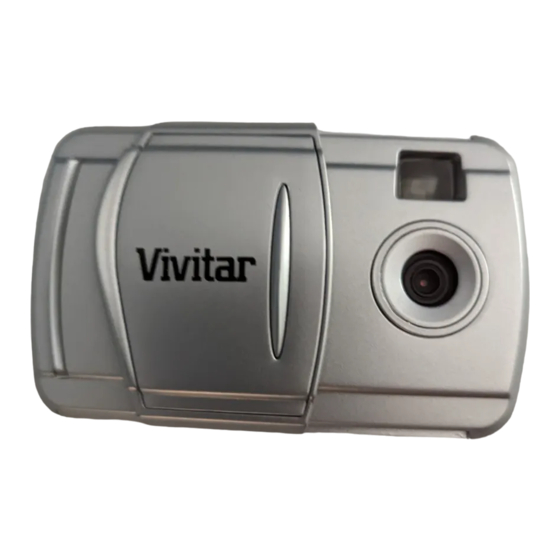
Page 5: A Quick Look At Your Digital Camera
A Quick Look at your Digital Camera Installing the Batteries Your camera requires 2 AAA batteries (not included). Insert the batteries into the camera as shown: 1. Open the battery compartment. 2. Insert the batteries in accordance with the polarity (+/-) shown on the inside of the battery cover. -
Page 6: Starting Your Camera
Note: In order to download the photos and videos captured with this camera you need to install the Vivitar Experience Image Manager Software and camera specific driver for your camera. See the “Installing the Vivitar Experience Image Manager Software and Camera Driver” section of this... -
Page 7: Taking Photos
Taking Photos 1. Compose your shot using the view finder. The optimal distance between the camera and the subject is approximately 5 feet. 2. Hold the camera steady and press the Shutter button to take the photo. 3. The camera will beep when a photo is taken. 4. -
Page 8: The Camera Modes
The Camera Modes Power Off - 1. Press the MODE button for the icon to appear on the LCD screen. 2. Press the Shutter button and the camera will switch off. Self-Timer - 1. Press the MODE button for the icon to appear on the LCD screen. - Page 9 Delete All - To delete all photos on the camera: 1. Press the MODE button for the icon to appear on the LCD screen. 2. Press the Shutter button and the photo counter will flash. 3. Press the Shutter button again within 5 seconds and all photos in the camera will be deleted.
- Page 10 Compression There are 2 photo compressions to select from: High density - or Low density - 1. Press the MODE button for the icons to appear on the LCD screen 2. If the LCD displays , this means the present compression is Low density and in order to change to High density click the Shutter button.
- Page 11 Frequency - The camera has 2 Frequency settings: 50HZ for Asia and Europe, and 60HZ for the U.S. and Japan. To set the camera for the correct frequency: 1. Press the MODE button for the icons to appear on the LCD screen. 2.
-
Page 12: Installing The Vivitar Experience Image Manager Software And Camera Driver
Installing the Vivitar Experience Image Manager Software and Camera Driver Warning: Do not plug your camera into the computer until the Vivitar Experience Image Manager Software installation is complete. 1. Insert the installation CD into your CD-ROM drive. The Vivitar Experience Image Manager will begin to install. -
Page 13: Getting Photos And Videos From Your Camera To Your Computer
Getting Photos and Videos from your Camera to your Computer Important: Do not disconnect the cable during transfer. Doing so will cancel the transfer of any files on their way to your computer. 1. Select the “Get Images” button from the Main menu. 2. -
Page 14: Getting Started
Your camera, when plugged into your computer, can also be used as a Webcam with most instant messenger and web conferencing applications that support video. On PC: The webcam driver is installed on your computer when you install the Vivitar Experience Image Manager Software for this device. -
Page 15: Maintenance Of Your Digital Camera
On Mac: The webcam driver is installed on your computer when you install the Vivitar Experience Image Manager for this device. To preview the webcam video feature and open the Webcam application window, please follow these instructions: 1. Click the “Macintosh HD” icon on the desktop 2. -
Page 16: Sakar Warranty Card
08817 Technical Support For technical support issues please visit our website at www.vivitar.com. You can find manuals, software and FAQ‟s at the website. Can‟t find what you are looking for? E-mail us at support@vivitar.com and one of our technical support team members will answer your questions. -
Page 17: Technical Specifications
Technical Specifications Image Sensor CMOS Sensor Resolution 640 x 480 (VGA) 320 x 240 (QVGA) Memory 1M x 16 bytes SDRAM HI/Ld : 26 photos; HI/Hd: 52 photos; Lo/Ld: 104 photos; Number of pictures Lo/Hd: 208 photos Lens f=3.6/F2.4 Focus Range 1m to Infinity Shutter Range 1/6 ~1/15000 second... -
Page 18: Frequently Asked Questions
Frequently Asked Questions Q: I have taken photos, but my computer says "No photos in camera." What do I do? A: First, ensure that you have taken photos with your camera. Press the Shutter button a few times to take some sample photos and try again. If you still get a no photos error, this indicates that the software was not installed correctly or your computer may not meet the minimum system requirements (see the Computer System Requirements section of this manual). - Page 19 This device complies with the part 15 of the FCC rules. Operation is subject to the following two conditions: (1) this device may not cause harmful interference, and (2) this device must accept any interference received, including interference that may cause undesired operation. Caution: changes or modifications not expressly approved by the party responsible for compliance could void the user‟s authority to operate the equipment.