Table of Contents
Advertisement
Advertisement
Table of Contents

Related Manuals for Vivitar VIV-CV-530V


Summary of Contents for Vivitar VIV-CV-530V
-
Page 1: User Manual
VIV-CV-530V Digital Binocular Camera User Manual © 2011 Sakar International, Inc. All rights reserved. Windows and the Windows logo are registered trademarks of Microsoft Corporation. All other trademarks are the property of their respective companies. - 1 -... -
Page 2: Table Of Contents
Taking Photos ........................9 The Camera Modes ....................... 10 Installing the Vivitar Experience Image Manager Software and Camera Driver ... 15 Connecting your Camera to the Computer ..............16 Getting Photos and Videos from your Camera to your Computer ........16 Getting Started! ...................... -
Page 3: Introduction
Vivitar Experience Image Manager Software and camera driver. The Vivitar Experience Image Manager will help you get the most out of your camera. It is packed with powerful, yet easy to use features that allow you to share your photos and videos with friends and family. -
Page 4: Key Features
Key Features Vivitar Experience Image Manager Software for managing and enhancing your photos, printing, sending photos by e-mails, effortlessly upload to your social network accounts and much more 2 camera resolutions – 320 x 240 (QVGA), 640 x 480 (VGA) ... -
Page 5: Computer System Requirements
Computer System Requirements To be able to download photos and videos to your PC or Macintosh, you will need the following minimum configuration: WINDOWS OS Microsoft® Windows XP with Service Pack 3, Windows Vista with Service Pack 1 or Windows 7 Pentium®... -
Page 6: A Quick Look At Your Camera
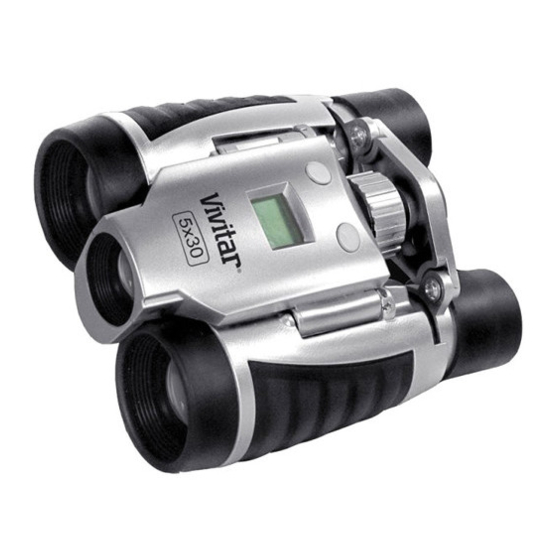
A Quick Look at Your Camera M - Power / Mode button LCD Panel Optical Lens USB Slot Telescope and Viewfinder S – Shutter / OK button Battery Compartment Tripod socket Barrels 10. Focus Wheel - 6 -... -
Page 7: Preparing Your Camera For Use
Preparing Your Camera for Use Battery Installation Your camera requires one (1) AAA battery. Alkaline battery recommended. Insert the battery into the camera: 1. Open the battery cover at the bottom of the camera. 2. Insert the battery according to the polarity (+ and -) indicated on the inside of the battery compartment. -
Page 8: Starting Your Camera
Vivitar Experience Image Manager Software and camera driver. See the “Installing the Vivitar Experience Image Manager Software and Camera Driver” section of this manual to learn how to install the software before connecting the camera to your computer. -
Page 9: Taking Photos
In order to continue taking photos you will need to: 1. Use the Vivitar Experience Image Manager application to download all the photos and videos from you camera to your computer. -
Page 10: The Camera Modes
The Camera Modes Navigating the Camera Modes To enter the different camera modes, continue to press the MODE button until you have selected the mode of your choice. Once you have selected the mode, press the Shutter button to confirm your choice. Powering On Your Camera To power on your camera, press the MODE button. - Page 11 5. Lift your finger off the Shutter button to stop capturing images. Note: The photos will continue to be taken until the Shutter button is released or the camera‟s memory is full. 6. The photos will be saved as JPEG images. Note: Photos taken in Continuous Shoot Mode may fail under poor lighting conditions.
- Page 12 Clear Last Mode (Delete Last Photo) - To delete the last photo taken: 1. Press the MODE button until the icon appears on the LCD screen. 2. Press the Shutter button. The LCD display then flashes 3. Press the Shutter button again within 5 seconds and the last photo will be deleted permanently.
- Page 13 5. The photo resolution setting can be changed at any time. 6. The amount of pictures that can be taken at the selected resolution appears on the LCD screen. 7. As there are only 2 digits on the screen, the camera will flash the hundreds digits before showing the tens and units digits on capturing a picture in order to show you how many pictures you can continue to take at that resolution.
- Page 14 Note: Photos taken at no compression take up more of the camera‟s memory and therefore fewer photos can be taken at non-compression than with compression. The photo resolution and compression settings determine the number of photos that can be taken and the amount of memory required for each photo. The following table tells you how many photos can be taken based on the image resolution and compression: Number of Captured Photos (According to Resolution and Compression settings)
-
Page 15: Installing The Vivitar Experience Image Manager Software And Camera Driver
On PC and Macintosh: Click the “I accept the terms of this license agreement” and then click “Next” to continue. 3. On PC only: Let the “Vivitar Experience Image Manager” installer create the folder to where the program will be installed, and then click “Install”. -
Page 16: Connecting Your Camera To The Computer
Connecting your Camera to the Computer 1. Use the USB cable that came with your camera to connect your camera to your computer. 2. Plug the one end of the USB cable into the USB slot on the side of the camera and plug the other end into an available USB port on your computer. -
Page 17: Getting Started
Use automatic “Geotagging” with built in Google Maps For more details on how to use the Vivitar Experience Image Manager open the „Help guide‟ from the Help menu or click the “Take a Tour” button on the application‟s Home page. -
Page 18: Using Your Camera As A Webcam
Your camera, when plugged into your computer, can also be used as a Webcam with most instant messenger and web conferencing applications that support video. On PC: The webcam driver is installed on your computer when you install the Vivitar Experience Image Manager Software for this device. - Page 19 Note: Use the Control menu / Video settings option of this web conferencing application to change the settings if needed. If you have a built-in camera on your computer, use the settings option of your web conferencing application to choose this „Dual Mode Camera‟. ...
-
Page 20: Sakar Warranty Card
Sakar Warranty Card This warranty covers for the original consumer purchaser only and is not transferable. Products that fail to function properly UNDER NORMAL USAGE, due to defects in material or workmanship. Your product will be repaired at no charge for parts or labor for a period of one year. What Is Not Covered By Warranty: Damages or malfunctions not resulting from defects in material or workmanship and damages or malfunctions from other than normal use, including but limited to, repair by unauthorized... -
Page 21: Technical Support
Technical Support For technical support issues please visit our website at www.vivitar.com. You can find manuals, software and FAQ‟s at the website. Can‟t find what you are looking for? E-mail us at support@vivitar.com and one of our technical support team members will answer your questions. -
Page 22: Frequently Asked Questions
Frequently Asked Questions Q: I have taken photos, but my computer says "No photos in camera." What do I do? A: Ensure that you have taken photos with your camera. Press the Shutter button a few times to take some sample photos and try again. If you still get a no photos error, this indicates that the software was not installed correctly or your computer may not meet the minimum system requirements (see the Computer System Requirements section of this manual). - Page 23 This device complies with the part 15 of the FCC rules. Operation is subject to the following two conditions: (1) this device may not cause harmful interference, and (2) this device must accept any interference received, including interference that may cause undesired operation. Caution: changes or modifications not expressly approved by the party responsible for compliance could void the user‟s authority to operate the equipment.