Table of Contents

Related Manuals for Vivitar VIV-CV-1225V


Summary of Contents for Vivitar VIV-CV-1225V
-
Page 1: User Manual
VIV-CV-1225V Digital Binocular Camera User Manual © 2010 Sakar International, Inc. All rights reserved. Windows and the Windows logo are registered trademarks of Microsoft Corporation. All other trademarks are the property of their respective companies. -
Page 2: Table Of Contents
Contents Introduction ..........................2 What‟s Included ..........................2 Computer System Requirements – WINDOWS OS ..............3 Computer System Requirements – MAC OS ................3 Parts of the Camera ........................4 Initial Camera Setup ........................5 Powering ON/OFF Your Digital Camera ..................7 Camera Button Functionality ...................... -
Page 3: Introduction
Everything you need to take quality digital photos is included with your camera. Vivitar makes capturing those special moments as easy as possible. Please read this manual carefully first in order to get the most out of your digital camera. -
Page 4: Computer System Requirements - Windows Os
Computer System Requirements – WINDOWS OS To be able to download photos to your PC, you will need the following minimum configuration: Microsoft® Windows XP with Service Pack 3, Windows Vista with Service Pack 1 or Windows 7 Pentium® 4 processor (or above) ... -
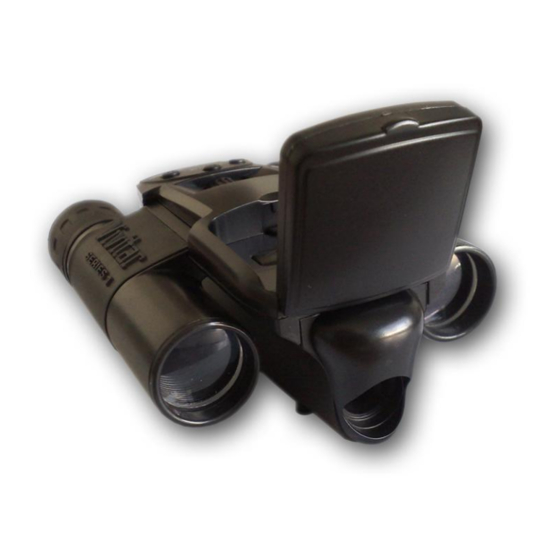
Page 5: Parts Of The Camera
Parts of the Camera LCD Screen Next Button Eyepiece Focus Knob Preview/OK Button Screen Button Shoot/Right Button USB Slot / SD Card Slot MENU/Left Button Power Button Battery Compartment Telescopic Funnel... -
Page 6: Initial Camera Setup
Initial Camera Setup INSTALLING THE BATTERIES Slide Open the battery compartment, located on the bottom of the camera. Insert 2 x AA (1.5V) batteries. Alkaline batteries are recommended. Close the battery compartment. Battery Indictor When your camera is powered on, an icon indicating how much battery power remains can be seen on the top left section of the LCD screen. - Page 7 - select images to delete using the Delete menu options in Playback Mode. - save your captured images by copying the images from the SD card onto your computer then deleting them from your SD card (using the Vivitar Experience Image Manager or manually – see related topics in Manual).
-
Page 8: Powering On/Off Your Digital Camera
Powering ON/OFF Your Digital Camera Make sure the batteries have been inserted properly into your digital camera. Insert 2 AA Batteries (1.5V) in the battery compartment of your camera. Alkaline batteries are recommended. Make sure an SD Memory card has been inserted into your camera. (SD card up to 8GB - SD Card not included) POWERING THE CAMERA ON 1) Press and hold for 3 seconds the Power... -
Page 9: Camera Button Functionality
Camera Button Functionality Button Function Press to turn the camera on and off. POWER Press to open the Menu Mode. MENU / Left Press again to exit the Menu Mode. Press to open the Playback Mode. PREVIEW / OK Press again to exit the Playback Mode. When in Menu Mode: - Opens Submenu options. -
Page 10: Photo Capture (Shoot) Mode
Photo Capture (Shoot) Mode TAKING A PICTURE Turn on your digital camera. Flip up and open the LCD display. The camera automatically opens to the Photo Capture (Shoot) Mode. camera icon will appear on the top right corner of the LCD. The amount of photos that can be captured with the available memory and as per the selected resolution will appear on the bottom section of the LCD screen. -
Page 11: Menu Mode: Changing The Camera Settings
Menu Mode: Changing the Camera Settings The Menu Mode allows you to select and change the following specific Camera settings: Picture Size, Picture Quality, Exposure, White Balance, and Continuous Shot Mode. PICTURE SIZE Picture size allows you to select the picture quantity and quality that could be stored in the memory card. - Page 12 PICTURE QUALITY The quality selected for your photo will affect the number of photos (with same memory card) that can be captured. High quality means that your camera can take less photos, but the photos are of better quality. The default picture quality is good. Press the MENU button to enter the Menu Mode options.
- Page 13 Press the MENU button to exit and return to the camera standby mode. The selected Light Exposure icon will appear on the left side of the LCD screen. WHITE BALANCE The White Balance feature allows your camera to adjust the coloring of the captured images depending on the type of light source in the current environment.
- Page 14 Takes continuous photos Takes a single photo Press the NEXT button to highlight and select the Continuous Shot you want to use. Press the OK button to select your option and save your choice. Press the MENU button to exit and return to the camera standby mode. The selected icon will appear on the bottom left side of the LCD screen.
-
Page 15: Menu Mode: Changing The General Camera Settings
Menu Mode: Changing the General Camera Settings The Menu Mode allows you to select and change the following settings to adjust the camera according to your usage: Format Memory Card, Auto Power Off, and Frequency. FORMAT MEMORY CARD You can use the Format Memory Card menu to delete all of the content that is currently on your camera‟s memory card. - Page 16 AUTO POWER OFF You can use the Auto Power Off feature in order to conserve you camera‟s battery life. When the camera sits idle for three minutes, the camera will shut off completely and will need to be powered on again with the power button before the next use. Press the MENU button to enter the Menu Mode options.
- Page 17 Press the MENU button to enter the Menu Mode options. Press the RIGHT button to enter the General menu of camera settings mode Press the LEFT button to return to the change of Camera Mode settings menu. Press the NEXT button to select the Frequency icon that appears on the screen menu.
-
Page 18: Playback Mode
Playback Mode The Playback Mode allows you to review and delete photos that you‟ve captured with your camera. DELETE PHOTOS Press the PREVIEW button to enter the Playback Mode. Press the MENU button to enter the Delete menu option. Press the OK button to select the Delete option. The following delete options are displayed on the LCD screen. -
Page 19: Installing The Software
Installing the Software You must be connected to the internet to install and run the Vivitar Experience Image Manager software. Insert the installation CD into your CD-ROM drive. The installation screen should automatically open. On PC: The Vivitar Experience Image Manager Installer window appears. If the window does not appear, open the application‟s CD/DVD drive and click on “Setup.exe”... -
Page 20: Connecting The Camera To The Computer
On PC and Macintosh: Click the “I accept the terms of this license agreement” and then click “Next” to continue. 10) On PC only: Let the “Vivitar Experience Image Manager” installer create the folder to where the program will be installed, and then click “Install”. -
Page 21: Getting Photos From Your Camera To Your Computer
Make sure the camera is powered off – otherwise it cannot be identified. Your computer recognizes the camera as a separate hard drive and the name of this hard drive varies according to the operating system. Use the USB cable that came with your camera to connect your camera to your computer. The first time you connect the device to the computer you will have to wait a few seconds until the computer recognizes the device. -
Page 22: Get Started
Edit images using automatic and manual tools Use automatic “Geotagging” with built in Google Maps For more details on how to use the Vivitar Experience Image Manager open the Help file or click the “Take the Tour” button on the application`s Home page. -
Page 23: Transfer Media From My Camera To My Computer Manually (Using Windows)
Transfer media from my camera to my computer manually (Using Windows) IMPORTANT: Before connecting your camera to the computer: Make sure an SD memory card (up to 8GB) with your captured photos is inserted in the camera. Make sure the camera is powered off – otherwise it cannot be identified. Use the USB cable that came with your camera to connect your camera to your computer. -
Page 24: Camera Maintenance
files. Select the files and drag them into your computer. Optionally, select the files and choose Copy from the Finder‟s Edit menu. Then select a folder and choose Paste from the Edit menu. We recommend that you copy the images into the Pictures folder. Do not disconnect the cable during transfer. -
Page 25: Sakar Warranty Card
Sakar Warranty Card This warranty covers for the original consumer purchaser only and is not transferable. Products that fail to function properly UNDER NORMAL USAGE, due to defects in material or workmanship will be repaired at no charge for parts or labor for a period of one year from the time of purchase. -
Page 26: Technical Support
Technical Support For technical support issues please visit our website at www.vivitar.com. You can find manuals, software and FAQ‟s at the website. Can‟t find what you are looking for? E-mail us at support@vivitar.com and one of our technical support team members will answer your questions.