Table of Contents
Advertisement
Save This Manual
For Future
Reference
owner's
manual
Model No.
113.236090
Serial
Number
Model
and serial num-
bers may be found
attached
to the right
side of arm housing.
You should
record both
model and serial num-
bers in a safe place for
future
use,
====1=
FOR YOUR
SAFETY
READ ALL
INSTRUCTIONS
CAREFULLY
r
®
16 iNCH VARIABLE
SPEED SCROLL SAW
- assembly
• operating
° repair parts
Sears,
Roebuck
and Coo, Hoffman
Estates,
IL 60179
U.S.A.
Part No
SP5837
Printed
in USA,
Advertisement
Table of Contents

Related Manuals for Craftsman 113.236090


Summary of Contents for Craftsman 113.236090
- Page 1 Save This Manual For Future Reference owner's manual Model No. 113.236090 Serial Number ® Model and serial num- bers may be found 16 iNCH VARIABLE attached to the right side of arm housing. SPEED SCROLL SAW You should record both model and serial num- bers in a safe place for future...
-
Page 2: Safety Instructions For Scroll Saw
_FULi-ONF YEAR WARRANTY ON CRAFTSMAN BENCHTOP TOOLS If this Scroll Saw fails due to a defect in material or workmanship, within one year from the date of purchase, RETURN IT TO THE NEAR= EST SEARS SERVICE CENTER IN THE UNITED STATES, and Sears will repair it, free of Charge. -
Page 3: When Installing Or Moving The Saw
When Installing or Moving The Saw Avoid Dangerous Environment. could occur Jfthe tool tips or you acci- the saw in a dry indoor place, protected dentally hit the cutting toot. Do not store from rain. Keep work area wel! lighted. any item above or near the tool where anyone might stand on the scroll saw to To avoid injury from unexpected saw... -
Page 4: Safety Instructions For Scroll Saw
Safety Instructions for Scroll Saw (continued) CAUTION: This saw is NOT Plan Your Work. designed for cutting ferrous metals - Use The Right Tool. Don't force tool or like iron or steel. When cutting attachment to do a job it was not nonferrous metals (brass, copper designed to do. -
Page 5: Whenever Saw Is Running
Plan the way you will hold the work- positions where a sudden slip could piece from start to finish. cause fingers or hand to move into the blade. * Do not hand hold pieces so smatl that your fingers will go under the blade •... -
Page 6: Power Supply And Motor Specifications
Motor Specifications and Electrical Requiremen :: p_o,,er S.ppiy a nd .oto rSpecif cot ons WARNINGI T0 avoid eiectri_al haz- ards; fire hazards or damageto I _n this saw. Changes to the : t0oi, use proper circuit protection; _ internal wiring will create a fire haz- I Your toot is Wired at the factory for Iard and may also create a shock Operation using the voltage shown,... -
Page 7: 110-120 Volt, 60 Hz. Tool
110-120 Volt, 60 Hz. Tool If the grounding instructions are not com- pletely understood, or if you are in doubt Information as to whether the tool is properly NOTE: The plug supplied on your tool grounded check with a qualified electri- may not fit into the outlet you are plan- cian or service personnel. -
Page 8: Table Of Contents
Motor Specifications and Electrical Requirements (continued) Wire Sizes NOTE: Make sure the proper extension Wire Sizes Required cord is used and is in good condition. Cord Length , .for (A.W.G.) The use of any extension cord will cause 110-120V some loss of power. To keepthis to a minimum and to prevent overheating 0-25 Ft. -
Page 9: Unpacking And Checking Contents
Unpacking and Checking Contents ....Tools Needed Medium Standard Screwdriver Combination Square Unpacking Do Not Lift Saw By This Arm WARNING: To avoid injury, from unexpected starting or electrical shock, do not plug the power cord into a power source outlet during unpacking and assembly, This cord must remain unplugged whenever you are working on the... -
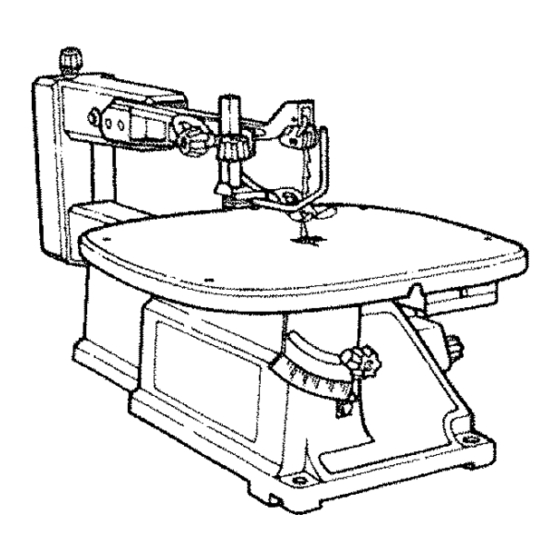
Page 10: Getting To Know Your Scroll Saw
Getting to Know Your Scroll Saw-_--. _!Knob 10 Blade Guard/Hold-Down Knob Holder Frame (Lift Here) 8 Btade Guard Blade Arm Bearings Speed Control On/Off Knob 2 Work Hold-Down Foot and Btade Support Lock Knob B_se (LIft Here) Indicator ___3 Bevel Scale Bevel _-'_ 9 Lower Blade Holder... - Page 11 Speed Control/On-Off Knob (continued) • To turn machine "ON", place fingers on Speed ControVOn-Off Knob and pull out. ,,To turn machine "OFF", push in Speed Control/On-Off Knob. machine unattended until it has I WARNING: Never leave the come to a complete stop. "On"...
-
Page 12: Alignment (Adjustments)
Alignment (Adjustments) _ ..Changing tho Table Bevel Angle o The scroll saw wO.r_table can be tilted to the left !oorbevel: CUtting Up to 45 ° from the 0 or tiori_or_tal cutting posi- tion. o A bevel scale and indicator are pro- vided under the work table as a conve- nient reference for setting the approximate table angle for bevel cut-... -
Page 13: Adjusting Work Hold-Down
Adjusting Work Hold-down WARNING: To avoid injury from Height Adjustment Knob accidental starting, always turn switch "OFF" and unplug power cord from outlet before removing or replacing the blade. The purpose of the work hold-down foot is to hold the work _gainst the table so Hold-Down that it is less likely to lift with the up Knob... - Page 14 Alignment (Adjustments) (continued) Removing Pin End Blades oseR WARNING: To avoid injury from accidental starting, always: turn switch "OFF" and unplug power cord from outlet before removing or replacing the blade, Tenslon Knob NOTE: Saw comes with pin end bfades. if you are going to use piain end blades, refer to the instructions under "Installing Plain End Blades".
-
Page 15: Installing Pin End Blades
Installing Pin End Blades Tighten Pin end blade set up: Check that the blade tension knob is loose. ,, Check that the upper and lower blade holder knobs are loose, Spread blade holder jaws open using fingers. NOTE: A rubber band looped aroundthe back of the blade holder will automati- cally open the jaws when the knobs are loosened which will make changing... - Page 16 Alignment (Adjustments) (continued) ..Loosen WARNING: To avoid injury from accidental starting, always turn switch "OFF and unplug power cord from outlet before removing or replacing the blade. Loosen tension on blade by turning ten- sion knob counterclockwise about three full turns. •...
-
Page 17: Installing Plain End Blades
installing Plain End Blades Check that the blade tension knob is loose. - Check that the upper and lower blade holder knobs are loose, Spread blade holder jaws open using fingers. NOTE: A rubber band looped around the back of the Made holder wiIl automati- cally open the jaws when the knobs are loosened which will make changing blades easier. -
Page 18: Dust Blower
Alignment (Adjustments) (continued) Dust B|ower Blade Guard The dust bto_er wilt direct air to the most effective point on the cutting tine when the hold:down is adjusted. No adjust- ment is necessary to the blower. Blade Guard The blade guard will always be posi- tioned parallet to the blade, No adjust- Dust Blower/"... - Page 19 Safety Instructions for Basic Saw Operations _efore Each Use • Make sure the blade tension is properly adjusted. Inspect your saw. • Keep Work Area Clean, Cluttered Disconr_ect The Saw. To avoid injury areas and benches invite accidents. from accidental starting, turn the switch Floor must not be stJppely.
-
Page 20: Basic Saw Operations
Safety Instructions for Basic Saw Operations (continued) Plan Ahead To Protect Your Eyes, enough to tip when not held down to Hands, Face And Ears the table top. • Never use another person as a substi- Any power saw Can throw foreign objects tute for a table extension, or as addi- into the eyes. - Page 21 oTurn switch "OFF", Before freeing any jammed material: oWait for nil moving parts to stop. ,, Turn switch "OFF". o Unplug saw. • Wait for all moving parts to stop. -With a flat blade screwdriver, turn the o Unplug saw. motor by hand while backing up the When backing up the workpiece, workpiecer...
-
Page 22: Choice Of Blade And Speed
Basic Saw Operations (continued) ............Making interior Scroll Cuts * When finished making the interior scrolt cuts, simply remove the blade from the . One of the features of tMs saw is, that it b_ade ho_ders, as described in the can be used to make scmt{ cuts on the Assembly section,... - Page 23 P!/aJnter_r_ce WARN{NG: Fo_ you_ own safety, push cont_'o_ knob "OFF" ramove plug _ro_'n _owe_ sogrce outlel before n]air_taini_;g ot ]ubri., caring you,r saw. General ,A,_/ Oc88SiOhal COat O_ pCSte '_'_'_!_XOn work table wii! ai}ow t,19 woo( _b_._ing cut _,_,_I "_ ..,_#r_,_ _-_--_ 1o 9 __e smeoth!y...
- Page 24 Troubleshooting . - .. WARNING_ For your own safety, turn switch "OFF", and remove plug from power source outlet before troubleshooting your scroll saw, ,,, ,,,,,,,,, ..,,,,,,,,,,,,_,, • Problem Probable Cause Remedy Schedule 1. Adjust blade tension. i Breaking 1.Wrong tension 2.
- Page 25 Wiring Diagram ..........WARNING: To avoid fire or shock, use only recommended service parts and reassemble exactly as originally assembled. Ground Switch Black) I_ _! O' _ :2:U_.. Board Cord w/Plug rj _=-_ Ground Screw .....
- Page 26 Repair Parts ....
- Page 27 Repa_Par_ >,...
-
Page 28: Maintenance
For the repair or replacement par_syou need Gall 7 am - 7 pro, 7 days a week 1-800-366_PART (1-800-365-7278) For in-home major brand repair service Call 24 hours a day, 7 days a week °8OO-4_REPAIR (1-800-473-7247) For the location of a Sears Repair Service Centerin your area Call 24 hours a day, 7 days a week t -800-488-1222...