Onkyo HT-S5600 Owner's Manual
Owner's manual english
Hide thumbs
Also See for HT-S5600:
- Manuel d'instructions (96 pages) ,
- Manual de instrucciones (96 pages)
Table of Contents
Advertisement
AV RECEIVER
HT-R592
Instruction Manual
Contents
Safety Information and Introduction ............2
Table of Contents ...........................................5
Connections .................................................11
Turning On & Basic Operations..................18
Advanced Operations ..................................36
Controlling Other Components...................51
Appendix .......................................................57
E
n
Advertisement
Table of Contents

Related Manuals for Onkyo HT-S5600


Summary of Contents for Onkyo HT-S5600
-
Page 1: Table Of Contents
Contents Safety Information and Introduction ....2 AV RECEIVER HT-R592 Table of Contents ...........5 Connections ..........11 Turning On & Basic Operations....18 Instruction Manual Advanced Operations ........36 Controlling Other Components....51 Appendix ............57 Speaker Package Remote Control Codes... -
Page 2: Safety Information And Introduction
Safety Information and Introduction 9. Do not defeat the safety purpose of the polarized or D. If the apparatus does not operate normally by grounding-type plug. A polarized plug has two blades following the operating instructions. Adjust only WARNING: with one wider than the other. A grounding type plug those controls that are covered by the operating TO REDUCE THE RISK OF FIRE OR ELECTRIC SHOCK, has two blades and a third grounding prong. -
Page 3: Precautions
If water or any other liquid gets inside water. Dry the unit immediately afterwards with a • Increase the separation between the equipment and this unit, have it checked by your Onkyo dealer. clean cloth. Don’t use abrasive cloths, thinners, receiver. -
Page 4: Supplied Accessories
• Remove expired batteries as soon as possible to prevent damage from leakage or corrosion. Thank you for purchasing an Onkyo AV Receiver. Please read this manual thoroughly before making connections and plugging in the unit. Following the instructions in this manual will enable you to obtain optimum performance and listening enjoyment from your new AV Receiver. -
Page 5: Table Of Contents
Controlling Zone 2 Components ....... 50 Turning On/Off the AV Receiver ........18 Turning On ..............18 Controlling Other Components Turning Off ..............18 iPod/iPhone Playback via Onkyo Dock ....51 Playback ..............19 Using the Onkyo Dock ..........51 Playing the Connected Component ......19 Controlling Your iPod/iPhone........52 Controlling Contents of USB Devices .......20... -
Page 6: Connections
® /iPhone ® models Processing USB input is compatible with iPod/iPhone and Onkyo Bluetooth adapter UBT-1. • HDMI (Audio Return Channel, 3D, DeepColor, Miscellaneous x.v.Color, Lip Sync, DTS-HD Master Audio, DTS-HD High Resolution Audio, Dolby TrueHD, Dolby Digital • 40 FM/AM Presets Plus, DSD and Multi-CH PCM) •... -
Page 7: Front & Rear Panels
Safety Information and Introduction Front & Rear Panels Front Panel (North American, Brazilian and Taiwanese models) (Asian models) For detailed information, see the pages in parentheses. DISPLAY button (35) USB port (15, 21, 22) ON/STANDBY button (18) SETUP button (36) SETUP MIC jack (26) HDMI THRU indicator (46) TUNING / , PRESET... -
Page 8: Display
Safety Information and Introduction Display For detailed information, see the pages in parentheses. Input indicators (62) Z2 (Zone 2) indicator (50) HDMI indicator (46, 62) 3D indicator DIGITAL indicator This lights when a 3D input signal is detected. ARC (Audio Return Channel) indicator (47) Headphone indicator (35) USB indicator (21, 22) and cursor indicators (22) -
Page 9: Rear Panel
Safety Information and Introduction Rear Panel (North American and Asian models) (Brazilian and Taiwanese models) DIGITAL IN COAXIAL and OPTICAL jacks MONITOR OUT V jack COMPONENT VIDEO IN and OUT jacks ZONE 2 LINE OUT jacks HDMI IN and OUT jacks SPEAKERS terminals (CENTER, FRONT, SURROUND, SURROUND FM ANTENNA jack and AM ANTENNA terminal... -
Page 10: Remote Controller
Receiver mode. RECEIVER). You can also use the remote controller to control Controlling the AV Receiver / buttons (23) Onkyo Blu-ray Disc/DVD player, CD player, and other components. D.TUN button (23) See “Entering Remote Control Codes” for more DISPLAY button details (➔... -
Page 11: Connections
Connections Connecting the AV Surround back/ Surround back/ front high front high Surround Surround Receiver right left right left Center Connecting Your Speakers Speaker Configuration The following table indicates the channels you should use depending on the number of speakers that you have. No matter how many speakers you use, a powered subwoofer is recommended for a really powerful and solid bass. - Page 12 Connections Connecting the Speaker Cables • Be careful not to short the positive and negative wires. Using a Powered Subwoofer Doing so may damage the AV receiver. The speaker terminals are color-coded for identification • Make sure the metal core of the wire does not have purpose.
-
Page 13: About Av Connections
Connections ■ AV Cables and Jacks Optical digital audio About AV Connections Optical digital connections allow you to enjoy digital ■ sound such as PCM , Dolby Digital or DTS. The audio HDMI Connecting AV components quality is the same as coaxial. HDMI connections can carry digital video and audio. -
Page 14: Connecting Components With Hdmi
Connections Connecting Components with HDMI VCR or DVD recorder/digital video recorder Game console TV, projector, etc. Satellite/cable set-top box, etc. Blu-ray Disc/DVD player ■ If your TV doesn’t support Audio Return Channel (ARC), you See also: Audio Return Channel (ARC) function need to connect an optical digital cable together with the HDMI •... -
Page 15: Connecting Your Components
Connections Connecting Your Components Note The on-screen menus appear only on a TV that is connected to the HDMI OUT. If your TV is connected When USB input is selected, you can input video signals from to other video outputs, use the AV receiver’s display the AUX INPUT VIDEO jack. -
Page 16: Connecting Onkyo Ri Components
Connecting Onkyo RI Components Connecting a Recording Component See “Recording” for details on recording (➔ page 35). Make sure that each Onkyo component is connected with an analog audio cable (connection in the hookup examples) (➔ page 15). Make the connection (see the illustration). -
Page 17: Connecting The Antennas
Connections Connecting the Antennas Connecting the Power Cord This section explains how to connect the supplied indoor FM antenna and AM loop antenna. (Brazilian and Taiwanese models) The AV receiver won’t pick up any radio signals without any antenna connected, so you must connect the antenna to use Connect the supplied power cord to the AV the tuner. -
Page 18: Turning On & Basic Operations
Turning On & Basic Operations Turning On/Off the AV Turning On Turning Off Receiver ON/STANDBY on the front panel. ON/STANDBY on the front panel. Press Press ON/STANDBY Press RECEIVER followed by on the remote Press RECEIVER followed by on the remote controller. -
Page 19: Turning On & Basic Operations
(➔ page • “Playing a USB Device” (➔ page (➔ page • “Listening to AM/FM Radio” • “iPod/iPhone Playback via Onkyo Dock” (➔ page • “Controlling Other Components” (➔ page To adjust the volume, use VOL / . Select a listening mode and enjoy! See also: (➔... -
Page 20: Controlling Contents Of Usb Devices
Turning On & Basic Operations TOP MENU RANDOM Controlling Contents of USB Devices This button displays the top menu for each media or service. This button performs random playback. REPEAT / and ENTER Press this button repeatedly to cycle through the repeat These buttons navigate through the menus. -
Page 21: Understanding Icons On The Display
Turning On & Basic Operations Understanding Icons on the Display Playing an iPod/iPhone via USB Use / to select a music file, and press ENTER or to start playback. This section describes icons that appear on the AV The on-screen menus appear only on a TV that is receiver’s display during media playback. -
Page 22: Playing A Usb Device
Turning On & Basic Operations Playing a USB Device The on-screen menus appear only on a TV that is connected to the HDMI OUT. This section explains how to play music files from a USB device (e.g., USB flash drives and MP3 players). See also: (➔... -
Page 23: Listening To Am/Fm Radio
Turning On & Basic Operations ■ Tuning into Radio Stations Manual tuning mode Listening to AM/FM Radio In manual tuning mode, FM stations will be in mono. ■ Auto tuning mode This section describes the procedure using the buttons Press TUNING MODE so that the AUTO indicator on the front panel unless otherwise specified. - Page 24 Turning On & Basic Operations ■ Presetting AM/FM Stations Selecting Presets Using RDS (excluding North American, Brazilian and Taiwanese models) You can store a combination of up to 40 of your favorite To select a preset, use PRESET on the AV AM/FM radio stations as presets.
- Page 25 Turning On & Basic Operations ■ Listening to Traffic News (TP) RDS program types (PTY) Note Type Display • In some cases, the text characters displayed on the AV receiver You can search for stations that broadcast traffic news. may not be identical to those broadcast by the radio station. Also, None None unexpected characters may be displayed when unsupported...
-
Page 26: Using Basic Functions
Turning On & Basic Operations Using Basic Functions Measurement procedure Note • Make the room as quiet as possible. Background noise and Radio To create a listening environment in your home theater that Frequency Interference (RFI) can disrupt the room all listeners will enjoy, Audyssey 2EQ takes measurements Using the Automatic Speaker Setup measurements. - Page 27 Turning On & Basic Operations Turn on the AV receiver and the connected TV. When you’ve finished making the settings, press Press ENTER. ENTER. On the TV, select the input to which the AV receiver Audyssey 2EQ ® Room Correction and Speaker Setup is connected.
- Page 28 • Changes to the room after Audyssey 2EQ Room Correction and this message appears after 2 or 3 attempts, contact your Speaker Setup requires you run Audyssey 2EQ Room Correction Onkyo dealer. and Speaker Setup again, as room EQ characteristics may have • Speaker Detect Error changed.
-
Page 29: Using The Listening Modes
Turning On & Basic Operations MOVIE/TV button Using the Listening Modes This button selects the listening modes intended for use with movies and TV. Selecting Listening Modes MUSIC button See “About Listening Modes” for detailed information This button selects the listening modes intended for use (➔... - Page 30 Turning On & Basic Operations About Listening Modes Input Source Speaker Layout The following audio formats are supported by the listening The illustration shows which speakers are activated in each The AV receiver’s listening modes can transform your mode. channel. See “4. Sp Config (Speaker Configuration)” for listening room into a movie theater or concert hall, with the speaker setup (➔...
- Page 31 Turning On & Basic Operations ■ Onkyo-Original DSP Listening Modes Listening Mode Description Input Speaker Source Layout Listening Mode Description Input Speaker T-D (Theater- With this mode you can enjoy a virtual Source Layout Dimensional) surround sound even with only two or three...
- Page 32 Turning On & Basic Operations Listening Mode Description Input Speaker Listening Mode Description Input Speaker Source Layout Source Layout In this mode, audio from the input source is DTS-ES Discrete This mode is for use with DTS-ES Discrete output without surround-sound processing. soundtracks, which use a discrete surround D S D i s c r e t e...
- Page 33 Turning On & Basic Operations Listening Mode Description Input Speaker Note Source Layout These listening modes cannot be selected during USB or iPod playback. Dolby Pro Logic IIz Dolby Pro Logic IIz Height is designed to Based on the audio channel signal contained in the source, the corresponding speakers will output Height more effectively use existing program the sound.
-
Page 34: Using The Home Menu
Turning On & Basic Operations ■ Information Using the Home Menu Using the Sleep Timer You can view the information of the following The Home menu provides quick access to frequently used With the sleep timer, you can set the AV receiver to turn items: “Input”... -
Page 35: Displaying Source Information
Using Headphones You can display various information about the current When you connect an -capable Onkyo component, you Connect a pair of stereo headphones with a input source as follows. standard plug (1/4 inch or 6.3 mm) to the PHONES... -
Page 36: Advanced Operations
Advanced Operations On-screen Setup Explanatory Notes Common Procedures in Setup Menu The setup menus provides a convenient way to change the Menu Sp Config AV receiver’s various settings. Settings are organized into ■ Remote indicator Subwoofer 10 categories. The on-screen menus appear only on a TV that is connected to the HDMI OUT. -
Page 37: Advanced Operations
Advanced Operations Menu item Setting target Menu item Setting target Setup menu items 5. Sp Distance Unit 9. Hardware Volume OSD (➔ page (➔ page Left Remote ID Menu item Setting target Front High Left AM/FM Freq Step 1. HDMI Input BD/DVD AM Freq Step (➔... -
Page 38: Hdmi Input
Advanced Operations 1. HDMI Input 2. Component (Component Video Note Input) • If no video component is connected to HDMI output (even if the HDMI input is assigned), the AV receiver selects the video source based on the setting of “2. Component (Component Video Input)”. -
Page 39: Digital Audio (Digital Audio Input)
Advanced Operations ■ Powered Zone 2 3. Digital Audio (Digital Audio Input) 4. Sp Config (Speaker Configuration) Yes: Zone 2 speakers can be used. (Powered Zone 2 enabled). Menu Digital Audio Menu Sp Config Note • When the “Powered Zone 2” setting is set to “Yes” and Zone 2 If you connect a component to a digital audio input, you Some of the settings in this section are set automatically is turned on, the surround back and front high speakers cannot be... -
Page 40: Sp Distance (Speaker Distance)
Advanced Operations Speaker cone diameter Crossover frequency 5. Sp Distance (Speaker Distance) Note Under 3-1/2 in. (9 cm) 150/200 Hz If the “Front” setting is set to “Small”, the “Large” option cannot be selected. Choose the setting suitable for the speaker. If the “Surround”... -
Page 41: Level Cal (Level Calibration)
Advanced Operations Dolby 6. Level Cal (Level Calibration) 7. Audio Adjust ■ PL IIx Music (2ch Input) These settings apply to only 2-channel stereo sources. If you’re not using any surround back speakers, these settings apply to Dolby Pro Logic II, not Dolby Pro Logic Menu Level Cal Menu... -
Page 42: Source Setup
Advanced Operations ■ PL IIz Height Gain 8. Source Setup ■ Neo:6 Music High Center Image The Height Gain Control in Dolby Pro Logic IIz enables 0 to 2 to 5 Items can be set individually for each input selector. the listener to select how much gain is applied to the front The DTS Neo:6 Music listening mode creates 6-channel high speakers. - Page 43 Advanced Operations ■ Dynamic EQ Audyssey Dynamic EQ is referenced to the standard film About Audyssey Dynamic EQ ® mix level. It makes adjustments to maintain the reference Audyssey Dynamic EQ solves the problem of response and surround envelopment when the volume is deteriorating sound quality as volume is decreased by turned down from 0 dB.
- Page 44 Advanced Operations A/V Sync Audio Selector Setting the Incoming Digital Signal (Fixed Mode) ■ ■ A/V Sync Audio Selector ■ Fixed Mode 0 ms to 400 ms in 10 msec steps. ARC: The audio signal from your TV tuner can be sent to When using progressive scanning on your Blu-ray Off: the HDMI OUT of the AV receiver.
-
Page 45: Hardware
1, 2, or 3 • When the HDMI Through is enabled, the power consumption ■ slightly increases. When several Onkyo components are used in the same Auto Standby room, their remote ID codes may overlap. To differentiate Note the AV receiver from the other components, you can •... -
Page 46: 10. Hdmi Setup
Advanced Operations ■ Audio TV Out • When the source equipment is connected with the 10. HDMI Setup connection, it may malfunction if “HDMI CEC (RIHD)” is set to “On”. ■ This preference determines whether the incoming audio HDMI Through signal is output from the HDMI output. -
Page 47: Using The Audio Settings
Advanced Operations ■ Audio Return Ch (ARC) Phase Matching Bass Using the Audio Settings ■ Auto: You can change various audio settings from the Home PM Bass (➔ page 34). The audio signal from your TV tuner can be sent to menu the HDMI OUT of the AV receiver. - Page 48 Advanced Operations Auto: CinemaFILTER Note The Late Night function is set to “On” or “Off” • These settings cannot be calibrated in either of the following ■ automatically. Cinema Filter cases: – A pair of headphones is connected. – The AV receiver is muted. •...
-
Page 49: Zone 2
Advanced Operations Zone 2 Connecting the Zone Speakers to an Main room Additional Amplifier In addition to the main listening room, you can also enjoy This setup allows 7.1-channel playback in your main playback in another room, which we call Zone 2. For either listening room and 2-channel stereo playback in Zone 2. -
Page 50: Controlling Zone 2 Components
Advanced Operations Controlling Zone 2 Components Note Press ZONE2 and then press RECEIVER. • Only analog input sources are output from the ZONE 2 LINE ■ Zone 2 turns on, the Z2 indicator lights on the AV Operating on the AV receiver OUT L/R jacks and ZONE 2 L/R terminals. -
Page 51: Controlling Other Components
In addition, when RI depending on the region. Dock and iPod/iPhone are on, the AV receiver can be For the latest information on the Onkyo Dock turned on by pressing SOURCE. components, see the Onkyo web site at: Auto Power On http://www.onkyo.com... -
Page 52: Controlling Your Ipod/Iphone
DS-A2 RI Dock. Make an connection and enter the remote This button does not turn the Onkyo DS-A2 or DS-A2X RI control code 81993 (with Dock on or off. Also, your iPod/iPhone may not respond the first time you press this button, in which case you should press •... -
Page 53: Controlling Other Components
REMOTE MODE buttons. However, these buttons also work as input selector buttons, so choose a REMOTE BD/DVD Onkyo Blu-ray Disc player (➔ page MODE button that corresponds with the input to which you... -
Page 54: Remote Control Codes For Onkyo Components Connected Via Ri
You can reset the remote controller to its default settings. Controlling Apple TV Controlling Onkyo components without If you want to control an Onkyo component by pointing the While holding down RECEIVER, press and hold By programming the supplied remote controller with the... - Page 55 Controlling Other Components ■ Controlling a Blu-ray Disc/DVD Player, HD TV operation Press the appropriate REMOTE DVD Player Available buttons MODE button first. Number: 1 to 9, 0 , INPUT, TV VOL / BD/DVD is preprogrammed with the remote control code GUIDE Number: +10 for controlling a component that supports the...
- Page 56 Controlling Other Components ■ ■ DVD player/DVD recorder operation Satellite receiver/Cable receiver operation Press the appropriate REMOTE Available buttons Available buttons MODE button first. TOP MENU GUIDE SOURCE SOURCE DISPLAY DISPLAY / / / , ENTER / / / , ENTER SETUP MUTING SETUP...
-
Page 57: Appendix
If you can’t resolve the issue yourself, try resetting the ■ Make sure that the inputs and outputs of all 14-16 AV receiver before contacting your Onkyo dealer. Can’t turn on the AV receiver components are connected properly. To reset the AV receiver to its factory defaults, turn it Make sure that the power cord is properly plugged —... - Page 58 Appendix If the input signal format is set to “PCM” or “DTS”. When Powered Zone 2 is used, playback in the main — An audio cable may be picking up interference. Try — Set it to “Off”. room is reduced to 5.1channels and the front high and repositioning your cables.
- Page 59 Move the AV receiver away from your TV or — connected. computer. If it’s an Onkyo component, make sure that the cable and analog audio cable are connected properly. If the video source is connected to a component video Listen to the station in mono.
- Page 60 Appendix ■ The sound changes when I connect my Try resetting your iPod/iPhone. — Recording headphones ■ ■ Can’t record There’s no video When a pair of headphones is connected, the listening — mode is set to Stereo, unless it’s already set to Stereo, On your recorder, make sure the correct input is —...
- Page 61 This setting can be made for the BD/DVD, VCR/DVR, CBL/SAT, GAME, AUX, or USB input. Onkyo is not responsible for damages (such as CD rental If you have a games console connected to the composite fees) due to unsuccessful recordings caused by the unit’s video input, and the picture isn’t very clear, you can...
-
Page 62: Connection Tips And Video Signal Path
Appendix Connection Tips and Video Connection Formats Audio Connection Formats Video Signal Path Video components can be connected by using any one of Audio components can be connected by using any of the the following video connection formats: composite video, following audio connection formats: analog, optical, The AV receiver supports several connection formats for component video, or HDMI, the latter offering the best... -
Page 63: Using An Rihd-Compatible Tv, Player, Or Recorder
• The AV receiver will enter standby mode when the TV is ■ Players/Recorders set to standby. Onkyo components. The AV receiver can be used with CEC (Consumer Electronics Control), which allows • You can set on the menu screen of the TV to either output • Onkyo and Integra... - Page 64 Appendix ■ How to connect and setup Change each item in the “HDMI Setup” menu Operate with the remote controller. according to the following settings: (➔ page 53). For buttons that can be operated Confirm the connecting and setting. • HDMI CEC (RIHD): On Note 1.
-
Page 65: About Hdmi
Appendix About HDMI Supported Audio Formats About Copyright Protection • 2-channel linear PCM (32–192 kHz, 16/20/24 bit) The AV receiver supports HDCP (High-bandwidth Digital Designed to meet the increased demands of digital TV, Content Protection) , a copy-protection system for digital HDMI (High Definition Multimedia Interface) is a new •... -
Page 66: Usb Features
• Protected WMA music files on an MP3 player cannot be played. ■ AAC (.aac/.m4a/.mp4/.AAC/.M4A or .MP4) • Onkyo accepts no responsibility whatsoever for the loss or AAC stands for MPEG-2/MPEG-4 Audio. damage to data stored on a USB device when that device is used with the AV receiver. -
Page 67: License And Trademark Information
Apple TV is a trademark of Apple Inc., registered in the U.S. and Pro Logic and the double-D symbol are trademarks of Dolby other countries. Laboratories. Music Optimizer™ and “WRAT” are trademarks of Onkyo Corporation. Manufactured under license from Audyssey Laboratories™, Inc. ®... -
Page 68: Specifications
Appendix Specifications Video Section Weight (North American , Brazilian and Taiwanese models) 8.3 kg (18.3 lbs.) (Asian) Input Sensitivity/Output Level and Impedance Amplifier Section 8.6 kg (19.0 lbs.) 1 Vp-p/75 Ω (Component Y) 0.7 Vp-p/75 Ω (Component P ■ 1 Vp-p/75 Ω (Composite) HDMI Rated Output Power All channels:... - Page 69 Appendix ■ Others Setup Mic 1 (Front) Specifications and features are subject to change without notice. En-69...
- Page 70 Appendix Memo En-70...
- Page 71 Appendix Memo En-71...
- Page 72 Tel: 86-21-52131366 Fax: 86-21-52130396 http://www.cn.onkyo.com/ Asia, Oceania, Middle East, Africa Please contact an Onkyo distributor referring to Onkyo SUPPORT site. http://www.intl.onkyo.com/support/ The above-mentioned information is subject to change without prior notice. Visit the Onkyo web site for the latest update.
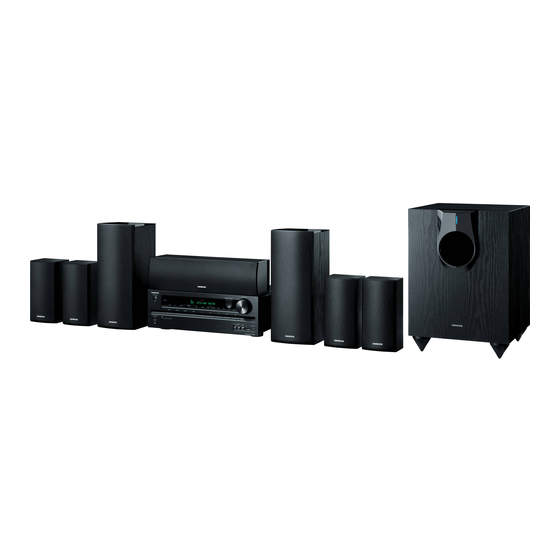
- Page 73 HTP-591 7.1ch Home Theater Speaker Package Surround speakers (SKR-590) Supplied Accessories Part Names Surround back speakers (SKB-590) Make sure you have the following accessories. Keyhole slot Front speakers (SKF-591) Speaker terminals (Blue) (Gray) Surround speakers (White) (Red) SKF-591 Front speakers Speaker cables 10 ft.
-
Page 74: Speaker Package
■ Front Setting the Subwoofer Level Before Using the Home Theater Status indicator Speaker Package To set the level of the subwoofer, use the Off: Subwoofer in standby mode or OUTPUT LEVEL control. Set it so that bass disconnected from power source Using the Rubber Stoppers for a More Stable sounds are evenly balanced with the treble sounds Blue: Subwoofer on... -
Page 75: Enjoying Home Theater
• Be careful not to short the positive and negative wires. Surround back left and right speakers (SKB-590) Caution Doing so may damage your amp. These speakers further enhance the realism of surround • A mounting screw’s ability to support a Wall sound and improve sound localization behind the Note... - Page 76 ■ Surround/Surround Back Speakers Terminal Spring type color coded Specifications (SKR-590/SKB-590) Keyhole slot Available ■ Grille Fixed Powered Subwoofer (SKW-591) Type Full Range Closed Box Other Non-magnetic shielding 6 Ω Impedance Type Bass-Reflex ■ Center Speaker Maximum input power 130 W Input sensitivity/Impedance Sensitivity 81 dB/W/m...
- Page 77 HTP-591 Ensemble d’enceintes du Home cinéma 7.1 can. Enceintes surround (SKR-590) Accessoires fournis Noms des pièces Enceintes surround arrière (SKB-590) Assurez-vous que le carton contient bien les accessoires suivants. Encoche en trou de serrure Enceintes avant (SKF-591) Bornes d’enceinte (Bleu) (Gris) Enceintes surround (Blanc)
- Page 78 ■ Avant Réglage du niveau sonore du subwoofer Avant d’utiliser l’Ensemble d’enceintes Indicateur d’état du Home cinéma Pour régler le niveau sonore du subwoofer, utilisez Off : subwoofer en mode veille ou le bouton OUTPUT LEVEL. Réglez-le de façon à débranché...
-
Page 79: Branchement Des Enceintes
• Faites très attention à respecter la polarité des Enceintes surround arrière gauche et Mise en garde câbles de vos enceintes. Ne branchez les droite (SKB-590) • La capacité de la vis de fixation bornes positives (+) que sur les bornes Ces enceintes renforcent encore plus le réalisme du son permettant de supporter une enceinte positives (+) et les bornes négatives (–) que... - Page 80 Capacité du coffrage 0,20 pieds cubiques (5,7 L) (y compris la grille et la projection) Y1202-2 SN 29400973A (C) Copyright 2012 ONKYO SOUND & VISION CORPORATION Japan. All rights reserved. * 2 9 4 0 0 9 7 3 A *...
-
Page 81: Remote Control Codes
Remote Control Codes Remote Control Codes While holding down the REMOTE MODE button to which you want to assign a code, press and hold down [DISPLAY] (about 3 seconds). The REMOTE MODE button/Remote indicator lights. On Integra products, button names are capitalized. For example, “Remote Mode” button and “Display”... - Page 82 Remote Control Codes Codes de télécommande Códigos de control remoto Tout en maintenant enfoncé le bouton REMOTE MODE auquel vous souhaitez Manteniendo pulsado el botón REMOTE MODE para el cual desea introducir un associer un code, pressez et maintenez enfoncé le bouton [DISPLAY] (pendant código, pulse y mantenga presionado el botón [DISPLAY] (aproximadamente 3 environ 3 secondes).
- Page 83 Remote Control Codes Codici del telecomando Fernbedienungscodes Tenendo premuto il tasto REMOTE MODE al quale si desidera assegnare il Halten Sie die REMOTE MODE-Taste gedruckt, fur die Sie den Code eingeben codice, premere e tenere premuto [DISPLAY] (per circa 3 secondi). mochten, und drucken Sie (ca.
- Page 84 Remote Control Codes Afstandsbedieningscodes Fjärrstyrningskoder Houd terwijl u de REMOTE MODE toets ingedrukt houdt waarvoor u een code Håll ned knappen för det REMOTE MODE som du vill tilldela en kod samtidigt wilt toewijzen de [DISPLAY] toets ingedrukt (ongeveer 3 seconden). som du trycker och håller ned [DISPLAY] (i cirka 3 sekunder).
- Page 85 Remote Control Codes 遥控代码 按住想指定编码的 REMOTE MODE (遥控模式)按钮的同时,按住 [DISPLAY (显示)] (大约 3 秒钟) 。 REMOTE MODE (遥控模式)按钮 / 遥控指示灯亮起。 Integra 产品上的按钮名称单词首字母大写。例如, “Remote Mode (遥控模 式) ”按钮和 “Display (显示) ”按钮。 注意: • [RECEIVER (接收机)] 和多区域按钮不能输入遥控编码。 • • 只能为 [TV (电视)] 输入电视遥控编码。 •...
- Page 86 Remote Control Codes Cable Set Top Box Cable Set Top Box Cable Set Top Box Cable/PVR Combination 02254, 02769 Neuf TV 03107 Visiopass 00817 Time Warner 01376, 01877, 02187 02769 Noos 00817 01376 01582 Arris 02187 01068, 01060 WideOpenWest 01877 Videotron 01877 AT&T...
- Page 87 Remote Control Codes IPTV/PVR Combination Neuf TV 03107 Harman/Kardon 70157 Rotel 70157 Onkyo 70868 Philips 02294 Hitachi 70032 70157 Sony 70490, 70000 Scientific Atlanta 00858 Integra 71817, 70101 Sansui 70157 TEAC 72977 03107 70072 SAST 70157 Yamaha 70490 Verizon 02378...
- Page 88 82228 Alba 01284 Centrex 01457 Durabrand 01284 Logitech 82182 Allvision 01334 01413, 01567 Echostar 00775, 00853, 01323, 01409, 02527 Onkyo 82990, 81993, 82351 Amstrad 00847, 01175, 01662, Chess 01334, 01626 01693 Eco-Star 01413 Polk Audio 82228 CityCom 01176 Ansonic 02418...
- Page 89 Remote Control Codes Satellite Set Top Box Satellite Set Top Box Satellite Set Top Box Satellite Set Top Box Hama 01567 Leiko 01626 Pace 00847, 00853, 00887, Sat Industrie 01611 01175, 01323, 01356, Hanseatic 01100 Lemon 01334 SAT+ 01409 01423, 01662, 01693, Hirschmann 00173 Lenoxx...
- Page 90 Remote Control Codes Satellite Set Top Box Satellite Set Top Box SAT/PVR Combination SAT/PVR Combination Star 00887 00642 Canal+ 02657 SKY Deutschland 02754 Stream System 01300 00879, 01356 CanalSat 02657 SKY Italia 01693, 01850 Strong 00853, 00879, 01284, United 01251, 01626, 02418 Cyfrowy Polsat 02527 SKY New Zealand...
- Page 91 Remote Control Codes Television Television Television Television Akura 10171, 10037, 10714, Belstar 11037 Classic 10499 DMTech 12001 10668, 11037, 11363, Beon 10037 Clatronic 10037, 10714, 11324 Domeos 10668 11585, 11667, 11709 Berthen 10556, 10668 Clayton 11037 Drean 10037 Alba 10037, 10714, 10668, Bestar 10037 Condor...
- Page 92 Remote Control Codes Television Television Television Television Ferguson 10037, 10625, 10560, Goodmans 10556, 10037, 10625, Hoeher 10714 Karcher 10714, 11324 10195, 11037, 11585 10714, 10560, 10668, Hornyphon 10037 Kathrein 10556 10634, 11037, 10499, Fidelity 10171, 10037, 10512 Hugoson 11666 Kendo 10037, 11037, 11585 11585, 11667 Finlandia...
- Page 93 10556, 10037 10178, 10037 Phocus 10714, 11652 Onix 10698 Medion 10556, 10037, 10714, Naiko 10037 Phoenix 10037 Onkyo 11807, 13100, 13500 10668, 11037, 10698, Nakimura 10037 Phonola 10556, 10037 10512, 11248, 11585, 11667, 11709 National 10508, 10208 11667, 12001, 12719...
- Page 94 Remote Control Codes Television Television Television Television Profitronic 10037 Rowa 10037, 10698 Siera 10556, 10037 Svasa 10208 Proline 10037, 10625, 10634, Saba 10625, 10714, 10560 Silva 10037 Swisstec 11614, 11775 11037 Sagem 10618 Silva Schneider 10037 Sylvania 10171, 11394, 11864, Prosonic 10037, 10714, 10668, 11886...
- Page 95 Remote Control Codes Television Television Television Telefunken 10037, 10625, 10714, Ultravox 10037 Wharfedale 10556, 10037, 11324, ReplayTV 20616 10560, 10698, 11585, 11667 11614, 11775 Sonic Blue 20616 11667 White Westinghouse 10037 Unic Line 10037 TiVo 20739 Telefusion 10037 Wilson 10556 Uniden 12122 Telegazi...
- Page 96 30741 Durabrand 30675, 30713 Irradio 30646 Sanyo 30713 30741, 31602 Dynex 32596 30503, 30539, 30623, Schneider 30539, 30646, 30713 30867, 31597, 31602, Onkyo 30503, 30627, 31612, Dyon 33052 Schoentech 30713 32855 32147, 30571, 31634 eBench 31152 Scott 31394 Kendo 30713...
- Page 97 32414, 32432, 33444 SilverCrest 31152 Victor 31597 Philips 30646, 31340 Momitsu 33052 Skantic 30539, 30713 Vizio 32563 Pioneer 30631, 32860 Onkyo 32147, 32900, 32910, SM Electronic 31152 Vtrek 32587 33100, 33101, 33500, 30646 Smart 30713 33501 Waltham 30713 30522 Sony...
- Page 98 Remote Control Codes TV/DVD Combination TV/DVD Combination Centrum 11037, 30713 Sunstech 12001 Crown 11037, 30713 Sylvania 10171, 11394, 11864, 11886, 30630, 30675 DMTech 12001 TEAC 10698 Dual 11037, 30713 Technica 11037, 30713 Dynex 12049 Telefunken 10698 Elfunk 11037, 30713 Teletech 11037, 30713 Emerson 11394, 11864, 11886,...
- Page 99 Remote Control Codes Memo...
- Page 100 Y1212-1 SN 29401471CODE (C) Copyright 2013 Onkyo Corporation Japan. All rights reserved. * 2 9 4 0 1 4 7 1 C O D E *...