Table of Contents
Advertisement
Quick Links
Advertisement
Table of Contents

Related Manuals for Cobra AURA SL3


Summary of Contents for Cobra AURA SL3
-
Page 2: Table Of Contents
Contents Introduction Introduction ....................2 Important Information and Customer Assistance ........3 Components ..................... 4 Features ....................5 Registration and Downloading ..............6 Installation ....................7 Operating Instructions ................12 Troubleshooting ..................16 Limited 1-Year Warranty ................. 17 Product Service and Trademark Acknowledgement ......... 18... -
Page 3: Introduction
LED display ensuring your highest concentration at all times. Drive Safely with AURA The Cobra SL3 has been designed and manufactured to help enhance road safety and should not be used as a license to speed or a substitute for concentration. Driving within the posted speed limit while carefully observing current road conditions and local regulations is essential. -
Page 4: Important Information And Customer Assistance
Customer Assistance Operators English and Spanish. 8:00 a.m. to 5:30 p.m. Central Time Mon. through Fri. (except holidays) 773-889-3087 (phone). Questions English and Spanish. Faxes can be received at 773-622-2269 (fax). Technical Assistance English only. www.cobra.com (on-line: Frequently Asked Questions). English and Spanish. productinfo@cobra.com (e-mail). For Assistance Outside the U.S.A. -
Page 5: Components
Components Introduction Components The following components come as standard with your Cobra SL3 GPS Safety Locator: 1 x SL3 system 1 x Windshield bracket with suction cups 1 pair x Hook & Loop fastener 1 x Coiled 12V power cord with cigarette lighter socket adaptor... -
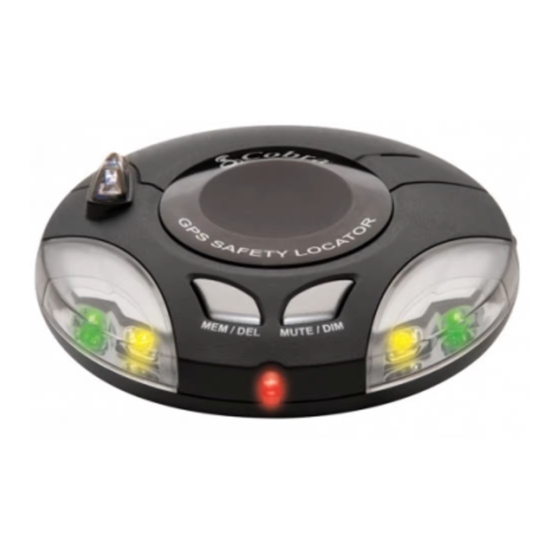
Page 6: Features
Features Introduction 1. Mute/Dim Button 6. Bracket Mounting Slot 2. Memory/Delete Button 7. 12V Power Input Socket 3. Zone 1 Alert* (Green LED) 8. USB Socket 4. Zone 2 Alert* (Amber LED) 9. Power On/Off/Volume Control 5a. Zone 3 Alert* (Red LED) 5b. -
Page 7: Registration And Downloading
IMPORTANT PLEASE READ BEFORE USING YOUR COBRA SL3! Registering your Cobra SL3: The database built into your Cobra SL3 is populated with the latest data available during production. However, you will need to register your SL3 to receive your one (1) year free database “update”... -
Page 8: Installation
Mounting Installation Once you have performed a download it is time to install the Cobra SL3 into your vehicle. The most important aspect of this installation is ensuring that the SL3 is positioned in such a way that it has a clear view of the sky while ensuring that the device is situated so that it does not interfere with the vehicle controls, jeopardize passenger or driver safety. - Page 9 Installing your Cobra SL3 using the Hook and Loop fastener The Cobra SL3 can be installed anywhere on the dashboard as long as the built-in GPS antenna has a clear view of the sky, you can easily see the LED display, and you can operate the controls safely.
- Page 10 Installation Mounting Installing your Cobra SL3 using the Windshield Suction Cup bracket If you prefer, you can mount your SL3 to the inside of your vehicle’s windshield using the suc- tion cup bracket provided. Simply select a position within the windshield so that the top of the unit has a clear view of the sky, remembering that you need to connect the power connection cable, as well as ensuring that you can read the LED display and reach the controls safely.
-
Page 11: Power Connection
Using the cigarette lighter socket The Cobra SL3 comes with a power cable designed to plug into your vehicles cigarette lighter socket. Take the power cord and plug the smaller end into the DC 12V input socket on the back of the SL3 and the cigarette lighter adapter in your vehicles cigarette lighter socket. - Page 12 Installation Power Connection Caution: If you must use pliers to loosen the ring, be careful not to crush the tip. Never use pliers or other tools to retighten the ring on the cigarette lighter plug. 2. Pull the ring straight out, then remove the metal tip, spring and old fuse. 3.
-
Page 13: Operating Instructions
Operation Starting Up After you have successfully installed your Cobra SL3 it is time to perform the first start up. First, make sure your vehicle is parked in as open a space as possible, clear of tall trees and buildings so that the built-in GPS antenna has a clear view of the sky above. -
Page 14: Adjusting The Volume
Operating Instructions Operation 3. Adjusting the volume The SL3 has an adjustable volume for controlling the loudness of the audible alert. To increase the volume simply turn the volume control on the right hand side of the device, towards you. To decrease the volume of the alert turn the volume control away from you. - Page 15 Operation Alerts The Cobra SL3 responds to four types of alerts: Speed Trap, Photo Enforcement (Red Light and Speed Cameras), Caution Areas (high accident locations) and User Points. The audio alerts are sounded whenever the SL3 crosses the boundries as shown in Table 1 and Figure 1.
- Page 16 Operating Instructions Operation Alerts (continued) Visually, the zones are indicated with the 5 LEDs flashing while within the zones: ZONE 1: Outer green LEDs flash. ZONE 2: Outer green and middle amber LEDs flash. ZONE 3: The green, amber and center red LEDs all flash.
-
Page 17: Troubleshooting
The unit cannot acquire satellites Check that the Cobra SL3’s built-in GPS antenna has a clear view of the sky above. If this is the first time you have powered up your SL3, please remember that the first ‘cold’ start may take between 15-30 minutes to acquire sufficient satellites for operation. -
Page 18: Limited 1-Year Warranty
Cobra will, without charge, repair or replace, at its option, de fec tive SL3 GPS Safety Locators, products or com po nent parts upon de liv ery to the Cobra Factory Service Department, ac com pa nied by proof of the date of first consumer pur chase, such as a du pli cat ed copy of a sales receipt. -
Page 19: Product Service And Trademark Acknowledgement
Trademark Acknowledgement Service Info Product Service If you have any questions about operation or installing your new Cobra product, or if you are missing parts… Please call Cobra first! DO NOT RETURN THIS PRODUCT TO THE STORE! See customer assistance on page A1. - Page 20 The Cobra line of quality products includes: CB Radios microTALK Radios ® Radar/Laser Detectors Safety Alert Traffic Warning System ® HighGear Accessories ® CobraMarine VHF Radios ® Power Inverters Accessories For more information or to order any of our products, please visit our website: www.cobra.com...