Advertisement
Quick Links
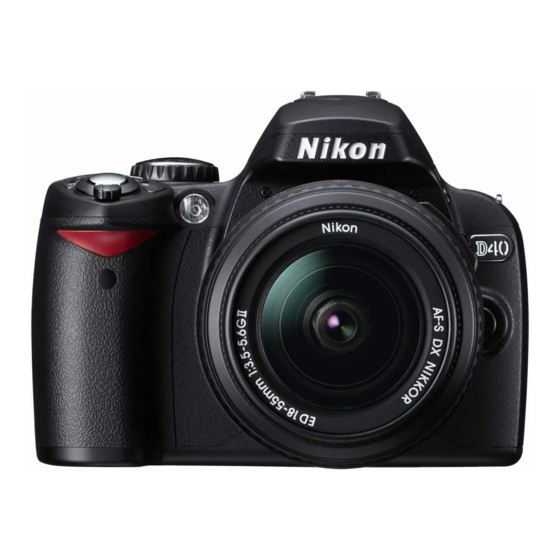
Digital Camera
Quick Start Guide
This guide provides fi rst-time users with information
on taking photographs with the D40, on copying
p h o to gr a p h s to a co m p u te r, a n d p r i n t i n g
photographs. Complete information on using your
Nikon digital camera can be found in the Nikon
Guide to Digital Photography with the D40 and the
PictureProject Reference Manual (on CD).
Digitutor
"Digitutor, " a series of "watch and learn" manuals in
movie form, is available at the following website:
http://www.nikondigitutor.com/index_eng.html
Package Contents
Confirm that the package contains the items listed below. Purchasers of the lens kit option should
confirm that the package also includes a lens. Memory cards are not provided; please use one of
the Secure Digital (SD) memory cards listed on page 102 of the Guide to Digital Photography.
The following items are found on the camera:
❏ Accessory shoe cover
❏ DK-16 viewfinder eyepiece
❏ Body cap
D40 camera
The following items are included with the camera:
❏ Quick Start Guide (this guide)
❏ PictureProject installer CD (gray)
❏ Guide to Digital Photography
❏ PictureProject reference CD (silver)
❏ Warranty
❏ EN-EL9 rechargeable
❏ MH-23 Quick Charger
Li-ion battery
(with terminal cover)
(with power cord
* Shape of cord depends on
country of sale.
❏ UC-E4 USB cable
❏ Strap
❏ DK-5 eyepiece cap
(for use with self-timer; clips to strap)
Parts of the Camera
Eyelet for camera strap
Built-in flash
Mode dial
Shutter-release
button
Power switch
Viewfinder eyepiece
cup
AF-assist illuminator
Diopter adjustment
control
Viewfinder
eyepiece
Multi selector
Command dial
Lens mounting
(menu) button
index
(playback)
Focal length scale
button
Zoom ring
Memory card slot cover
Memory card access lamp
Battery-chamber cover latch
Battery-chamber cover
(playback
zoom) button
Monitor
(delete) button
(thumbnail) button
En
Setup
Setup
Attach the Strap
Attach the Strap
Attach a Lens
Attach a Lens
Care should be taken to prevent dust from entering the camera when the lens or body
cap is removed.
Keeping the mounting index on the lens aligned with the
mounting index on the camera body, position the lens in
the camera's bayonet mount and rotate the lens in the
direction shown until it clicks into place.
If the lens is equipped with an A-M or M/A-M switch, select
A (autofocus) or M/A (autofocus with manual priority).
Autofocus is available with AF-S lenses. The lens kit option
includes an AF-S lens; for information on other lenses
that can be used with the D40, see the Guide to Digital
Photography.
Charge the Battery
Charge the Battery
A completely exhausted battery will charge in about 90 minutes.
Charging
Insert as shown
*
)
Insert the Battery
Insert the Battery
Insert terminals first
in orientation shown
Choose a Language and Set the Clock
Choose a Language and Set the Clock
USB connector
(under cover)
A language-selection dialog will be displayed the first time the camera is turned on.
Follow the steps below to choose a language and set the camera clock.
Turn camera on.
Language-
Select language.
selection dialog displayed.
Select local time zone.
Display daylight saving time
options. Highlight On if daylight
saving time is in effect.
Resetting the clock: Use the World time option in the setup menu to change the camera
clock. See the Guide to Digital Photography for details.
Insert a Memory Card (Available Separately)
Insert a Memory Card (Available Separately)
Before inserting or removing memory cards, turn
the camera off and open the card slot cover.
The memory card access
lamp will light for about
Lens mounting index
a second.
Format the Memory Card
Format the Memory Card
Memory cards must be formatted in the D40 before first use. Note that formatting
memory cards permanently deletes all photographs and other data they may contain.
Be sure all data you wish to keep have been copied to another storage device before
formatting the card.
Turn camera on.
Press
in monitor.
* If setup menu is displayed, proceed to
Highlight .
Position cursor in setup menu.
Blinks
Stops blinking
Charging complete
Display options.
Highlight Yes.
Setup menu displayed when
formatting is complete.
Focus the Viewfinder
Focus the Viewfinder
Focus brackets
Display map of world time
zones.
Taking Photographs
Taking Photographs
Rotate the Mode Dial to
Rotate the Mode Dial to
Set clock and return to shooting
mode. Monitor will turn off au-
tomatically.
Ready the Camera
Ready the Camera
Hold the hand-grip
with your right hand
Face up
Insert as shown
Slide the memory card in as shown
above until it clicks into place.
Support the lens with
your left hand
Frame a Photograph
Frame a Photograph
Zoom in
button. Menus displayed
Highlight icon for current menu.
*
Focus and Shoot
Focus and Shoot
.
1
Highlight Format memory card.
Format card. Do not turn camera
off or remove card or battery
2
until formatting is complete.
View the Results
View the Results
Slide the diopter adjustment control
up and down until the focus brackets
are in sharp focus. When operating
the diopter adjustment control with
your eye to the viewfinder, be careful
not to put your fingers or fingernails
in your eye.
For more information on taking photographs and other camera operations, see the
Guide to Digital Photography. See the other side of this guide for information on
using the supplied PictureProject software to copy photographs to a computer, and
printing photographs via direct USB connection.
Keep your
elbows in
Stand with one
foot half a pace in
front of the other
Frame a photo in the viewfinder with the main subject
positioned in any of the three focus areas.
Use the zoom ring to zoom in on the subject so that it
fills a larger area of the frame, or zoom out to increase the
area visible in the photograph (select longer focal lengths
on the lens focal length scale index to zoom in, shorter
Zoom out
focal lengths to zoom out).
Press the shutter-release button halfway. The camera
will automatically select the focus area containing the
subject closest to the camera and focus on this subject.
If the subject is dark, the AF-assist illuminator may light
to assist the focus operation and the flash may pop up.
The monitor will turn off.
When the focus operation is complete, the selected
focus area will be highlighted, a beep will sound, and
the in-focus indicator (●) will appear in the viewfinder.
Smoothly press the shutter-release button the rest of
the way down to release the shutter and record the
photograph. The memory card access lamp will light.
Do not eject the memory card or remove or disconnect
the power source until the lamp has gone out and
recording is complete.
Photographs are automatically displayed
after shooting. If no photograph is dis-
played in the monitor, the most recent
picture can be viewed by pressing the
button. Additional pictures can be dis-
played by rotating the command dial or
pressing the multi selector left or right.
To end playback and return to shooting
mode, press the shutter-release button
halfway.
To delete the photograph currently dis-
played in the monitor, press the
button.
A confirmation dialog will be displayed.
Press the
button again to delete the im-
age and return to playback. To exit with-
out deleting the picture, press the
but-
ton.
Continued on reverse ...
Advertisement

Related Manuals for Nikon D 40


Summary of Contents for Nikon D 40
-
Page 1: Quick Start Guide
Insert as shown photographs. Complete information on using your Slide the memory card in as shown Nikon digital camera can be found in the Nikon Attach a Lens Attach a Lens above until it clicks into place. - Page 2 2 Double-click the CD icon. …and click Yes to accept and proceed with installation. • Windows: Double-click the CD (Nikon) icon in “Computer” (Windows Vista) or “My Computer” (Windows XP/2000). • Macintosh: Double-click the CD (Nikon) icon on the desktop.