Table of Contents
Advertisement
Advertisement
Table of Contents

Related Manuals for Dymo LabelManager 120P


Summary of Contents for Dymo LabelManager 120P
-
Page 2: Table Of Contents
Contents About Your New Label Maker .............. 5 Product Registration ..................5 Getting Started ................. 5 Connecting the Power ..................5 Inserting the Tape Cassette ................6 Using the Label Maker for the First Time ..........6 Getting to Know the Label Maker ............7 Power ........................7 LCD Display ......................8 Settings ......................8... - Page 3 Troubleshooting ................14 DYMO D1 Tape Cassettes ..............15 Documentation Feedback ..............16 Environmental Information ..............17...
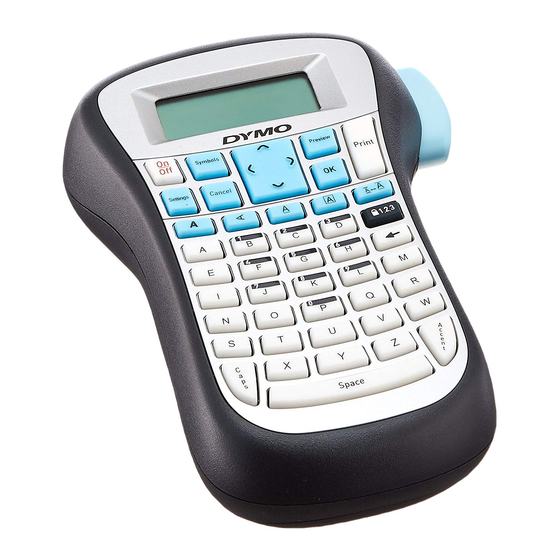
- Page 4 Figure 1 LabelManager 120P Electronic Label Maker Tape cutter button Border 15 On/Off Print Space bar 16 Symbols 10 Vertical 17 Navigation Size 11 CAPS 18 Underline 12 Bold 19 LCD display Num lock 13 Cancel 20 Preview Backspace 14 Settings 21 Tape exit Accented character...
-
Page 5: About Your New Label Maker
You can choose to print your labels in several different font sizes and styles. The label maker uses DYMO D1 tape cassettes in widths of 9 mm or 12 mm. These tape cassettes are available in a wide range of colors. -
Page 6: Inserting The Tape Cassette
Inserting the Tape Cassette Your label maker comes with one tape cassette. You can purchase additional tape cassettes from your local office supply retailer. To insert the tape cassette Lift the tape cassette cover to open the Figure 3 tape compartment. See Figure 3. Before using the label maker for the first time, remove the protective cardboard insert from the tape exit... -
Page 7: Getting To Know The Label Maker
To set up the label maker Press { to turn on the power. Select the language and press By default, the language is set to English. The language option you choose determines the character set that is available. Select inches or mm and press Select the width of the tape cassette currently inserted in the label maker. -
Page 8: Lcd Display
The number of characters displayed will vary due to proportional spacing. With DYMO’s exclusive graphical display, most of the formatting you add is visible instantly. For example, the border added to the text below is clearly displayed. -
Page 9: Num Lock
Num Lock key provides access to the numbers located on some of the alphabetic keys. When Num Lock mode is turned on, the Num Lock indicator is shown on the display and the numbers 0 through 9 appear when you press the corresponding letter keys. -
Page 10: Adding Font Styles
Adding Font Styles You can choose from three different font styles: AaBbCc Normal AaBbCc Bold Vertical The style you select applies to all characters. Styles can be used with alphanumeric characters and some symbols. The font style keys toggle the style on and off. To add bold text Press for bold text. -
Page 11: Using Symbols And Special Characters
Using Symbols and Special Characters Symbols, punctuation, and other special characters can be added to your labels. Adding Symbols The label maker supports the extended symbol set shown below. Position in row To insert a symbol Press Use the left and right arrow keys to move to your desired symbol. The left and right arrows move horizontally along a row of symbols. -
Page 12: Adding International Characters
Adding International Characters The label maker supports the extended Latin character set using RACE technology. After pressing the key, repeatedly pressing a letter scrolls through the available variations of that letter. For example, if French is selected as the language and you press the letter a, you will see a à... -
Page 13: Adjusting The Print Contrast
Adjusting the Print Contrast You can adjust the print contrast to fine tune the print quality of your label. To set the contrast Press Contrast and press }. Select 1 (less contrast) Use the arrow keys to select a contrast setting between and 5 (more contrast), and press }. -
Page 14: Troubleshooting
Remove jammed label; replace tape cassette. Motor is stalled due to label jam • Clean cutter blade. If you still need assistance, contact DYMO Customer Support. See Contacting Customer Support at the back of this User Guide to locate the contact number for your country. -
Page 15: Dymo D1 Tape Cassettes
DYMO D1 Tape Cassettes Width: 9 mm 12 mm Length: S0720670 S0720500 Black/Clear 40910 45010 S0720510 Blue/Clear 45011 S0720520 Red/Clear 45012 S0720680 S0720530 Black/White 40913 45013 S0720690 S0720540 Blue/White 40914 45014 S0720700 S0720550 Red/White 40915 45015 S0720710 S0720560 Black/Blue 40916... -
Page 16: Documentation Feedback
We also welcome your suggestions about additional topics you would like to see covered in the documentation. Send email messages to: documentation@dymo.com. Please keep in mind that this email address is only for documentation feedback. If you have a technical question, please contact Customer Support. -
Page 17: Environmental Information
Environmental Information The equipment that you have bought requires the extraction and use of natural resources for its production. It may contain substances that are hazardous to health and the environment. In order to avoid the dissemination of those substances in our environment, and to diminish the pressure on natural resources, we encourage you to use the appropriate take-back systems. -
Page 19: Contacting Customer Support
Contacting customer support Country Telephone Support Fax Support UNITED KINGDOM 020 73 41 55 29 + 31 20 581 93 80 IRELAND 014 118 934 + 31 20 581 93 80 FRANCE 01 69 32 49 32 + 31 20 581 93 80 NEDERLAND 020 581 93 86 020 581 93 80... - Page 20 ©2007 DYMO A Newell Rubbermaid company DYMO bvba Industriepark-Noord 30 9100 Sint-Niklaas Belgium www.dymo.com...