Table of Contents
Advertisement
OWNER'S MANUAL
If SAN SU
32" WIDE TFT LCD TELEVISION
WITH DIGITAL TUNER
LC
DIGITAL
H
r
I
o o o o
s o o o
:_o o o
:_ooo
I
ATTENTION
11
If you purchase
a universal
remote control from your local retailer, please contact
the remote
manufacturer
for the required programming
code.
_.m
TV/CABLE
MODE SELECTION
7
When shipped
from the factory, the TV/CABLE
menu option is set to the "CABLE"
(Cable Television)|
:d:Jf
n:i:usingCabl:TV,
se
his menu option to the "TV" position__
................................................................................
J
IF CONTACTWITH CUSTOMER SERVICE IS REQUIRED
PLEASE HAVETHE MODEL NUMBER READY PRIOR TO THE CALL
CUSTOMER
SERVICE
- 1-800-289-0980
ORLON WEBSITE
FOR INFORMATION
ON OUR OTHER
PRODUCTS,
PLEASE
VISIT
OUR WEBSITE
AT
www.orionsalesinc.com
Before operating
the unit, please
read this manual
thoroughly.
Advertisement
Table of Contents

Related Manuals for Sansui HDLCD3200A


Summary of Contents for Sansui HDLCD3200A
- Page 1 OWNER'S MANUAL 32" WIDE TFT LCD TELEVISION WITH DIGITAL TUNER DIGITAL o o o o s o o o :_o o o :_ooo If you purchase a universal manufacturer for the required programming When shipped from the factory, the TV/CABLE :d:Jf n:i:usingCabl:TV, IF CONTACTWITH CUSTOMER SERVICE IS REQUIRED...
- Page 2 A cAo,,o. CAUTION: TO REDUCE THE RISK OF ELECTRIC SHOCK, DO NOT REMOVE COVER (OR BACK). NO USER-SERVICEABLE PARTS INSIDE. REFER SERVICING TO QUALIFIED SERVICE PERSONNEL. WARNING: TO PREVENT FIRE OR SHOCK HAZARD, DO NOT EXPOSE THIS APPLIANCE TO RAIN OR MOISTURE.
-
Page 3: Important Safety Instructions
Read these instructions. Keep these instructions. Heed all warnings. Follow all instructions. Do not use this apparatus near water. Clean only with dry cloth. Do not block any ventilation openings. Install in accordance with the manufacturer's Do not install near any heat sources such as radiators, heat registers, stoves, or other apparatus (including amplifiers) that produce heat. - Page 4 ! PORTANT SAFETY INSTRUCTIONS 19) If an outside antenna or cable system is connected to the unit, be sure the antenna or cable system is grounded to provide some protection against voltage surges and built-up static charges, Section 810 of the National Electrical Code, ANSl/NFPA 70, provides information with respect to proper grounding of the mast and supporting structure, grounding of the lead-in wire to an antenna discharge unit, size of grounding conductors,...
-
Page 5: Safety Precautions
! PORTANT SAFETY INSTRUCTIONS CONDENSATION Moisture will form in the operating section of the player if the player is brought from cool surroundings the temperature of the room rises suddenly. When this happens, player's performance player stand in its new surroundings gradually. -
Page 6: Table Of Contents
Contents i PREPARATIONS IMPORTANT SAFETY INSTRUCTIONS ... SAFETY PRECAUTIONS Contents ... Features ... Power source ... Parts and functions ... Remote control ... Antenna connections ... Cable TV connections ... Connections to other equipment ... Setting the language ... I OPERATION Memorizing channels ... -
Page 7: Features
• Integrated Digital Tuner - You can view digital broadcasting without using a Digital TV Set-Top Box. • Closed Caption Decoder With Full Text Mode - Displays text captions or full screen text on the screen for hearing impaired viewers. •... -
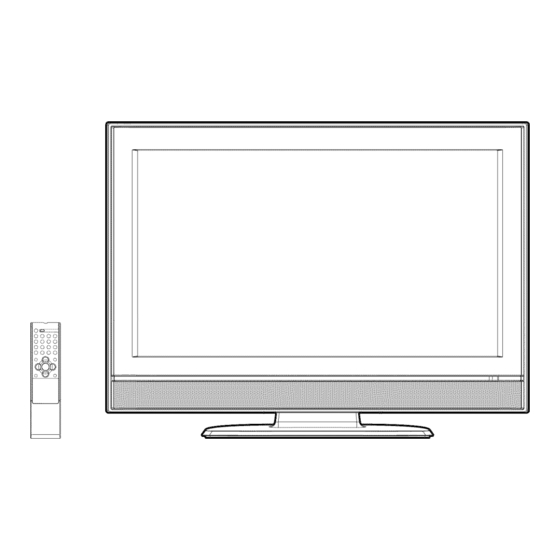
Page 8: Parts And Functions
Parts and functions MENU button CHANNEL A/V buttons VOLUME +/- butt°nsx Remote sensor Left side INPUT button /POWER button COAXIAL DIGITAL AUDIO OUT jack POWER indicator O©©-- O©©-- To display the menu screen. Press MENU button to display the menu screen. -
Page 9: Remote Control
1. POWER Button = Used to turn the LCD TV. 2. SLEEP Button =To set the LCD TV to turn off after a preset amount of time, use the SLEEP button on the remote control. 3. Direct Channel Selection Buttons direct access to any channel of the LCD TV. -
Page 10: Antenna Connections
Antenna connections If you are using an indoor or outdoor system, if you are using a Cable TV service, see page 11 for Cable TV connections. Combination VHF/UHF Antenna (Single 75 ohm cable or 300 ohm twin-lead Antenna Jack 75 ohm 300-75 oh Coaxial Matching... -
Page 11: Cable Tv Connections
This TV has an extended tuning range and can tune most cable channels without using a Cable TV Converter box. Some cable companies offer "premium Descrambling these signals for normal viewing requires the use of a descrambler generally provided by the Cable TV company. FOR SUBSCRIBERS TO BASIC CABLE Antenna... -
Page 12: Connections To Other Equipment
Connections to other equipment The exact arrangement you use to interconnect various video and audio components dependent on the model and features of each component. Check the Owner's Manual provided with each component for the location of video and audio inputs and outputs. The connection diagrams below are offered as suggestions. - Page 13 To connect the LCD TV to a DVD player/Satellite If your DVD player or Satellite receiver has a S-Video out jack, connect cords as shown. Audio cord (not supplied) Rear of the LCD TV © To S-VIDEO IN 1 ,(_'-_ ©...
- Page 14 Connections to other equipment To connect the LCD TV to a DTV receiver/set-top If you connect a DTV receiver/set-top nent video cord. Left side of the LCD TV To COMPONENT IN _ (_----_)"To AUDIO Audio cord (not supplied) To connect the LCD TV to a HDMI or a DVI device The HDMI input receives digital audio and uncompressed video from a DVI device.
- Page 15 Using an AV Amplifier with if you are using an Amplifier with built-in digital surround sound, you can enjoy various audio systems including Dolby Digital Surround audio that sounds just like the movie. Connect an AV amplifier with built=in Dolby Digital decoder, or etc. as shown below. Left side of the LCDTV ©...
- Page 16 Connections to other equipment To connect the LCD TV to a Game The LCD TV can also be used as a TV device for many video games. However, due to the wide variety of signals generated by these devices and subsequent included in the suggested connection diagrams.
-
Page 17: Setting The Language
You can choose from three different languages (English, French and Spanish) for the on=screen displays. On-screen language selection (step 3) will automatically appear on the screen when you press MENU initially. Select the language you prefer first, then proceed with the other menu options. -
Page 18: Memorizing Channels
Memorizing channels This TV is equipped with a channel memory feature which allows channels to skip up or down to the next channel set into memory, skipping over unwanted channels. Before selecting channels, they must be programmed into the TV's memory. To use this TV with an antenna, set the TV/CABLE menu option to the TV mode. - Page 19 NOTES: • Memorizing channels is best accomplished during evening "PRIMETIME" hours, as more stations are broadcasting digital signals. Memorizing channels can only be accomplished while a station is broadcasting a digital signal to set that channel into memory. • If you are unsure of the digital channels available in your area you may visit www.antennaweb.org to receive a list based on your...
-
Page 20: Tv Operation
TV operation NOTES: • If a channel with no broadcast is selected, the sound will automatically be muted. • It may take a few seconds for a digital channel picture to appear on screen after being selected. To turn on the TV, press POWER. Adjust the volume level by pressing VOL + or -. - Page 21 NOTES: • The TV is capable of holding a still video image or On screen display image on your TV screen indefinitely. If you leave the still video image or On screen display image displayed on your TV for an extended period of time, you risk permanent damage to your TV screen.
-
Page 22: Labeling Channels
Labeling channels Channel labels appear over the channel number display each time you turn on theTV, select a channel, or press DISPLAY. You can choose any four charac= ters to identify a channel. NOTE: Select "RETURN" and press 41 or _" to return from CH LABEL menu to OPTION menu. -
Page 23: Selecting The Video Input Source
Selectingthe videoinputsource/Labeling t he videoinputsource NOTE: Select "RETURN" and press 4 or I_ to return from VIDEO LABEL menu to OPTION menu. Selecting the video input source Press iNPUT SELECT to view a signal from another device connected to your LCD TV, such as a VCR or DVD player. -
Page 24: Setting The V-Chip
Setting the V-Chip An age limitation can be set to restrict children from viewing or hearing violent scenes or pictures that you may choose to exclude. The restriction applies transmitted. You may set this restriction password. NOTES: • If you forget the password, contact Customer Service at 1- 800-289-0980 for assistance. - Page 25 To use theTV after theTV protected. When a program is received that is blocked by the V-Chip, press MUTE and enter the password, then press ENTER. When the password is entered correctly the protection will be temporarily overridden. If the TV is turned off, or the channel is changed the V-Chip restriction will be reactivated.
- Page 26 Setting the V-Chip To change the password Press IVIENU.TheTV menu screen will appear. Press _ or II_ to select _ ... (LOCKS) menu. Press A or V to display the password entering mode. Use Number buttons (0-9) to enter your password, then press ENTER.
-
Page 27: Closed Caption
WHAT IS CLOSED CAPTiONiNG? This television has the capability to decode and display Closed Captioned television programs. Closed Captioning will display text on the screen for hearing impaired viewers or it will translate and display text in another language. NOTES: •... -
Page 28: Cc Advanced
CC advanced Closed Captions are factory preset however you can adjust them individually as follows: NOTE: Do not set the Closed Caption "TEXT COLOR" and "BACKGROUND COLOR" as the same color or you will not be able to see the text. This feature is designed to customize Digital Captions only. -
Page 29: Setting The Picture Size
You can view 480i and 480p format programs in a variety of picture sizes--NATURAL, CINEMA WIDE1, CINEMA WIDE2, CINEMA WIDE3, and FULL. NOTE: Some High Definition and/or Digital broadcasts may not allow you to change the picture size. Setting the picture size Selecting the picture size Press MENU. - Page 30 Setting picture NOTES: • In HDMI or COMPONENT mode of scanning rate: 720p and 1080i, the PICTUIRE SIZE feature is available only for CINEMA WIDE2 and FULL. The PICTURE SIZE feature is in the PC mode only for NATURAL or FULL.
-
Page 31: Setting The Picture Scroll
You can scrol the picture in CINEMA WIDE2 and CINEMA WIDE3 NOTE: The scroll amounts are as follows: • 480i/480p signal source: CINEMA WIDE1 : Not adjustable CINEMA WIDE2 : -10 to +10 CINEMA WIDE3 : -10 to +10 Setting the picture scroll Press MENU in CINEMA WIDE2 or CINEMA WIDE3 mode. -
Page 32: Selecting The Cinema Mode
Selecting the cinema mode/Using the aspect feature NOTE: If the signal does not include aspect information, the picture size you selected on page 29 is displayed. Selecting the cinema mode A smoother motion may be obtained by setting the Picture Mode to Film when you view a DVD from the DVD player connected with the component input. -
Page 33: Adjusting The Picture Preference
Adjustingthe picturepreference/Picture c ontroladjustment You can select four picture modes--SPORTS, STANDARD, MOVIE, and MEMORY--as scribed in the following table: NOTE: The CONTRAST default setting is set to maximum at the factory. Adjusting the picture preference Press MENU, then press 4 or to select (PICTURE) menu. -
Page 34: Selecting The Color Temperature
Selecting the color temperature/ Adjusting the back lighting Selecting the color temperature Change the picture quality by selecting from three preset color temperatures=COOL, MEDIUM, and WARM: Press MENU, then press 4 or to select (PICTURE) menu. Press A or V to select "COLOR TEMPERATURE". -
Page 35: Resetting Your Picture Adjustments
The RESET function returns your picture quality adjustments to the following factory settings: NOTE: When you press RESET in the _ (PICTURE) menu, the picture adjustment returns to the factory preset level. Resetting your picture adjustments PICTUREPREFERENCE... SPORTS BRIGHTNESS... c enter (25) CONTRAST ...max (50) COLOR ... -
Page 36: Selecting Stereo/Second Audio Program (Sap)
Selecting Stereo/Second Sound control adjustment The multi=channel TV sound (WITS) feature provides high=fidelity stereo sound. WiTS also can transmit a second audio program (SAP) containing a second language or other audio informs= tion. When the TV receives a stereo or SAP broadcast, the word "STEREO"... -
Page 37: Selecting The Hdmi Audio Input Source
Selecting the HDIVli audio input source/ Selecting the audio language Selecting the HDIVll audio input source When you use HDMI AUDIO IN jacks with HDMI or DVI device, you must select HDMI audio input source from "HDMF' or "DVI'. Press MENU.Then press _ or I_ to select (AUDIO) menu. -
Page 38: Selecting The Digital Output
Selecting the digital output/ Resetting your audio adjustments NOTE: When you press RESET in (AUDIO) menu, the audio adjustment returns to the factory preset levels. Selecting the digital output You can choose the format of the digital audio output signal. Press MENU, then press 4 or to select (AUDIO) menu. -
Page 39: Checking The Digital-Signal Strength
This TV will allow you to view the digital signal meter for digital channels. NOTES: • Signal meter feature is not available for analog channels. • After 240 seconds, SIGNAL METER screen will return to normal TV-operation automatically. Checking the Digital-signal strength Press MENU, then press 4 or I_ to select (SETUP) menu. -
Page 40: Setting The Auto Shut Off
Setting the auto shut off in case of "AUTO SHUT OFF" feature is "ON", if a station being viewed stops broadcasting, the TV will automatically shut itself off after 15 minutes. Press MENU, then press _ or to select (SETUP) menu. Press A or V to select "AUTO SHUT OFF". -
Page 41: Picture/Audio Control Adjustment In The Pc Mode
Picture/Audio control adjustment in the PC mode NOTES: • If you wish to change the on- screen language, follow the steps 1 - 5 on page 17. • If no buttons are pressed for more than approx. 60 seconds, the PC Monitor Menu-screen will return to normal Monitor- screen automatically. - Page 42 Picture/Audio NOTE: When you press RESET in (PICTURE) or (AUDIO) menu, the picture or audio adjustment returns to the factory preset level. control adjustment Resetting your picture/audio The RESET function returns your picture/audio adjustment to the following factory settings: PICTURE menu BRIGHTNESS ...
-
Page 43: Reception Disturbances
Most types of television interference UHF antenna. Outdoor antennas are recommended television interference are shown below, if one of these symptoms appear when the TV is connected to a Cable TV system, the disturbance RADIO FREQUENCY installing an RFI filter may improve the picture. PICTURE SiZE VARiATiON CARE AND MAINTENANCE... -
Page 44: Troubleshooting
Troubleshooting Use the following checklist for troubleshooting service outlet problems persist. SYMPTOMS POSSIBLE SOLUTIONS , Make sure the power cord is plugged in. TV does not , Try another AC outlet. operate. , Power is off, check fuse or circuit breaker. , Unplug unit for an hour, then plug it back in. -
Page 45: Specifications
AC 120V 60 Hz Power supply: Power consumption: Operation: Stand by: Weight: 31.1 Ibs (14.1 kg) Dimensions: Width: Height: Depth: Inputs: VIDEO: 1 V (p-p)/75 ohms AUDIO: -8 dBm/50k ohms S-VIDEO: COMPONENT: Digital audio out: 0.5 Vp-p 75 ohms terminated HDMI input: HDMI compliant (type A connector) HDCP compliant... -
Page 46: Limited Warranty
ORION warrants this product to be free from manufacturing defects in material and workmanship normal use and conditions for a period of 1 year from date of original purchase in the United States, Should service be necessary under this warranty for any reason due to a manufacturing defect or malfunction during the first 12 months from date of original purchase, ORLON will provide in-home repair service by an ORLON authorized Independent Service Center at no charge. - Page 47 Memo...
- Page 48 Illllllllllllllllllllllllllllllllllll J32D0202A SH 07/05 [] Printed in Thailand...