Table of Contents
Advertisement
Advertisement
Table of Contents

Related Manuals for Electrolux ERN 28600


Summary of Contents for Electrolux ERN 28600
-
Page 1: User Manual
- f r e e z e r USER MANUAL ERN 28600 2223 010-41... -
Page 2: Important Safety Information
Under no circumstances should you attempt to repair the machine yourself. Repairs carried out by inexperienced persons may cause injury or serious malfunctioning. Refer to your local Electrolux Service Force Centre and always insist on genuine spare parts. At the end of the Appliance Life •... -
Page 3: Table Of Contents
Disposal of old Appliances The symbol on the product or on its packaging indicates that this product may not be treated as household waste. Instead it shall be handed over to the applicable collection point for the recycling of electrical and electronic equipment. By ensuring this product is disposed of correctly, you will help prevent potential negative consequences for the environment and human health, which could otherwise be caused... -
Page 4: Operation
Do not use soap or detergent as the smell may linger. Dry thoroughly. Setting the temperature The temperature inside the refrigerator and the freezer is regulated by a single thermostat with 6 temperature positions and an “OFF” (O) position. Position 1 = minimum coldness Position 6 = maximum coldness Turn the thermostat dial to the required position. -
Page 5: Frozen Food Storage
Do not cover the shelves with any protective material, such as paper, cardboard or plastic, which may obstruct the air circulation through them. To help you use your refrigerator correctly, here are some more useful hints: Raw meat (beef, pork, lamb & wild fowl): wrap in polythene bags and place on top of the salad crispers. -
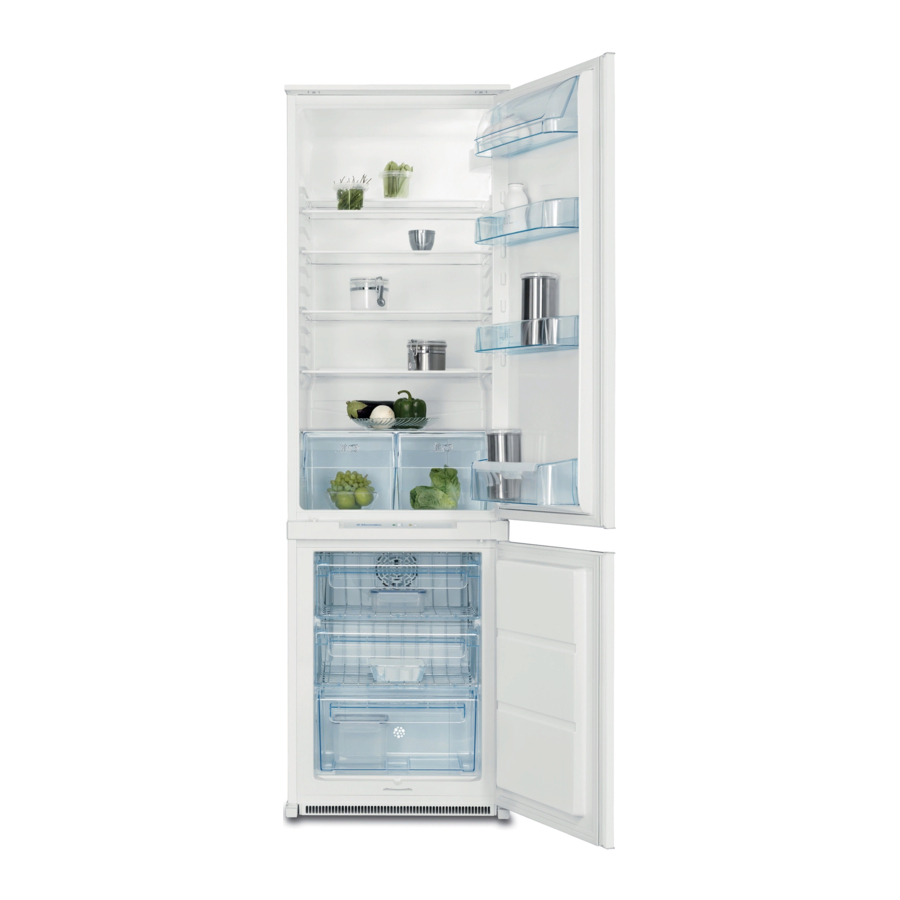
Page 6: Movable Shelves
Movable shelves The walls of the refrigerator have runners so that the shelves can be positioned as desired . For better use of space, the front half-shelves can lie over the rear ones. Positioning the door shelves To permit storage of food packages of various sizes, the door shelves can be adjusted in height.To make... -
Page 7: Hints And Tips
• Do not store food uncovered. • Remove suspect food from your refrigerator and clean, refer to ‘Maintenance and Cleaning’. • Ensure that food placed in the freezer is dated and labelled and used in date order to ensure that food is consumed at its best. -
Page 8: Maintenance And Cleaning
MAINTENANCE AND CLEANING Before any maintenance or cleaning work is carried out, DISCONNECT the appliance from the ELECTRICITY supply. Internal cleaning Clean the inside and accessories with warm water and bicarbonate of soda (5ml to 0.5 litre of water). Rinse and dry thoroughly. NEVER USE DETERGENTS, ABRASIVE POWDERS, HIGHLY PERFUMED CLEANING PRODUCTS OR WAX... -
Page 9: Defrosting
Defrosting Refrigerator The refrigerator automatically defrosts every time the compressor stops. The water is discharged, via the pipe, into a tray located at the back of the appliance above the compressor, where it evaporates. Important To avoid defrost water overflowing into the fridge,... -
Page 10: Something Not Working
During prolonged periods of low room temperatures,ie;10°C and lower, the compressor on single compressor fridge freezers can remain inoperative during this time . This is due to the air temperature within the refrigerator compartment being maintained at 6°C or under thus not calling the thermostat to energise the compressor . -
Page 11: Service And Spare Parts
Please note that a valid purchase receipt or guarantee documentation is required for in-guarantee service calls. CUSTOMER CARE DEPARTMENT For general enquiries concerning your Electrolux appliance or for further information on Electrolux products, please contact our Customer Care Department by letter or telephone at the address below or visit our website at www.electrolux.co.uk... -
Page 12: Guarantee Conditions
Standard guarantee conditions We, Electrolux, undertake that if within 12 months of the date of the purchase this Electrolux appliance or any part thereof is proved to be defective by reason only of faulty workmanship or materials, we will, at our option repair or replace the same FREE OF CHARGE for labour, materials or carriage on condition that: The appliance has been correctly installed and used only on the electricity supply stated on the rating plate. -
Page 13: Technical Specification
TECHNICAL SPECIFICATIONS POWER SUPPLY VOLTAGE AND FREQUENCY TOTAL POWER ABSORBED AVERAGE DAILY UNITS ELECTRICITY * GROSS CAPACITY NET CAPACITY STAR RATING This figure is based on standard test results in accordance with European Standard EN 153. Actual consumption will depend on how the appliance is used and where it is located. 220-240 V / 50 Hz 160 W 0.879 kWh... -
Page 14: Installation
INSTALLATION Warning IF YOU ARE DISCARDING AN OLD APPLIANCE THAT HAS A LOCK OR CATCH ON THE DOOR, YOU MUST ENSURE THAT IT IS MADE UNUSABLE TO PREVENT YOUNG CHILDREN BEING TRAPPED INSIDE. Depending upon the position which you choose for your appliance, you may wish to reverse the way in which the door opens. -
Page 15: Electrical Connection
The cover/carrier is indicated by the coloured insert at the base of the plug. A replacement cover/carrier must be obtained from your local Electrolux Service Force Centre. This appliance complies with the E.E.C. Directive No. 87/308 of 2.6.87 relative to radio interference suppression. -
Page 16: Door Reversal
Instructions for totally built-in appliances Door reversal The appliance is supplied with the right or left door opening. To change the opening direction of the door proceed as in the following instructions before installing it. 1. Unscrew the upper pin and remove the spacer 2. - Page 17 (I = short) (P = long) Apply the sealing strip pushing it between the refrigerator and the adjacent cabinet. Apply covers (C-D) on joint cover lugs and into hinge holes. Snap vent grille (B) and hinge cover (E) into position.
- Page 18 Place guide (Ha) on the inside part of the furniture door, up and down as shown in the figure and mark the position of external holes. After having drilled holes, fix the guide with the screws supplied. Fix cover (Hc) on guide (Ha) until it clips into place Open the appliance door and the furniture door at 90°.
- Page 19 Fix cover (Hd) on guide (Hb) until it clips into place. If the appliance is fixed to the side of the kitchen unit, simply slacken the screws in fixing brackets (D), move the brackets as shown in the figure and re- tighten the screws.
- Page 20 . . e e l l e e c c t t r r o o l l u u x x . . c c o o m m www.electrolux.co.uk © Electrolux plc 2007...