
Related Manuals for Singer 5500


Summary of Contents for Singer 5500
- Page 1 5500/5400 6199/6180/6160 INSTRUCTION MANUAL MANUEL D’INSTRUCTION MANUAL DE INSTRUCCIONES...
-
Page 2: Important Safety Instructions
“IMPORTANT SAFETY INSTRUCTIONS” “When using an electrical appliance, basic safety precautions should always be followed, including the following.” “Read all instructions before using this sewing machine.” “DANGER-- To reduce the risk of electric shock:” 1. “ This sewing machine should never be left unattended when plugged in. Always unplug this sewing machine from the electric outlet immediately after using and before cleaning.”... - Page 3 If in doubt, please contact your retailer for guidance. SINGER, is the exclusive trademark of The Singer Company Limited S.à r.l. or its Affiliates. ©2011 The Singer Company Limited S.à r.l. or its Affiliates. All rights reserved.
- Page 4 IMPORTANTES CONSIGNES DE SÉCURITÉ Toujours faire preuve de prudence en utilisant un appareil électromécanique. Lire toutes les instructions avant d’utiliser cette machine à coudre. DANGER- Pour réduire le risque de décharge électrique, suivre ce qui suit: 1. Cette machine à coudre ne devrait jamais être laissée sans surveillance lorsque branchée.
- Page 5 électriques/électroniques. En cas de doute, veuillez communiquer avec le détaillant. SINGER es una marca registrada de “The Singer Company Limited S.à r.l.” o sus Afiliadas. ©2011 The Singer Company Limited S.à r.l. o sus Afiliadas. Todos los derechos reservados.
- Page 6 IMPORTANTES INSTRUCCIONES DE SEGURIDAD Cuando se usa un aparato eléctrico, debe seguirse unas precauciones básicas y que vienen incluidas a continuación. “Leer las instrucciones antes de usar la máquina de coser.” PELIGRO - Para reducir el riesgo de una descarga eléctrica. 1.
- Page 7 Si tiene alguna duda al respecto, por favor contacte con el distribuidor. SINGER est une marque exclusive de The Singer Company Limited S.à r.l. ou de ses Affiliés. ©2011 The Singer Company Limited S.à r.l. ou de ses Affiliés. Tous Droits Réservés.
-
Page 8: Table Of Contents
TABLE OF CONTENTS 1. KNOWING YOUR SEWING Zigzag stitching --------------------------------- 40 Adjusting stitch width and length MACHINE Multi-stitch zigzag, Shell stitch -------- 41-42 Machine identification ------------------------9-10 Satin stitch, Placement of patterns Accessories ---------------------------------------11 Sewing on a button --------------------------- 43 Setting up your machine -----------------------12 Blindhem stitch ---------------------------- 44-45 Spool pins, Presser foot lifter -----------------13 Decorative and stretch stitches ------- 46-51... - Page 9 TABLE DES MATIÈRES 1. DESCRIPTION DE LA MACHINE À Point droit -------------------------------------- 36-37 Pour garder la couture droite COUDRE Point de matelassage d'apparence Description -------------------------------------- 9-10 fait à la main ----------------------------------38-39 Accessoires----------------------------------------- 11 Mise en place de fermetures à glissière Passepoil Préparation de la machine ------------------ 12 Point zigzag --------------------------------------- 40...
-
Page 10: Empezar A Coser
INDICE DE CONTENIDOS 1. PRINCIPALES PARTES DE LA Puntada recta ----------------------------------36-37 MAQUINA Manteniendo la puntada derecha Puntada recta con función de Identificación de la máquina ----------------- 9-10 remate automático--------------------------- 38-39 Accesorios -----------------------------------------11 Colocación de cierres y vivo Preparación de la máquina ----------------------12 Colocación de vivos Porta carretes, Palanca pie prensatelas ---------13 Puntada zig-zag ---------------------------------- 40... -
Page 11: Knowing Your Sewing Machine
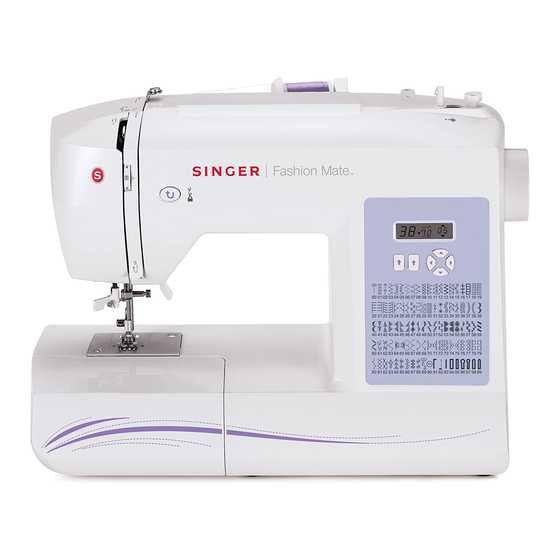
1. KNOWING YOUR SEWING MACHINE 1. DESCRIPTION DE LA MACHINE À COUDRE 1. PRINCIPALES PARTES DE LA MAQUINA MACHINE IDENTIFICATION 1. Bobbin winding tension disk 2. Thread take-up 3. Thread tension control 4. Face cover 5. Thread cutter 6. Removable extension table / Accessory box 7. -
Page 12: Description
DESCRIPTION IDENTIFICACIÓN DE LA MÁQUINA 1. Disque de tension du bobineur 1. Disco de tensión de bobina 2. Releveur de fil 2. Tira hilos 3. Réglage de la tension du fil supérieur 3. Control tensión hilo 4. Plaque frontale 4. Cubierta frontal 5. -
Page 13: Accessories
ACCESSORIES ACCESSOIRES ACCESORIOS 1. Needles 2. Bobbins 3. Auxiliary spool pin 4. Spool pin felt discs 5. Spool pin cap 6. Buttonhole opener/Seam ripper and brush 7. Screwdriver for needle plate 8. Darning plate 9. Zipper foot 10. Buttonhole foot The foot that comes on your sewing m a c h i n e i s c a l l e d t h e g e n e r a l purpose foot and will be used for the... -
Page 14: Setting Up Your Machine
SETTING UP YOUR MACHINE Set power/light switch at “OFF” PRÉPARATION DE LA MACHINE R é g l a g e d e l ' i n t e r r u p t e u r moteur/lumière à « OFF » PRÉPARACION DE LA MÁQUINA Pin plug Poner el Interruptor de corriente/luz... -
Page 15: Spool Pins, Presser Foot Lifter
SPOOL PINS Spool Bobine PORTE-BOBINE Carrete Spool pin felt discs PORTA CARRETES Rondelle feutre Disco del pasador carrete Vertical spool pin HORIZONTAL SPOOL PIN Porte-bobine vertical Pasador de carrete vertical Pull the spool pin towards you. Place thread spool on the pin and secure Thread retaining slot Fente de retenue de fil with a spool cap to ensure smooth flow of... -
Page 16: Darning Plate
DARNING PLATE PLAQUE DE REPRISAGE PLACA TRANSPARENTE Use the darning plate when you need to control fabric feeding for button sewing, free motion work and free motion darning. Raise needle and presser foot, and position darning plate onto the needle plate with the two pins on the back inserted to the holes of needle plate. -
Page 17: Winding The Bobbin
WINDING THE BOBBIN PRÉPARATION DE LA CANETTE DEVANADO DE LA BOBINA Be sure to use Class 15 bobbins. 1. Place a spool of thread on the spool pin, and secure it with the spool pin cap. Pull the thread out from the spool and place it through thread guides as shown in illustration.Be sure to pull thread securely into the bobbin winding tension... -
Page 18: Removing Bobbin Case From Shuttle
REMOVING BOBBIN CASE FROM SHUTTLE COMMENT ENLEVER LE BOÎTIER DE LA CANETTE EXTRACCION DE LA CEPSULA BOBINA DE LA LANZADERA 1. Raise the needle to its highest position by rotating the hand wheel toward you (counter-clockwise). 2. Open the bobbin access cover by pulling it down. -
Page 19: Inserting Bobbin Case Into Shuttle
INSERTING BOBBIN CASE INTO SHUTTLE MISE EN PLACE PLACE DU BOÎTIER DE LA CANETTE INSERCION DE LA CAPSULA BOBINA EN LA LANZADERA 1. Hold the latch open, with locating pin Locating groove straight up. Fente Ranura de posicionamiento 2. Slide the bobbin case onto the center spindle of the shuttle, with the thread toward you. - Page 20 C.Thread the machine with your left hand while firmly gripping the thread with your right hand in the following order as illustrated. *Pass the thread through the thread take-up (3) from right to left. *Pass the thread through the eye of the needle (5) from front to back. (See following page for instructions on operation of the Automatic Needle Threader.) IMPORTANT: To verify that the machine is threaded properly in the tension discs, do this simple check:...
-
Page 21: Using Automatic Needle Threader
USING AUTOMATIC NEEDLE THREADER UTILISATION DE L’ENFILEUR DE CHAS D’AIGUILLE EMPLEO DEL ENSARTADOR AUTOMÁTICO DE AGUJA Raise the needle to its highest position by rotating the hand wheel towards you (counter-clockwise). 1. H o o k t h r e a d i n t o t h r e a d g u i d e a s illustrated. -
Page 22: Picking Up Bobbin Thread
PICKING UP BOBBIN THREAD RAPPEL DU FIL INFÉRIEURE EXTRACCIÓN DEL HILO DE LA BOBINA 1. Raise the presser foot lifter. 2. Holding needle thread loosely with your left hand, turn hand wheel toward you (counter-clockwise) with your right hand, first lowering the needle and continuing until the needle comes to its highest position. -
Page 23: Needle, Thread And Fabric Chart
All-Purpose 16/100 purple band * For best sewing results, always use a SINGER branded needle. TABLEAU DES TISSUS, DU FIL ET DES AIGUILLES Le choix d’une aiguille et du fil correspondant au tissu est très important. Le tableau suivant vous aidera à faire un choix, avant d’entreprendre votre ouvrage. - Page 24 11/80 banda narranja Punto aglomerado Algodón sobre mecha polyester 2045 14/90 Puntos Punto doble 100% Polyester amarilla rojo banda azúl Jersey / Tricot Uso general 16/100 banda púrpula * Para los mejores resultados de costura, use siempre agujas marca SINGER.
-
Page 25: Changing The Needle
CHANGING THE NEEDLE CHANGEMENT D'AIGUILLE CAMBIO DE LA AGUJA Flat side Côté plat Always disconnect the machine Lado plano from power supply by removing the plug from the electrical outlet. Needle Aiguille Aguja 1. Raise the needle bar to its highest position by turning the hand wheel toward you (counter-clockwise). -
Page 26: Adjusting Top Thread Tension
ADJUSTING TOP THREAD TENSION RÉGLAGE DE LA TENSION DU FIL SUPÉRIEUR AJUSTE DE LA TENSION DEL ILOSUPERIOR Under side Envers Reverso Top side Endroit Cara Top stitch too tight Top stitch too loose Fil supérieur trop tendu Fil supérieur trop lâche P u n t a d a s u p e r i o r Well balanced P u n t a d a s u p e r i o r... - Page 27 STRAIGHT STITCHING The correct appearance of your stitching is largely determined by the balanced tension of both top and bobbin threads. The tension is well balanced when these two threads "lock" in the middle of layers of the fabric you are sewing. If, when you start to sew, you find that the stitching is irregular, you will need to adjust the tension control.
-
Page 28: Functions Of Control Panel
FUNCTIONS OF CONTROL PANEL FONCTIONS DU PANNEAU DE COMMANDE FUNCIONES DE PANEL DE CONTROL Stitch width/needle position of straight stitch Stitch length Largeur du point/position de l'aiguille sur le point droit Longueur du point Ancho de puntada/posición de aguja en costura recta Largo de puntada Stitch pattern number LCD display... -
Page 29: Straight Stitch Needle Position
STITCH LENGTH AND STITCH WIDTH / Manual adjustment buttons NEEDLE POSITION ADJUSTMENT for stitch length BUTTONS Boutons d'ajustement manuel Your sewing machine will produce your de la longueur du point . stitching requirements at a 5/Default stitch Ajuste manual botones length and width. -
Page 30: Adjusting Bobbin Thread Tension
ADJUSTING BOBBIN THREAD TENSION RÉGLAGE DE LA TENSION DU FIL INFÉRIEUR AJUSTE DE LA TENSION DEL HILO DE LA BOBINA B O B B I N T H R E A D T E N S I O N R E Q U I R E S Fabric puckers ADJUSTMENT LESS FREQUENTLY THAN THE La couture est froncée. -
Page 31: Helpful Messages
HELPFUL MESSAGES MESSAGES D’AIDE MENSAJES DE AYUDA If an incorrect operation is made, a helpful message will be displayed. When a helpful message is displayed, fix the problem following the instructions below. Si une opération ne se fait pas correctement, un message d’aide apparaîtra Lorsque le message d’aide apparaît, résoudre le problème en suivant les instructions ci-dessous. -
Page 32: Reverse Operation Button
REVERSE OPERATION BUTTON BOUTON D'OPÉRATION DU POINT DE MARCHE ARRIÈRE INTERRUPTORES DE FUNCIONAMIENTO DUAL PURPOSE REVERSE/ TACKING STITCH BUTTON * Reverse stitch function for straight and zigzag stitches ( Reverse sewing is carried out while the reverse stitch button is pushed. The machine will continue to sew in Reverse stitch button reverse as long as the reverse button is... -
Page 33: Starting To Sew
2. STARTING TO SEW QUICK REFERENCE TABLE OF STITCH LENGTH AND WIDTH TABLEAU DE RÉFÉRENCE RAPIDE DES LARGEURS ET 2. POUR COUDRE LONGUEURS DE POINTS CUADRO DE REFERENCIA RÁPIDA DE LARGO Y 2. EMPEZAR A COSER ANCHO DE PUNTADA PATTERN No. NEEDLE POSITION LENGTH N°... - Page 34 PATTERN No. PATTERN No. N° DU MODÈLE N° DU MODÈLE PATTERN No. PATTERN No. WIDTH LENGTH WIDTH LENGTH LARGEUR (mm) LONGUEUR (mm) LARGEUR (mm) LONGUEUR (mm) ANCHO LARGO ANCHO LARGO AUTO MANUAL AUTO MANUAL AUTO MANUAL AUTO MANUAL AUTO MANUEL AUTO MANUEL AUTO...
- Page 35 PATTERN No. PATTERN No. N° DU MODÈLE N° DU MODÈLE WIDTH LENGTH WIDTH LENGTH PATTERN No. PATTERN No. LARGEUR (mm) LONGUEUR (mm) LARGEUR (mm) LONGUEUR (mm) ANCHO LARGO ANCHO LARGO MANUAL MANUAL AUTO AUTO MANUAL AUTO AUTO MANUAL AUTO AUTO AUTO AUTO MANUEL...
- Page 36 PATTERN No. PATTERN No. N° DU MODÈLE N° DU MODÈLE WIDTH LENGTH WIDTH LENGTH PATTERN No. PATTERN No. LARGEUR (mm) LONGUEUR (mm) LARGEUR (mm) LONGUEUR (mm) ANCHO LARGO ANCHO LARGO AUTO MANUAL AUTO MANUAL AUTO MANUAL AUTO MANUAL AUTO MANUEL AUTO MANUEL AUTO...
-
Page 37: Pattern Number Reference Guide
PATTERN NUMBER REFERENCE GUIDE GUIDE DE RÉFÉRENCE DES MOTIFS GUÍA DE REFERENCIA DEL NÚMERO DE PUNTADA 60 stitch model Modèle 60 points Modelo 60 puntadas 80 stitch model Modèle 80 points Modelo 80 puntadas 100 stitch model Modèle 100 points Modelo 100 puntadas... -
Page 38: Straight Stitching
STRAIGHT STITCHING 100 stitch model : 80 stitch model : POINT DROIT 60 stitch model : PUNTADA RECTA Straight stitch is most frequently used for all types of sewing. Let’s begin by following the steps below. NOTE: Based upon the weight of the fabric, slight “fine tuning” of the tension may be desired. 1.SETTINGS A.Thread tension control Presser foot - General purpose foot... -
Page 39: Keeping Seams Straight
La puntada recta se usa más frecuentemente para coser todo tipos de costura. Comencemos siguiendo los pasos abajo. NOTA: De acuerdo con el peso del tejido, puede ser necesario ajustar ligeramente la tensión. 1.AJUSTES A. Control tensión hilo Pie prensatelas - Pie universal B. -
Page 40: Hand-Look Quilt Stitch
HAND-LOOK QUILT STITCH POINT DE MATELASSAGE D'APPARENCE FAIT À LA MAIN PUNTADA DE ACOLCHADO CONTINUA This stitch is designed to look like hand 100 stitch model : sewing for topstitching and quilting. 80 stitch model : 1. Thread bobbin with desired top stitching 60 stitch model : color. -
Page 41: Piping
INSERTING ZIPPERS To sew down the right side, attach left side of zipper foot to presser foot holder so that the needle passes through the opening on the left side of the foot. To sew down the left side, attach right side of foot to foot holder. -
Page 42: Zigzag Stitching
ZIGZAG STITCHING 100 stitch model : 80 stitch model : POINT ZIGZAG 60 stitch model : PUNTADA ZIG-ZAG Under side Côté de dessous SETTINGS : Presser foot - General Purpose Foot Reverso :Thread tension control - 5 The top thread may appear on the bottom depending on the thread, fabric, type of Top side stitch and sewing speed, but the bobbin... -
Page 43: Multi-Stitch Zigzag, Shell Stitch
MULTI-STITCH ZIGZAG 100 stitch model : ZIGZAG MULTI-POINT 80 stitch model : ZIG-ZAG DE TRES PUNTADAS 60 stitch model : SETTINGS :Presser foot - General purpose foot :Thread tension control - 5 This is a strong stitch because as its name implies, it makes three short stitches where the normal zig-zag makes only one. - Page 44 SATIN STITCH This is a closely spaced stitch for appliqué, bar tacking, etc. Slightly loosen the top thread tension and manually adjust the stitch length between 0.5 and 2.0 for satin stitching. Use a backing of stabilizer or interfacing to avoid puckering.
-
Page 45: Sewing On A Button
SEWING ON A BUTTON 100 stitch model : 80 stitch model : POSE DE BOUTONS 60 stitch model : COSIDO DE BOTONES SETTINGS : Presser foot - General purpose foot : Darning plate Position your fabric and button under the presser foot. -
Page 46: Blindhem Stitch
BLINDHEM STITCH 100 stitch model : 04, 05, 07 80 stitch model : 04, 05, 07 POINT INVISBLE 60 stitch model : 04, 05, 07 PUNTADA INVISIBLE Settings : Presser foot - General purpose foot AJUSTES : Pie prensatelas - Pie universa : Control tensión hilo - 5 : Thread tension control: 5 La puntada invisible se usa principalmente para... - Page 47 1. With matching thread finish the raw edge. On fine fabric turn up and press a small ½” (1.3cm) or less hem. On medium to heavyweight fabrics overcast the fabric’s raw edge. 2. Now fold the fabric as illustrated with the wrong side up. 3.
-
Page 48: Decorative And Stretch Stitches
DECORATIVE AND STRETCH STITCHES POINT DÉCORATIFS ET POINTS EXTENSIBLES PUNTADAS DECORATIVAS Y ELÁSTICAS SETTINGS : Presser foot - General purpose foot : Thread tension control - 5 Stretch stitches are mainly for use on knit, or stretchable fabrics, but can also be used on woven materials. -
Page 49: Puntada Sobre-Orillado
OVEREDGE STITCH This is the same type stitch used by the garment industry in making sportswear - it forms and finishes the seam in one operation. It’s very effective for use in repairing raw or worn seams of garments. 100 stitch model : 10, 11 80 stitch model : 10, 11... - Page 50 . T h e entredeux stitch is most often sewn with a wing needle (SINGER Style 2040) to create holes in the stitch pattern.
- Page 51 LADDER STITCH 100 stitch model : 80 stitch model : The ladder stitch is primarily used for drawn 60 stitch model : thread hemstitching. It can also be used for sewing over thin tape in a contrasting or same color.Place the stitch in the center and a special effect will be obtained for decoration.
- Page 52 SLANT PIN STITCH Excellent for hemstitching projects like table linens. Picot-like stitch can also be made on sheer materials. Sew along the 100 stitch model : 22, 23 raw edge of fabric and trim close to the 80 stitch model : 22, 23 outside of the stitching.
-
Page 53: Reinforced Overedge Stitch
THORN STITCH It is a versatile stitch used for joining fabric pieces 100 stitch model : as well as for decorative machine stitching. 80 stitch model : 60 stitch model : POINT D’ÉPINE PUNTADA “HERRINGBONE” C’est un point polyvalent utilisé pour joindre des pièces de tissu aussi bien que Es una puntada versátil, usada para unir piezas de pour la couture décorative à... -
Page 54: More Decorative Stitches & Ideas For Decorative Machine Stitching
MORE DECORATIVE STITCHES and IDEAS FOR DECORATIVE MACHINE STITCHING AUTRES POINTS DÉCORATIFS ET IDÉES POUR LA COUTURE DÉCORATIVE À LA MACHINE MAS PUNTADAS DECORATIVAS E IDEAS PARA DECORAR SUS MANUALIDADES SETTINGS : Presser foot - General purpose foot : Thread tension control - 5 or -1 You should carry out a test sewing on an extra piece of the fabric being sewn to check the decorative pattern to be used. -
Page 55: Buttonhole Making
BUTTONHOLE MAKING Tab A Tab B CONFECTION DES BOUTONNIÈRES Languette A Languette B Lengüeta A Lengüeta B CONFECCION DE OJALES AUTOMATIC BUTTONHOLE USING BUTTONHOLE FOOT Your machine offers you two different widths of bartack, keyhole and round- end buttonholes sewn by a system that measures the size of the button and calculates the size of buttonhole required. - Page 56 1. Select one of the buttonhole patterns. 2. R e p l a c e t h e p r e s s e r f o o t w i t h t h e buttonhole foot. (Refer to “Changing presser foot”...
- Page 57 * Sewing will be completed automatically in the following order. * La couture sera complétée automatiquement dans l’ordre indiqué sur l’illustration. * La costura se terminará automáticamente en el siguiente orden. Buttonhole foot alignment position Position d'alignement du pied à boutonnière. Posición de alineación del pie de ojaladora Fabric marking Marque du tissu...
-
Page 58: Caring For Your Machine
3. CARING FOR YOUR MACHINE A l w a y s d i s c o n n e c t t h e machine from power supply 3. ENTRETIENT DE LA MACHINE by removing the plug from 3. CUIDE SU MAQUINA CAUTION the electrical outlet. -
Page 59: Limpiar El Area Del Transportador Y La Lanzadera
CLEANING THE FEED DOGS AND SHUTTLE AREA NETTOYAGE DES GRIFFES ET AUTOUR DE LA NAVETTE LIMPIAR EL ÁREA DEL TRANSPORTADOR Y LA LANZADERA Raise the needle to its highest position. 1.Remove the bobbin case from the shuttle. 2.Push aside the two shuttle keepers. 3.Remove the shuttle race cover and shuttle. -
Page 60: Option Accessories
4.OPTION ACCESSORIES 4.ACCESOIRES EN OPTIONS 4.ACCESORIOS OPCIÓN LARGE EXTENSION TABLE To p l a c e o n t o t h e m a c h i n e , l i f t t h e supporting leg of the extension table, and slide the table into place while fitting the guide pins A, B, C and D into machine as illustrated. -
Page 61: Performance Checklist
5. PERFORMANCE CHECKLIST GENERAL PROBLEMS Machine does not sew. * Power switch is turned off. - Turn on the switch. * Assure foot controller plug is fully engaged (pushed into its socket). * Buttonhole lever is not raised when sewing stitch patterns. –... -
Page 62: Du Fil Supérieur
5. VÉRIFICATION DES PROBLÈMES MINEUR DE COUTURE PROBLÈMES GÉNÉRAUX La machine ne coud pas. * L’interrupteur est hors tension. Le mettre sous tension. * Asegúrese que el control de pedal esté completamente conectado (presionando el conector). * Le levier pour boutonnière n’est pas relevé lorsque vous cousez des motifs de points. - Relevez le levier pour boutonnière. -
Page 63: Cuadro De Verificacion De Rendimiento
5. CUADRO DE VERIFICACION DE RENDIMIENTO PROBLEMAS GENERALES Máquina no cose. * El interruptor de energía no está conectado. - en la posición LOW o HIGH. * Assurez que la fiche du rhéostat est totalement insérée (poussé la dans son réceptacle). * La palanca de ojal no está... - Page 64 ENGLISH / FRANÇAIS / ESPAÑOL © Part No. 82946 8/11 12/11 ( 1 )