Table of Contents
Advertisement
Quick Links
Advertisement
Table of Contents

Related Manuals for ESI Prodigy 7.1 HiFi


Summary of Contents for ESI Prodigy 7.1 HiFi
- Page 1 192 kHz 7.1 HiFi Surround Audio Interface User’s Guide...
- Page 2 ESI - Copyright © 2006 - 2009 Revision 3, November 2009 www.esi-audio.com...
-
Page 3: Table Of Contents
Prodigy 7.1 HiFi INDEX 1. Introduction..........................4 2. What’s in the box ......................... 4 3. Key Features..........................4 4. System Requirements ........................5 5. Connectors ............................ 5 6. Hardware Installation ......................... 6 7. Software Installation........................8 7.1 Windows 2000 and Windows XP ........................8 7.2 Windows Vista and Windows 7......................... -
Page 4: Introduction
The Prodigy 7.1 HiFi driver software is based on the EWDM standard from pro audio manufacturer ESI providing perfect compatibility with Windows 2000 / XP / 2003 / Vista / 7, offering high performance and low latency operation with all important famous audio applications. The DirectWIRE 3.0 support in the driver allows you to virtually patch all your digital audio sources... -
Page 5: System Requirements
Prodigy 7.1 HiFi 4. System Requirements Prodigy 7.1 HiFi is a high end multimedia digital audio interface with many different functions and not just a simple sound card. Even though Prodigy 7.1 HiFi does not depend very much on the available CPU in your system, it is important that the computer meets the minimum system requirements. -
Page 6: Hardware Installation
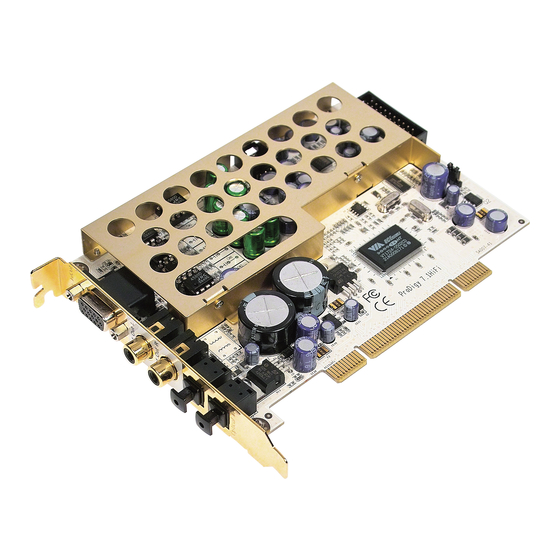
Prodigy 7.1 HiFi 6. Hardware Installation Prodigy 7.1 HiFi and other components in the computer could easily be damaged by electrical shocks. You should use an anti-static device that can discharge the static electricity of your body to avoid potential static damage to the cards. The Prodigy 7.1 HiFi card is shipped in an anti-static plastic pouch to protect it from static electricity - do not open the pouch before you install the card. - Page 7 Prodigy 7.1 HiFi Figure 3. Typical PC Motherboard Slot Configuration Figure 4. Removing the PCI Slot faceplate If the PCI slot is covered by a faceplate, you can remove it by removing the screw holding it in place or by prying it off with a screwdriver. Insert the Prodigy 7.1 HiFi card into the PCI slot, firmly pushing the card into the slot until it is seated securely.
-
Page 8: Software Installation
3. During installation in Windows 2000 and Windows XP, you will be prompted with a message warning once or several times that the driver software has not passed Windows Logo testing. Select Continue Anyway and proceed with the installation. The driver is completely tested and verified by ESI and safe to use. - Page 9 Prodigy 7.1 HiFi 4. After you complete the driver installation (by following all the instructions on screen), you should restart your computer. 5. After restarting Windows, you will see the Prodigy 7.1 HiFi control panel icon in your system tray (lower right corner of your desktop). Click on the icon to open the Prodigy 7.1 HiFi control panel.
-
Page 10: Windows Vista And Windows 7
Prodigy 7.1 HiFi You can choose each stereo device or multi channel device for your use as Default device on Sound playback or Sound recording which will be used as default in your audio applications. 7.2 Windows Vista and Windows 7 Turn on your computer. - Page 11 Prodigy 7.1 HiFi Controller driver will be completed and you need to click Close. To confirm the completion of the installation, please check if the ESI icon is displayed in the taskbar notification area as shown below.
-
Page 12: Prodigy 7.1 Hifi Control Panel
The Prodigy 7.1 HiFi control panel is installed in your system when you complete the driver installation. To open the panel, double click the red ESI icon in the system tray. While the Prodigy 7.1 HiFi control panel offers you complete control over various functions, you may find that the default settings work just fine for your needs. - Page 13 Prodigy 7.1 HiFi 1) Input: You can change the input level on channels 1/2 by clicking and dragging the fader bar. The number on the bottom shows the relative amount in dB. Clicking this number enables you to mute the channel. And you can choose input level MIC or LINE. 2) Output: You can change the output level on all channels by clicking and dragging the fader bar.
- Page 14 Prodigy 7.1 HiFi a) QSound Multi Speaker System (QMSS™): It is for multi-channel synthesis from mono and stereo content* - Outputs: 3, 4 and 5.1-channel speaker systems QXpander™: It is for mono-to-3D and stereo-to-3D stereo sound stage synthesis and enhancement* - Outputs: headphones or stereo speakers.
- Page 15 Prodigy 7.1 HiFi a) QSound Environmental Modeling: You can select your acoustic environment simulation from the choices b) Intensity: The intensity control for QEM™ 5. Equalizer The QSound Equalizer. a) EQ On: The On/Off switch for the EQ effect. 6. QEM QSound Environmental Modeling (QEM™) on/off.
- Page 16 Prodigy 7.1 HiFi 10. 3D effect QMSS and QXpander, QRumble™ on/off. 11. QRumble™ QRumble™ panel on/off. 12. DirectWIRE 3.0 Clicking this menu will open the DirectWIRE 3.0 screen. DirectWIRE 3.0 is a unique feature of the EWDM driver that transfers digital audio data internally within different applications. MME, Multi- MME, ASIO and GSIF indicate the different driver interfaces supported by Prodigy 7.1 HiFi.
-
Page 17: Directwire 3.0
1. What is DirectWIRE? DirectWIRE is a 100% purely digital wire! DirectWIRE is a driver technology, developed by from pro audio manufacturer ESI, which can be used for routing audio streams internally within applications using EWDM Audio/MIDI drivers, exclusively available for ESI and ESI. - Page 18 Prodigy 7.1 HiFi d) the ASIO column represents ASIO application’s I/O, for example from programs like Cubase, Logic, Reason, Nuendo, SONAR (in ASIO mode) or Samplitude. e) the GSIF column represents GSIF applications like GigaStudio. f) the numbers in the column on the left represent the number of each input or output port. You can patch the virtual cables from one point to another by draging your mouse.
- Page 19 Prodigy 7.1 HiFi 4) recording from ASIO input 5) recording ASIO playback in a WDM application 6) recording from GigaStudio (GSIF) to Cubase (ASIO)
-
Page 20: Application Setup
11. General Information Trademarks ESI, Prodigy and Prodigy 7.1 HiFi are trademarks of EGOSYS, Inc. and ESI Audiotechnik GmbH. Windows is a trademark of Microsoft Corporation. Other product and brand names are trademarks or registered trademarks of their respective companies. - Page 21 If necessary, consult an experienced radio/television technician for additional suggestions. Correspondence For technical support inquiries, contact your nearest dealer, local distributor or ESI support online at www.esi-audio.com. Disclaimer All features and specifications subject to change without notice.