Table of Contents
Advertisement
Advertisement
Table of Contents

Related Manuals for VTech V.Reader Interactive E-Reading System


Summary of Contents for VTech V.Reader Interactive E-Reading System
- Page 1 User’s Manual User’s Manual...
- Page 2 Dear Parent, At VTech® , we know how important reading is for your child’s development. We want to introduce children to reading in a dynamic, engaging way that will make them readers for life. That’s why we created V.Reader where reading comes alive with animated storytelling! In these animated books, stories come to life through colorful scenes, voices, sounds and music.
-
Page 3: Table Of Contents
CONTENTS IntroductIon ..............Included in This Package ............Product Features ............GettInG started ............Battery Installation ..............Battery Notice ................ AC Adaptor ................Standard Guidelines for Adaptor Toys........How to Play ......................... • STEP 1: Insert the Storybook Cartridge V.reader .......... -
Page 4: Introduction
INTRODUCTION V.reader animated e-Book system! Thank you for purchasing the VTech ® V.reader is an animated storyteller that brings books to life in a kid-tough, touch screen reading system for 3 - 7 year olds. With V.reader your child will discover the joy of reading while watching well-loved characters and stories in vivid animations. -
Page 5: Product Features
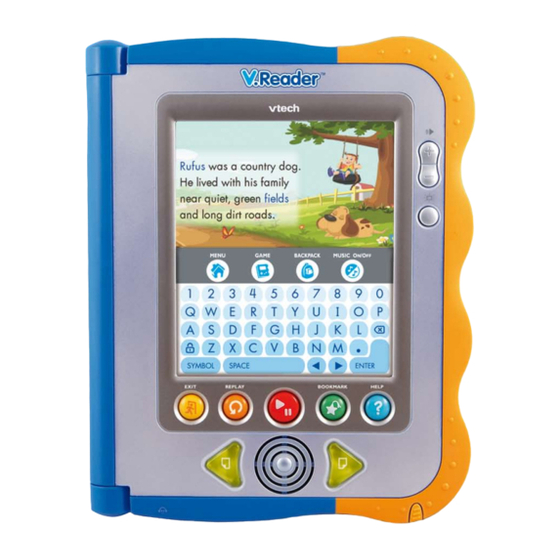
PRODUCT FEATURES ON / Off Button USB Port Volume Button Brightness Button Touch Screen Headphone Jack See-through Cover DC Power Jack Pen & V.Reader Pen Holder Features actIon ON / Off Button Press and hold this button to turn the unit on or off. Always do this before removing a cartridge. - Page 6 Page Arrow Next Turn to the next page. Page Arrow QWERTY KEYPAD Press the keys to type in your user name, write a welcome message, or enter answers for some reading game questions. 2010 © VTech Printed in China 91-002452-007-000...
-
Page 7: Getting Started
Storybook Cartridge Slot SD Card Slot Battery Compartment Battery Cover Features FunctIon Storybook Cartridge Slot Insert the V.reader storybook cartridge into the slot to read and play. SD Card Slot Insert an SD card (not included). Please see pages 11 &12 for more information. -
Page 8: Ac Adaptor
• Use a standard 9V AC/DC adaptor. We recommend the ® use of a VTech 9V AC/DC adaptor. • Make sure the unit is turned off. • Plug the power cord into the 9V socket on the bottom of the V.reader •... -
Page 9: How To Play
How to Play STEP 1: Insert the Storybook Cartridge Make sure the unit is turned off. Insert the V.reader storybook cartridge firmly down into the cartridge slot located on the back of the unit and push until it clicks into place. The label should face away from you (image 3). -
Page 10: Activities
Storybook Cartridge If a V.reader storybook cartridge is inserted properly, you will see it displayed as a book in the System Menu. Touch the book to read the story and play reading games. Backpack Touch the Backpack icon to see what you have saved on your V.reader . -
Page 11: Watch The Story
settings: Touch the Settings icon to turn the background music and vocabulary highlight feature on or off. Watch the Story There are two ways to start Watch the Story. You can choose Whole Story to enjoy the entire story narration from the beginning, or touch Bookmark to go right to your bookmarked page. -
Page 12: Reading Games
• Press to save a bookmark for the current page. • Press or the onscreen arrow icon to restart the automatic story narration. Reading Games Play 8 reading games to have fun with the story while developing your reading skills. The reading comprehension game “What Happened?”... -
Page 13: Story Dictionary
Reading Game Curriculum - What’s That Noise? reading Game title reading Game curriculum What Happened? Reading Comprehension Same Sounds Onomatopoeia In the Beginning Beginning Sounds/Beginning Letters Silly Syllables Syllables Capital Idea Capital & Lowercase Letters Hello! ¡Hola! Bonjour! Foreign Languages Opposites Attract Antonyms Rhyme Time... -
Page 14: Using The V.reader Tm Touch Screen
Using the V.Reader Touch Screen V.reader has a touch-sensitive screen that you can interact with by using your finger or the included pen. Lightly touch the screen with your finger or the pen. MENU GAME HIGHLIGHT MUSIC OFF MENU GAME HIGHLIGHT MUSIC OFF note:... -
Page 15: Connecting To A Computer
Connecting to a Computer Connecting to a Computer • Download the setup program from www.vtechkids.com/download for US and www.vtechcanada.com/toysdownload for Canada and install it onto your computer. • Insert an SD card into your V.reader , as shown above. • Turn on your V.reader •... -
Page 16: Computer Requirements
note : Do not disconnect V.reader or the computer while files are downloading. After you have finished, turn off the unit to save power. When not connected to a computer, please close the USB port cover on the V.reader , for safety. Computer Requirements Computer Requirements Pc Hardware requirements:... -
Page 17: Care & Maintenance
CARE & MAINTENANCE 1. Keep your V.reader clean by wiping it with a slightly damp cloth. Never use solvents or abrasives. 2. Keep it out of direct sunlight and away from direct sources of heat. 3. Remove the batteries when not using it for an extended period of time. 4. -
Page 18: Technical Support
No screen display Battery power low Replace the battery. after pressing Incomplete battery Make sure batteries are installed in both ON/Off button installation battery compartments. No AC adaptor Securely connect the AC adaptor or car power adaptor to both the V.reader and the power source. -
Page 19: Copyright Notices
® North America, L.L.C. and its suppliers assume no responsibility for any loss or claims by third parties that may arise through the use of this software. Vtech ® Electronics North America, L.L.C. and its suppliers assume no responsibility for any damage or loss caused by deletion of data as a result of malfunction, dead battery, or repairs. - Page 20 • Reorient or relocate the receiving antenna. • Increase the separation between the equipment and receiver. • Connect the equipment into an outlet on a circuit different from that to which the receiver is connected. • Consult the dealer or an experienced radio/TV technician for help. This device complies with Part 15 of the fCC Rules.