Table of Contents
Advertisement
Quick Links
Advertisement
Table of Contents
Troubleshooting

Related Manuals for Actron CP9180


Summary of Contents for Actron CP9180
- Page 1 CP9180 ® AutoScanner Plus P/N 0002-000-2935...
-
Page 2: Tool Information
Refer to section 3-7 to get the Serial Number (Serial No) and Software Identification (SW ID.) If you have questions or concerns Contact Technical Support: 1-800-228-7667 • Phone: • Website: www.actron.com • Mail: SPX Service Solutions 15825 Industrial Parkway Cleveland, Ohio 44135 Attn: Technical Support Copyright Information Copyright ©... -
Page 3: Table Of Contents
Table of Contents Safety Precautions Section 1 – Using This Manual Section 2 – Getting Started Introduction ..........2-1 Using the CD . - Page 4 Connecting The Scan Tool ........3-12 Vehicle Selection.
-
Page 5: Safety Precautions
Safety Precautions For your safety, read this manual thoroughly before operating your Scan Tool. Always refer to and follow safety messages and test procedures provided by the manufacturer of the vehicle or equipment being tested. The safety messages presented below and throughout this user’s manual are reminders to the operator to exercise extreme care when using this test instrument. -
Page 6: Type Styles Used
Safety Precautions Type Styles Used: Safety messages contain three different type styles. • Normal type states the hazard. • Bold type states how to avoid the hazard. Italic type states the possible consequences of not avoiding the • hazard Icons used: An icon, when present, gives a graphical description of a potential hazard. -
Page 7: Important Safety Messages
Safety Precautions Important Safety Messages Risk of electric shock. • Do not exceed voltage limits between inputs indicated in the Specifications. • Use extreme caution when working with circuits that have voltage greater than 60 volts DC or 24 volts Electric shock can cause injury. - Page 8 Safety Precautions • Avoid making an accidental connection between the battery terminals. Do not place uninsulated metal tools on the battery. • When removing battery cables, remove the ground cable first. • Avoid sparks when connecting or disconnecting power leads to the battery. •...
- Page 9 Safety Precautions Battery acid is a highly corrosive sulfuric acid. WARNING • Safety goggles and protective gloves must be worn by the operator and any bystanders. - Even if your everyday glasses have impact resistant lenses, they are NOT safety glasses, and may not provide adequate protection.
- Page 10 Safety Precautions Risk of fire. • Safety goggles and protective clothing must be worn by the operator and any bystanders. - Even if your everyday glasses have impact resistant lenses, they are NOT safety glasses, and may not provide adequate protection. •...
- Page 11 Safety Precautions Risk of burns. Batteries can produce a short-circuit current high • enough to weld jewelry to metal. - Remove jewelry such as rings, bracelets and watches before working near batteries. Short circuits can cause injury. Risk of burns. WARNING •...
- Page 12 Safety Precautions Engine compartment contains electrical connections and hot or moving parts. • Keep yourself, test leads, clothing and other objects clear of electrical connections and hot or moving engine parts. • Do not wear watches, rings, or loose fitting clothing when working in an engine compartment.
- Page 13 Safety Precautions Risk of unexpected vehicle movement. WARNING • Block drive wheels before performing a test with engine running. • Unless instructed otherwise: PRNDL2 - set parking brake - put gear selector in neutral for manual transmissions - put gear selector in park for automatic transmissions - disconnect release mechanism on the automatic parking brake release for testing and reconnect when testing is completed.
- Page 14 Safety Precautions Misdiagnosis may lead to incorrect or improper repair CAUTION and/or adjustment. • Do not rely on erratic, questionable, or obviously erroneous test information or results. - If test information or results are erratic, questionable, or obviously erroneous, make sure all connections and data entry information are correct and test procedures were performed correctly.
-
Page 15: Section 1 - Using This Manual
Section 1 – Using This Manual This manual contains instructions for the use and setup of your Scan Tool. A table of contents and glossary are provided to make this manual easy to use. Some of the information shown in text or illustrations is obtained using optional equipment. - Page 16 Using This Manual Functions and Selections Diagnostic and tool functions performed by the Scan Tool are highlighted in bold. Example: The View Data function allows you to view the vehicle’s parameter identification (PID) data in real time. Menus The menus on the Scan Tool display are referenced in the procedures and are highlighted in bold-italic text.
-
Page 17: Section 2 - Getting Started
Section 2 – Getting Started Introduction The Scan Tool was developed by experts in the automotive service industry to help diagnose vehicles and assist in troubleshooting procedures. The Scan Tool monitors vehicle events and retrieves codes from the vehicle’s control modules to help pinpoint problem areas. All information, illustrations and specifications contained in this manual are based on the latest information available from industry sources at the time of publication. -
Page 18: Using The Cd
Getting Started Using the CD ✓ The included CD is NOT required to operate the Scan Tool ✓ Install the CD application prior to connecting the Scan Tool to the ✓ Some of the items included on the CD are: ❒... -
Page 19: Installing Applications On Included Cd
Getting Started Installing Applications On Included CD 1. Close all programs on the computer. 2. Place the CD in CD-Drive. ✓ If CD does not start automatically; ❒ Select the Start button. ❒ Select Run... ❒ Enter “X:\Setup.htm” in Open Box on Computer and select OK. -
Page 20: Vehicle Service Information
Getting Started Vehicle Service Information The following is a list of web sites and phone numbers where electronic engine control (EEC) diagnostic information is available. ✓ Some manuals may be available at your local dealer, auto parts stores or local public libraries. Domestic Vehicles Web Site Phone Number... - Page 21 Getting Started Hyundai www.hyundai.com 1-800-633-5151 Infiniti www.infiniti.com 1-800-662-6200 Nissan www.nissanusa.com 1-800-nissan1 www.kia.com 1-800-333-4542 Mazda www.mazda.com 1-800-222-5500 Daewoo www.daewoo.com 1-822-759-2114 Subaru www.subaru.com 1-800-SUBARU3 Isuzu www.isuzu.com 1-800-255-6727 Not Available Not Available Mitsubishi www.mitsubishi.com 1-888-MITSU2004 Suzuki www.suzukiauto.com 1-800-934-0934 Other Manuals Chilton Book Company www.chiltonsonline.com 1-800-347-7707 Haynes Publications...
-
Page 22: Introduction To On-Board Diagnostics
Getting Started Introduction to On-Board Diagnostics OBD II On-board diagnostics version II (OBD II) is a system that the Society of Automotive Engineers (SAE) developed to standardize automotive electronic diagnosis. Beginning in 1996, most new vehicles sold in the United States were fully OBD II compliant. -
Page 23: Diagnostic Link Connector (Dlc)
Getting Started Diagnostic Link Connector (DLC) The Data Link Connector (DLC) is used with scan tool to communicate with the vehicle’s control module. ✓ Data Link Connector Location. ❒ Under dashboard on driver side of vehicle. ❒ If Data Link Connector is not located under dashboard, a label should be there telling location. -
Page 24: Obd Ii Diagnostic Trouble Codes (Dtcs)
Getting Started OBD II Diagnostic Trouble Codes (DTCs) ✓ DTCs are used to help determine the cause of a problem or problems with a vehicle. ❒ DTCs consist of a five-digit alphanumeric code. ❒ The DTCs format and general code types are shown below. P 0 1 0 1 Bx - Body Cx - Chassis... - Page 25 Getting Started Lower Upper Assigned DTC System Lower Upper Assigned DTC System P0000 P00FF Fuel Air Metering Auxiliary Manufacturer Control Emission Controls P1600 P16FF Auxiliary Inputs Auxiliary Outputs P0100 P02FF Fuel Air Metering P1700 P19FF Manufacturer Control P0300 P03FF Ignition System or Misfire Transmission P0400 P04FF Auxiliary Emission Controls Fuel Air Metering Auxiliary...
-
Page 26: Getting Started
Getting Started 2 – 10 • • • • • • • • • • • • • • • • • • • • • • • • • • • • • • • • • • • • • • • • • • • • • • • • • • • • • • •... -
Page 27: Section 3- Using The Scan Tool
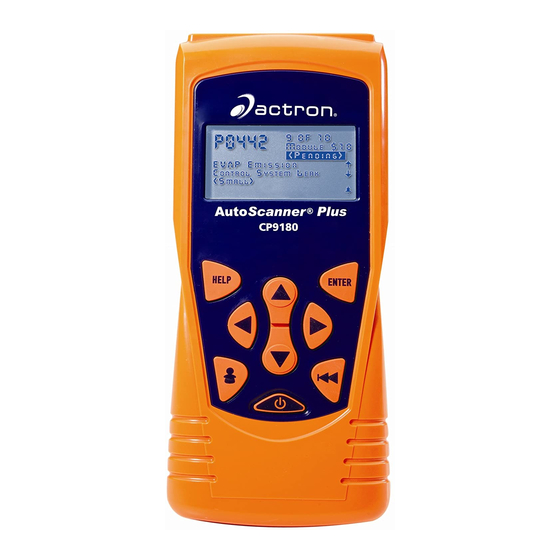
Section 3 – Section 3 – Using The Scan Tool The Scan Tool LCD Display – backlit, 128 x 64 pixel display with contrast adjustment. UP and DOWN arrow keys – moves selection UP or DOWN, or selects YES or NO. ENTER key –... -
Page 28: Specifications
Using The Scan Tool Specifications Display: Backlit, 128 x 64 pixel display with contrast adjust Operating Temperature: 0 to 50°C (32 to 122°F) Storage Temperature: -20 to 70°C (-4 to 158°F) Internal Power: 9V Battery External Power: 7 to 16 Volts ✓... -
Page 29: Display
Using The Scan Tool • Phone at 1-800-228-7667 (8:00 - 6:00 EST Monday - Friday) Display The display has a large viewing area displaying messages, instructions, and diagnostic information. ✓ The back-lit liquid crystal display (LCD) is a 128 x 64 pixel display. ❒... -
Page 30: Scan Tool Power Up
Using The Scan Tool Scan Tool Power UP ✓ Refer to Scan Tool Does Not Power Up in section 5 Troubleshooting on page 5-2 if there are problems. Internal Battery ✓ ON/OFF button on Scan Tool turns tool on and off. ❒... -
Page 31: System Setup
Using The Scan Tool Vehicle Power When using the OBD II Cable, the power to the Scan Tool comes from the vehicle DLC. ✓ Diagnostic Connector Scan Tool will automatically turn on when connected to vehicle. System Setup ✓ System Setup allows: ❒... -
Page 32: Changing Display Contrast
Using The Scan Tool Changing Display Contrast From System Setup screen: 1.Select Contrast Adjust. UP or DOWN arrow •Use SYSTEM SETUP ===================== key until Display Contrast is Contrast Adjust highlighted. Display Test Keypad Test ENTER. •Press Memory Test Tool Information Program Mode 2.Increase or Decrease Display Contrast. -
Page 33: View Tool Information
Using The Scan Tool 3.Save Contrast Setting. ENTER. •Press ✓ ENTER Press again to return to theSystem Setup menu. View Tool Information ✓ This function allows you to view specific tool information that may be needed when contacting customer service. From System Setup menu: 1.Select Tool Information. -
Page 34: Display Test
Using The Scan Tool 4.Return to Setup Tool Menu. BACK key. •Use the ENTER Key. •Use the Display Test The Display Test is used to check the display. ✓ The test fills every pixel of the display with a solid black character. From System Setup menu: 1.Select Display Test. -
Page 35: Keypad Test
Using The Scan Tool Display Test Check for missing spots in display Press Back to Quit BACK Key. 4. When Done, Press Keypad Test The Keypad Test is used to verify keys are working correctly. From System Setup menu: 1.Select Keypad Test. UP or DOWN arrow •Use... -
Page 36: Memory Test
Using The Scan Tool 2. Press a KEY. • Key name or scroll direction should inverse colors on display. BACK • The only exception is the BACK key is pressed, key. When System Setup menu returns. ✓ If System Setup menu does not return, BACK key is not working then correctly. -
Page 37: Program Mode
Using The Scan Tool ✓ The tool reports its progress on the bottom of the display. Tool Information ===================== ❒ Memory Test may take S/N: 1234567 several minutes to complete. SWID: A7B1 ❒ Memory Test results display. ❒ If no problems were Press BACK to Exit detected, then PASS is dis- played... -
Page 38: Connecting The Scan Tool
Using The Scan Tool Connecting The Scan Tool To diagnose a vehicle, connect the OBD II Cable to the Scan Tool. If you just want to power up the tool to do self-tests, code lookup, review or printing data from the last vehicle tested, then you do not need to attach the OBD II Cable. -
Page 39: Vehicle Selection
Using The Scan Tool Vehicle Selection Vehicle Selection will be displayed for Read Codes and Pending Codes when a manufacturer specific DTC was retrieved from the vehicle. Vehicle selection may also be required when looking up a manufacturer specific DTC in Code Lookup. 1.Select desired vehicle to diagnose. - Page 40 Using The Scan Tool ✓ On GM vehicles the tool may require you to look at the VIN to determine the Series, Model, Engine Size and more. ❒ For example a GM Tahoe may be considered a K1500 series. GM Typical VIN 1 2 3 4 5 6 7 8 9 10 11 12 13 14 15 16 17 VIN Position Description of Number...
-
Page 41: Review Data
Using The Scan Tool Review Data ✓ The Review Data function allows the user to view the information from the previous vehicle tested. ✓ Review Data is available from both the Main Menu and OBD II function list. ✓ Scan Tool does not require power from the vehicle to use the Review Data function. -
Page 42: Playback
Using The Scan Tool Playback The Playback function is used to playback a recording. ✓ This function is very similar to View Data. The only difference is that View Data is real time viewing of PIDs, while Playback is a viewing of previously recorded PIDs. - Page 43 Using The Scan Tool ✓ The Playback has frame number and timestamp (in seconds). ENGINE (RPM) CALC LOAD (%) ❒ Negative frames and MAP (KPA) timestamps indicate data COOLANT (F) LT FTRM1 (%) recorded before trigger event. ST FTRM1 (%) ❒...
-
Page 44: Print Data
Using The Scan Tool Print Data The Print Data function allows the printing of diagnostic information stored in the Scan Tool. ✓ The Scan Tool’s internal battery power can be used to print data. ✓ Print Data is available from both the Main Menu and OBD II Function List. -
Page 45: Code Lookup
Using The Scan Tool ✓ When selected data does not exist in the Scan Tool’s memory, a message informs the user to run the function. 3.Return to Select Print Data screen. ENTER •Press Code Lookup Code Lookup is used to look up definitions of DTCs stored in the Scan Tool. - Page 46 Using The Scan Tool 3.Enter code. •All characters must be entered •Only one character can be P0001 changed at a time. Press & LEFT or RIGHT change selected digit •Use Press & arrow keys to scroll to desired select another digit Press ENTER to view character.
-
Page 47: Vehicle Diagnostics
Section 4 – Vehicle Diagnostics ✓ The first time the scan tool links to the vehicle, the communication protocol is automatically detected, and is used until the Scan Tool is turned off. ✓ If an Error Message displays, make sure the OBDII connector is attached, and the ignition key is on. -
Page 48: Obd Ii Function List
Vehicle Diagnostics OBD II Function List ❒ I/M Readiness OBD II Function List ❒ ===================== Read Codes I/M Readiness ❒ Pending Codes Read Codes Pending Codes ❒ Erase Codes Erase Codes ❒ State OBD Check State OBD Check View Data ❒... -
Page 49: I/M Readiness
Vehicle Diagnostics I/M Readiness The I/M Readiness (Inspection / Maintenance) function is used to view a snapshot of the operations for the emission system on OBD II vehicles. ✓ I/M Readiness is a very useful function. To guarantee no faults exist make sure all monitors are ok or n/a and no DTC’s exist. - Page 50 Vehicle Diagnostics From OBD II Function List: 1. Select I/M Readiness. UP or DOWN arrow •Use Special Tests Menu key until I/M Readiness is I/M Readiness I/M Readiness Drive Cycle Monitor highlighted. State OBD Check ENTER. •Press O2 Monitor Test Diag Mon Tests On-Board Systems Vehicle Info...
- Page 51 Vehicle Diagnostics Abbreviations and names for OBD II Monitors supported by the Scan Tool are shown below. They are required by the United States Environmental Protection Agency (EPA). Not all monitors are supported by all vehicles •Abbreviated Name Expanded Name - Misfire Monitor Misfire Monitor - Fuel System Mon...
-
Page 52: Read Codes
Vehicle Diagnostics Read Codes ✓ The Read Codes function allows the Scan Tool to read the DTCs from the vehicle’s control modules. DTCs are used to help determine the cause of a problem or problems with a vehicle. These codes cause the control module to illuminate the malfunction indicator lamp (MIL) when emission-related or driveability fault occurs. - Page 53 Vehicle Diagnostics 3. View and write down DTCs. UP or DOWN arrow key. •Use ❒ In the example shown module $18 is reporting the DTCs. P0113 1 of 3 MOD $18 IAT Sensor 1 Circuit High Input 4. Return to OBD II Function List. BACK •...
-
Page 54: Pending Codes
Vehicle Diagnostics Pending Codes Pending Codes are also referred to as continuous monitor or maturing codes. An intermittent fault causes the control module to store a code in memory. If the fault does not occur within a certain number of warm-up cycles (depending on vehicle), the code clears from memory. -
Page 55: Erase Codes
Vehicle Diagnostics 3. If Pending Codes are Present. •View and write down codes using UP or DOWN arrow key. ✓ See “Read Codes” on page 4-6 for details of how DTCs are shown. 4. Return to OBD II Function List. BACK •... - Page 56 Vehicle Diagnostics ✓ Perform Erase Codes function only after systems have been checked completely and DTCs have been written down. ✓ After servicing the vehicle, erase stored DTCs and verify no codes have been reset. If a DTC returns, problem has not been fixed or other faults are present.
- Page 57 Vehicle Diagnostics 2. Select Yes to erase diagnostic results and Erase Codes codes. ===================== Are you sure you •Press want to Erase Diagnostic Results and Codes? 3. Prepare Vehicle. •Turn key on. Erase ===================== •Leave engine off. Engine is Running ENTER.
-
Page 58: State Obd Check (Emissions)
Vehicle Diagnostics State OBD Check (Emissions) The State OBD Check function is used to display a basic status of the vehicles OBD system. ❒ Malfunction Indicator Lamp (MIL) Status ❒ Codes Found ❒ I/M Readiness ✓ The State OBD Check function has the following areas: ❒... -
Page 59: View Data
Vehicle Diagnostics From the OBD II Function List: 1. Select State OBD Check OBD II Function List UP or DOWN arrow ===================== •Use I/M Readiness Read Codes key until State OBD Check is Pending Codes highlighted Erase Codes ENTER . State OBD Check •Press View Data... - Page 60 Vehicle Diagnostics From OBD II Function List 1. Select View Data. UP or DOWN arrow •Use OBD II Function List ===================== key until View Data is I/M Readiness highlighted. Read Codes Pending Codes ENTER. •Press Erase Codes State OBD Check View Data 2.
- Page 61 Vehicle Diagnostics View Entire List. ✓ View Entire List shows all supported PID data for the vehicle being tested. From Select Data to View menu: Select Entire Data List. UP or DOWN arrow •Use Select Data to View ===================== key until Entire Data List is Entire Data List highlighted.
- Page 62 Vehicle Diagnostics Custom List Select ✓ The Custom Data List allows certain PIDs from the View Entire Data List, such as those PIDs that apply to a specific driveability symptom or system, to be selected. From Select Data to View menu: Select Custom List Select.
- Page 63 Vehicle Diagnostics ✓ Selected PIDs are kept until: ❒ Another vehicle is selected. ❒ You erase data stored in the Scan Tool from the previous vehicle tests. View PIDs on Scan Tool. UP or DOWN arrow •Use A/C PRESS (psi) 15.5 key.
-
Page 64: View Freeze Data
Vehicle Diagnostics Customize Lines ✓ The Customize Lines allows the number of lines to be shown at one time to be set from 1 to 8. ✓ Selecting fewer lines provides faster update speeds. The default is a eight-line display. From Select Data to View menu: Select Customize Lines. - Page 65 Vehicle Diagnostics From OBD II Function List: 1. Select View Freeze Data. UP or DOWN arrow •Use OBD II Function List ===================== key until View Freeze Data is View Fre eze Data highlighted. Drive Cycle Monitor O2 Monitor Test ENTER. •Press Diag Monitor Tests On-Board Systems...
-
Page 66: Drive Cycle Monitor
Vehicle Diagnostics Drive Cycle Monitor The Drive Cycle Monitor function is very similar to the I/M Monitors though the Drive Cycle Monitor is used to view REAL TIME operations of the Emissions System on OBD II vehicles. ✓ Drive Cycle Monitor continuously updates as the vehicle reports operations of the Emission System. - Page 67 Vehicle Diagnostics From the OBD II Function List: 1. Select Drive Cycle Monitor. UP or DOWN arrow •Use OBD II Function List ===================== key to highlight Drive Cycle View Fre eze Data Drive Cycle Monitor Monitors. O2 Monitor Test ENTER. •Press Diag Monitor Tests On-Board Systems...
- Page 68 Vehicle Diagnostics 3.Depending on the Drive Cycle Monitors one of these 2 screens will be present. Since DTCs Cleared This Drive Cycle ===================== ===================== Catalyst Mon Catalyst Mon Htd Catalyst Htd Catalyst Evap System Mon Evap System Mon ✓ The Scan Tool display is continuously updated.
-
Page 69: O2 Monitor Test
Vehicle Diagnostics O2 Monitor Test OBD II regulations require applicable vehicles monitor and test oxygen (O2) sensors to determine problems related to fuel and emissions. The O2 Monitor Test allows retrieval of completed O2 sensors monitor test results. ✓ The O2 Monitor Test is not an on-demand test. O2 sensors are not tested when selected via the menu. - Page 70 Vehicle Diagnostics From the OBD II Function List: 1. Select O2 Monitor Test. UP or DOWN arrow •Use OBD II Function List key until O2 Monitor Test is ===================== View Fre eze Data highlighted. Drive Cycle Monitor ENTER. O2 Monitor Test •Press Diag Monitor Test On-Board Systems...
-
Page 71: Diagnostic Monitor Tests
Vehicle Diagnostics 4. Return to O2 Monitor Tests menu. BACK •Press 5. Return to OBD II Function List. BACK •Press Diagnostic Monitor Tests The Diagnostic Monitor Test function is useful after servicing or after erasing a vehicle’s memory. Test results do not necessarily indicate a faulty component or system. - Page 72 Vehicle Diagnostics 2. Review test results displayed on Scan Tool. Select Diag Mon Test UP or DOWN arrow ===================== •Use key until desired test results is highlighted. ENTER. •Press ✓ Refer to appropriate vehicle service manual for test IDs and Non-CAN Vehicles definitions.
- Page 73 Vehicle Diagnostics ✓ On Non-CAN vehicles the Scan Tool displays: Test $53 Data ==================== ❒ Test data (test ID) ❒ MAX: Maximum value (MAX) MEAS: ❒ MIN: ---- Test measurements (MEAS) STS: ❒ Minimum value (MIN) MOD: ❒ Status (STS) ❒...
-
Page 74: On-Board Systems
Vehicle Diagnostics 3. Return to Select Diag Mon Test Menu. BACK •Press key. 4. Return to OBD II Function List. BACK •Press key. On-Board Systems The On-Board Systems test allows the Scan Tool to control operation of vehicle components, tests or systems. ✓... -
Page 75: Record Data
Vehicle Diagnostics 3. Return to On-Board Systems menu. BACK •Press key. 4. Return to OBD II Function List. BACK •Press key. ✓ The manufacturer is responsible for determining the criteria to automatically stop test. Refer to appropriate vehicle service manual. Record Data ✓... - Page 76 Vehicle Diagnostics From OBD II Function List: 1. Select Record Data. UP or DOWN arrow •Use OBD II Function List ===================== key until Record Data is O2 Monitor Test highlighted. Diag Monitor Tests On-Board Systems ENTER. •Press Record Data Vehicle Information Modules Present Review Data ✓...
- Page 77 Vehicle Diagnostics 3. From the Select Trigger Method Screen. Select Trig Method UP or DOWN arrow ===================== •Use Manual Trigger key until desired trigger Trigger on Codes method is highlighted. ENTER. •Press ✓ ENTER key) When trigger event (either a DTC or a Press of the occurs, time is recorded and data is saved.
-
Page 78: Vehicle Info
Vehicle Diagnostics 4. After recording, Scan Tool displays a prompt to Record Data Playback Data. Playback Data? • Answer No to return to OBD II Function List. •Answer Yes to display <Yes> <No> recorded data. ❒ Refer to Playback from Review Data and press ENTER . - Page 79 Vehicle Diagnostics From the OBD II Function List: 1. Select Vehicle Information. UP or DOWN arrow •Use OBD II Function List key until Vehicle Information ===================== View Fre eze Data is highlighted. Drive Cycle Monitor O2 Monitor Test ENTER. •Press Diag Monitor Test On-Board Systems Record Data...
-
Page 80: Modules Present
Vehicle Diagnostics Modules Present The Scan Tool identifies the module IDs and communication type for OBD II modules in the vehicle. From the OBD II Function List: 1. Select Modules Present. UP or DOWN arrow •Use OBD II Function List key until Modules Present is ===================== O2 Monitor Test... - Page 81 Vehicle Diagnostics ❒ SAE J1850 protocol is shown as VPWM or PWM. Modules Present ===================== Protocols $10 VPWM* $1A VPWM* Modules Present ===================== Protocols $10 PWM* $1A PWM* ❒ ISO 15765-4 protocol is shown as CAN. Modules Present ===================== Protocols $01 CAN*7e9 $00 CAN*7e8 ✓...
- Page 82 Vehicle Diagnostics •ISO 14230-4 protocol is shown as K2K (Keyword 2000.) Modules Present ===================== Protocols $10 K2K* $1A K2K* ✓ In the above examples the * indicates the protocol used to communicate to the vehicle’s control module. 4 – 36 • • • • • • • • • • • • • • • • • • • • • • • • • • • • • • • • • • • • • • • • • • • • • • • • • • • • • • • •...
-
Page 83: Section 5 - Troubleshooting
Section 5 – Troubleshooting How to Use On-Line Help Scan tool contains On-Line Help for specific Scan Tool screens, functions, and error messages. ✓ When icon (?) appears in the right column of the display, On-Line Help is available. To Use On-Line Help: HELP 1.Press Key. -
Page 84: Error Messages
Troubleshooting Error Messages Check the following if an error message displays: ❒ Verify ignition key is in the ON and not in the ACCESSORIES position. ❒ Make sure OBD II Cable is attached to vehicle’s data link connector (DLC) and Scan Tool. ❒... -
Page 85: Vehicle Communication Fault
Troubleshooting Vehicle Communication Fault The vehicle’s control module(s) enters into an unrecoverable state. 1.Turn vehicle key to off position. Vehicle Comm Fault • Wait 10 seconds. ===================== Please Turn the ENTER. • Press Key Off For 10 Seconds Press ENTER To Reset Tool. -
Page 86: Battery Replacement
Troubleshooting Battery Replacement The Scan Tool requires 9V alkaline battery to operate without vehicle power. ✓ When the battery needs to be replaced, the low-battery icon ( ) displays. ✓ Rechargeable batteries do not last as long as alkaline types and are not recommended. -
Page 87: Tool Self-Tests
• Toll-Free Number: 1-800-228-7667. • Website: www.actron.com • • • • • • • • • • • • • • • • • • • • • • • • • • • • • • • • • • • • • • • • • • • • • • • • • • • • • • • • • 5 – 5... -
Page 88: Troubleshooting
Troubleshooting 5 – 6 • • • • • • • • • • • • • • • • • • • • • • • • • • • • • • • • • • • • • • • • • • • • • • • • • • • • • • • • •... -
Page 89: Appendix A - Pid Definitions
Appendix A – PID Definitions Global PID Definitions All global parameter identification (PID) data listed were verified on actual vehicles to guarantee accuracy. PID definitions were obtained from reliable sources and are accurate at time of printing. It is possible that some newer vehicles may contain data different from what is listed. - Page 90 PID Definitions Global Data Parameter List: ABS FRP Absolute Fuel Rail Pressure FUEL PRES ABS LOAD Fuel System Pressure Absolute Load Value FUEL SYS x ABSLT TPS Fuel System x Loop Status Absolute Throttle Position ACC POS x Intake Air Temperature Accelerator Position x IGN ADV BARO PRS...
-
Page 91: Vehicle Power
• • • • • • • • • • • • • • • • • • • • • • • • • • • • • • • • • • • • • • • • • • • • • • • • • • • • • • • • PID Definitions ST FTRM x TROUB CODE Short Term Fuel Trim Bank x... -
Page 92: Pid Definitions
PID Definitions A – 4 • • • • • • • • • • • • • • • • • • • • • • • • • • • • • • • • • • • • • • • • • • • • • • • • • • • • • • • •... -
Page 93: Appendix B - Glossary
Appendix B – Glossary A/C: Air Conditioner A/D: Analog to Digital A/F: Air/Fuel ratio. The proportion of air and fuel delivered to the cylinder for combustion. For example, an A/F ratio of 14:1 denotes 14 times as much air as fuel in the mixture. - Page 94 Glossary BCM: Body Control Module Boost Control Solenoid: A solenoid that is energized by the PCM, in order to control turbo/supercharger boost pressure. Brake Switch Signal: An input signal to the PCM indicating that the brake pedal is being pressed. This signal is typically used to disengage Cruise Control systems and Torque Converter Clutch (TCC) solenoids.
- Page 95 • • • • • • • • • • • • • • • • • • • • • • • • • • • • • • • • • • • • • • • • • • • • • • • • • • • • • • • • • • • • • Glossary CTS: Coolant Temperature Sensor.
- Page 96 Glossary EFI: Electronic Fuel Injection. Any system where a computer controls fuel delivery to the engine by using fuel injectors. EGR: Exhaust Gas Recirculation. The PCM uses the EGR system to recirculate exhaust gases back into the intake manifold to reduce emissions. EGR is used only during warm engine cruise conditions.
- Page 97 • • • • • • • • • • • • • • • • • • • • • • • • • • • • • • • • • • • • • • • • • • • • • • • • • • • • • • • • • • • • • Glossary IAC: Idle Air Control.
- Page 98 Glossary MAP: Manifold Absolute Pressure (sensor). Measures intake manifold vacuum or pressure and sends a frequency or voltage signal (depending on sensor type) to the PCM. This gives the PCM information on engine load for control of fuel delivery, spark advance, and EGR flow. MAT: Manifold Air Temperature (sensor).
- Page 99 • • • • • • • • • • • • • • • • • • • • • • • • • • • • • • • • • • • • • • • • • • • • • • • • • • • • • • • • • • • • • Glossary PCM: Powertrain Control Module.
- Page 100 Glossary ROM: Read-Only Memory. Permanent programming information stored inside the PCM, containing the information the PCM needs to operate a specific vehicle model/engine combination. RPM: Revolutions Per Minute SAE: Society of Automotive Engineers. Scan Tool: A device that interfaces with and communicates information on a data link. SDM: Sensing and Diagnostic Module Sensor x:...
- Page 101 • • • • • • • • • • • • • • • • • • • • • • • • • • • • • • • • • • • • • • • • • • • • • • • • • • • • • • • • • • • • • Glossary TDC: Top Dead Center.
- Page 102 Glossary Warm-up Cycle: Warm-up cycle is when the engine coolant temperature rises at least 40 degrees above that at engine start up. WOT: Wide-Open Throttle. The vehicle operating condition brought about when the throttle is completely (or nearly) open. The PCM typically delivers extra fuel to the engine and de-energizes the A/C compressor at this time for acceleration purposes.
-
Page 103: Warranty
SPX Corporation Limited Warranty THIS WARRANTY IS EXPRESSLY LIMITED TO ORIGINAL RETAIL BUYERS OF SPX ELECTRONIC DIAGNOSTIC TOOLS (“UNITS”). SPX Units are warranted against defects in materials and workmanship for one year (12 months) from date of delivery. This warranty does not cover any Unit that has been abused, altered, used for a purpose other than that for which it was intended, or used in a manner inconsistent with instructions regarding use. - Page 104 © 2006 SPX Corporation All Rights Reserved. Todos los derechos reservados. Tous droits réservés. P/N 0002-000-2935...