Table of Contents
Advertisement
Advertisement
Table of Contents

Related Manuals for AEG SANTO 75438 KG


Summary of Contents for AEG SANTO 75438 KG
- Page 1 SANTO 75438 KG User Manual Fridge Freezer...
- Page 2 Dear customer, Before placing your new refrigerator/freezer into operation please read the- se operating instructions carefully. They contain important information for safe use, for installation and for care of the appliance. Please keep these operating instructions for future reference. Pass them on to possible new owners of the appliance.
-
Page 3: Table Of Contents
Contents Safety ..........4 Disposal . -
Page 4: Safety
• Alterations or changes to the freezer are not permitted for reasons of safety. • If you use the refrigerator in a commercial application or forpurposes other than the cooling, freezing or frozen storage of foods,please obser- ve all valid legal regulations for your application. -
Page 5: Disposal
• Bottles and cans must not be placed in the freezer compartment. They can burst when the contents freeze, high carbonate content drinks can even explode! Never store lemonade, juices, beer, wine, sparkling wine etc. -
Page 6: Disposal Of Old Appliances
The carton parts are made from recycled paper and should be disposed of at a waste-paper recycling collection location. Disposal of old Appliances For environmental reasons, refrigeration appliances must be disposed of properly. This applies to your old appliance, and - at the end of its service life - for your new appliance as well. -
Page 7: Control Panel
G RESET button H Freezer section indicator I Temperature indicator for freezer section L Buttons for setting temperature for freezer section M Thermometer indicator for freezer section (with FROSTMATIC) Temperature setting buttons The temperature is adjusted using the „+“ (WARMER) and „-“ (COLDER) but- tons. -
Page 8: Temperature Displays
– a square or a letter in the temperature display of the fridge for a fault in the fridge, – a square or a letter in the temperature display of the freezer for a fault in the freezer. MODE button Different operating modes can be set using the MODE button. -
Page 9: Reset Button
– FROSTMATIC and COOLMATIC: Cooling for freezer section runs for 52 hours in continuous operation, frid- ge temperature value 2 °C for 6 hours. – HOLIDAY: Fridge temperature value approx.14 °C. – : Normal operation according to the required temperatures set. -
Page 10: Initial Start-Up
RATURE indicator goes out, if the temperature in the appliance has gone below the warning temperature. 3 Temperature settings set in the factory: +5 °C for the fridge section, -18 °C for the freezer section. 4. Set the refrigerator to the desired temperature (see section: "Tempera- ture Adjustment"). -
Page 11: Temperature Adjustment
5. Set the freezer temperature to -18 °C or colder (see section: "Tempera- ture Adjustment"). Do not load freezer with goods until a temperature of -18 °C has been rea- ched, or until the red warning indicator light has gone out.. -
Page 12: Operating Modes
This automatically sets a desired temperature of +2 °C for the fridge section for 6 hours. Cooling for the freezer section runs for 1 hour in continuous operation. -
Page 13: Frostmatic And Coolmatic
When the FROSTMATIC and COOLMATIC functions are combined, a desired temperature of +2 °C is automatically set for the fridge section for 6 hours. Cooling for the freezer section runs for 52 hours in continuous operation. 1. Press the MODE button repeatedly until FROSTMATIC and COOLMATIC are flashing in the display at the same time. -
Page 14: Switching The Appliance Off
The system warns: – when there was a power cut; – when the temperature in the refrigerator or freezer compartment is too high; – if there are functional disturbances at the appliance. -
Page 15: Temperature Warning
– a square or a letter in the temperature display of the fridge for a fault in the fridge, – a square or a letter in the temperature display of the freezer for a fault in the freezer. 1. Using the RESET button you can switch off the alarm and the flashing red light. -
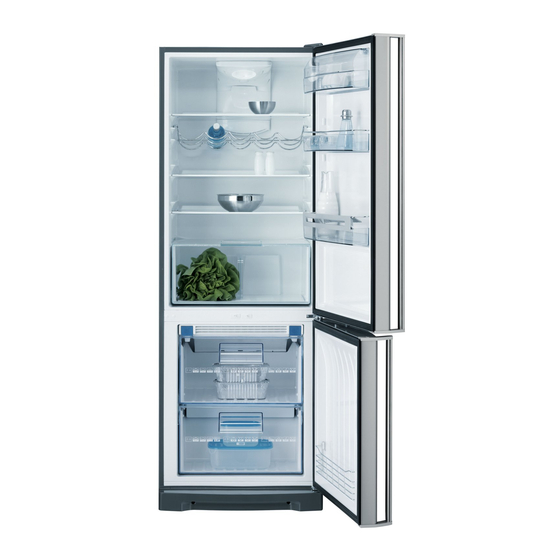
Page 16: Interior Accessories
Interior Accessories Storage shelves • You should always slide one of the full size glass storage shelf into the lowest set of guides, above the fruit and the vegetable containers, and keep it in this position. • The height of the storage shelves can be adjusted: •... -
Page 17: Drawer
Drawer The drawer is suitable for storing fruit and vegetables. There is a separator inside the drawer that can be placed in different posi- tions to allow for the subdivision best suited to personal needs. There is a grille on the bottom of the drawer to separate the fruit and vegetables from any humidity that may form on the bottom... -
Page 18: Air Recycling
Air recycling The refrigerator compartment is equipped with a special D.A.C. (Dynamic Air Cooling) fan which is automatically activated when the shopping mode is selected and under high ambient temperature conditions. This device allows for rapid cooling of foods and a more uniform temperature in the com- partment. -
Page 19: Freezing And Storing Frozen Food
• Bottles and cans must not be placed in the freezer. They can burst when the contents freeze, high carbonate content drinks can even explode! Never store lemonade, juices, beer, wine, sparkling wine etc. -
Page 20: Ice Cube Production
These are insert on the sides of the upper freezer drawer. Pull out the upper freezer draw- er. Extract the ice-tray. Pull out the top. Fill with water to the limit indi- cated. -
Page 21: Installation Of The Charcoal Filter
Installation of the charcoal filter On delivery the charcoal fil- ter is placed in a plastic bag to secure the length of life of the charcoal filter. The filter should be placed behind the flap before the appliance is turned on. •... -
Page 22: Defrosting
Remove frozen food and the food from the refrigerator. Wrap frozen food in several layers of newspaper. Store it in a cool place, well covered. Defrost the freezer compartment prior to cleaning (see "Defrosting" sec- tion). Switch the appliance off and remove the plug from the mains, or switch off... -
Page 23: Energy Saving Tips
Clean the appliance and the interior accessories with a cloth and lukewarm water. Commercially available dish washing detergents may also be used. After cleaning wipe with fresh water and rub dry. Accumulation of dust at the condenser increases energy consumption. For this reason carefully clean the condenser at the back of the appliance once a year with a soft brush or a vacuum cleaner. -
Page 24: What To Do If
What to do if ... Correcting Malfunctions A malfunction may be caused by only a minor fault that you can rectify yourself using the following instructions. Do not perform any other work on the appliance if the following information does not provide assistance in your specific case. -
Page 25: Changing The Light Bulb
Malfunction Unusual noises. The compressor does not start immediately after changing the temperature setting. Water on the floor or on sto- rage shelves. Changing the light bulb Warning! There is a risk of electric shocks! Before changing the light bulb, switch off the appliance and unplug it, or pull the fuse or the circuit breaker. -
Page 26: Service And Spare Parts
Service and Spare Parts In the event of your appliance requiring service, or if you wish to purchase spare parts, please contact your local Service Force Centre by telephoning: Your telephone call will be automatically routed to the Service Force Cen- tre covering your post code area. -
Page 27: Guarantee Conditions
Guarantee Conditions Guarantee Conditions AEG offer the following guarantee to the first purchaser of this appliance. 1. The guarantee is valid for 12 months commencing when the appliance is handed over to the first retail purchaser, which must be verified by purchase invoice or similar documen- tation. -
Page 28: Installation
Installation Electrical Connection Any electrical work required to install this appliance should be carried out by a qualified electrician or competent person. WARNING – THIS APPLIANCE MUST BE EARTHED The manufacturer declines any liability should these safety measures not be observed. Before switching on, make sure the electricity supply voltage is the same as that indicated on the appliance rating plate. -
Page 29: Positioning
Positioning This appliance should only be installed at a location where the ambient temperature corresponds to the climate classification indicated on the rat- ing plate, which is located at the left on the inside of the appliance. The following table shows which ambient temperature is correct for each climate classification: SN +10°C to + 32°C +16°C to + 32°C... -
Page 30: Rear Spacer
Rear spacers Fit the rear spacers contained in the documentation bag to ensu- re even dissipation of heat gene- reted during operation. Proceed in the sequence illustrated by the figures. Fitting the Door Handles Screw the top handle bracket to the handle rod (1). -
Page 31: Regulations, Standard, Guidelines
Regulations, Standards, Guidelines This appliance was designed for household use and was manufactured in accordance with the appropriate standards. The necessary measures in accordance with appliance safety legislation regulations (GSG), accident prevention regulations for refrigeration appliances (VBG 20) and the regu- lations of the German Society of Electrical Engineers (VDE) were observed in the manufacture of this appliance. - Page 32 Subject to change without notice 2223 450-11-00-13042007...