Table of Contents
Advertisement
Quick Links
Advertisement
Table of Contents

Related Manuals for AgfaPhoto DC-533


Summary of Contents for AgfaPhoto DC-533
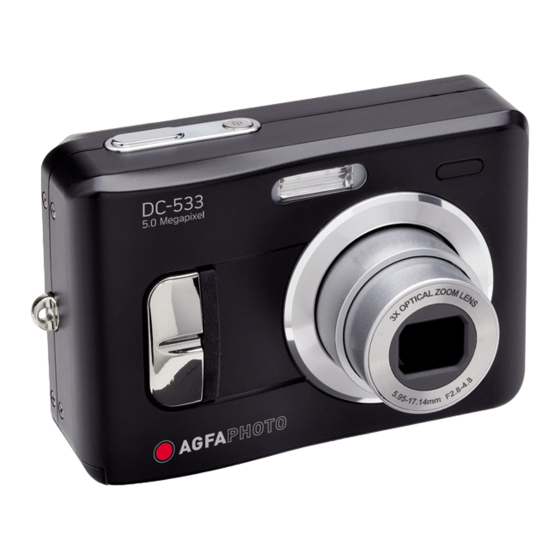
- Page 1 DC-533 User manual...
- Page 2 Thank you for purchasing this DC-533 digital camera. Please read these operating instructions carefully in order to use the product correctly. Keep the instructions in a safe place after reading so that you can refer to them later. Disclaimer We assume no responsibility over and above the provisions of the Product Liability Law for damages suffered by the user or third parties as a result of inappropriate handling of the product or its accessories, or by their operational failure and by their use.
- Page 3 Disposal of Waste Equipment by Users in Private Households in the European Union This symbol on the product or on its packaging indicates that this product must not be disposed of with your other household waste. Instead, it is your responsibility to dispose of your waste equipment by handing it over to a designated collection point for the recycling of waste electrical and electronic equipment.
-
Page 4: Fcc Compliance And Advisory
FCC Compliance and Advisory This device complies with Part 15 of the FCC Rules. Operation is subject to the following two conditions: 1.) this device may not cause harmful interference, and 2.) this device must accept any interference received, including interference that may cause unsatisfactory operation. This equipment has been tested and found to comply with the limits for a Class B peripheral, pursuant to Part 15 of the FCC Rules. -
Page 5: Safety Information
Safety Information Before using the camera, please ensure that you read and understand the safety precautions described below. Always ensure that the camera is operated correctly. Do not aim the camera directly into the sun or other intense light sources which could damage your eyesight. -
Page 6: Table Of Contents
Table of Contents FCC C ..................................1 OMPLIANCE AND DVISORY .......................................4 AFETY NFORMATION GETTING STARTED ..................................... 8 ......................................8 TANDARD CCESSORIES Attaching the Wrist Strap..................................9 Using the Soft Case....................................9 ........................................10 AMES OF ARTS ....................................12 NSERTING THE ATTERIES Low Battery Indicator.....................................12 ....................................13 NSERTING A EMORY About Camera Memory..................................13 DCF Protocol .......................................13... - Page 7 Using the Scene Mode...................................26 Setting the Resolution and Quality..............................27 Setting the Movie Size...................................27 Setting the White Balance...................................28 Setting the ISO ......................................28 Setting the Exposure....................................29 Setting the Metering....................................29 Setting the Sharpness...................................29 Setting the Photo Effect..................................30 Setting Date Stamp....................................30 PLAYBACK ......................................31 ......................................31 LAYING MAGES Using the Thumbnail....................................31...
- Page 8 USB P ......................................41 ETTING ....................................42 HOOSING A TARTUP MAGE ....................................42 ORMATTING THE EMORY ..................................43 ESETTING TO EFAULT ETTINGS MAKING CONNECTIONS..................................43 TV ..................................43 ONNECTING THE AMERA TO A PC...................................44 ONNECTING THE AMERA TO A Using the Card Reader ..................................44 Connecting the Camera to a Computer with a USB Cable ....................44 SOFTWARE INSTALLATION................................45 .......................................45 YSTEM...
-
Page 9: Getting Started
Getting Started Standard Accessories Camera USB Cable Video out Cable Soft Case Strap 2 x AA Batteries Software Installation User’s Manual CD-ROM - 8 -... -
Page 10: Attaching The Wrist Strap
Attaching the Wrist Strap Attach the wrist strap to your camera as shown. NOTE: Do not swing the camera when carrying by the wrist strap. Using the Soft Case When not using the digital camera, keep it in the soft case for protection. - 9 -... -
Page 11: Names Of Parts
Names of Parts Front Bottom - 10 -... - Page 12 Back Side 5-function button - 11 -...
-
Page 13: Inserting The Batteries
Inserting the Batteries The camera is powered by two AA-size alkaline batteries or rechargeable Ni-MH (min. 1000 mAh / 1.2V) batteries. 1. Slide the battery cover open. 2. Insert two AA-size alkaline batteries with the positive (+) and negative (-) poles matching the directions indicated inside the battery room. -
Page 14: Inserting A Memory Card
Inserting a Memory Card You can use SD Card or MMC Card with this digital camera. The memory card slot is located beneath the battery cover, adjacent to the battery compartment. 1. Be sure that the camera is turned off. 2. -
Page 15: Setting The Date And Time
Setting the Date and Time When the camera is first turned on, the date and time setting will not be correct. So before using, be sure to set date and time. 1. Press the MENU button, using select SETUP ( ) and press the SET button. -
Page 16: Basic Operations
Basic Operations Turning the Power On and Off 1. Press the POWER button to turn on the camera in the Record mode. Or you can press the button to turn on the camera in the Playback mode. 2. Press the POWER button again to turn the power off. -
Page 17: Switching Between Record And Playback
Switching between Record and Playback You can switch between the Record mode and the Playback mode in following ways: In Record mode Press the MODE button to cycle through the still image shooting, voice recording, and movie recording. Press the button to switch to the Playback mode. -
Page 18: Using The Menus
Using the Menus Recording Menu / Playback Menu When a menu screen is displayed, the arrow button and the SET button are used to make the desired settings. 1. Press the MENU button to display the menu. The menu displays depends on whether you are in the Record mode or the Playback mode. -
Page 19: Using The Lcd Monitor
Using the LCD monitor The LCD monitor is used to compose images while recording, adjust settings and replay images. LCD Screen Indicator In Recording Mode icon Aperture value Flash Shutter speed Macro Metering Self-timer / Burst Exposure Zoom indicator Battery White balance Storage media Sharpness... -
Page 20: Switching The Screen Display
In Playback Mode icon Storage media Protect Capture date & time Voice memo DPOF Date stamp File number / Total DPOF indicator Battery Resolution Switching the Screen Display Press the DISP button changes the next display mode of the LCD monitor as shown below: In Record mode In Playback mode (1) OSD on... -
Page 21: Recording
Recording Recording Still Images 1. Hold the camera with both hands and make sure the camera is stable. 2. Set the camera to the Record mode 3. Aim the focus area to the subject that you want to take and press the shutter release button halfway. -
Page 22: Using The Zoom Function
Using the Zoom Function Your camera has a combination of optical and digital zoom functions that allow you to zoom in on far away subjects or zoom out for a wide angle shot. The optical zoom is achieved by mechanically adjusting the lens of the camera. -
Page 23: Using The Flash
Using the Flash Press the flash button cycles your camera through the various flash modes. A symbol appears on the LCD screen to indicate the flash mode. The flash cannot be used when movie recording. 1. Set the camera to the Record mode The flash function only used in still image shooting. -
Page 24: Using The Self-Timer & Burst
Using the Self-timer & Burst Use the self-timer to set a delay from the time the shutter button is pressed to the time the image is shot. Use the burst to record four continuous still images shooting. 1. Set the camera to the Record mode This function only used in still image shooting. -
Page 25: Using The Macro Mode
Using the Macro mode Your camera is equipped with a macro function that allows you to focus on very close subjects. In macro mode you can focus on subjects 5 cm from the lens when in the maximum wide angle (zoomed out) setting and 50 cm in the maximum telephoto (zoomed in) setting. 1. -
Page 26: Recording Movie Clips
Recording Movie Clips Your camera can record movie clips with audio. 1. Set the camera to the Record mode The LCD monitor displays the available recording time. 2. Press the shutter to start recording. 3. Press the shutter again to end recording. The camera will stop recording automatically when the memory capacity has been reached. -
Page 27: Setting The Recording Functions
Setting the Recording Functions Using the Scene Mode You can select from various scene mode for specific shooting conditions. 1. Set the camera to the Record mode The scene mode function only used in still image shooting. 2. Press the button to show the Scene Mode screen. -
Page 28: Setting The Resolution And Quality
Setting the Resolution and Quality You can select lower image resolution and quality to decrease the image size to capture more images. Choose a suitable setting according to the desired image quality and purpose. Resolution Option Description 3264x2448 - Suitable for printing large size paper. 2560x1920 - Suitable for printing normal size paper. -
Page 29: Setting The White Balance
Setting the White Balance Adjust the white balance to match different light sources such as sunlight, incandescent (tungsten) lighting or, fluorescent lighting. Option Description Automatically corrects white balance. Ideal for general photography. Adjusts for bright sun conditions, or natural light conditions. -
Page 30: Setting The Exposure
NOTE: Higher ISO speeds increase the image noise. To take clean images, use as low an ISO speed as possible. Setting the Exposure Set the exposure value manually to compensate for unusual lighting conditions such as indirect indoor lighting, dark backgrounds, and strong backlighting. Setting the Metering There are 3 different light metering options available on your camera. -
Page 31: Setting The Photo Effect
Setting the Photo Effect You can add special effects to your images in Record mode or in Playback mode. Option Description No effect is added to the image. B&W Convert image to black & white. Sepia Recorded image will be stored in a sepia tone. Neg. -
Page 32: Playback
Playback Playing Back Images 1. Set the camera to the Playback mode Hint: 2. Press to play back the previous Holding down scrolls images image; press to play back the next in a high speed. image. Using the Thumbnail When in Playback mode, you can view all your stored images in thumbnail format. 1. -
Page 33: Playing Back Movie Clips
Playing Back Movie Clips 1. Set the camera to the Playback mode 2. Press to select the movie clip that you want to playback. 3. Press the SET button to start the movie. The movie clip will play on the LCD monitor. -
Page 34: Playing Back A Voice Memo
NOTE: The voice memo cannot be added to a movie clip or a protected image. You cannot delete only the voice memo. When you delete the image, the attached voice memo is also deleted. Playing Back a Voice Memo 1. Set the camera to the Playback mode 2. -
Page 35: Deleting All Files
Hint: To quickly delete the current display image 1. Select the image you want to delete. 2. Press the button to show a confirmation bar. 3. Press the SET button to delete the current display image. Deleting All Files You can use the Playback Menu to delete multiple files. 1. -
Page 36: Editing Images
Hint: To unlock the file, press the SET button again in step 5. The will disappear and the file is unlocked. To lock / unlock all files at a time 1. Set the camera to the Playback mode 2. Press the MENU button, then press to select PROTECT ( 3. -
Page 37: Changing The Image Size
Changing the Image Size The resolution of still images that had already been recorded can be changed. Set the camera to the Playback mode Press to select the image you want to resize. Press the MENU button, then press select RESIZE ( Press to select an option, and then press the SET button. -
Page 38: Setting The Dpof
Setting the DPOF The Digital Print Order Format (DPOF) setting allows you to select images on the memory card for printing and specify the number of print copies in advance using the camera. This is extremely convenient for sending the images to a photo developing service or for printing on a direct print function compatible printer. -
Page 39: Playing A Slide Show
Playing a Slide Show You can set the camera to display images in a slide show. Set the camera to the Playback mode . Press the MENU button, using to select SLIDE SHOW ( ) and press the SET button. Use the arrow button to set the playback interval ) and repeat or not ( You can set the interval between 1~10 seconds. -
Page 40: Setup Settings
Setup Settings Adjusting Sounds You can adjust the sound volume and set different sounds as the start-up sound. 1. Set the camera to the Setup Menu 2. Press to select SOUNDS ( ) and then press or the SET button to enter the sounds screen. -
Page 41: Setting The Language
Setting the Language The camera can display menus and other information in a number of different languages. 1. Set the camera to the Setup Menu 2. Press to select LANGUAGE ( ) then press or the SET button to launch the submenu. 3. -
Page 42: File Naming
File Naming File name begins with “DSCI” and are followed by a 4-digit number that increases in sequence. File numbering starts from 0001 when a new folder is created. If the highest folder number is 999 and highest file number exceeds 9999, the camera will display the warning message “Folder cannot be created”. -
Page 43: Choosing A Startup Image
Choosing a Startup Image You can choose a recorded image as the start-up image. Set the camera to the Playback mode Press to select a desired image. Press the MENU button, then press to select S.IMAGE ( Press to select an option, and then press the SET button. -
Page 44: Resetting To Default Settings
Resetting to Default Settings You can reset the entire menu and button operation settings to initial default. 1. Set the camera to the Setup Menu 2. Press to select RESET ALL ( ) then press or the SET button to launch the submenu. -
Page 45: Connecting The Camera To Apc
Connecting the Camera to a PC There are two ways to download files from the camera’s internal memory or memory card to a computer: by inserting the memory card into a card reader by connecting the camera to a computer using the included USB cable Using the Card Reader 1. -
Page 46: Software Installation
NOTE: You don’t have to turn off the computer or camera when making this connection. Refer to your computer’s manual for information regarding the USB port location. The camera will turn off automatically if the USB cable is disconnected. Windows 98/98SE: If this is the first time the camera has been connected to the computer, Windows detects the camera as an “Unknown device”... -
Page 47: Installing The Software
Installing the Software The bundled software CD has the drivers and software that come with camera. Insert the CD into your CD-ROM drive. The autorun menu appears: The following software is listed: Install Ulead Photo Explorer 8 SE Basic Installs software for organizing and keeping track of you media. Install VideoStudio 7 SE VCD Installs software for editing captured movies. -
Page 48: Installing The Software Driver
Installing the Software Driver Windows 98 (Second Edition) requires the installation if the driver to use the camera as a mass storage device. 1. Install the included software installation CD-Rom in you computer’s CD-ROM drive. The autorun menu appears. 2. Click Drivers. You are prompted to choose a setup language. Choose a setup language and click OK. -
Page 49: Using The Software
Using the Software Ulead Photo Explorer 8 SE Basic Ulead Photo Explorer 8.0 SE Basic is a versatile tool for owners of digital cameras. Webcams, DV camcorders, scanners, or anyone who strives to handle digital media effectively, Photo Explorer provides an efficient way to transfer, browse, modify and distribute digital media. -
Page 50: Appendix
Appendix Troubleshooting Problem Cause Solution Power does not turn on. Battery is inserted in the Reload battery in the correct wrong direction. direction. Batteries are dead. Replace or recharge batteries. The battery compartment Make sure the battery door is open. compartment door is securely closed. -
Page 51: Specifications & Customer Care
Specifications Sensor 5.0 megapixels CCD Size : 1/2.5 inch Lens Focal length : f=5.95 ~17.14mm , 3X optical zoom, 4X digital zoom LCD monitor 2.4” TFT color LCD Focus Range Normal: 80cm ~ Infinity Macro: (W) 5cm ~ 1m / (T) 50cm ~1m Aperture F/2.8 ~ 4.8 Shutter... -
Page 52: Customer Care
Customer care More information to the complete product range can be found under: www.plawa.com Service & Repair Hotline (Europe): 00800 75292100 Service & Support Hotline (Germany): 0900 1000 042 (1.49 Euro/ min. Deutsche Telekom) Online Service: support-apdc@plawa.com Manufactured by plawa-feinwerktechnik GmbH & Co. KG plawa-feinwerktechnik GmbH &...