Dell 1704FPV - UltraSharp - 17" LCD Monitor User Manual
User guide
Hide thumbs
Also See for 1704FPV - UltraSharp - 17" LCD Monitor:
- Setting up (2 pages) ,
- Specifications (2 pages)
Table of Contents
Advertisement
Dell™ 1704FPV Flat Panel Monitor
About Your Monitor
Front View
Back View
Side View
Bottom View
Monitor Specifications
Dell Soundbar (Optional) Specifications
Caring for Your Monitor
Using Your Adjustable Monitor Stand
Attaching the Stand
Organizing Your Cables
Using the Tilt, Swivel, Vertical Extension
Removing the Stand
Setting Up Your Monitor
Connecting Your Monitor
Using the Front Panel Buttons
Using the OSD
Setting the Optimal Resolution
Using the Dell Soundbar (Optional)
Information in this document is subject to change without notice.
© 2004 Dell Inc. All rights reserved.
Reproduction in any manner whatsoever without the written permission of Dell Inc. is strictly forbidden.
Trademarks used in this text: Dell™, PowerEdge™, PowerConnect™, PowerVault™, Dell™ Dimension™, Inspiron™, OptiPlex™, Latitude™, Dell
Precision™ and Dell | EMC are trademarks of Dell Inc; Microsoft, Windows and Windows NT are registered trademarks of Microsoft
Corporation; Adobe is a trademark of Adobe Systems Incorporated, which may be registered in certain jurisdictions. ENERGY STAR is a registered
trademark of the U.S. Environmental Protection Agency. As an ENERGY STAR partner, Dell Inc. has determined that this product meets the ENERGY
STAR guidelines for energy efficiency. EMC is a registered trademark of EMC Corporation.
Other trademarks and trade names may be used in this document to refer to either the entities claiming the marks and names or their products.
Dell Inc. disclaims any proprietary interest in trademarks and trade names other than its own.
August 2004
Rotating Your Monitor
Changing the Rotation of Your Monitor
Rotating Your Operating System
Solving Problems
Troubleshooting Your Monitor
General Problems
Product Specific Problems
USB Problems
Troubleshooting Your Soundbar
Appendix
Warranty
Safety Information
Contacting Dell
Regulatory Notices
Recycling
Your Monitor Set-up Guide
Advertisement
Table of Contents

Related Manuals for Dell 1704FPV - UltraSharp - 17" LCD Monitor


Summary of Contents for Dell 1704FPV - UltraSharp - 17" LCD Monitor
-
Page 1: About Your Monitor
Corporation; Adobe is a trademark of Adobe Systems Incorporated, which may be registered in certain jurisdictions. ENERGY STAR is a registered trademark of the U.S. Environmental Protection Agency. As an ENERGY STAR partner, Dell Inc. has determined that this product meets the ENERGY STAR guidelines for energy efficiency. -
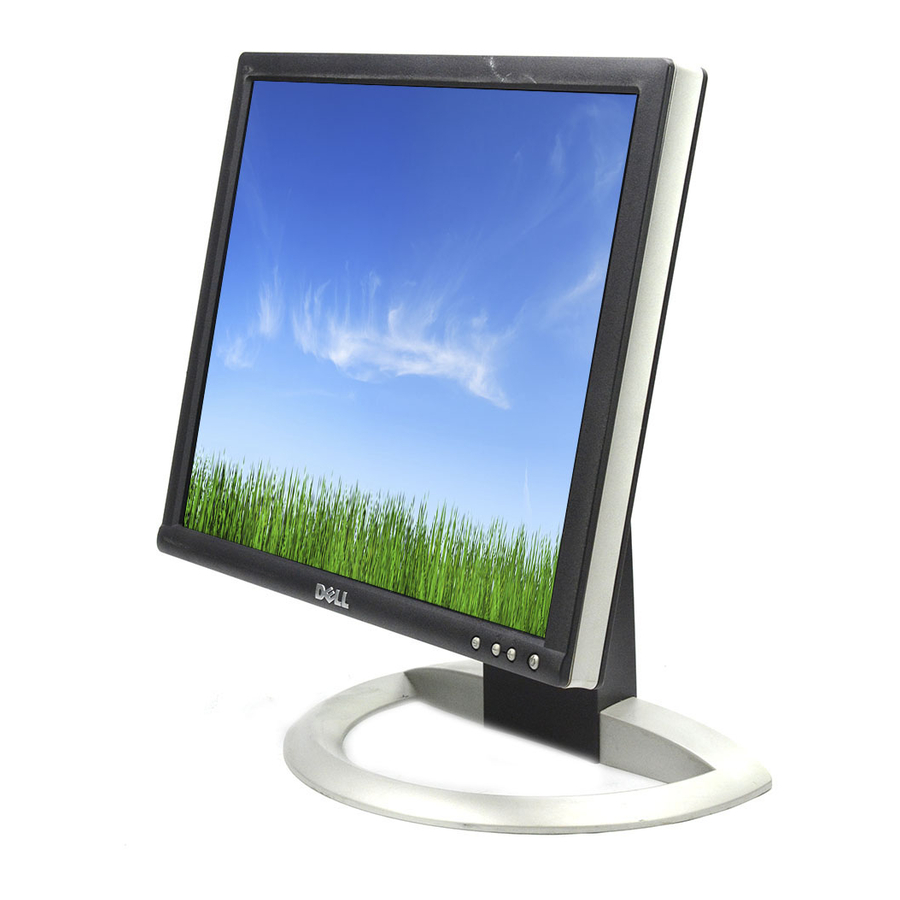
Page 2: Front View
Back to Contents Page About Your Monitor Dell™ 1704FPV Flat Panel Monitor Front View Back View Bottom View Side View Monitor Specifications Dell Soundbar (Optional) Specifications Caring for Your Monitor Front View 1. OSD menu / select button 2. Input select / down button 3. -
Page 3: Bottom View
4. VESA mounting holes (100mm [Behind attached base plate]) — Use to mount the monitor. 5. Barcode serial number label — Refer to this label if you need to contact Dell for technical support 6. Lock down/release button — Push the monitor down, press the button to unlock the monitor, and then lift the monitor to the desired height. -
Page 4: Monitor Specifications
* Zero power consumption in OFF mode can only be achieved by disconnecting the main cable from the monitor. ENERGY STAR® is a U.S. registered mark. As an ENERGY STAR® Partner, DELL has determined that this product meets the ENERGY STAR® guidelines for energy efficiency. -
Page 5: Universal Serial Bus (Usb) Interface
Video-Red Video-Green Video-Blue GND-R GND-G GND-B DDC +5V Sync/self-test DDC data H-sync V-sync DDC clock 24 pin digital-only DVI connector: Note: Pin 1 is at the top right. Pin Signal Assignment Pin Signal Assignment Pin Signal Assignment T.M.D.S. Data 2- T.M.D.S. -
Page 6: Flat Panel
You can install the monitor in any Plug and Play-compatible system. The monitor automatically provides the computer system with its Extended Display Identification Data (EDID) using Display Data Channel (DDC) protocols so the system can configure itself and optimize the monitor settings. If desired, the user can select different settings, but in most cases monitor installation is automatic. -
Page 7: Physical Characteristics
12,192 m (40,000 ft) max Thermal dissipation 221.937 BTU/hour (maximum) 109.261 BTU/hour (typical) Dell Soundbar (Optional) Specifications System Frequency Response 95 Hz to 20 kHz @ 10 dB below avg. SPL Total Power Output 14 W continuous average power (all speakers operating) @ 10% (THD+N), 1 kHz (FTC rated) Headphone Jack 40 mW continuous average power (RL = 32Ω) @ 10% (THD+N), 1 kHz... -
Page 8: Caring For Your Monitor
Caring for Your Monitor CAUTION: Read and follow the safety instructions before cleaning the monitor. CAUTION: Before cleaning the monitor, unplug the monitor from the electrical outlet. To clean your antistatic screen, lightly dampen a soft, clean cloth with water. If possible, use a special screen-cleaning tissue or solution suitable for the antistatic coating. -
Page 9: Attaching The Stand
Back to Contents Page Using Your Adjustable Monitor Stand Dell™ 1704FPV Flat Panel Monitor Attaching the Stand Organizing Your Cables Using the Tilt, Swivel, and Vertical Extension Removing the Stand Attaching the Stand NOTE: The stand is detached and extended when the monitor is shipped from the factory. -
Page 10: Using The Tilt, Swivel, And Vertical Extension
After attaching all necessary cables to your monitor and computer, (See Connecting Your Monitor for cable attachment,) use the cable holder to neatly organize all cables as shown above. Using the Tilt, Swivel, and Vertical Extension Adjusting Your Monitor Using Tilt, Swivel, and Vertical Extension. You can adjust your monitor to best fit your viewing needs. You can adjust the stand vertically, up to 5.12 inches (130mm) using the stand lock/release button. -
Page 11: Removing The Stand
Removing the Stand NOTICE: After placing the monitor panel on soft cloth or cushion, complete the following steps to remove the stand. 1. Rotate the stand to allow access to the stand removal button. 2. Press and hold the stand removal button while lifting the monitor up and away from the stand. Back to Contents Page... -
Page 12: Setting Up Your Monitor
Back to Contents Page Setting Up Your Monitor Dell™ 1704FPV Flat Panel Monitor Connecting Your Monitor Using the Front Panel Buttons Using the OSD Setting the Optimal Resolution Using the Dell Soundbar (Optional) Connecting Your Monitor CAUTION: Before you begin any of the procedures in this section, follow the safety instructions. -
Page 13: Using The Front Panel Buttons
Use the Input Select button to select between two different video signals that may be connected to your monitor. NOTE: The floating 'Dell - self-test Feature Check' dialog appears (against a black background) if the monitor cannot sense a video... -
Page 14: Using The Osd
Input select Use these buttons to adjust (decrease/increase ranges) items in the OSD. Down (-) and Up (+) Use this button to activate automatic setup and adjustment. The following dialog appears on a black screen as the monitor self-adjusts to the current input: Auto Adjust In Progress Auto Adjustment button allows the monitor to self-adjust to the incoming video signal. - Page 15 NOTE: Positioning and Image settings are only available when you are using the Analog (VGA) connector. 2. Push the - and + buttons to move between the setting options. As you move from one icon to another, the option name is highlighted. See the table below for a complete list of all the options available for the monitor.
- Page 16 NOTE: When using DVI source, the contrast adjustment is not available Positioning: Positioning moves the viewing area around on the monitor screen. Horizontal When making changes to either the Horizontal or Vertical settings, no changes occur to the size of the viewing area, the image shifts in response to your Vertical selection.
- Page 17 NOTE: When using DVI source, the Image Settings option is not available. Color Settings Color Settings adjusts the color temperature, color hue, and saturation. The color hue is most noticeable in areas of white. Blue Preset Blue Preset is selected to obtain a bluish tint. This color setting is typically used for text based applications (spreadsheets, programming, text editors etc.).
- Page 18 To adjust the vertical position of the OSD, use the - and + buttons move OSD down and up. Vertical Position OSD Hold Time: The OSD stays active for as long as it is in use. Adjust the hold time, sets the length of time the OSD remains ctive after the last time you pressed a button.
- Page 19 (optional) Yes — enables audio No — disables audio (default) NOTE: When the Dell Soundbar is not properly connected to the monitor, the audio menu is not available. Factory Reset: Reset the OSD menu options to the factory preset values.
-
Page 20: Setting The Optimal Resolution
Using the Dell Soundbar (Optional) The Dell Soundbar is a four-speaker, two-channel speaker that can be attached to your monitor. Located on the Soundbar are a: Rotary volume and on/off control to adjust the overall system level, a green LED for power indication, and two audio headset jacks. -
Page 21: Soundbar Attachment To The Monitor
Attach mechanism Power/volume control Power indicator Headphone connectors Soundbar Attachment to the Monitor NOTICE: Do not use the soundbar power connector with any other device. - Page 22 Attach the Soundbar by aligning the two slots on the Soundbar with the two tabs on the bottom of the monitor. Slide the Soundbar to the left until it snaps in to place. Plug in the power cord from the Soundbar in to the connector on the back of the monitor. Insert the green stereo plug from the Soundbar in to your computer's audio output connector.
- Page 23 After you have rotated your monitor, you need to complete the procedure below to rotate your operating system. NOTE: If you are using the monitor with a non-Dell computer, you need to go the graphics driver website or your computer manufacturer website for information on rotating your operating system.
-
Page 25: Solving Problems
(white connector) and the Analog(blue connector) cables from the back of computer. 3. Turn on the monitor. The floating 'Dell - Self-Test Feature Check' dialog box should appear on-screen (against a black background) if the monitor cannot sense a video signal and is working correctly. While in self-test mode, the power LED remains green. -
Page 26: Osd Warning Messages
OSD Warning Messages One of the following warning messages may appear on the screen indicating that the monitor is out of sync. Analog Input 2.Digital Input Cannot Display This Video Mode Cannot Display This Video Mode This means that the monitor cannot synchronize with the signal that it is receiving from the computer. Either the signal is too high or too low for the monitor to use. -
Page 27: Product Specific Problems
Adjust Phase and Clock controls via OSD Perform monitor self-test feature check and determine if these lines are also in self-test mode Check for bent or broken pins Sync Problems Screen is scrambled or Perform monitor reset appears torn Push Auto Adjust button Adjust Phase and Clock controls via OSD Perform monitor self-test feature check to determine if scrambled screen appears in self-test mode... - Page 28 Troubleshooting Your Soundbar COMMON WHAT YOU POSSIBLE SOLUTIONS SYMPTOMS EXPERIENCE No Sound No power to Soundbar - Turn the Power/Volume knob on the Soundbar clockwise to the middle the power indicator is position; check if the power indicator (green LED) on the front of the off.
-
Page 29: Warranty
These terms and conditions ("Agreement") apply to your purchase of computer systems and/or related products and/or services and support sold in the United States ("Product") by the Dell entity named on the invoice or acknowledgement ("Dell") provided to you. By accepting delivery of the Product, you accept and are bound to the terms and conditions of this Agreement. If you do not wish to be bound by this Agreement, you must notify Dell immediately and return your purchase pursuant to Dell's Total Satisfaction Return Policy. -
Page 30: Limited Warranty For Dell-Branded Hardware Products (U.s. Only)
7. Changed or Discontinued Product. Dell's policy is one of ongoing update and revision. Dell may revise and discontinue Product at any time without notice to you and this may affect information saved in your online "cart." Dell will ship Product that has the functionality and performance of the Product ordered, but changes between what is shipped and what is described in a specification sheet or catalog are possible. - Page 31 Dell computer on which such parts are installed. The limited warranty on all Dell-branded products begins on the date of the packing slip or invoice. The warranty period is not extended if we repair or replace a warranted product or any parts. Dell may change the availability of limited warranties, at its discretion, but any changes will not be retroactive.
- Page 32 During the 90 days of the 90-day limited warranty and the first year of all other limited warranties: During the 90 days of the 90-day limited warranty and the first year of all other limited warranties, we will repair any Dell-branded hardware products returned to us that prove to be defective in materials or workmanship. If we are not able to repair the product, we will replace it with a comparable product that is new or refurbished.
-
Page 33: Total Satisfaction Return Policy (U.s. Only)
You must ship the products to Dell within five (5) days of the date that Dell issues the Credit Return Authorization Number. You must also return the products to Dell in their original packaging, in as-new condition along with any media, documentation, and all other items that were included in the original shipment, prepay shipping charges, and insure the shipment or accept the risk of loss or damage during shipment. - Page 34 This limited warranty lasts for the time period indicated on your packing slip or invoice, except that the limited warranty on Dell-branded batteries lasts only 1 year and the limited warranty on the lamps for Dell-branded projectors lasts only 90 days. The limited warranty begins on the date of the packing slip or invoice. The warranty period is not extended if we repair or replace a warranted product or any parts.
-
Page 35: Total Satisfaction Return Policy (Canada Only)
If you are an end-user customer who bought new products directly from Dell, you may return them to Dell up to 30 days after you receive them for a refund or credit of the product purchase price. If you are... -
Page 36: Dell Software And Peripherals (Canada Only)
While Dell offers a wide selection of software and peripheral products, we do not specifically test or guarantee that all of the products we offer work with any or all of the various models of Dell computers, nor do we test or guarantee all of the products we sell on the hundreds of different brands of computers available today. -
Page 37: Safety Information
This Guarantee does not impair or affect mandatory statutory rights of the end user against and/or any rights resulting from other contracts concluded by the end user with Dell and/or any other seller. - Page 38 NOTE: Toll-free numbers are for use within the country for which they are listed. When you need to contact Dell, use the electronic addresses, telephone numbers, and codes provided in the following table. If you need assistance in determining which codes to use, contact a local or an international operator.
- Page 39 Technical Support E-mail: cn_support@dell.com Customer Care E-mail: customer_cn@dell.com Technical Support Fax 818 1350 Technical Support (Dell™ Dimension™ and Inspiron™) toll-free: 800 858 2969 Technical Support (OptiPlex™, Latitude™, and Dell Precision™) toll-free: 800 858 0950 Technical Support (servers and storage) toll-free: 800 858 0960...
- Page 40 800 858 2811 Large Corporate Accounts Spare Parts toll-free: 800 858 2621 Colombia General Support 980-9-15-3978 Costa Rica General Support 0800-012-0435 Website: support.euro.dell.com E-mail: czech_dell@dell.com Czech Republic (Prague) Technical Support 22537 2727 International Access Code: 00 Customer Care 22537 2707 22537 2714...
- Page 41 General Support toll-free: 1-877-270-4609 Website: support.ap.dell.com Technical Support E-mail: apsupport@dell.com Technical Support (Dimension and Inspiron) 2969 3188 Technical Support (OptiPlex, Latitude, and Dell Precision) 2969 3191 Hong Kong Technical Support (PowerApp™, PowerEdge™, PowerConnect™, and PowerVault™) 2969 3196 International Access Code: 001...
- Page 42 0120-198-226 Technical Support outside of Japan (Dimension and Inspiron) 81-44-520-1435 Technical Support (Dell Precision, OptiPlex, and Latitude) toll-free:0120-198-433 Technical Support outside of Japan (Dell Precision, OptiPlex, and Latitude) 81-44-556-3894 Japan (Kawasaki) Technical Support (PDAs, projectors, printers, routers) toll-free: 0120-981-690...
- Page 43 Transaction Sales (Xiamen, China) 29 693 115 Website: support.ap.dell.com toll-free: 1 800 88 0193 Technical Support (Dell Precision, OptiPlex, and Latitude) toll-free: 1 800 88 1306 Malaysia (Penang) Technical Support (Dimension, Inspiron, and Electronics and Accessories) International Access Code: 00...
- Page 44 020 674 47 50 Switchboard 020 674 50 00 Switchboard Fax 020 674 47 50 E-mail (New Zealand): nz_tech_support@dell.com E-mail (Australia): au_tech_support@dell.com Technical Support (for desktop and portable computers) toll-free: 0800 446 255 New Zealand Technical Support (for servers and workstations)
- Page 45 Website: support.ap.dell.com Technical Support (Dimension, Inspiron, and Electronics and Accessories) toll-free: 1800 394 7430 Singapore (Singapore) Technical Support (OptiPlex, Latitude, and Dell Precision) toll-free: 1800 394 7488 International Access Code: 005 Technical Support (PowerApp, PowerEdge, PowerConnect, and PowerVault) toll-free: 1800 394 7478...
- Page 46 Transaction Sales toll-free: 00801 65 1228 Corporate Sales toll-free: 00801 651 227 Website: support.ap.dell.com Technical Support (OptiPlex, Latitude, and Dell Precision) toll-free: 1800 0060 07 Thailand Technical Support (PowerApp, PowerEdge, PowerConnect, and PowerVault) toll-free: 1800 0600 09 International Access Code: 001...
-
Page 47: Regulatory Notices
Software and Peripherals Sales toll-free: 1-800-671-3355 Spare Parts Sales toll-free: 1-800-357-3355 Extended Service and Warranty Sales toll-free: 1-800-247-4618 toll-free: 1-800-727-8320 toll-free: 1-877-DELLTTY Dell Services for the Deaf, Hard-of-Hearing, or Speech-Impaired (1-877-335-5889) U.S. Virgin Islands General Support 1-877-673-3355 Venezuela General Support 8001-3605... -
Page 48: Why Do We Have Environmentally Labelled Computers
Congratulations! You have just purchased a TCO'99 approved and labelled product! Your choice has provided you with a product developed for professional use. Your purchase has also contributed to reducing the burden on the environment and also to the further development of environmentally adapted electronics products. Why do we have environmentally labelled computers? In many countries, environmental labelling has become an established method for encouraging the adaptation of goods and services to the environment. - Page 49 Cadmium Cadmium is present in rechargeable batteries and in the colour-generating layers of certain computer displays. TCO'99 requires that batteries, the colour-generating layers of display screens, and the electrical or electronics components shall not contain any cadmium. Mercury Mercury is sometimes found in batteries, relays and switches. TCO'99 requires that batteries shall not contain any mercury. It also demands that mercury is not present in any of the electrical or electronics components associated with the labelled unit.
-
Page 50: Fcc Declaration Of Conformity
The proper operation of the function requires a computer with VESA® DPM™ power management capabilities. When used with a computer equipped with VESA® DPM™, the monitor is ENERGY STAR®-compliant. As an ENERGY STAR® Partner, Dell Inc. has determined that this product meets the ENERGY STAR® guidelines for energy efficiency. Federal Communications Commission (FCC) Notice (U.S. Only) CAUTION: This equipment has been tested and found to comply with the limits for a Class B digital device, pursuant to Part 15 of the FCC Rules. - Page 51 392, Ruey, Kuang Road, Neihu, Taipei 114, Taiwan R.O.C. Tel) 8798-2888 Fax) 8798-2829 * Manufacturer Information : LITEON Technology Corp. Display Division 392, Ruey, Kuang Road, Neihu, Taipei 114, Taiwan R.O.C. EMC Department Manager 2004-08-05 Douglas Yang / Manager (place and date of issue) (name and signature of authorized person) EU Declaration of Conformity (LVD, EMC) For the following product:...
- Page 52 This digital apparatus does not exceed the Class B limits for radio noise emissions from digital apparatus set out in the Radio Interference Regulations of the Canadian Department of Communications. Note that Canadian Department of Communications (DOC) regulations provide, that changes or modifications not expressly approved by Dell Inc. could void your authority to operate this equipment.
- Page 53 The following information is provided on the device(s) described in this document in compliance with the requirements of the official Mexican standards (NOM): Dell Inc. Exporter: One Dell Way Round Rock, TX 78682 Dell Computer de México, Importer: S.A. de C.V. Rio Lerma No. 302 - 4º Piso Col. Cuauhtemoc 16500 México, D.F. Dell Computer de México, S.A.
- Page 54 Frequency: 50/60 Hz Current consumption: 1704FPVt - 1.5 A BSMI Notice (Taiwan Only) Ergonomics Notice (Germany Only) Under the requirements of German ergonomics standard EK 1/59-98, EK 1/60-98, graphics or characters: 1. Blue graphics or characters in dark background are not recommended. (This combination may increase eye fatigue due to poor visibility caused by low contrast.) 2.
- Page 55 Recycling Dell recommends that customers dispose of their used computer hardware, including monitors, in an environmentally sound manner. Potential methods include the reuse of parts or whole products and recycling of product, components, and/or materials. www.dell.com/recycling_programs and www.dell.com/environment For more information, please visit Your Monitor Set-up Guide To view PDF files (files with an extension of .pdf), click the document title.