HP Z210 Series User Manual
Hp z210 workstation series user guide
Hide thumbs
Also See for Z210 Series:
- Maintenance and service manual (185 pages) ,
- Support manual (22 pages) ,
- Installation manual (19 pages)
Table of Contents
Advertisement
Advertisement
Table of Contents

Related Manuals for HP Z210 Series


Summary of Contents for HP Z210 Series
- Page 1 HP Z210 Workstation Series User Guide...
- Page 2 First Edition: February 2011 Hewlett-Packard Company shall not be The HP Invent logo is a trademark of liable for technical or editorial errors or Hewlett-Packard Company in the U.S. and Part number: 634377-001 omissions contained herein or for incidental other countries.
-
Page 3: About This Guide
Installing hard disk drives on page 44 Installing optical disk drives on page 53 TIP: If you do not find what you are looking for in this guide for your HP Z210 workstation, refer to the workstation Maintenance and Service Guide on the Web at http://www.hp.com/support/ workstation_manuals/, or see http://www.hp.com/go/workstations... - Page 4 About this guide ENWW...
-
Page 5: Table Of Contents
HP Z210 CMT Workstation components ..................7 HP Z210 CMT Workstation chassis components ............8 HP Z210 CMT Workstation front panel components ............9 HP Z210 CMT Workstation rear panel components ............ 10 HP Z210 SFF Workstation components ..................11 HP Z210 SFF Workstation chassis components ............ - Page 6 Power limitations for graphics cards ..................42 Installing an expansion card ....................42 9 Installing hard disk drives ....................44 HDD configuration ......................... 44 Installing a hard disk drive ...................... 45 Installing an HDD in an HP Z210 CMT Workstation ............ 45 ENWW...
- Page 7 Installing an HDD in an HP Z210 SFF Workstation ............47 Installing a secondary HDD or media card reader into a Z210 SFF ....... 51 10 Installing optical disk drives ..................53 Installing an optical drive in an HP Z210 CMT Workstation ............53 Installing an optical drive (mini-tower configuration) ............
- Page 8 viii ENWW...
-
Page 9: Locating Hp Resources
Locating HP resources This section provides information on the following HP resources for your workstation: Topics Product information on page 2 Product data sheets ● HP Cool Tools ● Regulatory information ● Accessories ● System board ● Serial number and Certificate of Authenticity labels ●... -
Page 10: Product Information
Product information Table 1-1 Product information Topic Location Product data sheets See www.hp.com/go/quickspecs. HP Cool Tools Most HP Microsoft Windows workstations are preloaded with additional software that is not automatically installed during first boot. Additionally, a number of valuable tools on your workstation are preinstalled that may enhance system performance. -
Page 11: Product Support
Product support Table 1-2 Product support Topic Location Additional information For online access to technical support information and tools, see http://www.hp.com/go/workstationsupport. Support resources include Web-based troubleshooting tools, technical knowledge databases, driver and patch downloads, online communities, and proactive notification services. The following communication and diagnostic tools are also available: Instant Chat... -
Page 12: Product Documentation
Table 1-2 Product support (continued) Topic Location HP Hardware Support Services For hardware service information, see http://h20219.www2.hp.com/services/us/en/always-on/ hardware-support-supporting-information.html? jumpid=reg_R1002_USEN. Warranty information To locate base warranty information, see http://www.hp.com/support/warranty-lookuptool. To locate an existing Care Pack, see http://www.hp.com/ go/lookuptool. To extend a standard product warranty, see http://h20219.www2.hp.com/services/us/en/warranty/ carepack-overview.html?jumpid=hpr_R1002_USEN. -
Page 13: Product Diagnostics
Product diagnostics Table 1-4 Product diagnostics Topic Location Diagnostics tools The HP Vision Diagnostics utility can be found as a burnable ISO image on the workstation hard disk (under C: \VisionDiagnostics), or can be downloaded from the HP web site. For details on using this utility, refer to the section that covers HP Vision Diagnostics in the workstation Maintenance and Service Guide. -
Page 14: Product Updates
Product updates Table 1-5 Product updates Topic Location Driver and BIOS updates http://www.hp.com/go/workstation_swdrivers to verify that you have the latest drivers for the workstation. To determine the current workstation BIOS on your workstation, follow these steps during system power up: Power on the workstation, and wait for F10=setup to appear on the lower right corner of the screen. -
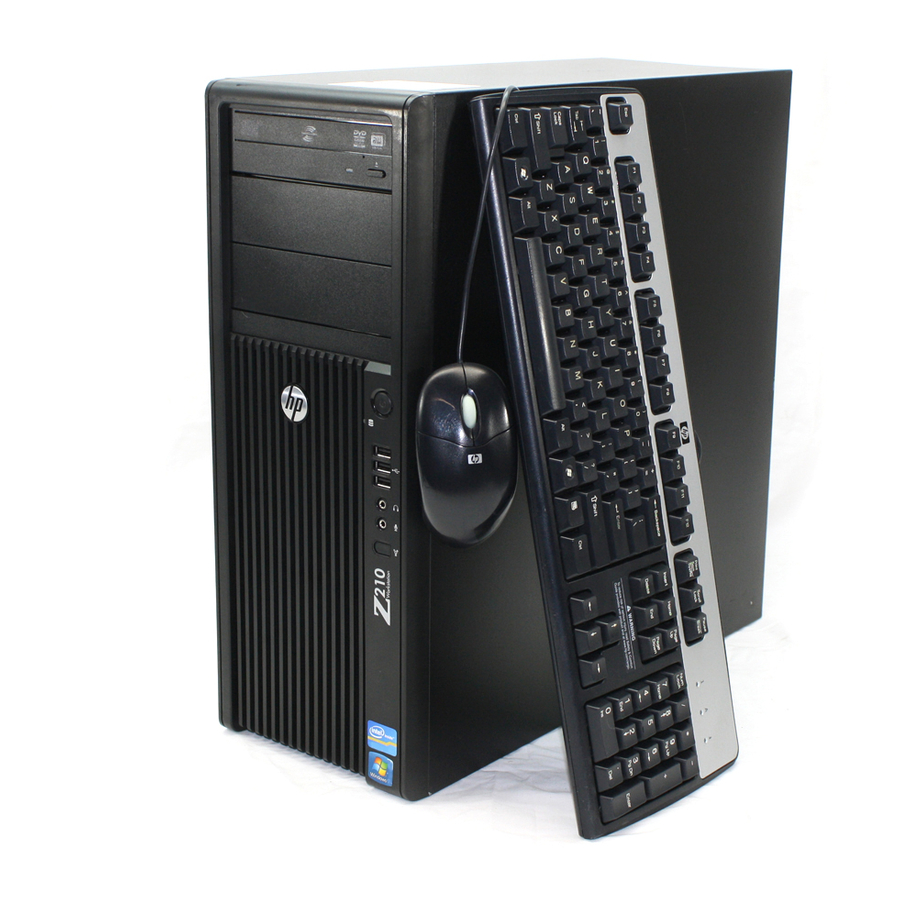
Page 15: Workstation Components
11 HP Z210 CMT Workstation components This section describes the HP Z210 Convertible Mini Tower (CMT) Workstation components, including front and rear panel connectors. For complete and current information on supported accessories and components for the computer, see http://partsurfer.hp.com. -
Page 16: Hp Z210 Cmt Workstation Chassis Components
HP Z210 CMT Workstation chassis components The following figure shows the chassis components of a typical HP Z210 CMT Workstation layout. Drive configurations can vary. Figure 2-1 HP Z210 CMT Workstation chassis components Table 2-1 HP Z210 CMT Workstation component descriptions... -
Page 17: Hp Z210 Cmt Workstation Front Panel Components
HP Z210 CMT Workstation front panel components The following figure shows the front panel of an HP Z210 CMT Workstation. Drive configurations can vary. Figure 2-2 HP Z210 Workstation front panel Table 2-2 HP Z210 CMT Workstation front panel connectors... -
Page 18: Hp Z210 Cmt Workstation Rear Panel Components
HP Z210 CMT Workstation rear panel components The following figure shows the rear panel of a typical HP Z210 CMT Workstation. Figure 2-3 HP Z210 CMT Workstation rear panel NOTE: The labels for the rear panel connectors use industry-standard icons and colors. -
Page 19: Hp Z210 Sff Workstation Components
For complete and current information on supported accessories and components for the computer, see http://partsurfer.hp.com. HP Z210 SFF Workstation chassis components The following figure shows the chassis components of a typical HP Z210 SFF Workstation layout. Drive configurations can vary. Figure 2-4... -
Page 20: Hp Z210 Sff Workstation Front Panel Components
HP Z210 SFF Workstation front panel components The following figure shows the front panel of an HP Z210 SFF Workstation. Drive configurations can vary. Figure 2-5 HP Z210 Workstation front panel Table 2-5 Front panel components Item Symbol Description Item... -
Page 21: Hp Z210 Sff Workstation Rear Panel Components
HP Z210 SFF Workstation rear panel components The following figure shows the rear panel of a typical HP Z210 SFF Workstation. Figure 2-6 HP Z210 SFF Workstation rear panel NOTE: The labels for the rear panel connectors use industry-standard icons and colors. -
Page 22: Setting Up The Workstation
Setting up the workstation This chapter describes how to set up the workstation, and includes these topics: Topics Ensuring proper ventilation on page 14 Setup procedures on page 15 Converting to desktop configuration on page 17 Adding monitors on page 19 Accessibility on page 24 Security on page 24 Product recycling on page 24... -
Page 23: Setup Procedures
NOTE: The ambient upper limit of 35 C is only good up to 1524 m (5000 ft) elevation. There is a 1 C per 304.8 m (1000 Fft derating above 1524 m (5000 ft). So, at 3,048 m (10,000 ft), the upper ambient air temperature limit is 30 C. - Page 24 Connect the power cord: Figure 3-3 Connecting the power cord WARNING! To reduce the risk of electric shock or damage to your equipment, observe these practices: • Plug the power cord into an AC outlet that is easily accessible. • Disconnect power from the computer by unplugging the power cord from the AC outlet (not by unplugging the power cord from the computer).
-
Page 25: Converting To Desktop Configuration
Converting to desktop configuration The Z210 Convertible Mini Tower (CMT) Workstation can be operated in the mini-tower or the desktop configuration. Follow these steps to convert to desktop configuration operation: NOTE: See the workstation Maintenance and Service Guide for installation details for the following steps. - Page 26 On the back of the front bezel, squeeze the HP logo mounting tabs (1) and press the logo outward (2) as shown in the following figure. Figure 3-6 Rotating the HP logo Rotate the HP logo 90 degrees counterclockwise, and then release the logo and press it back into place in the front bezel.
-
Page 27: Adding Monitors
This section describes how to connect monitors to the workstation. Using workstation integrated graphics Depending on CPU configuration, some HP Z210 CMT and SFF workstations support Intel® HD Graphics (integrated graphics) with simultaneous output to two monitors. Refer to the workstation Maintenance and Service Guide on the Web at http://www.hp.com/support/workstation_manuals/,... - Page 28 NOTE: HP Z Workstations do not support all graphics cards. Make sure a new graphics card is supported before purchasing it. To find out how to list supported graphics cards and get other information, see Finding supported graphics cards on page The maximum number of monitors that a graphics card supports depends on the card.
-
Page 29: Finding Supported Graphics Cards
After the page reloads, click on Workstations in the left hand navigation frame. This displays an overview page for HP workstations. Click on your workstation model, for example HP Z210 Workstation, choosing either HTML or PDF. In the document that is displayed, click on Technical Specifications-Graphics. This displays expanded technical information for the graphics cards supported for your workstation. -
Page 30: Identifying Monitor Connection Requirements
Identifying monitor connection requirements The following are various scenarios for connecting monitors. (See Matching graphics cards to monitor connectors on page 21 for more information about the different graphic cards): Graphics card with DisplayPort output — If the workstation has a graphics card with four ●... -
Page 31: Connecting The Monitors
Connecting the monitors NOTE: HP-supported graphics cards typically support at least two monitors, as shown in this section; some supported cards support more monitors. Refer to the graphics card documentation for details. Connect the monitor cable adapters (1) (if required) to the workstation, then connect the appropriate monitor cables to the adapters (2) or directly to the graphics card, as shown in the following figure. -
Page 32: Using A Third-Party Graphics Configuration Utility
Using a third-party graphics configuration utility Third-party graphics cards may include a monitor configuration utility. Upon installation, this utility is integrated into Windows. You can select the utility and use it to configure multiple monitors with your workstation. Refer to your graphics card documentation for instructions on using the monitor configuration utility. NOTE: Some third-party configuration utilities require that you enable the monitors in Windows before using the configuration tool. -
Page 33: Setting Up The Operating System
Setting up the operating system This chapter provides setup and update information for the workstation operating system. It includes these topics: Topics Setting up the Microsoft operating system on page 26 Setting up Red Hat Enterprise Linux on page 27 Setting up Novell SLED on page 28 Updating the workstation on page 29 This chapter also includes information on how to determine that you have the latest BIOS, drivers, and... -
Page 34: Setting Up The Microsoft Operating System
Setting up the Microsoft operating system When you first apply power to the workstation, the operating system is installed. This process takes approximately 5 to 10 minutes. Carefully follow the instructions on the screen to complete the installation. CAUTION: After installation has started, do not turn off the workstation until the process is complete. Turning off the workstation during installation can damage the installation and operation of the software. -
Page 35: Setting Up Red Hat Enterprise Linux
Setting up Red Hat Enterprise Linux HP offers an HP Installer Kit for Linux (HPIKL) to supplement Red Hat box sets and help HP Linux customers customize their system image. The HPIKL contains the HP driver CD and device drivers to successfully setup up the Red Hat Enterprise Linux (RHEL) operating system, The HP Installer Kit for Linux CDs are currently available for download at http://www.hp.com/support/workstation_swdrivers. -
Page 36: Setting Up Novell Sled
Setting up Novell SLED HP offers an HP Installer Kit for Linux (HPIKL) to help HP Linux customers customize their system image. The HPIKL contains the HP driver CD and device drivers to successfully setup up the SUSE Linux Enterprise Desktop (SLED) operating system. The HP Installer Kit for Linux CDs are currently available for download at http://www.hp.com/support/workstation_swdrivers. -
Page 37: Updating The Workstation
Updating the workstation HP is constantly working on improving your total workstation experience. To ensure that the workstation leverages the latest enhancements, HP recommends that you install the latest BIOS, driver, and software updates on a regular basis. Updating the workstation after first boot After successfully booting the workstation for the first time, you should follow these guidelines to ensure that the workstation is up-to-date: Ensure that you have the latest system BIOS loaded. -
Page 38: Upgrading Bios
Upgrading BIOS To find and download the latest available BIOS, which includes the latest enhancements: Go to http://www.hp.com/go/workstationsupport. Select Download Drivers and Software from the left menu column under Tasks. Follow the instructions to locate the latest BIOS available for the workstation. If the BIOS on the Web site is the same as the version on your system, no further action is required. -
Page 39: Restoring The Operating System
Restoring the operating system This chapter describes how to restore the Windows or Linux operating system. It includes these topics: Topics Restore method on page 31 Ordering backup software on page 32 Restoring Windows 7 on page 32 Restoring Novell SLED on page 33 Restore method The Windows 7 operating system can be reinstalled using the HP Recovery Manager HP Recovery Manager reinstalls the Windows operating system and device drivers (for devices... -
Page 40: Ordering Backup Software
Ordering backup software You can order a recovery disk set from the HP support center. To obtain the support center telephone number for your region see http://www.hp.com/support/contactHP. Request the Windows 7 32-bit or 64-bit system recovery media kit. Restoring Windows 7 This section describes how to restore Windows 7. -
Page 41: Restoring Novell Sled
Restoring Novell SLED The SLED restore media is required to restore the Linux operating system. Creating restore media The SUSE Linux Enterprise Desktop preload includes a SUSE ISO icon on the desktop. You can click this icon to go to the /iso directory. The /iso directory contains all iso images used to preload your workstation. -
Page 42: Preparing For Component Installation
Chassis locks Side access panel Rotate front drive cage Rotate power supply to upward position to upright position (Z210 SFF) (Z210 SFF) Optical drive Chassis locks Side access panel Remove front bezel See the workstation Maintenance and Service Guide for chassis lock locations and operation instructions. - Page 43 Z210 CMT Z210 SFF Pull up on the handle (1), slide the cover 1.27 cm (0.5 Lift the side access panel handle (1), and remove the side inches) toward the rear of the system (2), then rotate the access panel (2).
- Page 44 (HP Z210 CMT only) Remove the front bezel as shown in the following illustration. Lift the release tabs (1), and then rotate the front bezel off the chassis (2). (HP Z210 SFF only) Rotate the front drive cage to the upright position.
- Page 45 (HP Z210 SFF only) Rotate the power supply to its upright position. The workstation is now prepared for the component installation procedures described in the chapters that follow. Preparing the workstation for component installation ENWW...
-
Page 46: Installing Memory
NOTE: — Install only HP-approved, unbuffered DDR3 DIMMs. — HP Z210 CMT and SFF Workstations support Error Checking and Correcting (ECC) and non-ECC DIMM memory modules. — Do not intermix ECC and non-ECC memory. The system will not boot and will produce a memory error. -
Page 47: Preparing For Component Installation On
Installing a DIMM To install a DIMM: Follow the procedures described in Preparing for component installation on page 34 to prepare the workstation for component installation. Push gently outward on the DIMM socket levers as shown in the following illustration. Figure 7-1 Opening DIMM socket levers Align the DIMM connector key with the DIMM socket key, and then seat the DIMM firmly in the... - Page 48 Secure the socket levers (2). Replace all components that were removed in preparation for component installation. Chapter 7 Installing memory ENWW...
-
Page 49: Installing Pci/Pcie Devices
PCI/PCIe devices such as graphics cards or audio cards can be installed in the expansion card slots on the workstation. Expansion card slot identification The following tables describe the expansion card slots in the HP Z210 Workstations. Z210 CMT Z210 SFF... -
Page 50: Power Limitations For Graphics Cards
CPU, and memory) must not exceed the maximum rating of the workstation power supply. When when planning, purchasing, and installing graphics cards in your workstation, observe the following power limitations: Z210 CMT ● Maximum allowable graphics card power for Slot 2 is 150W. Note that 75W is available ◦... - Page 51 Installing an expansion card (Z210 CMT shown) Close the retention clamp by rotating it downward (2) as shown in the illustration above. NOTE: For the Z210 SFF Workstation, close the expansion slot retention clamp making sure all cards are seated. Figure 8-2...
-
Page 52: Installing Hard Disk Drives
This section describes how to install a hard disk drive (HDD) in the workstation. HDD configuration The following table contains hard disk drive installation configuration information. Z210 CMT Z210 SFF HDD bays are designed to permit easy installation. Data cables are pre-connected in the workstation based on the factory configuration delivered. -
Page 53: Installing A Hard Disk Drive
HDD installation order Installing a hard disk drive This section describes how to install a hard disk drive in the workstation. Installing an HDD in an HP Z210 CMT Workstation To install an HDD: Follow the procedures described in Preparing for component installation on page 34 to prepare the workstation for component installation. - Page 54 Select a drive bay in which to install the hard disk drive and remove its mounting sled. Figure 9-1 Removing the mounting sled Install the HDD into the mounting sled as shown in the following figure. Figure 9-2 Installing the HDD in the mounting sled Chapter 9 Installing hard disk drives ENWW...
-
Page 55: Installing An Hdd In An Hp Z210 Sff Workstation
Blue SATA ports (numbered zero and one) support SATA Gen 3 (6 Gbit/sec). Replace all components that were removed in preparation for component installation. Installing an HDD in an HP Z210 SFF Workstation To install an HDD: Follow the procedures described in... - Page 56 Rotate the drive cage to its upright position. Figure 9-4 Rotating the Drive Cage Up Rotate the power supply to its upright position. The hard drive is located beneath the power supply. Figure 9-5 Rotating the power supply up Chapter 9 Installing hard disk drives ENWW...
- Page 57 Disconnect the power cable (1) and data cable (2) from the hard drive. Figure 9-6 Disconnecting power and data cables from the primary HDD Press down on the green release latch next to the hard drive (1). While holding the latch down, slide the drive forward until it stops, then lift the drive up and out of the bay (2).
- Page 58 To install a new hard drive, move the silver and blue isolation mounting guide screws from the old hard drive to the new hard drive. Figure 9-8 Installing the hard drive guide screws You can also install a 6.4 cm (2.5 in.) small form factor hard drive in the primary drive bay: Transfer the silver and blue isolation mounting guide screws from the old hard drive to a drive carrier.
-
Page 59: Installing A Secondary Hdd Or Media Card Reader Into A Z210 Sff
Replace all components that were removed in preparation for component installation. Installing a secondary HDD or media card reader into a Z210 SFF You can install an 8.89 cm (3.5 in) hard drive underneath the 13.3 cm (5.25 in) optical drive. A media card reader can also be installed at this location. - Page 60 USB connector on the system board labeled MEDIA. If the media card reader includes a 1394 port, connect the 1394 cable to the 1394 PCI card. Replace the optical drive. (See Installing an optical drive in an HP Z210 SFF Workstation on page 56.) Replace the front bezel.
-
Page 61: 10 Installing Optical Disk Drives
This section describes how to install an optical disk drive (ODD) in the workstation. Installing an optical drive in an HP Z210 CMT Workstation This section describes how to install an optical disk drive in the HP Z210 CMT Workstation in the mini- tower and desktop configurations. Installing an optical drive (mini-tower configuration) - Page 62 Align the screws with the grooves in the drive bay and gently slide the drive into the casing. Slide the drive completely in until it snaps into place. CAUTION: Verify that the optical disk drive is secure in the workstation chassis by pulling on the drive to see if it can be easily disengaged.
-
Page 63: Installing An Optical Drive (Desktop Configuration)
Failure to properly secure the drive can cause damage to the drive when moving the workstation. Connect the power and drive cables to the drive and system board. Figure 10-5 Connecting the power and data cables Installing an optical drive in an HP Z210 CMT Workstation ENWW... -
Page 64: Installing An Optical Drive In An Hp Z210 Sff Workstation
Installing an optical drive in an HP Z210 SFF Workstation To install or re-install an optical drive in an HP Z210 SFF Workstation: Follow the procedures described in Preparing for component installation on page 34 to prepare the workstation for component installation. - Page 65 The other is part of the chassis frame under the drive cage. Ensure that the data cable is routed through these guides before connecting it to the optical drive. Figure 10-9 Routing the drive cable Installing an optical drive in an HP Z210 SFF Workstation ENWW...
- Page 66 Connect the power cable (1) and data cable (2) to the rear of the optical drive. Figure 10-10 Connecting the power and data cables Carefully rotate the drive cage back down to its normal position. CAUTION: Be careful not to pinch any cables or wires when rotating the drive cage down. Replace the front bezel with any bezel blanks removed as applicable.
-
Page 67: Notice For Blu-Ray Optical Drives
Notice for Blu-ray optical drives If you installed a Blu-ray optical drive, note the following: Blu-ray movie playback As Blu-ray is a new format containing new technologies, certain disc, digital connection, compatibility and/or performance issues may arise, and do not constitute defects in the product. Flawless playback on all systems is not guaranteed. -
Page 68: Index
Index BIOS Installing Red Hat Linux Determining version 29 Expansion cards 41 Setting up 27 Updating 30 Hard drive 44 Restoring the operating system hardware 34 Restore method 31 Memory 39 Drivers Optical drive 53 Installing 26 Side access panel PCI/PCIe cards 41 Updating 26, 30 Removing 34...