Sony Bravia KDL-32CX520 Operating Instructions Manual
Lcd digital colour tv
Hide thumbs
Also See for Bravia KDL-32CX520:
- Service manual (41 pages) ,
- Operating instructions manual (36 pages) ,
- I-manual online (178 pages)
Table of Contents
Advertisement
LCD
Digital Colour TV
Operating Instructions
KDL-60EX720 / 55EX723 / 55EX720 / 46EX723 / 46EX720 / 46EX523 / 46EX520 / 46CX523 / 46CX520
KDL-40EX723 / 40EX720 / 40EX523 / 40EX520 / 40CX523 / 40CX520 / 32EX723 / 32EX720 / 32EX523
KDL-32EX520 / 32EX420 / 32CX523 / 32CX520 / 26EX423 / 26EX420 / 22EX423 / 22EX420
4-268-265-17(1)
Getting Started
Using Your BRAVIA TV
Network Setup
Additional Information
Advertisement
Table of Contents

Related Manuals for Sony Bravia KDL-32CX520


Summary of Contents for Sony Bravia KDL-32CX520
- Page 1 4-268-265-17(1) Getting Started Using Your BRAVIA TV Digital Colour TV Network Setup Operating Instructions Additional Information KDL-60EX720 / 55EX723 / 55EX720 / 46EX723 / 46EX720 / 46EX523 / 46EX520 / 46CX523 / 46CX520 KDL-40EX723 / 40EX720 / 40EX523 / 40EX520 / 40CX523 / 40CX520 / 32EX723 / 32EX720 / 32EX523 KDL-32EX520 / 32EX420 / 32CX523 / 32CX520 / 26EX423 / 26EX420 / 22EX423 / 22EX420...
-
Page 2: Trademark Information
Introduction Trademark information Thank you for choosing this Sony product. is a registered trademark of the DVB Before operating the TV, please read this Project. manual thoroughly and retain it for future HDMI, the HDMI Logo, and High- reference. Definition Multimedia Interface are... -
Page 3: Lcd Screen
(such as eye strain, fatigue, or nausea) equipment. Your co-operation shall while watching 3D video images or facilitate proper disposal & help prevent playing 3D video games. Sony potential negative consequences/hazards to recommends that all viewers take regular the environment and human health, which... -
Page 4: Table Of Contents
Table of Contents Getting Started Checking the accessories ......................6 Inserting batteries into the remote.................... 6 1: Attaching the Table-Top Stand .................... 7 2: Adjusting the viewing angle of the TV .................. 8 3: Connecting an antenna/cable/VCR..................10 4: Connecting audio/video devices ..................11 5: Preventing the TV from toppling over................. -
Page 5: Parts Description
After setting up your BRAVIA TV and learning basic operations with this manual, see the built-in manual (i-Manual) for further explanation of the features of your TV. This TV has a built-in manual (i-Manual). To access the i-Manual, press i-MANUAL on the remote, and select an item. For details, see page 18 of this manual. -
Page 6: Getting Started
Getting Started Checking the accessories Inserting batteries into the remote Remote (1) Size AAA batteries (R03 type) (2) B KDL-55/46/40/32EX723 and Table-Top Stand (1)* KDL-60/55/46/40/32EX720 Fixing screws for Table-Top Stand (M4 × 12) (2) (for KDL-26/22EX42x) Fixing screws for Table-Top Stand (M5 ×... -
Page 7: 1: Attaching The Table-Top Stand
B KDL-55/46/40/32EX723, 1: Attaching the Table-Top KDL-55/46/40/32EX720, KDL-46/40/32EX523, KDL-46/40/32EX520, Stand KDL-46/40/32CX523, KDL-46/40/32CX520 and KDL-32EX420 (except Australia and Except KDL-60EX720 New Zealand model) Refer to the supplied Table-Top Stand leaflet for proper attachment for some TV models. Place the TV set on the Table-Top Stand. B KDL-55/46/40/32EX723, KDL-55/46/40/32EX720, KDL-46/40/32EX523, KDL-46/40/32EX520,... -
Page 8: 2: Adjusting The Viewing Angle Of The Tv
For KDL-60EX720 Detaching the Table-Top Stand Align with the two dowels of the Table- from the TV Top Stand, and gently place the TV, To detach the Table-Top Stand from the TV, checking the f mark is facing the front. remove the screws fixed in step 3. - Page 9 Angle adjustment (Tilt) B KDL-32EX420 (Australia and New Zealand model) (except KDL-60EX720/ KDL-46/40/32CX523/ 0° KDL-46/40/32CX520) • Be careful not to pinch your fingers between the TV and stand when adjusting the angle. B KDL-55/46/40/32EX723, KDL-55/46/40/32EX720, KDL-46/40/32EX523, KDL-46/40/32EX520 and KDL-32EX420 (except Australia and New Zealand model) 0°...
-
Page 10: 3: Connecting An Antenna/Cable/Vcr
Connecting an antenna/cable and VCR 3: Connecting an antenna/ cable/VCR Connecting an antenna/cable Antenna cable (not supplied) AV cable (not supplied) Antenna cable Antenna cable (not supplied) (not supplied) Connecting a Set Top Box/recorder (e.g. DVD recorder) with HDMI Set Top Box/recorder (e.g. DVD recorder) -
Page 11: 4: Connecting Audio/Video Devices
4: Connecting audio/video 5: Preventing the TV from devices toppling over Antenna cable (not supplied) AV cable (not supplied) Install a wood screw (4 mm in diameter, not supplied) in the TV stand. Install a machine screw (M4, not supplied) into the screw hole of the TV. Tie the wood screw and the machine Antenna cable screw with a strong cord (not supplied). -
Page 12: 6: Organizing The Ac Power Cord/Bundling The Cables
6: Organizing the AC power KDL-55/46/40/32EX723, KDL-60/55/46/40/32EX720, cord/Bundling the cables KDL-46/40/32EX523, KDL-46/40/32EX520 and KDL-32EX420 (except Australia and B KDL-46/40/32CX52x New Zealand model) AC power cord B Except KDL-46/40/32CX52x • Before bundling the cables, remove the cable holder from the AC cover (see step 1 and 2). Reuse the KDL-32EX420 (Australia and New cable holder (see step 3) to bundle the other cables Zealand model) -
Page 13: 7: Performing The Initial Set-Up
7: Performing the initial set- Except For KDL-46/40/ KDL-46/40/32CX52x 32CX52x Follow the instructions on the screen. Programme Sorting: Changes the order of analogue channels stored in the TV. Press F/f to select the channel you want to move to a new position, then press Press F/f to select the new position for the channel, then press •... -
Page 14: Using Your Bravia Tv
Using Your BRAVIA TV Watching the TV Turn on the TV. Press 1 on the TV to turn on the TV. Select a mode. Select a TV channel. To use Digital Electronic Programme Guide (only available for EPG supported countries/ GUIDE regions) Press GUIDE in digital mode to display the programme... - Page 15 Parts and controls of the remote Use the supplied remote to control your TV. Basic remote operations are explained here. For details on all of the remote function, press i-MANUAL and see the built-in manual (i-Manual) (page 18). 1 :/1 Press to turn the TV on and off from standby mode.
-
Page 16: Selecting Various Functions And Settings (Home Menu)
Selecting various functions and settings (Home Menu) You can select all the features from the Home menu. See page 17 for the Home menu map. Press HOME. Press F/f/G/g/ to select items. 1, 3 To select items in the Home menu (e.g., selecting “Settings”) 1 Press G/g to select “Settings”. - Page 17 Home menu map After pressing HOME on the remote control, following icons are displayed as categories. The categories are available depending on your TV model, region, country and broadcasting conditions. You can select a list of TV channels, or a programme guide. Media You can enjoy photo/music/video content via USB devices or the home network.
-
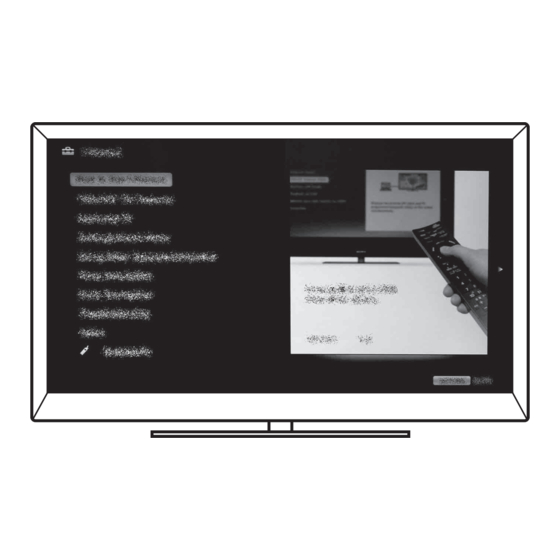
Page 18: Displaying Operating Instructions (I-Manual)
Displaying Operating Instructions (i-Manual) Operating instructions are built into your BRAVIA TV and can be displayed on the screen. To learn more about your TVs features, access your i-Manual with the touch of a button. Press i-MANUAL. Press F/f/G/g/ to select items. To select items in the i-Manual 1 Press F/f to select an item. - Page 19 Description of the i-Manual screen Press G to go back to the previous page Press f to go to the next page Page number/Total page number Press RETURN to go back to the previous page Press to launch the function •...
-
Page 20: Network Setup
Network Setup When you connect this TV to the Internet, you Preparing a wireless LAN can enjoy multiple functions: displaying a photograph that shows its location on the map, Wireless LAN Ready lets you easily access the enjoying Internet video, etc. For details on the Internet and your home network with the USB functions, refer to the i-Manual. -
Page 21: Setting Up The Internet Connection
For security purpose, “WPS (PIN)” provides a Setting up the Internet PIN code for your router. PIN code is renewed connection every time you select “WPS (PIN)”. Press HOME, then select > Using the network feature you can connect the “Network”... -
Page 22: If You Cannot Connect To The Internet
Type 3: Unsecured network with Viewing the network status any type of wireless LAN router You can confirm your network status. To set up a wireless LAN, SSID (wireless Press HOME, then select > network name) will be required. “Network” > “Network Set-up”. Press HOME, then select >... - Page 23 If you cannot connect to your home network The TV detects if the server is being correctly recognised when you cannot connect it to your home network. If the diagnostic results indicate a failure, check possible causes, and network connections and settings. Press HOME, then select >...
-
Page 24: Additional Information
When the 1 (standby) indicator is flashing, count how many times it flashes (interval time is three seconds). Press 1 on the TV to turn it off, disconnect the AC power cord, and inform your dealer or Sony service centre of how the indicator flashes (number of flashes). -
Page 25: Specifications
Specifications System Panel system LCD (Liquid Crystal Display) Panel TV system Analogue: B/G, I, D/K, M, L Digital: DVB–T Colour/video system Analogue: PAL, PAL60 (only video input), SECAM, NTSC3.58, NTSC4.43 (only video input) Digital: MPEG-2 MP@ML/HL, MPEG-2 MP@ML/HL, H.264/MPEG-4 AVC MP/HP@L4 Channel coverage Analogue: VHF: E2–E12/UHF: E21–E69/CATV: S01–S03, S1–S41 VHF: 0–12, 5A, 9A/UHF: 28–69/CATV: S01–S03, S1–S44 (Australia) - Page 26 Model name KDL- 60EX720 55EX72x 46EX72x 46EX52x 46CX52x 40EX72x 40EX52x 40CX52x Supplied accessories See “Checking the accessories” (page 6). Optional accessories Wall-Mount Bracket: SU-WL50B USB Wireless LAN Adaptor 3D Glasses: TDG-BR250, TDG-BR200, TDG-BR100, TDG-BR50 (for KDL-55/46/40EX723, KDL-60/55/46/40EX720) Camera and Microphone Unit: CMU-BR100 (except KDL-55/46/40EX723, KDL-46/40EX523, KDL-46/40CX523) Operating temperature 0 ºC –...
-
Page 27: Installing The Accessories (Wall-Mount Bracket)
6 cm. Use this space to route cables to the TV. Wall For product protection and safety reasons, Sony strongly recommends that installing of your TV be performed by Sony dealers or licensed contractors. Do not attempt to install it yourself. - Page 28 SU-WL50B and SU-WL100 When installing the base bracket on the wall (for SU-WL50B): Install one side of each plate to the upper bracket and the other side to the lower bracket. Attach the base bracket to the wall. Remove the plates. (except KDL-60EX720, KDL-55EX723, KDL-55EX720) •...
- Page 29 KDL-55/46/40/32EX723, KDL-60/55/46/32EX720, KDL-46/40/32EX523, KDL-46/40/32EX520, KDL-46/40/32CX523, KDL-46/40/32CX520 and KDL-32EX420 SU-WL50B Screw (+PSW 6 × 16) Mounting Hook × Soft cloth KDL-26/22EX423 and KDL-26/22EX420 SU-WL100 Screw (+PSW 4 × 12) Mounting Hook Soft cloth • Attach the Mounting Hook using four screws supplied with the Wall-Mount Bracket. •...
- Page 30 Screw and Hook locations diagram/table Model Name Screw location Hook location KDL- SU-WL50B SU-WL50B 60EX720 d, i 55EX72x e, j 46EX72x/46EX52x e, j 46CX52x d, i 40EX72x/40EX52x e, j 40CX52x d, i 32EX72x/32EX52x e, h 32EX420 e, h 32CX52x e, h SU-WL100 26EX42x 22EX42x...
- Page 31 SU-WL100 Hook location When installing the TV onto the Base Bracket. TV installation dimensions table 1 SU-WL50B Screen centre point 2 SU-WL100 Screen centre point (Continued)
- Page 32 Unit: mm Screen Length for each mounting angle Display dimensions centre Model Angle (0°) Angle (20°) dimension Name KDL- SU-WL50B SU-WL50B SU-WL50B 60EX720 1389 55EX72x 1269 46EX72x 1078 46EX52x 1078 46CX52x 1122 40EX72x 40EX52x 40CX52x 32EX72x 32EX52x/ 32EX420* 32EX420* 32CX52x SU-WL100 26EX42x 22EX42x...
-
Page 33: Safety Information
WARNING • Never cover the ventilation holes or insert – Use only Sony supplied AC power cords, anything in the cabinet. not those of other brands. Batteries must not be exposed to excessive • Leave space around the TV set as shown heat such as sunshine, fire or the like. - Page 34 TV set shall not be exposed to dripping or following problems occur. splashing and no objects filled with Ask your dealer or Sony service centre to liquids, such as vases, shall be placed on have it checked by qualified service the TV.
- Page 36 Instructions about “Installing Wall Mount Bracket” are included within this TV’s instructions manual. Customer Support: 4-268-265-17(1) © 2011 Sony Corporation Printed in Malaysia...