Table of Contents
Advertisement
Advertisement
Table of Contents

Related Manuals for Asus WL-330N


Summary of Contents for Asus WL-330N
- Page 1 WL-330N Portable Wireless N Router User Manual...
- Page 2 Product warranty or service will not be extended if: (1) the product is repaired, modified or altered, unless such repair, modification of alteration is authorized in writing by ASUS; or (2) the serial number of the product is defaced or missing.
-
Page 3: Table Of Contents
Table of contents Notices ....................v About this guide .................. vii Conventions used in this guide ............viii ASUS contact information ..............ix Chapter 1 Product introduction 1.1 Welcome! ..................1-2 1.2 Package contents ................. 1-2 1.3 Features ..................1-2 1.3.1... - Page 4 Table of contents 4.2.3 Repeater mode ............... 4-8 4.2.4 Ethernet Adapter mode ........... 4-9 4.2.5 Hotspot (WiFi Account Sharing) mode ......4-10 4.3 Advanced setting ............... 4-11 4.3.1 Wireless .................4-11 4.3.2 LAN ................4-24 4.3.3 WAN ................4-26 4.3.4 Internet Firewall ............4-29 4.3.5 Administration ...............
-
Page 5: Notices
Notices ASUS Recycling/Takeback Services ASUS recycling and takeback programs come from our commitment to the highest standards for protecting our environment. We believe in providing solutions for you to be able to responsibly recycle our products, batteries, other components, as well as the packaging materials. -
Page 6: Safety Statements
RF Exposure warning This equipment must be installed and operated in accordance with provided instructions and the antenna(s) used for transmitter must be installed to provide a separation distance of at least 20 cm from all persons and must be co-located or operating in conjunction with any other antenna or transmitter. -
Page 7: About This Guide
How this guide is organized This guide contains the following parts: • Chapter 1: Product introduction This chapter describes the physical features of the ASUS WL-330N. This part also presents the package contents, LED indicators, and recommended network settings. •... -
Page 8: Conventions Used In This Guide
This chapter provides instructions on how to configure the ASUS WL-330N using the web graphics user interface (web GUI). • Chapter 5: Using the device This chapter provides instructions on how to use the ASUS WL-330N on various network setups. • Appendix: Troubleshooting The Appendix features a troubleshooting guide for solving common problems you may encounter when using the ASUS WL-330N. -
Page 9: Asus Contact Information
+1-510-739-3777 +1-510-608-4555 Web site usa.asus.com Technical Support Telephone +1-812-282-2787 Support fax +1-812-284-0883 Online support support.asus.com ASUS COMPUTER GmbH (Germany and Austria) Address Harkort Str. 21-23, D-40880 Ratingen, Germany Telephone +49-1805-010923* +49-2102-959911 Web site www.asus.de Online contact www.asus.de/sales Technical Support Telephone (Component, Networking) - Page 11 Chapter 1 This chapter describes the physical features of the ASUS WL-330N. This part presents the package contents, LED indicators, and recommended network settings.
-
Page 12: Chapter 1 Product Introduction
64-bit/128-bit Wired Equivalent Privacy (WEP) encryption and Wi-Fi Protected Access (WPA) features. Package contents Check the following items in your ASUS WL-330N package. Contact your retailer if any item is damaged or missing. ASUS WL-330N Universal power adapter (110V ~ 240V) -
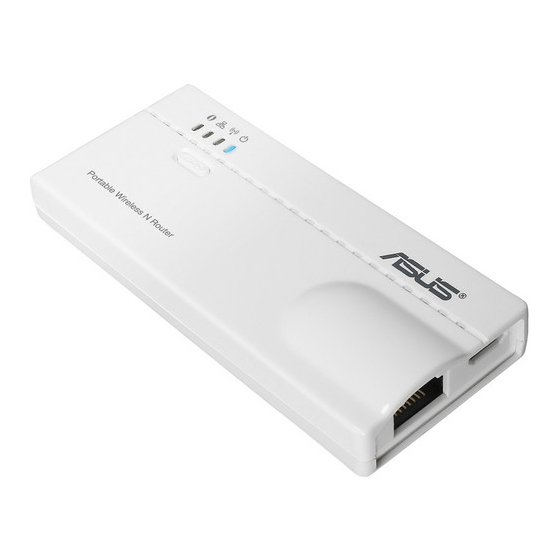
Page 13: Top View
1.3.1 Top view The ASUS WL-330N comes with Link status, Ethernet, Wireless, and Power LED indicators. Refer to the table below for LED indicators Status Mode* Indication Link Router/AP A wireless client has connected to status WL-330N successfully. EA/URE/HS WL-330N has connected to Wi-Fi station successfully. -
Page 14: Bottom View
*Modes: AP: Access Point mode EA: Ethernet adapter mode URE: Universal repeater mode HS: Hotspot (WiFi Account Sharing) mode 1.3.2 Bottom view Restore button: Using a pen or paper clip, press this button for five Air vents second or until the power LED starts blinking. -
Page 15: Recommended Network Settings
5. Hotspot (WiFi Account Sharing) mode 3. Ethernet Adapter mode 1.4.1 Router mode In the Router mode, the ASUS WL-330N connects to the Internet via an ADSL or a cable modem, and your network environment has multi-users using the same IP to ISP. ˝... -
Page 16: Ethernet Adapter Mode
When the Link status LED is on, it indicates that WL-330N has successfully connected to Wi-Fi station. 1.4.4 Repeater mode In the Repeater mode, you can use the ASUS WL-330N to connect with your root router at home to extend your wireless coverage. ˝ Internet... - Page 17 Chapter 2 This chapter provides information on how to install the ASUS WL-330N.
-
Page 18: Chapter 2 Hardware Installation
System requirements Before installing the ASUS WL-330N, make sure that your system/network meets the following requirements: • An Ethernet RJ-45 port (10-100Base-T) • At least one IEEE 802.11b/g/n device with wireless capability • An installed TCP/IP and Internet browser Device installation Follow these instructions to install the ASUS WL-330N. -
Page 19: Installing The Device
Connect the power adapter plug to the WL-330N DC-IN socket and connect the power adapter to a wall socket (A). Connect the USB power cord plug to the WL-330N DC-IN socket and connect the USB connectors into your computer’s USB ports (B). ASUS WL-330N... - Page 20 Chapter 2: Hardware installation...
- Page 21 Chapter 3 This chapter provides information on how to configure the ASUS WL-330N using the utilities available from the support CD.
-
Page 22: Chapter 3 Utilities
Installing the utilities The support CD contains the utilities for configuring the ASUS WL-330N. To install the ASUS WLAN Utilities in Microsoft Windows, insert the support CD in the CD ® drive. If Autorun is disabled, run setup.exe from the root directory of the support 2. -
Page 23: Launching The Utilities
3.1.1 Launching the utilities To launch the utilities, click Start > All Programs > ASUS Utility from the Windows desktop. Device Discovery Device Discovery is an ASUS WLAN utility which detects an ASUS device, and enables you to configure the device. -
Page 24: Firmware Restoration
3. Use the following to set up your TCP/IP settings: IP address: 192.168.1.x Subnet mask: 255.255.255.0 4. From your computer’s desktop, click Start > All Programs > ASUS Utility > WL-330N Wireless Router > Firmware Restoration. Chapter 3: Utilities... - Page 25 Chapter 4 This chapter provides instructions on how to configure the ASUS WL-330N using the web graphics user interface (web GUI).
-
Page 26: Chapter 4 Configuration
Overview The web graphics user interface (web GUI) allows you to configure the ASUS WL- 330N using a web browser on your computer. 4.1.1 Adjusting the TCP/IP settings By default, the IP address of the ASUS WL-330N is 192.168.1.1, and the Subnet Mask is 255.255.255.0. - Page 27 Obtain DNS server address automatically for your computer to automatically obtain an IP address from the DHCP and DNS servers. Changing the TCP/IP settings may require you to reboot your computer. Turn on the WL-330N immediately after rebooting your computer. ASUS WL-330N...
-
Page 28: Launching The Web Gui
4.1.2 Launching the web GUI To launch the web GUI: 1. In your web browser, enter 192.168.1.1. The login screen appears. 2. Use admin as the username and password. The Setup Wizard is then displayed. The Setup Wizard displays five operation modes that you can configure using the web GUI. -
Page 29: Operation Modes
The ASUS WL-330N is designed with five operation modes: Router, Access Point (AP), Ethernet Adapter, Repeater, Hotspot. 4.2.1 Router mode In the Router mode, the ASUS WL-330N connects to the Internet via an ADSL or a cable modem, and your network environment has multi-users using the same IP to ISP. ˝... -
Page 30: Access Point (Ap) Mode
5. Click Apply to save the settings. After setting the ASUS WL-330N in Router mode, you need to connect the WL-330N’s LAN port to an ADSL modem and connect your computer to WL-330N’s SSID via wireless connection. For more details on setting up the advanced functions, refer to the section 4.3 Advanced Setting. - Page 31 4. Click Apply to save the settings. • For more details on setting up the advanced functions, refer to section 4.3. Advanced Setting. • Use the ASUS Device Discovery to search for your WL-330N. For more details, refer 3.1.1 Launching the utilities. ASUS WL-330N...
-
Page 32: Repeater Mode
• For more details on setting up the advanced functions, refer to section 4.3. Advanced Setting. • Use the ASUS Device Discovery to search for your WL-330N. For more details, refer 3.1.1 Launching the utilities. • You can also reset all settings to their factory defaults manually by pressing the "Reset"... - Page 33 In the Networl Adapter mode, you can enable any Ethernet-capable device to go wireless. ˝ Internet WL-330N To configure the ASUS WL-330N in Network Adapter mode: 1. Click the Network Adapter tab. The Network Adapter page appears. 2. From the available device of site survey list, select the device you want to connect to. 3. Click Connect. ASUS WL-330N...
-
Page 34: Hotspot (Wifi Account Sharing) Mode
• For more details on setting up the advanced functions, refer to section 4.3. Advanced Setting. • The DUT’s IP address is changed to 192.168.220.1. • You can also reset all settings to their factory defaults by pressing the "Reset" button on the ASUS WL-330N while it is ON. 4-10 Chapter 4: Configuration... -
Page 35: Advanced Setting
Advanced setting When you click the link Advance Setting from any of the modes, the screen shown below is displayed. 4.3.1 Wireless Click an item on the page and follow the instructions to set up the ASUS WL-330N. ASUS WL-330N 4-11... - Page 36 The SSID is an identification string of up to 32 ASCII characters that differentiate the ASUS WL-330N from other manufacturers. The SSID is also referred to as the “ESSID” or “Extended Service Set ID.” You can use the default SSID and radio channel unless more than one WL-330N is deployed in the same area.
- Page 37 Based on your site survey of your network facility, make sure that all the ASUS WL-330N sharing the same channel, or channels in close number frequency, are located far from each other as possible.
- Page 38 Together these two schemes make a 64-bit (40 + 24) encryption scheme. Some vendors refer to this level of WEP as 40-bit and others refer to this as 64-bit. ASUS WLAN products use the term 64-bit when referring to this lower level of encryption.
- Page 39 The ASUS WLAN family of products uses the same algorithm to generate WEP keys. It eliminates the need for users to remember passwords and maintains compatibility between products. But, this method to generate WEP keys is not as secure as manual assignment.
-
Page 40: Using Wps Wizard
ASUS WL-167g v2 driver v.1.2.2.0 or later ASUS WL-160N/WL-130N driver v.1.0.4.0 or later Windows XP/2003 64-bit ASUS wireless LAN card with ASUS WLAN Utility Windows XP 32-bit SP1/ XP 32-bit ASUS WL-167g v2 driver v.1.2.2.0 or later Windows 2003 32-bit SP1 / 2003 ASUS WL-160N/WL-130N driver v.1.0.4.0 or later... - Page 41 • When running WPS, the Internet connection pauses briefly then reestablishes the connection. • If the WPS button is pushed without running the WPS Wizard, the WPS indicator flashes and Internet connection pauses briefly and then reestablishes the connection. ASUS WL-330N 4-17...
- Page 42 4. Key in desired network name or SSID (service set identifier). When done, click Next. 5. Create and key in a passphrase consisting of 8-63 characters or use the automatically generated passphrase then click Next. A passphrase is a sentence, phrase, or sequence of alpha-numeric characters used to generate a security key.
- Page 43 For more details on adding devices to the network using a USB flash drive, refer to the section Adding network devices using a USB flash drive on the next page. 7. You have connected to the WL-330N. If you want to configure the Internet settings, click Quick Internet Setup. ASUS WL-330N 4-19...
- Page 44 Adding network devices using a USB flash drive With the WPS utility, you can add devices to your network using a USB flash drive. To add network devices using a USB flash drive: 1. In the WPS Wizard, click Save settings to a USB flash drive. 2. Insert a USB flash drive into your computer's USB port, then select the drive from the dropdown list.
- Page 45 4. Locate SetupWireless.exe from the USB drive, and double-click to run it. Click Yes to add the computer to the wireless network. 5. Click OK to exit the Wireless Network Setup Wizard. ASUS WL-330N 4-21...
-
Page 46: Wireless Mac Filter
Disable (no info required) Accept (need to input information) Reject (need to input information) For security, the ASUS WL-330N allows you to accept or reject wireless mobile clients. The default setting of “Disable” allows any wireless mobile client to connect. - Page 47 Enable TX Bursting – This field allows you to enable TX-bursting mode to improve performance with wireless clients that also support TX-bursting. Enable Packet Aggregation - This field allows you to enable Packet Aggregation. Enable Greenfield - This field allows you to enable Greenfield. ASUS WL-330N 4-23...
-
Page 48: Lan
Enable WMM DLS - This field allows you to enable WMM DLS. 4.3.2 Click this item on the menu and follow the instructions to setup the ASUS WL-330N. LAN IP This page allows you to configure the LAN IP of WL-330N. The DHCP Server dynamically changes the IP pool when you change the LAN IP. -
Page 49: Dhcp Server
WL-330N if the DHCP server is enabled. Route This function allows you to add routing rules into the ASUS WL-330N. It is useful if you connect several routers behind WL-330N to share the same connection to the Internet. -
Page 50: Wan
4.3.3 Click this item on the menu and follow the instructions to setup the ASUS WL-330N. Internet Connection WL-330N supports several connection types to WAN. The settings fields differ depending on the connection type you selected. 4-26 Chapter 4: Configuration... -
Page 51: Port Trigger
This function allows you to open certain TCP or UDP ports to communicate with the computers connected to the ASUS WL-330N. This is done by defining trigger ports and incoming ports. When the trigger port is detected, the inbound packets to the specified incoming port numbers are redirected to your computer. -
Page 52: Virtual Dmz
Virtual DMZ This function allows you to expose a computer to the Internet, so that all inbound traffics will be redirected to the computer you set. It is useful when you run some applications that use uncertain incoming ports. Use this function carefully. DDNS This function allows you to assign an Internet domain name tto a computer with a dynamic IP address. -
Page 53: Internet Firewall
If you want to filter out specific packets, refer to the next section LAN to WAN Filter. URL Filter This function allows you to block specific URL access from your local network. ASUS WL-330N 4-29... -
Page 54: Mac Filter
MAC Filter This function allows you to block packets from devices with specific MAC address in your LAN and Wireless LAN. LAN to WAN Filter This function allows you to block specific packets between LAN and WAN. First, you should define the date and time that filtering will take place. Next, you should select the default action for filter in both directions and insert rules for any exceptions. -
Page 55: Administration
4.3.5 Administration Click this item on the menu and follow the instructions to setup the ASUS WL-330N. System This function allows you to change your password and configure other settings such as Remote Log Server, Time Zone, and NTP Server. -
Page 56: Firmware Upgrade
Firmware Upgrade This page reports the Flash Code (Firmware) version installed in the ASUS WL-330N. Periodically, a new Flash Code is available for the ASUS WL-330N on ASUS’s Web site. You can update the ASUS WL-330N’s Flash Code using the Firmware Upgrade page under the Administration menu of the Web Manager. - Page 57 You can also reset all settings to their factory defaults manually by pushing the “Restore” button on the ASUS WL-330N while it is ON. Push the “Restore” button with a pen or a paper clip for about 5 seconds or until the power LED starts blinking.
-
Page 58: System Log
4.3.6 System Log Click this item on the menu to view related information about the ASUS WL-330N. General Log DHCP Leases 4-34 Chapter 4: Configuration... - Page 59 Wireless Log Port Forwarding Routing Table ASUS WL-330N 4-35...
- Page 60 4-36 Chapter 4: Configuration...
- Page 61 Chapter 5 This chapter provides instructions on how to use the ASUS WL-330N on various network setups.
-
Page 62: Chapter 5 Using The Device
ADSL or cable modem. To do this: 1. Switch the WL-330N to AP mode. (Default SSID: ASUS), then turn on the device. 2. Connect one end of the supplied RJ-45 cable to the Ethernet port of the device and the other end to the Ethernet port of the ADSL or cable modem. -
Page 63: Replacing The Cable Connections Of Other Devices
To do this: 1. Switch the WL-330N to Ethernet adapter mode using the mode switch. (Default SSID: ASUS) 2. Place the WL-330N nearest the AP you wish to connect, then turn on the device. 3. Connect one end of the supplied RJ-45 cable to the Ethernet port of the device and the other end to the Xbox, PlayStation 2, or set-top box Ethernet port. - Page 64 Table 4-1: Internet connection sharing matrix If your Internet Then set the IP of Number of allowed connection is other computer(s) Internet connections xDSL1 with dynamic IP ISP automatically Depends on the Internet (PPPoE2 account) assigns the IP (using Service Provider (ISP) PPPoE dial-up) xDSL with static IP to the provided static IP...
- Page 65 Appendix The Appendix features a troubleshooting guide for solving common problems you may encounter when using the ASUS WL-330N.
-
Page 66: Appendix Troubleshooting
This troubleshooting guide provides solutions to some common problems that you may encounter while installing or using the ASUS WL-330N. These problems require simple troubleshooting that you can perform by yourself. Contact the ASUS Technical Support if you encounter problems not mentioned in this section. - Page 67 ASUS WL-330N (IEEE 802.11b/ the ASUS WL-330N. g/n). Minimize the distance between the devices. The ASUS WLAN card may be out of range of the ASUS WL-330N. • Check if the ASUS WL-330N and the ASUS WLAN card have the same SSID.
- Page 68 Action A wireless client wants Make sure the DHCP server is working properly. to connect to the ASUS Some DHCP servers can only assign one IP address WL-330N but can not at a time. In this case, assign a fixed IP address to get the correct IP from your ASUS WL-330N.