Sony HVR-DR60 - 60GB Hard Disk Recorder Operating Instructions Manual
Hard disk recording unit
Hide thumbs
Also See for HVR-DR60 - 60GB Hard Disk Recorder:
- Specifications (6 pages) ,
- Brochure & specs (12 pages) ,
- Service manual (80 pages)
Table of Contents
Advertisement
2-898-341-11(1)
Hard Disk
Recording Unit
Operating Instructions
Owner's record
The model number and the serial number are located at the name plate on the left of the
unit. Record the serial number in the space provided below. Refer to these numbers
whenever you call upon your Sony dealer regarding this product.
Model No. HVR-
Serial No. ______________________
HVR-DR60
2006 Sony Corporation
Advertisement
Table of Contents

Related Manuals for Sony HVR-DR60 - 60GB Hard Disk Recorder


Summary of Contents for Sony HVR-DR60 - 60GB Hard Disk Recorder
-
Page 1: Operating Instructions
The model number and the serial number are located at the name plate on the left of the unit. Record the serial number in the space provided below. Refer to these numbers whenever you call upon your Sony dealer regarding this product. Model No. HVR- Serial No. - Page 2 If you have any questions about this product, you may WARNING call: Sony’s Business Information Center (BIC) at 1-800- To reduce fire or shock hazard, do not 686-SONY (7669) expose the unit to rain or moisture. Declaration of Conformity Trade Name:...
- Page 3 The recycling of materials will help to conserve natural resources. For more detailed information about recycling of this product, please contact your local Sony office or visit Sony Europe’s web site for business customers: http://www.sonybiz.net/environment Caution Television programs, films, video tapes and other materials may be copyrighted.
-
Page 4: Table Of Contents
• “InfoLITHIUM” is a trademark of Sony Corporation. Table of contents • i.LINK and are trademarks of Sony Corporation. • HDV and the HDV logo are trademarks of Sony Corporation and Victor Company of Japan, Ltd. • Microsoft, Windows, and Windows Media are either registered trademarks or trademarks of Microsoft Overview ............ -
Page 5: Overview
Overview Features Supported models The HVR-DR60 can be used connected to the camcorder/ • Long recording time, small and light body VTR. The 1.8-inch internal HDD provides a large 60 GB capacity. For details of supported models, refer to the supplied “Guide Although the HVR-DR60 only weighs about 230 g, it to supported models and their functions.”... -
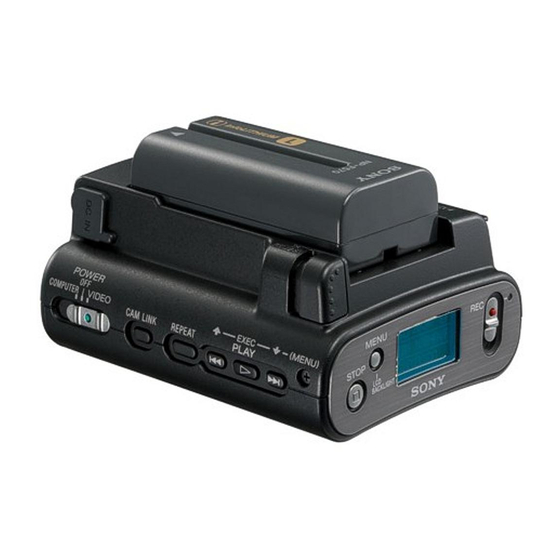
Page 6: Names Of Parts
Names of parts Hard Disk Recording Unit qd qf 1 BATT RELEASE button qa CAM LINK button Remove the battery pack from this unit by pressing the Switch to CAM LINK [ON] (FOLLOW/SYNCHRO) to BATT RELEASE button. record video in conjunction with the recording operation of the camcorder, or to CAM LINK [OFF] to record with 2 STOP button this unit alone. -
Page 7: Lcd Screen Display
LCD screen display VIDEO mode During recording During playback 1 2 3 1 Power supply display 6 Folder name display Display the power supply icons. Display the folder name in which the recording/playback data is saved. Battery pack in use Display the remaining battery capacity. -
Page 8: Getting Prepared
Getting prepared Remaining battery time indication in the AC Preparing the power supply adaptor/charger display window This indication is provided by data communications between the AC adaptor/charger and the InfoLITHIUM battery pack. To charge the battery pack This unit does not have a data communications function, so When using an InfoLITHIUM battery pack (L-series, the displayed time may differ from the actual remaining time. - Page 9 AC adaptor/charger To connect this unit to a wall outlet Do not short-circuit the DC plug of the AC adaptor/charger For prolonged operation, such as playing the recorded or battery terminal with any metallic objects. This may cause images, you can operate this unit from a domestic wall outlet a malfunction.
-
Page 10: Using In Video Mode
Using in VIDEO mode Connecting this unit to a camcorder As an example, the following steps and illustration show how to connect this unit to an HVR-V1U/V1N/V1E/V1P digital HD camcorder. Attach the supplied shoe adaptor to this unit. Attach this unit to the accessory shoe of the HVR-V1U/ V1N/V1E/V1P. -
Page 11: Menu Organization
Menu organization AUTO PLAY MODE CAM LINK SEL FOLLOW SYNCHRO CACHE REC DELETE LAST SHOT FORMAT TC FORMAT AUTO DV FILE TYPE RAW DV SLEEP MODE 3G SENSOR ALL RESET * Boldface settings are default settings. 1 PLAY MODE 4 DELETE You can switch the playback format. - Page 12 6 DV FILE TYPE Changes the DV recording format. • AVI ..... Records video in AVI format. • RAW DV ... Records video in DV format. 7 SLEEP MODE You can set the sleep mode to ON or OFF. • ON ..... Sleep mode is set to ON. •...
-
Page 13: Recording Images From The Camcorder To This Unit
Recording images from the camcorder to this unit Images recorded by the camcorder can be recorded onto this x Recording video simultaneously on this unit and unit. a camcorder – Connecting to a camcorder with an “external REC control” function (SYNCHRO mode) Recording images When connected to a camcorder that has an external REC (POWER switch at the VIDEO side) - Page 14 x Recording video on this unit while changing the Cache recording mode tape of the camcorder The most recent approximately maximum 14 seconds of When connected to a camcorder that has an external REC video and audio captured by the camcorder are held in a control function, you can record video on this unit only buffer memory and automatically recorded on the hard disk while changing the tape or the camcorder, so that you do...
-
Page 15: Playback The Image From The Camcorder
Playback the image from the camcorder To play back video data recorded on this unit, you need to Trick playback connect this unit to a playback device via an i.LINK cable. When the playback file is output to i.LINK, the file is played at triple the normal speed. -
Page 16: Useful Functions In Combination With Hvr- V1U/V1N/V1E/V1P
You can record the time code of the HVR-V1U/V1N/V1E/ Useful functions in combination V1P without a tape in the HVR-V1U/V1N/V1E/V1P. with HVR- V1U/V1N/V1E/V1P If you want to record video using the time code of the HVR- V1U/V1N/V1E/V1P, set the time code Tapeless external REC control setting of the HVR- V1U/V1N/V1E/V1P as follows. - Page 17 Display the operational status of this unit on the HVR-V1U/V1N/V1E/V1P LCD screen CAMERA mode – Indicators – Status check indicator • The following information can be displayed on the LCD • The following information can be displayed on the status screen of the HVR-V1U/V1N/V1E/V1P.
- Page 18 VCR mode – Indicators – Status check indicator • The following information can be displayed on the LCD • The following information can be displayed on the status screen of the HVR-V1U/V1N/V1E/V1P. check indicator (VCR mode) of the HVR-V1U/V1N/V1E/ V1P. 1 HDD connecting status PB FORMAT This icon is displayed when this unit is connected to the...
-
Page 19: Using In Computer Mode
Using in COMPUTER mode Connecting to a computer You can transfer recorded images on this unit as a file in HDV or DV format to a nonlinear editing system or computer. Attach the AC adaptor to this unit. For extended use, using the AC adaptor is recommended. This unit can still be operated even with the battery pack attached. -
Page 20: Folder Saving Format
Folder saving format Folder organization The file/folder organization on the HDD of this unit is as follows. VIDEO 100DVF 100DVF.IDX DVS10001.AVI 100DVF.IDX DVS10002.AVI 101DVF 999DVF.IDX 999DVF DVS99901.DV HDVF 100HDVF 100HDVF.IDX HDV10001.M2T File number HDV10001.TS Format 01 - 99 100HDVF.IDX HDV10002.M2T HDV10002.TS HDV xxx xx .M2T 101HDVF... -
Page 21: Hdd Organization
HDD organization Video area • Up to 4.5 hours of video data can be recorded. • Do not save the file. • Do not transfer data from a computer to this unit in Video area COMPUTER mode. Write back the data in VIDEO mode. •... -
Page 22: Trouble Shooting
• During repair work, Sony may perform a minimal check of the data on a hard disk in order to verify improvements or the occurrence of defective symptoms. However, Sony never copies or saves the data. - Page 23 Symptom Cause/Remedy • This unit is recording the image you just shot. The ACCESS lamp remains on even when you stop recording. t Do not remove the AC adaptor or the battery pack while the lamp is turned on. • The temperature of this unit is extremely high. Recording stops.
-
Page 24: Warning Indicators
Self-diagnosis display When an error occurs the following warning indicators may appear on the LCD screen. Message Cause/Corrective Action If an error recurs after you repeat corrective action several times, contact Sony A:ss:ss/I:ss:ss/M:ss:ss/ Customer Service or the place of purchase. X:ss:ss/F:ss:ss... -
Page 25: Notes On Using The Hard Disk Drive
Notes on using the hard disk drive Save all your recorded image data • In the case of your image data being damaged, save all your recorded images. It is recommended that you use this unit or your computer to save the image data on a tape or DVD etc. -
Page 26: About I.link
• i.LINK is an easy-to-remember term for the IEEE 1394 the device is connected to the AC outlet, a high-voltage proposed by Sony, and is a trademark approved by many current (8 to 40 V) output from the i.LINK jack of the device corporations in Japan and overseas. -
Page 27: Specifications
Specifications System File system FAT32 Hard disk 60 GB The capacity is the value when 1 GB equals 1 billion bytes. The actual usable capacity may be slightly less because administrative files etc. are included. File format HDV recording MPEG-2TS (.m2t) DVCAM/DV recording AVI-Type1... -
Page 28: Precautions
If this unit gets wet, it may malfunction. Sometimes this malfunction cannot be repaired. • If any solid object or liquid gets inside the casing, unplug this unit and have it checked by a Sony dealer before operating it any further. • Avoid rough handling, disassembling, modifying, physical shock, or impact such as hammering, dropping or stepping on this unit. -
Page 29: Getting The Best Performance From The Battery Pack
Getting the best performance from the battery pack • If the ambient temperature is low, the battery pack performance deteriorates, reducing the operating time. To maximize the operating time, the following techniques are recommended. – Keep the battery pack warm in a pocket, and load it into the unit immediately before shooting. - Page 30 Additional information on this product and answers to frequently asked questions can be found at our Customer Support Website.