
Related Manuals for Pioneer DEH-4400HD


Summary of Contents for Pioneer DEH-4400HD
- Page 1 CD RDS RECEIVER REPRODUCTOR DE CD CON RECEPTOR RDS DEH-4400HD DEH-44HD Owner’s Manual Manual de instrucciones...
-
Page 2: Before You Start
Section Before you start Before you start Thank you for purchasing this PIONEER the following measures: About this unit Important (Serial number) product - Reorient or relocate the receiving antenna. The serial number is located on the bottom of The tuner frequencies on this unit are allocated... -
Page 3: Head Unit/Remote Control Overview
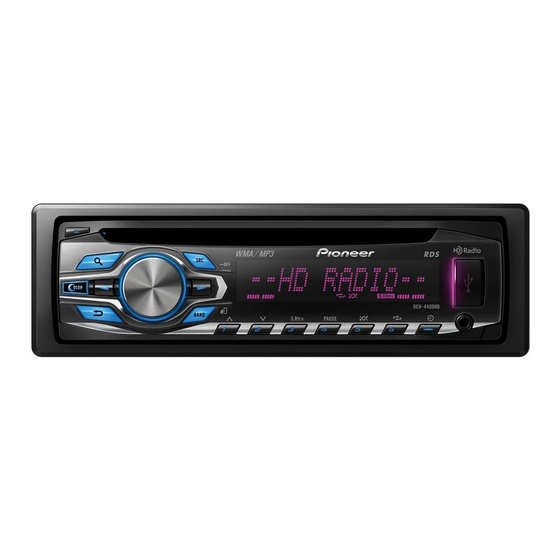
Should this unit fail to operate properly, please Press to select different dis- CAUTION contact your dealer or nearest authorized plays. ! Use an optional Pioneer USB cable (CD- DISP/SCRL PIONEER Service Station. Press and hold to turn dimmer U50E) to connect the USB audio player/USB on or off. -
Page 4: Basic Operations
Section Operating this unit Operating this unit Display indication After installation of this unit, turn the Basic operations Removing the front panel to protect your unit from ignition switch to ON. theft Important SET UP appears. 1 Press the detach button to release the front ! Handle gently when removing or attaching panel. -
Page 5: Use And Care Of The Remote Control
Section Operating this unit Operating this unit Menu operations identical Selecting a source WARNING 1 Press SRC/OFF to cycle between: for set up menu/function ! Keep the battery out of the reach of children. TUNER (tuner)—CD (built-in CD player)—USB settings/audio adjustments/ Should the battery be swallowed, consult a (USB)/iPod (iPod)—AUX (auxiliary) doctor immediately. - Page 6 Section Operating this unit Operating this unit Basic operations Press one of the preset tuning buttons (1 CD/CD-R/CD-RW and USB Local seek tuning lets you tune in to only those to 6) to select the desired station. storage devices radio stations with sufficiently strong signals for # You can also recall stored radio stations by press- Selecting a band good reception.
-
Page 7: Ipod
Section Operating this unit Operating this unit Note Advanced operations using Notes REPEAT (repeat play) Disconnect USB storage devices from the unit ! The iPod cannot be turned on or off when the special buttons when not in use. control mode is set to CTRL AUDIO. 1 Press M.C. -
Page 8: Function Settings
Section Operating this unit Operating this unit Notes Turn M.C. to change the mode; press to % Press BAND/ to switch the control 1 Press M.C. to select your favorite setting. select. mode. ! You can play playlists created with the PC ap- ! SNG –... -
Page 9: Initial Settings
Section Operating this unit Operating this unit Audio adjustments Loudness compensates for deficiencies in the low- SLA (source level adjustment) This setting allows you to switch your source to frequency and high-frequency ranges at low vol- USB/iPod automatically. Press M.C. to display the main menu. SLA (Source level adjustment) lets you adjust the 1 Press M.C. - Page 10 Section Operating this unit Operating this unit Turn M.C. to display KEY COLOR and Note Turn M.C. to adjust the brightness level. The RCA outputs can be used for rear speaker or press to select. Adjustment range: 0 to 60 For details about colors on the list, refer to Se- subwoofer connection.
-
Page 11: Power Cord
Section Installation Installation Connections ! Use this unit with a 12-volt battery and nega- This unit Perform these connections when using a sub- tive grounding only. Failure to do so may re- woofer without the optional amplifier. sult in a fire or malfunction. WARNING ! To prevent a short-circuit, overheating or mal- ! Use speakers over 50 W (output value) and... -
Page 12: Power Amp (Sold Separately)
Section Installation Installation j When using a subwoofer of 70 W (2 Ω), be Installation Secure the mounting sleeve by using a DIN Rear-mount sure to connect the subwoofer to the violet screwdriver to bend the metal tabs (90°) into Determine the appropriate position Important place. -
Page 13: Additional Information
Removing and re-attaching the When you contact your dealer or your nearest play. onds. front panel Pioneer Service Center, be sure to note the error The repeat Depending on Select the repeat message. You can remove the front panel to protect your... - Page 14 Appendix Additional information Additional information Message Cause Action Message Cause Action Message Cause Action Message Cause Action NO AUDIO The inserted Replace the disc. SKIPPED The connected Play an audio file CHECK USB The USB con- Check that the ERROR-19 Communication Perform one of disc does not...
-
Page 15: Handling Guidelines
Appendix Additional information Additional information DualDiscs To clean a CD, wipe the disc with a soft cloth out- Firmly secure the USB storage device when driv- Message Cause Action ward from the center. ing. Do not let the USB storage device fall onto the DualDiscs are two-sided discs that have a record- NOT FOUND No related... -
Page 16: Ipod Compatibility
File system: ISO 9660 Level 1 and 2, Romeo, Joliet that specify the playback sequence (e.g., USB Cable is required. 001xxx.mp3 and 099yyy.mp3). Multi-session playback: Compatible 2 Put those files into a folder. A Pioneer CD-IU51 interface cable is also avail- able. For details, consult your dealer. -
Page 17: Copyright And Trademark
Appendix Additional information Additional information 3 Save the folder containing files on the USB “Made for iPod” and “Made for iPhone” mean Specifications Subwoofer (mono): Frequency ....50 Hz/63 Hz/80 Hz/100 Hz/ storage device. that an electronic accessory has been designed 125 Hz General However, depending on the system environment,... - Page 18 Appendix Additional information Signal-to-noise ratio ..62 dB (analog broadcasting) (IHF-A network) CEA2006 Specifications Power output ....14 W RMS × 4 Channels (4 W and ≦ 1 % THD+N) S/N ratio ......91 dBA (reference: 1 W into 4 W) Note Specifications and the design are subject to modifications without notice.
-
Page 20: Antes De Comenzar
La demostración se inicia automáticamente si nario o con el centro de servicio PIONEER transcurren unos 30 segundos sin usar ninguna autorizado más cercano. función desde la última vez que la utilizó y si la PRECAUCIÓN... -
Page 21: Mando A Distancia
Gire M.C. para cambiar a YES. Para selec- PRECAUCIÓN cuencia cionar, pulse M.C. Pulse este botón para seleccio- ! Utilice un cable USB Pioneer opcional (CD- ! Reproductor de CD incor- nar diferentes visualizaciones. # El menú de configuración desaparece si no se Sección... -
Page 22: Utilización De Esta Unidad
Sección Utilización de esta unidad Utilización de esta unidad Siga los siguientes pasos para ajustar el ! Mantenga el panel frontal fuera del alcance Uso y cuidado del mando a Encendido de la unidad menú: de la luz solar directa y no lo exponga a altas 1 Pulse SRC/OFF para encender la unidad. - Page 23 Sección Utilización de esta unidad Utilización de esta unidad ! De producirse fugas en la pila, limpie com- Sintonizador Funcionamiento básico Almacenamiento y recuperación pletamente el mando a distancia e instale de emisoras para cada banda Acerca de la radiodifusión HD una pila nueva.
-
Page 24: Cd/Cd-R/Cd-Rw Y Dispositivos De Almacenamiento Usb
Sección Utilización de esta unidad Utilización de esta unidad Gire M.C. para cambiar la opción de Visualización de información de BLEND (modo de recepción) Detención de la reproducción de archivos en un menú y pulse para seleccionar FUNCTION. texto dispositivo de almacenamiento USB Si la calidad de recepción de una emisión digital 1 Puede desconectar el dispositivo de almace- Gire M.C. - Page 25 Sección Utilización de esta unidad Utilización de esta unidad Operaciones avanzadas mediante Gire M.C. para seleccionar la función. Selección de un álbum Visualización de una lista de canciones de la cate- Una vez seleccionada, siga los siguientes pasos el uso de botones especiales 1 Pulse 1/ o 2/ .
- Page 26 Sección Utilización de esta unidad Utilización de esta unidad — Pausa Operaciones avanzadas mediante Reproducción de canciones Uso de la función iPod de esta — Avance rápido/retroceso el uso de botones especiales relacionadas con la canción que unidad desde el iPod —...
-
Page 27: Ajustes De Audio
Sección Utilización de esta unidad Utilización de esta unidad Ajustes de audio La sonoridad compensa las deficiencias en las SLA (ajuste del nivel de fuente) 1 Pulse M.C. para activar la función de repro- gamas de frecuencias bajas y altas cuando se es- Pulse M.C. -
Page 28: Selección De La Iluminación En Color
Sección Utilización de esta unidad Utilización de esta unidad Selección del color de las teclas de Pulse USB PNP (plug and play) Las salidas de RCA pueden usarse para conectar la lista de colores de la iluminación los subgraves o los altavoces traseros. Gire M.C. -
Page 29: Instalación
Sección Utilización de esta unidad Instalación Notas ! Es posible crear iluminación en colores per- Conexiones Importante sonalizados tanto para KEY COLOR como ! En esta función no es posible seleccionar ! Cuando esta unidad se instale en un ve- para DISP COLOR. - Page 30 Sección Instalación Instalación — Utilice un fusible con la intensidad nominal 9 Gris/negro Cable de alimentación Amplificador de potencia (se a Verde indicada. vende por separado) Realice estas conexiones cuando no esté conec- — Nunca conecte el cable negativo de los alta- b Verde/negro tado un altavoz trasero a uno de subgraves.
- Page 31 Sección Instalación Instalación 3 Salpicadero o consola ! El láser semiconductor se dañará si se sobre- Instale la unidad según la ilustración. Para obtener más información, consulte Extrac- calienta. Instale esta unidad alejada de ! Utilice tornillos de cabeza redonda (5 mm × ción del panel delantero para proteger la unidad zonas que alcancen altas temperaturas, 8 mm) o tornillos de cabeza embutida (5 mm...
-
Page 32: Información Adicional
El disco inser- Sustituya el disco. SKIPPED El dispositivo de Reproduzca un La gama de Dependiendo Seleccione de oficial de Pioneer más cercano. tado contiene almacenamien- archivo de audio repetición de de la gama de nuevo la gama de archivos prote- to USB conec- que no esté... -
Page 33: Pautas Para El Manejo
Apéndice Información adicional Información adicional Utilice sólo discos convencionales y completa- Mensaje Causa Resolución Mensaje Causa Resolución Mensaje Causa Resolución mente circulares. No use discos con formas irre- CHECK USB El conector Compruebe que ERROR-19 Error de comu- Realice una de ERROR-16 La versión de Actualice la ver-... -
Page 34: Compatibilidad Con Audio Comprimido (Disco, Usb)
Apéndice Información adicional Información adicional iPod La carga y expulsión frecuente de un disco Al usar discos de superficie imprimible para eti- DualDisc puede producir ralladuras en el disco. quetas, lea primero las instrucciones y las adver- Las ralladuras graves pueden producir problemas No deje el iPod en lugares expuestos a una tempe- Extensión de archivo: .wav tencias de los discos. -
Page 35: Compatibilidad Con Ipod
Información adicional Compatibilidad con iPod Dispositivo de almacenamiento Transferencia de datos en formato Packet Write: El cable de la interfaz CD-IU51 de Pioneer también no compatible está disponible. Para obtener información, consul- La secuencia de reproducción es la misma que Esta unidad sólo es compatible con los siguientes... -
Page 36: Especificaciones
Apéndice Información adicional Información adicional Además de las emisoras principales de siempre, Especificaciones Altavoz de subgraves (mono): Frecuencia ....50 Hz/63 Hz/80 Hz/100 Hz/ se incluyen canales adicionales de FM local. Windows Media es una marca registrada o una 125 Hz Generales Estos canales de HD2/HD3 emiten música marca de fábrica de Microsoft Corporation en... - Page 37 Apéndice Información adicional Relación de señal a ruido ........72 dB (emisión analógica) (red IHF-A) Sintonizador de AM Gama de frecuencias ..530 kHz a 1 710 kHz Sensibilidad utilizable ..25 µV (señal/ruido: 20 dB) Relación de señal a ruido ........
- Page 40 Col.Lomas de Chapultepec, Mexico, D.F. 11000 TEL: 55-9178-4270 先鋒股份有限公司 台北市內湖區瑞光路407號8樓 電話: (02) 2657-3588 先鋒電子(香港)有限公司 香港九龍長沙灣道909號5樓 電話: (0852) 2848-6488 ã 2011 PIONEER CORPORATION. All rights reserved. ã 2011 PIONEER CORPORATION. Todos los derechos reservados. Printed in China Impreso en China <KKMZX> <11I00000> <YRD5349-C/S> US...