Table of Contents
Advertisement
For more information, visit www.desatech.com
For more information, visit www.desatech.com
NATURAL GAS BURNER SYSTEM MODEL SDVBNC
PROPANE/LP GAS BURNER SYSTEM MODEL SDVBPC
IMPORTANT: This direct-vent burner system must be installed into approved cast iron
WARNING: If the information in this manual is not followed
exactly, a fire or explosion may result causing property
damage, personal injury, or loss of life.
Do not store or use gasoline or other flammable vapors and
liquids in the vicinity of this or any other appliance.
WHAT TO DO IF YOU SMELL GAS
• Do not try to light any appliance.
• Do not touch any electrical switch
• Do not use any phone in your building.
• Immediately call your gas supplier from a neighbor's
phone. Follow the gas supplier's instructions.
• If you cannot reach your gas supplier, call the fire department.
This appliance may be installed in an aftermarket*, permanently located, manufactured (mo-
bile) home, where not prohibited by state or local codes.
This appliance is only for use with the type of gas indicated on the rating plate. This appliance
is not convertible for use with other gases, unless a certified kit is used.
* Aftermarket: Completion of sale, not for purpose of resale, from the manufacturer.
CAST IRON STOVE AND DIRECT-VENT
(FREESTANDING FIREPLACE HEATER)
BURNER SYSTEM
OWNER'S OPERATION AND INSTALLATION MANUAL
REMOTE READY
stove bodies, models SCIVFC/PSCIVFC series ONLY.
FOR YOUR SAFETY
FOR YOUR SAFETY
Save this manual for future reference.
Save this manual for future reference.
SCIVFC/PSCIVFC
SERIES STOVE
WARNING: Improper instal-
lation, adjustment, alteration,
service, or maintenance can
cause injury or property dam-
age. Refer to this manual for
correct installation and op-
erational procedures. For as-
sistance or additional infor-
mation consult a qualified in-
staller, service agency, or the
gas supplier.
Installation and service must
be performed by a qualified
installer, service agency, or
the gas supplier.
Advertisement
Table of Contents

Related Manuals for Desa SDVBNC

Summary of Contents for Desa SDVBNC
- Page 1 For more information, visit www.desatech.com For more information, visit www.desatech.com NATURAL GAS BURNER SYSTEM MODEL SDVBNC PROPANE/LP GAS BURNER SYSTEM MODEL SDVBPC IMPORTANT: This direct-vent burner system must be installed into approved cast iron stove bodies, models SCIVFC/PSCIVFC series ONLY.
-
Page 2: Table Of Contents
TABLE OF CONTENTS SAFETY INFORMATION TABLE OF CONTENTS SAFETY INFORMATION ... 2 PRODUCT IDENTIFICATION ... 3 LOCAL CODES ... 4 PRODUCT FEATURES ... 4 GLOSSARY OF TERMS ... 4 PRE-INSTALLATION PREPARATION ... 4 CAST IRON STOVE AND DIRECT-VENT BURNER SYSTEM ASSEMBLY ... -
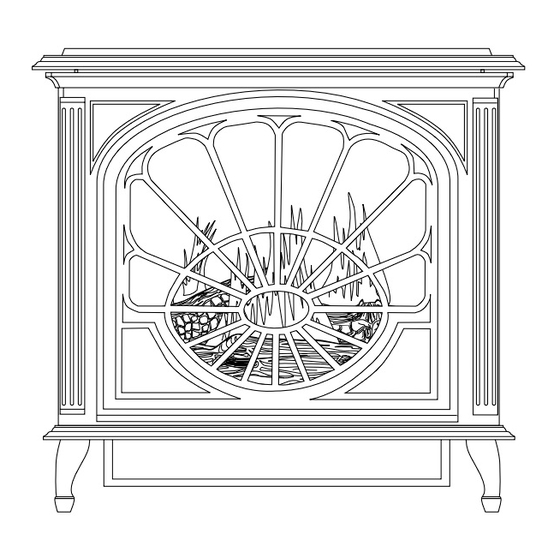
Page 3: Product Identification
Pilot Assy Blower with Adjustment Knob (Optional Installation) Glowing Embers Figure 1 - DESA Direct-Vent Burner System Shown Installed in Approved Cast Iron Stove Body (Vanguard Models SCIVFC/ PSCIVFC Series Shown) Control Valve Cast Iron Stove Body Burner Glass Door Assy... -
Page 4: Local Codes
LOCAL CODES PRODUCT FEATURES GLOSSARY OF TERMS PRE-INSTALLATION PREPARATION Location and Space Requirements LOCAL CODES Install and use stove and burner system with care. Follow all local codes. In the absence to local codes, use the current National Fuel Gas Code ANSI Z223.1/NFPA 54* (USA) or the current CSA- B149[.1 or .2] Installation Codes (Canada). -
Page 5: Cast Iron Stove And Direct-Vent Burner System Assembly
PRE-INSTALLATION PREPARATION Continued 3. Proper clearances must be maintained, see Figures 3 and 4. 4. This stove is a freestanding unit designed to set directly on the floor. If your stove is to be installed directly on carpeting, vi- nyl tile, or any combustible material other than wood, it must be installed on a metal or wood panel extending the full width and depth of the stove. - Page 6 CAST IRON STOVE AND DIRECT-VENT BURNER SYSTEM ASSEMBLY Stove Body Assembly (Cont.) CAST IRON STOVE AND DIRECT-VENT BURNER SYSTEM ASSEMBLY Continued 6. Remove all contents from inside stove cavity. Contents include: (1) - Stove bottom (Discard - Not used with this application) (4) - Legs with leg leveler bolts (1) - Bottom door (3) - Top grates...
- Page 7 CAST IRON STOVE AND DIRECT-VENT BURNER SYSTEM ASSEMBLY Continued 14. Lay the front panel assembly face down on a protected sur- face. Remove the two screws that hold the front plate onto the front surround plate (see Figure 14). Save these screws. Remove the seven screws and washers that hold the Optional: screen onto the front surround plate.
-
Page 8: Installing The Blower
CAST IRON STOVE AND DIRECT-VENT BURNER SYSTEM ASSEMBLY Installing Direct-Vent Burner System Into Stove Body Installing Optional Blower Accessory CAST IRON STOVE AND DIRECT-VENT BURNER SYSTEM ASSEMBLY Continued INSTALLING DIRECT-VENT BURNER SYSTEM INTO STOVE BODY 1. Carefully lift burner system and place into stove body from the rear of stove. - Page 9 CAST IRON STOVE AND DIRECT-VENT BURNER SYSTEM ASSEMBLY Continued Thermostat Blower Only: Attach thermal switch and bracket to inside rear cover wall with two hex head screws provided as shown in Figure 17, page 8. After securing bracket to rear cover, carefully bend along existing bend line on bracket to almost a 90°...
-
Page 10: General Venting
CAST IRON STOVE AND DIRECT-VENT BURNER SYSTEM ASSEMBLY Installing Rear Cover (Cont.) GENERAL VENTING Location of Vent Termination CAST IRON STOVE AND DIRECT-VENT BURNER SYSTEM ASSEMBLY Continued 4. Open lower door panel. The valve is attached to the underside of the burner system assembly. 5. - Page 11 GENERAL VENTING TERMINATION CAP A = clearance above grade, veranda, porch, deck, or balcony [*12 inches (30.5mc) minimum] B = clearance to window or door that may be opened [12 inches (30.5cm) minimum] C = clearance to permanently closed window [minimum 12 inches (30.5cm) recommended to prevent condensation on window] D = vertical clearance to ventilated soffit located above the terminal within a horizontal distance of 24 inches (61cm) from the...
-
Page 12: Venting Installation
• Installation of any damaged venting component • Unauthorized modification of the venting system • Installation of any component part not manufactured or approved by DESA • Installation other than as instructed by these instructions WARNING: This stove with burner system and vent assembly must be vented directly to the outside. - Page 13 VENTING INSTALLATION Continued Installing Vent System in a Chase A chase is a vertical box-like structure built to enclose venting that runs along the outside of a building. A chase is not required for such venting. NOTICE: Treatment of firestops and construction of the chase may vary from building type to building type.
- Page 14 VENTING INSTALLATION Installation for Horizontal Termination (Cont.) VENTING INSTALLATION Continued Attach vent pipe assembly to the burner system. Set stove in front of it’s permanent location to insure minimum clearances. Mark the wall for a 10"(25.4cm) square hole (for noncombus- tible material such as masonry block or concrete, a 7 diameter hole is acceptable).
- Page 15 VENTING INSTALLATION Continued Horizontal Termination Configurations Figures 29 through 31 show different configurations for venting with horizontal termination. Each figure includes a chart with vertical minimum/maximum and horizontal maximum dimensions which must be met. Seal all connections with high temperature silicone sealant (outer pipe only) as specified in the second warning statement on page 12.
-
Page 16: Installation For Vertical Termination
VENTING INSTALLATION Installation for Vertical Termination VENTING INSTALLATION Continued INSTALLATION FOR VERTICAL TERMINATION NOTICE: Use rigid pipe only. Flex venting is not to be used with a vertical termination. 1. Determine the route your vertical venting will take. If ceiling joists, roof rafters, or other framing will obstruct the venting system, consider an offset (see Figure 32) to avoid cutting load bearing members. - Page 17 VENTING INSTALLATION Continued 6. Continue to add pipe sections until the height of the vent cap meets the minimum building code requirements described in Figure 21 on page 11. Note : You must increase vent height for steep roof pitches. Nearby trees, adjoining rooflines, steep pitched roofs, and other similar factors may cause poor draft or down-drafting in high winds.
- Page 18 VENTING INSTALLATION Installation for Vertical Termination (Cont.) VENTING INSTALLATION Continued Venting with Two 90° Elbows Vertical (V) 5' min. 6' min. 7' min. 8' min. 20' max. Figure 37 - Vertical Venting Configuration Using Two 90° Elbows with Two Horizontal Runs For more information, visit www.desatech.com For more information, visit www.desatech.com Horizontal (H...
-
Page 19: High Altitude Installation
When installing this stove at an elevation above 4500 feet (in Canada), check with local authorities. For assistance with any high altitude installation contact DESA’s Technical Service Department at 1-866-672-6040. For more information, visit www.desatech.com For more information, visit www.desatech.com... -
Page 20: Stove And Direct-Vent Burner System Installation
STOVE AND DIRECT-VENT BURNER SYSTEM INSTALLATION Check Gas Type Installing Gas Piping to Stove/Burner System Location STOVE AND DIRECT-VENT BURNER SYSTEM INSTALLATION CHECK GAS TYPE Use proper gas type for the burner system unit you are installing. If you have conflicting gas types, do not install burner system. See dealer where you purchased the stove and burner system for proper burner system according to your gas type. -
Page 21: Checking Gas Connections
STOVE AND DIRECT-VENT BURNER SYSTEM INSTALLATION Continued Apply pipe joint sealant lightly to male NPT threads. This will prevent excess sealant from going into pipe. Excess sealant in pipe could result in clogged burner system valves. WARNING: Use pipe joint sealant that is resistant to liquid petroleum (LP) gas. - Page 22 STOVE AND DIRECT-VENT BURNER SYSTEM INSTALLATION Checking Gas Connection (Cont.) Installing Optional Wall Mount Switch - GWMS2 STOVE AND DIRECT-VENT BURNER SYSTEM INSTALLATION Continued 3. Check all joints from propane/LP supply tank or gas meter to equipment shutoff valve (see Figure 44 for propane/LP or Figure 45 for natural).
- Page 23 Installing Optional Wireless Hand-Held Remote Control Accessories - GHRC and GHRCTA Series STOVE AND DIRECT-VENT BURNER SYSTEM INSTALLATION Continued INSTALLING OPTIONAL WALL MOUNTED THERMOSTAT - GWMT1 WARNING: Installation must be done by a qualified installer familiar with low voltage wiring procedures. WARNING: Do not connect this thermostat to any electrical source! Electrical shock and/or fire hazard will occur.
- Page 24 STOVE AND DIRECT-VENT BURNER SYSTEM INSTALLATION Installing Optional Wireless Hand-Held Remote Control Accessories - GHRC and GHRCTA Series (Cont.) Removing/Replacing Glass Door STOVE AND DIRECT-VENT BURNER SYSTEM INSTALLATION Continued 4. Place receiver into valve bracket and align holes (see Figure 50). 5.
- Page 25 STOVE AND DIRECT-VENT BURNER SYSTEM INSTALLATION Continued INSTALLING LOGS, LAVA ROCK AND GLOWING EMBERS WARNING: Failure to position the parts in accor- dance with these diagrams or failure to use only parts specifically approved with this burner system may result in property damage or personal injury. It is very important to install these logs exactly as instructed in Figures 55 through 58.
-
Page 26: Operating Stove With Burner System
OPERATING STOVE AND BURNER SYSTEM For Your Safety Read Before Opening Lighting Instructions To Turn Off Gas To Appliance OPERATING STOVE WITH BURNER SYSTEM FOR YOUR SAFETY READ BEFORE LIGHTING WARNING: If you do not follow these instructions exactly, a fire or explosion may result causing prop- erty damage, personal injury or loss of life. -
Page 27: Manual Lighting Procedure
OPERATING STOVE WITH BURNER SYSTEM Continued MANUAL LIGHTING PROCEDURE 1. Remove glass door (see Removing/Replacing Glass Door, page 24). 2. Follow steps 1 through 8 under Lighting Instructions, page 26. 3. Depress gas control knob and light pilot with match. 4. -
Page 28: Inspecting Burners
OPERATING STOVE AND BURNER SYSTEM Operating Optional Blower Accessory Operating Optional GWMT1 Wall Mounted Thermostat INSPECTING BURNERS Pilot Assembly Burner Flame Pattern OPERATING STOVE WITH BURNER SYSTEM Continued OPERATING OPTIONAL BLOWER ACCESSORY Blower controls are located on left side of rear cover (when standing in front of stove). -
Page 29: Cleaning And Maintenance
CLEANING AND MAINTENANCE WARNING: Turn off burner system and let cool before cleaning. CAUTION: You must keep control areas, burners, and circulating air passageways of burner system and stove clean. Inspect these areas of burner sys- tem and stove before each use. Have burner system and stove inspected yearly by a qualified service person. -
Page 30: Troubleshooting
TROUBLESHOOTING TROUBLESHOOTING Note: For additional help, visit DESA’s technical service web site at www.desatech.com. Note: All troubleshooting items are listed in order of operation. OBSERVED PROBLEM When ignitor button is pressed, there is no spark at pilot When ignitor button is pressed, there is... - Page 31 TROUBLESHOOTING Continued OBSERVED PROBLEM Burner does not light after pilot is lit Delayed ignition burner Burner backfiring during combustion Slight smoke or odor during initial operation Burner system produces a whistling noise when burner is lit Glass soots Burner system produces a clicking/ticking noise just after burners are lit or shut off Remote does not function For more information, visit www.desatech.com...
- Page 32 TROUBLESHOOTING TROUBLESHOOTING Continued WARNING: If you smell gas • Shut off gas supply. • Do not try to light any appliance. • Do not touch any electrical switch; do not use any phone in your building. • Immediately call your gas supplier from a neighbor’s phone. Follow the gas supplier’s instructions.
-
Page 33: Specifications
Note: Use only original replacement parts. This will protect your warranty coverage for parts replaced under warranty. PARTS UNDER WARRANTY Contact authorized dealers of this product. If they can not supply original replacement part(s), call DESA’s Technical Service De- partment at 1-866-672-6040. Fan Switch (N.O.) When calling DESA, have ready •... -
Page 34: Illustrated Parts Breakdown And Parts List
ILLUSTRATED PARTS BREAKDOWN Models SDVBNC and SDVBPC ILLUSTRATED PARTS BREAKDOWN SDVBNC SDVBPC 26-3 26-1 26-4 26-2 For more information, visit www.desatech.com For more information, visit www.desatech.com 107304-01D... - Page 35 105774-01 Rear Log 105774-02 105774-03 Crossover Log 105774-04 Log Piece 098304-03 Screw 11107 Screw 11200 Screw PARTS AVAILABLE - NOT SHOWN GA6060 Lava Rock 14250 Ember Material M11084-26 Hex Screw for Blower Bracket PARTS LIST Models SDVBNC and SDVBPC QTY.
- Page 36 ILLUSTRATED PARTS BREAKDOWN Model(s) (P)SCIVFC Series ILLUSTRATED PARTS BREAKDOWN AMITY™ STOVE CHASSIS SCIVFC(*) SERIES PSCIVFC(*) SERIES (* Indicates Color Suffix Designation) For more information, visit www.desatech.com For more information, visit www.desatech.com 107304-01D...
- Page 37 PARTS LIST This list contains replaceable parts used in your stove. When ordering parts, follow the instructions listed under Replacement Parts on page 33 of this manual. AMITY™ STOVE CHASSIS SCIVFC(*) SERIES PSCIVFC(*) SERIES (* Indicates Color Suffix Designation) * Included In Hardware Kit For more information, visit www.desatech.com For more information, visit www.desatech.com 107304-01D...
-
Page 38: Technical Service
ACCESSORIES Purchase these stove and burner system accessories from your local dealer. If they can not supply these accessories, call DESA’s Sales Department at 1-866-672-6040 for information. You can also write to the address listed on the back page of this manual. -
Page 39: Owner's Registration
Address: City: Home Phone: E-Mail: Please answer the following questions to register your product with DESA: 1. Where will the product be used? Living/Family Room Office/Warehouse If you bought this product yourself, did you plan to purchase this type of product before going into the store? 3. - Page 40 Postage Required 2701 Industrial Drive P.O. Box 90004 Bowling Green, KY 42102-9004 For more information, visit www.desatech.com For more information, visit www.desatech.com TAPE 107304-01D...
- Page 41 NOTES _______________________________________________________________________________________________ _______________________________________________________________________________________________ _______________________________________________________________________________________________ _______________________________________________________________________________________________ _______________________________________________________________________________________________ _______________________________________________________________________________________________ _______________________________________________________________________________________________ _______________________________________________________________________________________________ _______________________________________________________________________________________________ _______________________________________________________________________________________________ _______________________________________________________________________________________________ _______________________________________________________________________________________________ _______________________________________________________________________________________________ _______________________________________________________________________________________________ _______________________________________________________________________________________________ _______________________________________________________________________________________________ _______________________________________________________________________________________________ _______________________________________________________________________________________________ _______________________________________________________________________________________________ _______________________________________________________________________________________________ _______________________________________________________________________________________________ _______________________________________________________________________________________________ _______________________________________________________________________________________________ _______________________________________________________________________________________________ _______________________________________________________________________________________________ _______________________________________________________________________________________________ _______________________________________________________________________________________________ _______________________________________________________________________________________________ _______________________________________________________________________________________________ _______________________________________________________________________________________________ _______________________________________________________________________________________________ _______________________________________________________________________________________________ _______________________________________________________________________________________________ _______________________________________________________________________________________________ For more information, visit www.desatech.com For more information, visit www.desatech.com 107304-01D...
-
Page 42: Warranty Information
DIRECT-VENT BURNER SYSTEM AND AMITY DESA warrants this product to be free from defects in materials and components for four (4) years from the date of first purchase, provided that the product has been properly installed, operated and maintained in accordance with all applicable instructions. To make a claim under this warranty the Bill of Sale or cancelled check must be presented.