Table of Contents
Advertisement
Available languages
Available languages
5.1ch Surround System
Système de son ambiant à 5.1 voies
HTS-GS1
SX-X360
S-X360
Register Your Product at
www.pioneerelectronics.com
www.pioneerelectronics.ca
Operating Instructions
Mode d'emploi
Audio Multi-channel Receiver Subwoofer
Caisson de basse de rècepteur multi-voies audio
Speaker System
Enceintes Acoustiques
(US)
(Canada)
Advertisement
Chapters
Table of Contents

Related Manuals for Pioneer HTS-GS1 - Surround Sound System


Summary of Contents for Pioneer HTS-GS1 - Surround Sound System
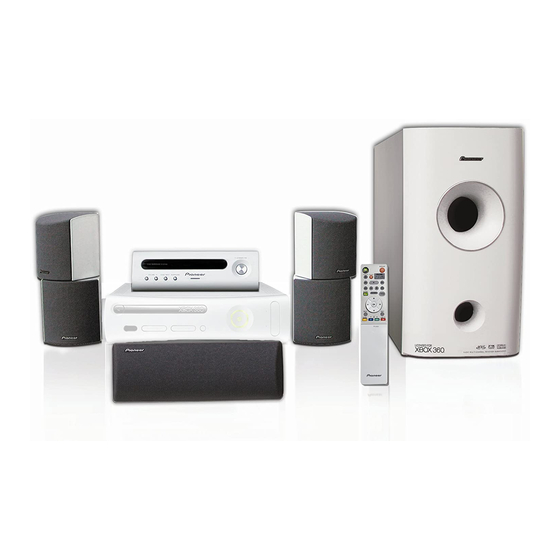
- Page 1 5.1ch Surround System Système de son ambiant à 5.1 voies HTS-GS1 Audio Multi-channel Receiver Subwoofer SX-X360 Caisson de basse de rècepteur multi-voies audio Speaker System S-X360 Enceintes Acoustiques Register Your Product at www.pioneerelectronics.com (US) www.pioneerelectronics.ca (Canada) Operating Instructions Mode d’emploi...
- Page 2 CAUTION RISK OF ELECTRIC SHOCK DO NOT OPEN The lightning flash with arrowhead, within CAUTION: The exclamation point within an equilateral an equilateral triangle, is intended to alert TO PREVENT THE RISK OF ELECTRIC triangle is intended to alert the user to the the user to the presence of uninsulated SHOCK, DO NOT REMOVE COVER (OR presence of important operating and...
- Page 3 READ INSTRUCTIONS — All the safety and GROUNDING OR POLARIZATION OBJECT AND LIQUID ENTRY — Never push operating instructions should be read before the • If this product is equipped with a polarized objects of any kind into this product through product is operated.
- Page 4 électrique. Vérifier le câble d’alimentation de NOT USE THIS (POLARIZED) PLUG temps en temps. Contacter le service après-vente WITH AN EXTENSION CORD. PIONEER le plus proche ou le revendeur pour un RECEPTACLE OR OTHER OUTLET remplacement. S002_Fr UNLESS THE BLADES CAN BE FULLY INSERTED TO PREVENT BLADE EXPOSURE.
-
Page 5: What's In The Box
We Want You Listening For A Lifetime Used wisely, your new sound equipment will provide a lifetime of fun and enjoyment. Since hearing damage from loud noise is often undetectable until it is too late, this manufacturer and the Electronic Industries Association’s Selecting fine audio equipment such as the unit Consumer Electronics Group recommend you avoid you’ve just purchased is only the start of your... -
Page 6: Table Of Contents
Using the remote control ..... .16 SR+ Setup for Pioneer plasma displays..28 Putting the batteries in the remote control . -
Page 7: Speaker Setup Guide
Speaker Setup Guide Chapter 1 Speaker Setup Guide Safety precautions when setting up Home theater sound setup When assembling the speakers, lay them down flat on Depending on the size and characteristics of your room, their side to avoid accidents or injury. Make sure to use a you can place your speakers in one of two ways using this stable surface when assembling, setting up, and placing system:... -
Page 8: Front Surround Setup
Speaker Setup Guide Front surround setup This setup is ideal when rear surround speaker placement isn't possible or you want to avoid running long speaker cables in your listening area. Use this setup together with the Front Surround modes in page 20 to take advantage of wall and ceiling reflections for a very realistic surround effect. -
Page 9: Wall Mounting The Front And Surround Speaker System
The front and surround speakers have holes for wall • Pioneer is not responsible for any accidents or mounting. However, if you are using the Front Surround damage that result from improper installation. -
Page 10: Connecting Up
Connecting up Chapter 2 Connecting up Basic connections Important • When connecting this system or changing connections, be sure to switch power off and disconnect the power cord from the wall socket. After completing all connections, connect the power cord to the wall socket. Audio/video output (red, white, yellow plugs) Receiver subwoofer... - Page 11 Connecting up Connect the Xbox 360 to your TV and the receiver c. If you want to fix to a wall or other surface, perform subwoofer. step b after first securing the stand with screws. a. Connect the Xbox 360 Component HD AV Cable (this It is recommended that you determine the reception is supplied with your Xbox 360) to the AV port on the strength before securing the stand with the screws.
- Page 12 Connecting up • Connect the other end to the color-coded speaker Caution terminals on the rear of the receiver subwoofer. Make sure to insert completely. • These speaker terminals carry HAZARDOUS LIVE voltage. To prevent the risk of electric shock when The small lug at the wire-end of the speaker plug connecting or disconnecting the speaker cables, should face up or down depending on whether it’s...
-
Page 13: Using This System For Tv Audio
Connecting up Using this system for TV audio If your TV has a stereo audio output you can connect it to this system and enjoy surround TV sound. AUDIO INPUT DIGITAL CONTROL SPEAKERS DVD/DVR XBOX 360 DIGITAL ANALOG SYSTEM CONNECTOR SUB WOOFER SURROUND (COAXIAL) -
Page 14: Controls And Displays
Controls and displays Chapter 3 Controls and displays Display unit STANDBY/ON 5.1ch SURROUND SYSTEM – VOLUME + AUDIO INPUT SURROUND STANDBY/ON SURROUND Press to switch the system on/into standby. Use to select a Surround mode (page 19). IR remote sensor (page 16) AUDIO INPUT (page 27) Press repeatedly to select one of the external audio Front panel display... -
Page 15: Remote Control
TV CONTROL 13 ADVANCED INPUT CHANNEL VOLUME MCACC – – Use to select a Pioneer original surround mode (page 20). 14 SURROUND OPEN OPEN Use to select a Surround mode (page 19). 15 MCACC Starts the Auto MCACC setup (page 17). -
Page 16: Using The Remote Control
Controls and displays • Make sure that the plus and minus ends of each Using the remote control battery match the indications in the battery compartment. Please keep in mind the following when using the remote control: • Remove batteries from equipment that isn’t going to be used for a month or more. -
Page 17: Getting Started
Getting started Chapter 4 Getting started System demo setting Using the Auto MCACC setup for optimal surround sound Switches the automatic demo feature on or off (this starts when you plug in for the first time). The Multichannel Acoustic Calibration (MCACC) system measures the acoustic characteristics of your listening area, taking into account ambient noise, and testing for AUDIO... - Page 18 Getting started If the receiver subwoofer is off, press RECEIVER to turn the power on. Press MCACC . Try to be as quiet as possible after pressing MCACC. The volume increases automatically and the system outputs a series of test tones. •...
-
Page 19: Listening To Your System
Listening to your system Chapter 5 Listening to your system • AUTO – Auto listening mode (see above) Auto listening mode • DOLBY PL (Dolby Pro Logic) – 4.1 channel surround The Auto listening mode is the simplest way to listen to sound for use with any two-channel source any source as it was mastered: the output from the •... -
Page 20: Using Front Surround
Listening to your system Using Front Surround Using Advanced Surround The Front Surround modes are effective when you are The Advanced Surround effects can be used with any using the Front surround speaker setup as described on multichannel or stereo source for a variety of additional page 8. -
Page 21: Using The Sound Retriever
Listening to your system Using the Sound Retriever Enhancing dialogue When audio data is removed during the MP3 or WMA The Dialogue Enhancement feature is designed to make compression process, sound quality often suffers from the dialogue stand out from other background sounds in an uneven sound image. -
Page 22: Boosting The Bass Level
Listening to your system Boosting the bass level There are two bass modes you can use to enhance the bass in a source. Press SOUND . Use the (cursor left/right) buttons to select BASSMODE then press ENTER . Use the (cursor up/down) buttons to select the sound then press ENTER to confirm. -
Page 23: Listening To The Radio
Listening to the radio Chapter 6 Listening to the radio Select FM AUTO above to switch back to auto-stereo Listening to the radio mode (the stereo indicator ( ) lights when receiving a stereo broadcast). The tuner can receive both FM and AM broadcasts, and lets you memorize your favorite stations so you don’t have Improving poor AM sound to manually tune in every time you want to listen. -
Page 24: Changing The Frequency Step
Listening to the radio Changing the frequency step If you find that you can’t tune into stations successfully, the frequency step may not be suitable for your country/ region. Switch the system into standby. Press SETUP . Use the (cursor left/right) buttons to select ‘AM 9K/10K’, then press ENTER . -
Page 25: Surround Sound Settings
Surround sound settings Chapter 7 Surround sound settings Press ENTER when you’re finished. Using the Setup menu • If you use the Auto MCACC feature again, it will overwrite the settings you have made here. From the Setup menu you can access all the surround sound settings of the system , including channel levels, Speaker distance setting... -
Page 26: Dual Mono Setting
Surround sound settings • DRC OFF (default) – No dynamic range adjustment Press TEST TONE . (use when listening at higher volume) The test tone is output from each speaker in turn. • DRC MID – Mid setting While a test tone is playing, use the (cursor •... -
Page 27: Other Connections
Other connections Chapter 8 Other connections Important Listening to an external audio source • When connecting this system or changing You can connect both analog and digital external audio connections, be sure to switch power off and sources to this system. Digital audio sources include disconnect the power cord from the wall socket. -
Page 28: Using This Unit With A Pioneer Plasma Display
1 This system is compatible with all Pioneer plasma displays from 2003 onward. 2 The 3-ringed SR+ cable from Pioneer is commercially available under the part number ADE7095. Contact the Pioneer Customer Support division for more information on obtaining an SR+ cable. -
Page 29: Using The Sr+ Mode With A Pioneer Plasma Display
• TVTN – switches the plasma display to its built-in TV purposes. tuner • Connect the CONTROL IN jack on another Pioneer component to the CONTROL OUT jack on the receiver subwoofer. Note This will allow you to control the other component (such •... -
Page 30: Additional Information
Additional information Chapter 9 Additional information Setting the sleep timer DTS CD setting The sleep timer switches off the receiver subwoofer after If you play a DTS-encoded CD, you will need to change a specified time so you can fall asleep without worrying this setting to hear the decoded signal. -
Page 31: Glossary
Additional information Use in an excessively dusty or damp environment. Setting up the remote to control your Place directly on top of an amplifier, or other component in your stereo system that becomes hot in use. Use near a television or monitor as you may experience You can use the supplied remote to control your TV. -
Page 32: Using The Tv Remote Control Buttons
YOKO 607, 642, 646 ZENITH 603, 620 653, 654, 655 655, 656, 607, 636, 651 FIRSTLINE 640, 644 MAGNADYNE 632, 649 PIONEER 600, 631, 632, 607, 636, FISHER 632, 635, 638, 645 MAGNAFON 649 642, 651 FORMENTI 632, 607, 642... -
Page 33: Troubleshooting
If the trouble cannot be rectified even after exercising the checks listed below, ask your nearest Pioneer authorized service center or your dealer to carry out repair work. • If the system does not operate normally due to external effects such as static electricity disconnect the plug from the outlet and insert again to return to normal operating conditions. -
Page 34: Tuner
EEP ERROR • Contact your Pioneer authorized service center or your dealer for servicing. NO SPTYP • Try switching the unit off then on again. If the error still appears, please contact a Pioneer authorized service center or your dealer. -
Page 35: Specifications
Additional information S-X360 Speaker system Specifications (Front speakers x2, surround speakers x2, center speaker SX-X360 Audio Multi-channel Receiver Subwoofer • Front speakers Enclosure ........Closed-box bookshelf type • Amplifier section (magnetically shielded) RMS Power Output: System ..........7.7 cm 1-way system Front, Center, Surround ...... - Page 36 Additional information...
- Page 37 Contenu de l’emballage Assurez-vous que tous les articles suivants sont Boîte des haut-parleurs (S-X360) présents. • Haut-parleurs (avant x 2, ambiance x 2, central x 1) Boîte du caisson de basses à récepteur (SX–X360) : (page 7) • Télécommande (page 15) •...
- Page 38 Utilisation de cet appareil avec un écran plasma Pioneer........28 03 Commandes et affichages Configuration SR+ pour écrans plasma de...
-
Page 39: Guide D'installation Des Haut-Parleurs
Guide d’installation des haut-parleurs Chapitre 1 Guide d’installation des haut-parleurs Précautions de sécurité lors de Configuration du son Home Theater l’installation Selon la taille et les caractéristiques de votre local d’écoute, vous pouvez installer les haut-parleurs selon Lors de l’installation des haut-parleurs, posez-les à plat l’une des deux manières suivantes avec ce système : sur leur flanc pour éviter des accidents ou des blessures. -
Page 40: Installation Frontale De Haut-Parleurs D'ambiance
Guide d’installation des haut-parleurs Installation frontale de haut-parleurs d’ambiance Cette installation est idéale lorsqu’il est impossible de poser les haut-parleurs d’ambiance derrière ou que vous souhaitez éviter de longs câbles d’enceinte dans votre salle d’écoute. Avec cette configuration, optez pour les modes Front Surround en page 20 pour tirer profit de la réflexion des murs et du plafond et obtenir un effet d’ambiance particulièrement réaliste. -
Page 41: Installation Sur Paroi Des Haut-Parleurs Avant Et D'ambiance
à un professionnel. Les haut-parleurs avant et les haut-parleurs d’ambiance • Pioneer n’assume aucune responsabilité en cas se présentent aussi avec des trous pour une installation d’accident ou de dégâts, découlant d’une installation murale. -
Page 42: Connexions
Connexions Chapitre 2 Connexions Connexions de base Important • Lors du branchement de cet appareil ou avant de changer ses connexions, coupez l’interrupteur d’alimentation et débranchez le cordon d’alimentation au niveau de la prise secteur. Toutes les connexions étant terminées, branchez le cordon d’alimentation sur la prise secteur. Sortie audio/vidéo (fiches rouge, blanche, jaune) Caisson de basse à... - Page 43 Connexions Si votre téléviseur est doté d’une entrée vidéo à Il est conseillé de vérifier l’intensité de réception composantes, vous pouvez l’utiliser au lieu de la avant d’immobiliser le support au moyen de vis. connexion vidéo (composite) jaune. Consultez le Raccordez les antennes AM et FM.
- Page 44 Connexions • Raccordez l’autre bout sur les bornes de haut-parleur Attention à code couleur à l’arrière du caisson de basses à • Ces bornes de haut-parleurs ont une tension récepteur. Veillez à insérer les fiches à fond. POTENTIELLEMENT MORTELLE. Pour éviter toute La petite patte au bout de la fiche de haut-parleur doit décharge électrique lors du branchement ou du être orientée vers le haut ou vers le bas selon que la...
-
Page 45: Utilisation De Ce Système Pour Les Sons De Télévision
Connexions Utilisation de ce système pour les sons de télévision Si votre téléviseur est doté d’une sortie audio stétéophonique, vous pouvez le raccorder à ce système et bénéficier des sons télévisé d’ambiance (surround). AUDIO INPUT DIGITAL CONTROL SPEAKERS DVD/DVR XBOX 360 DIGITAL ANALOG SYSTEM CONNECTOR... -
Page 46: Commandes Et Affichages
Commandes et affichages Chapitre 3 Commandes et affichages Unité d’affichage STANDBY/ON 5.1ch SURROUND SYSTEM – VOLUME + AUDIO INPUT SURROUND STANDBY/ON SURROUND Appuyez pour mettre le système sous tension ou en Pour sélectionner un mode d’ambiance (Surround) mode Veille. (page 19). Capteur de télécommande à... -
Page 47: Télécommande
INPUT CHANNEL VOLUME MCACC 13 ADVANCED – – Pour sélectionner un mode d’ambiance (Surround) original Pioneer (page 20). 14 SURROUND OPEN OPEN Pour sélectionner un mode d’ambiance (Surround) (page 19). 15 MCACC Démarre la configuration Auto MCACC (page 17). Commandes de la Xbox 360 Utilisez ces touches pour contrôler votre console Xbox... -
Page 48: Utilisation De La Télécommande
Commandes et affichages • Retirez les piles de l’appareil si vous prévoyez de ne Utilisation de la télécommande pas l’utiliser pendant plus d’un mois. • Lorsque vous éliminez des piles usagées, respectez Gardez les points suivants à l’esprit quand vous utilisez la les réglementations gouvernementales et autres télécommande. -
Page 49: Pour Commencer
Pour commencer Chapitre 4 Pour commencer Réglage du mode Démonstration du Utilisation de la configuration Auto système MCACC pour obtenir un son d’ambiance optimal Active ou désactive la fonction de démonstration automatique (elle démarre lorsque vous branchez Le système de Calibrage Acoustique Multicanaux l’appareil pour la première fois) : (MCACC) mesure les caractéristiques acoustiques de votre local d’écoute, prenant en considération les bruits... - Page 50 Pour commencer Placez le microphone à la position d’écoute normale. Le placer approximativement à la hauteur des oreilles et s’assurer qu’il est à l’horizontal en utilisant une table ou une chaise. Assurez-vous qu’aucun obstacle ne se trouve entre les haut-parleurs et le microphone. Si le caisson de basses à...
-
Page 51: Écoute De Votre Système
Écoute de votre système Chapitre 5 Écoute de votre système En présence d’une source Dolby Digital ou DTS, le voyant Mode d’écoute Auto 2 D ou DTS du panneau avant s’allume. • AUTO – Mode d’écoute Auto (voir avant) Le mode d’écoute Auto représente le moyen le plus simple •... -
Page 52: Utilisation Du Mode Front Surround
Écoute de votre système Utilisation du mode Front Surround Utilisation du mode Advanced Surround Les modes d’ambiance avant (Front Surround) sont efficaces s’ils sont utilisés avec la configuration de haut- Les effets d’ambiance avancés (Advanced Surround) parleurs d’ambiance avant, comme décrit à la page 8. peuvent être utilisés avec toute source multicanaux ou Les haut-parleurs d’ambiance doivent être placés sur les stéréo pour obtenir plusieurs effets d’ambiance... -
Page 53: Utilisation De "Sound Retriever
Écoute de votre système • La fonction Acoustic Calibration EQ est activée Utilisation de “Sound Retriever” automatiquement après que la configuration Auto MCACC est utilisée. Quand les données audio sont extraites au cours du processus de compression MP3 ou WMA, la qualité sonore souffre souvent d’une image sonore inégale. -
Page 54: Accentuation Du Niveau Des Graves
Écoute de votre système Accentuation du niveau des graves Deux modes de graves sont à votre disposition pour renforcer les graves d’une source. Appuyez sur SOUND. Utilisez les touches (curseur gauche/droite) pour sélectionner BASSMODE, puis appuyez sur ENTER. Utilisez les touches (curseur haut/bas) pour sélectionner le son, puis appuyez sur ENTER pour vérifier. -
Page 55: Écoute De La Radio
Écoute de la radio Chapitre 6 Écoute de la radio Utilisez les touches (curseur haut/bas) pour Écoute de la radio sélectionner FM MONO, puis appuyez sur ENTER. Le voyant mono ( ) s’allume lorsque le syntoniseur est Le syntoniseur peut recevoir des émissions FM et AM et en mode de réception mono. -
Page 56: Changement Du Pas De Fréquence
Écoute de la radio Changement du pas de fréquence Si vous ne parvenez pas à effectuer correctement l’accord sur les stations, il se peut que le pas des fréquences ne convienne pas à votre pays ou votre région. Mettez le système en mode Veille. Appuyez sur SETUP. -
Page 57: Utilisation Du Menu Setup (Configuration)
Réglages de sons d’ambiance Chapitre 7 Réglages de sons d’ambiance Sélectionnez la lecture stéréo ou multicanaux Utilisation du menu Setup pour une source. Appuyez sur SETUP. (Configuration) Utilisez les touches (curseur gauche/droite) À partir du menu Setup (Configuration), vous avez accès pour sélectionner CH LEVEL, puis appuyez sur ENTER. -
Page 58: Contrôle De La Plage Dynamique
Réglages de sons d’ambiance Contrôle de la plage dynamique Réglage du niveau des canaux au Lorsque vous regardez un programme Dolby Digital ou DTS à un volume réduit, les sons d’un niveau grave, y moyen de la tonalité d’essai compris certains dialogues, deviennent difficiles à Si vous le préférez, vous pouvez ajuster le niveau des entendre correctement. -
Page 59: Autres Connexions
Autres connexions Chapitre 8 Autres connexions Important Écoute d’une source audio externe • Lors du branchement de cet appareil ou avant de Ce système accepte le branchement de sources audio changer ses connexions, coupez l’interrupteur aussi bien analogiques que numériques. Les sources d’alimentation et débranchez le cordon audio numériques comprennent les récepteurs d’alimentation au niveau de la prise secteur. -
Page 60: Utilisation De Cet Appareil Avec Un Écran Plasma Pioneer
1 Ce système est compatible avec tous les écrans plasma de Pioneer datant de 2003 et ultérieurs. 2 Le câble SR+ à 3 anneaux de Pioneer est disponible dans le commerce sous le numéro de pièce ADE7095. Pour plus de renseignements sur l’acquisition du câble SR+, contactez le Service Clientèle de Pioneer. -
Page 61: Utilisation Du Mode Sr+ Avec Un Écran À Plasma Pioneer
DVD, l’écran plasma permute automatiquement à l’entrée 2. Bien des composants de Pioneer sont dotés de prises SR Pour chaque fonction d’entrée du caisson de basses à CONTROL, utilisables pour les relier entre eux, de récepteur (XBX (Xbox 360), DVD (DVD/DVR), DIG... -
Page 62: Informations Complémentaires
Informations complémentaires Chapitre 9 Informations complémentaires Appuyez sur SETUP. Réglage du minuteur de mise en Utilisez les touches (curseur gauche/droite) pour sélectionner DIMMER, puis appuyez sur ENTER. veille Utilisez les touches (curseur haut/bas) pour Le minuteur de mise en veille met le récepteur hors sélectionner LIGHT ou DARK, puis appuyez sur tension après le délai spécifié... -
Page 63: Glossaire
Informations complémentaires Ce que vous ne devez pas faire… Configuration de la télécommande Utiliser l’appareil dans un endroit exposé à des températures ou un degré d’humidité élevés, y compris à pour contrôler votre téléviseur proximité de radiateurs ou d’autres appareils de chauffage. Vous pouvez utiliser la télécommande fournie pour Placer l’appareil devant une fenêtre ou dans tout autre endroit où... -
Page 64: Utilisation Des Touches De Télécommande Du Téléviseur
YOKO 607, 642, 646 653, 654, 655 655, 656, 607, 636, 651 ZENITH 603, 620 FIRSTLINE 640, 644 MAGNADYNE 632, 649 PIONEER 600, 631, 632, 607, 636, FISHER 632, 635, 638, 645 MAGNAFON 649 642, 651 FORMENTI 632, 607, 642... -
Page 65: Guide De Dépannage
(page 29) • Si le caisson de basses à récepteur est raccordé à un écran plasma de Pioneer au moyen d’un câble SR+, assurez-vous que l’écran plasma est sous tension. Dirigez la télécommande vers l’écran plasma pour faire fonctionner le caisson de basses à... -
Page 66: Syntoniseur
EEP ERROR • Pour les réparations, contactez le service après-vente agréé par Pioneer ou votre revendeur. NO SPTYP • Essayez de mettre l’appareil hors tension, puis à nouveau sous tension. Si l’erreur persiste,... -
Page 67: Caractéristiques Techniques
Informations complémentaires Système d’enceinte acoustique S-X360 Caractéristiques techniques (Haut-parleurs avant x2, haut-parleurs d’ambiance x2, haut-parleur central x1) Caisson de basses à récepteur multi-canaux audio • Haut-parleurs avant SX-X360 Coffret ....Type étagère à boîtier fermé •... - Page 68 Should this product require service in the U.S.A. and you wish to locate the nearest Pioneer Authorized Independent Service Company, or if you wish to purchase replacement parts, operating instructions, service manuals, or accessories, please call the number shown below.