Table of Contents
Advertisement
Quick Links
Wireless File Transmitter
WFT-E2 II
Instruction Manual for Use With EOS-1D Mark IV
To EOS-1D Mark III or EOS-1Ds Mark III Users
This instruction manual describes the use of the transmitter when connected to the EOS-1D Mark IV.
When using the transmitter with the EOS-1D Mark III or EOS-1Ds Mark III, refer to the PDF
manual in the EOS_1DIII_1DsIII folder.
To comply with local radio wave regulations, Canon offers four region-specific versions of
the transmitter (WFT-E2 IIA, E2 IIB, E2 IIC, and E2 IID) in various areas around the world
(p.8). For convenience, we refer to the product in this manual simply as "the transmitter,"
without reference to versions A, B, C, or D.
INSTRUCTION MANUAL
E
Advertisement
Table of Contents

Related Manuals for Canon Wireless File Transmitter WFT-E2 II A


Summary of Contents for Canon Wireless File Transmitter WFT-E2 II A
- Page 1 When using the transmitter with the EOS-1D Mark III or EOS-1Ds Mark III, refer to the PDF manual in the EOS_1DIII_1DsIII folder. To comply with local radio wave regulations, Canon offers four region-specific versions of the transmitter (WFT-E2 IIA, E2 IIB, E2 IIC, and E2 IID) in various areas around the world (p.8).
-
Page 2: Introduction
Introduction The Wireless File Transmitter WFT-E2 II is an accessory for EOS-1D Mark IV camera. It gives the camera wireless and wired LAN functionality and adds a USB port, enabling the following operations. Wireless and Wired LAN Functions FTP Transfer Transfer images to an FTP server EOS Utility Use EOS Utility to capture, view, and... - Page 3 Introduction Functions When Connected via USB External Media Record or backup images onto external media Connected by a USB cable Connected via Bluetooth Add the latitude, longitude, altitude, date and time, and other shooting information to images...
-
Page 4: Conventions Used In This Manual
Note that Canon cannot be held liable for any loss or damage to the transmitter from erroneous network or FTP server settings. In addition, Canon cannot be held liable for any other loss or damage caused by use of the transmitter. -
Page 5: Table Of Contents
Chapter List Introduction Basic Network Settings Transferring Images to an FTP Server Remote Capture Using EOS Utility Remote Capture Using WFT Server Linked Shooting Managing Settings Information Using External Media Using GPS Devices Troubleshooting Reference... -
Page 6: Contents
Contents Introduction Conventions Used in this Manual ...................... 4 Chapter List............................5 Contents............................. 6 Areas of Use and Restrictions ......................8 Safety Warnings..........................10 Nomenclature........................... 11 Attaching to the Camera ........................12 Subsequent Organization of This Manual..................13 Basic Network Settings Getting Ready .......................... - Page 7 Contents Managing Settings Information Checking Settings ..........................66 Changing Settings..........................67 Saving and Loading Settings ......................69 Using External Media Connecting External Media......................72 Choosing Recording Media When Shooting ..................75 Copying Images ..........................77 Backing Up on External Media......................78 Using GPS Devices Connecting GPS Devices with a USB Cable ...................
-
Page 8: Areas Of Use And Restrictions
Areas of Use and Restrictions To comply with local radio wave regulations in various areas around the world, Canon offers four region-specific versions of the transmitter (WFT-E2 IIA, E2 IIB, E2 IIC, and E2 IID) as described below. Please do not use your model (version) of transmitter in regions it was not designed for. - Page 9 Use the transmitter as a wireless or wired LAN device as described in this instruction manual. If you use the transmitter for any other purpose, Canon cannot be held liable for any loss or damage that may occur.
-
Page 10: Safety Warnings
Do not wipe the transmitter using cleaners containing organic solvents. If the transmitter becomes difficult to clean, take it to the nearest Canon Service Center. To avoid corrosion, do not store the transmitter where there are strong chemicals, such as in... -
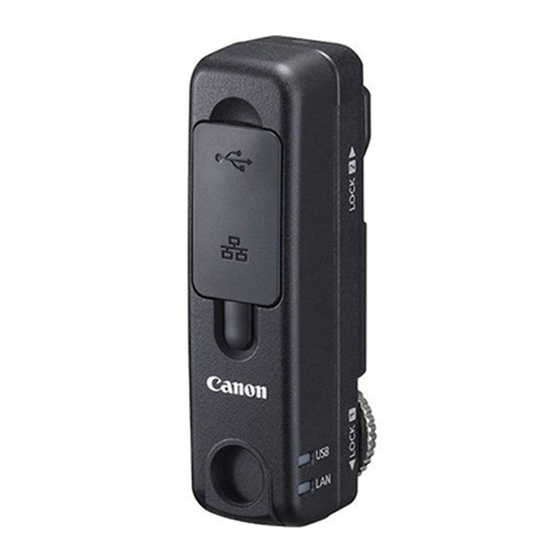
Page 11: Nomenclature
Nomenclature Locking lever Attachment pin USB port Ethernet RJ-45 port Port cover Tightening screw Terminal <USB> USB lamp <LAN> Network lamp Terminal cap receptacle (Not used with the EOS-1D Mark IV) Transmitter Case Waterproof/Dustproof USB Cap* External Media Case* *1: For storing portable hard disks or other devices. *2: Attach this cap before connecting the USB cable in rainy weather or under other adverse conditions. -
Page 12: Attaching To The Camera
Attaching to the Camera Turn off the camera before attaching the transmitter. Ensure the camera battery has sufficient charge. If the charge drops below 19%, you cannot transfer captured images or back them up to external media. Open the terminal cover on the camera. Open the extension system terminal cover and turn it toward the bottom. -
Page 13: Subsequent Organization Of This Manual
Subsequent Organization of This Manual Click one of the following chapter titles to view the corresponding page. 1 Basic Network Settings (p.15) 2 Transferring Images to an FTP Server (p.29) 3 Remote Capture Using EOS Utility (p.43) 4 Remote Capture Using WFT Server (p.49) 5 Linked Shooting (p.61) 6 Managing Settings Information (p.65) 7 Using External Media (p.71) -
Page 15: Basic Network Settings
Basic Network Settings Complete the basic network settings by following transmitter connection instructions on the camera menu screen. -
Page 16: Getting Ready
Getting Ready [FTP trans.], [EOSUtility], [WFTserver] The connection instructions help you follow the steps to connect the transmitter to an existing wireless or wired LAN. To connect to a wireless LAN, prepare the wireless LAN terminal (wireless LAN access point or wireless LAN adapter) and computer in advance so that they are ready for you to connect the transmitter to the wireless network. -
Page 17: Displaying The Connection Wizard
Displaying the Connection Wizard This section describes the process of following the connection instructions. If an error is displayed, refer to “Troubleshooting” in Chapter 9 (p.91) and check the settings. Pressing the shutter button or other camera controls during configuration by the connection instructions will close the connection instructions. -
Page 18: Selecting The Communication Method And Lan Type
Selecting the Communication Method and LAN Type Selecting the Communication Method Turn the <5> dial to select the communication method, and then press <0>. Select [OK] and press <0> to go to the next screen. • FTP trans. Choose this option to transfer captured images to an FTP server. Images can be automatically transferred as you shoot them, or you can select images to be transfered later. - Page 19 Selecting the Communication Method and LAN Type • WFTserver Choose this option for remote capture over a wireless or wired LAN with the transmitter acting as a server. Additionally, images on a memory card in the camera can be viewed and downloaded to a computer.
-
Page 20: Selecting The Lan Type
Selecting the Communication Method and LAN Type Selecting the LAN Type For [LinkedShot] instructions, refer to page 61. Note that no information about [LinkedShot] is given in this chapter. Turn the <5> dial to select the type of LAN, and then press <0>. -
Page 21: Using The Wizard To Establish A Connection
Using the Wizard to Establish a Connection Selecting the Wireless Network When you select [Connect with wizard], active wireless LAN terminals in your area are listed, accompanied by information about them. Select the SSID (or ESS-ID) of your desired wireless LAN terminal. - Page 22 Using the Wizard to Establish a Connection Entering the Wireless LAN Encryption Key Next, enter the encryption key of the wireless LAN terminal. For details on the encryption key, refer to the device’s instruction manual. Note that the screens displayed in steps 1 to 3 below vary depending on the authentication and encryption of the wireless LAN terminal.
-
Page 23: Wps Connections (Pbc Mode)
WPS Connections (PBC Mode) This is a connection mode when using a wireless LAN terminal compatible with Wi-Fi Protected Setup (WPS). Pushbutton Connection mode (PBC mode) makes it easy to establish a connection between the camera and the wireless LAN terminal by pressing the WPS button on the wireless LAN terminal. -
Page 24: Wps Connections (Pin Mode)
WPS Connections (PIN Mode) This is a connection mode when using a wireless LAN terminal compatible with Wi-Fi Protected Setup (WPS). In PIN code connection mode (PIN mode), an 8-digit identification number specified on the camera is set on the wireless LAN terminal to establish a connection. Even if there are multiple wireless LAN terminals active in your area, this is a relatively reliable method of establishing a connection using a shared identification number. -
Page 25: Configuring Network Settings
Configuring Network Settings Turn the <5> dial to select how to configure the network settings, and then press <0>. Select [OK] and press <0> to go to the next screen. [Auto setting] Settings otherwise configured with [Manual setting] can be configured automatically. However, the IP address and similar settings must be automatically assigned and configured in environments using DHCP servers or wireless LAN terminals or routers supporting DHCP server functions. - Page 26 Before performing the operations from page 43, perform the operations below. If these operations are not performed, the WFT Pairing Software described on page 44 may not start. Open the [C Drive] [Program Files] [Canon] [EOS Utility] [WFTPairing] folder (in this order), and then double-click the [WFT FirewallSettings] icon.
-
Page 27: Entering Text
Configuring Network Settings Virtual Keyboard Operation The virtual keyboard is displayed during entry of the encryption key, server name, and other information. Switching to other input areas To switch between input areas, press the <H> button. Moving the cursor To move the cursor, turn the <5> dial. You can also move the cursor using <9>. -
Page 29: Transferring Images To An Ftp Server
Transferring Images to an FTP Server With FTP transfer, you can automatically transfer each image to the FTP server as you shoot or transfer a set of shots together. -
Page 30: Configuring Ftp Communication Settings
Configuring FTP Communication Settings These instructions are continued from Chapter 1. Turn the <5> dial to select [Address setting], and then press <0>. If you have set the DNS server setting to [Disable], the screen at left is displayed. Press <0> to select the input position, and then turn the <5>... - Page 31 Configuring FTP Communication Settings Complete the [Login method] settings. Turn the <5> dial to select [OK], and then press <0> to go to the next screen. Complete the [Target folder] settings. Select [Root folder] to have images saved in the root folder as specified in FTP server settings.
-
Page 32: Automatic Image Transfer After Each Shot
Automatic Image Transfer After Each Shot An image can be automatically transferred to the FTP server immediately after shooting. You can also continue shooting even while images are being transferred. Before shooting, be sure to insert a memory card in the camera or connect external media (p.71). - Page 33 Automatic Image Transfer After Each Shot Selecting Particular Sizes or Types of Images to Transfer In automatic transfer during shooting, you can choose which images to transfer if different sizes of images are recorded to the memory card and external media, or during RAW+JPEG shooting.
-
Page 34: Transferring Images Individually
Transferring Images Individually Simply select an image and press <0> to transfer it. You can also add a caption before transferring images. You can also continue shooting even while images are being transferred. Transferring the Current Image In [WFT settings], select [Set up]. Select [Transfer with SET]. - Page 35 Transferring Images Individually Adding a Caption Before Transfer You can add a registered caption to each image before transfer. This is effective if you want to inform the recipient the printing quantity, for example. The caption is also added to images stored on the camera.
-
Page 36: Batch Transfer
Batch Transfer After shooting, you can select multiple images as desired and transfer them all at once. You can also transfer unsent images or images that could not be sent previously. If both a CF card and SD card are used at the same time, or if external media is connected, images are transferred from the source specified on the menu [5] tab, in [Record func+media/folder sel.] [Record/play]. - Page 37 Batch Transfer Transfer the images. Select [Transfer]. Select [OK] on the confirmation screen displayed next. A transfer progress screen is displayed. During image transfer, the <LAN> lamp blinks. Menu Operation During Image Transfer You can use the menu even during image transfer. However, to prevent transfer problems, some menu items are unavailable during transfer, including [WFT settings], [Protect images], [Erase images], [Format], and [Record func+media/folder sel.].
- Page 38 Batch Transfer Batch Transfer of Images in a Folder In [WFT settings], select [Image sel./ transfer]. Select [Sel.n]. Select [Folder images not transfer’d]. To transfer images that could not previously be transferred, select [Folder images failed transf.]. Select a folder. Transfer the images.
- Page 39 Batch Transfer Batch Transfer of Images on memory Cards In [WFT settings], select [Image sel./ transfer]. Select [All image]. Select [Card images not transferred]. To transfer images that could not previously be transferred, select [Card images failed transfer]. Transfer the images. Select [Transfer].
-
Page 40: Checking Image Transfer History
Checking Image Transfer History Checking the Transfer History of Individual Images To check the transfer history, in [Image sel./transfer], select [Sel.Image]. Image not selected for transfer (no icon) Image selected for transfer Image could not be transferred Image transferred Checking the Transfer History of Folders or Memory Cards On the [Image sel./transfer] screen, you can check the number of images for transfer as well as the transfer history of images in the selected folder or... -
Page 41: Viewing Transferred Images
Viewing Transferred Images Images transferred to the FTP server are stored in the following folder as specified in the FTP server settings. Windows Under the default settings of the FTP server, images are stored in [C drive] [Inetpub] folder [ftproot] folder, or in a subfolder of this folder. If the root folder of the transfer destination has been changed in the FTP server settings, ask the FTP server administrator where images are transferred. -
Page 43: Remote Capture Using Eos Utility
Remote Capture Using EOS Utility You can use EOS Utility to shoot remotely over a wireless or wired LAN. In addition to remote capture, all camera operations in EOS Utility are supported because a wireless or wired network is used with this option instead of the USB cable. -
Page 44: Configuring Eos Utility Communication Settings
Configuring EOS Utility Communication Settings These instructions are continued from Chapter 1. With EOS Utility, you can use the included WFT Pairing Software to establish a connection between the transmitter and a computer. WFT Pairing Software is installed automatically during easy installation of the software provided with the camera. - Page 45 Configuring EOS Utility Communication Settings Double-click the pairing software icon. Detected cameras are listed. Cameras that have already been connected are not included in the list. Click [Connect]. If multiple cameras are displayed, identify the camera to connect to by its [MAC address] or [IP address].
- Page 46 Configuring EOS Utility Communication Settings There is no need to complete pairing again if you will continue using a particular camera, transmitter, and computer together after pairing without changing the settings. Before your next PTP session, simply turn on the camera to which the transmitter is attached and start the pairing software.
-
Page 47: Using Eos Utility
Using EOS Utility For EOS Utility instructions, refer to the Software Instruction Manual (PDF). You can take full advantage of EOS Utility via the transmitter just as via a USB connection, without restrictions. In Remote Live View shooting, the rate of image transmission is slower than via USB. The motion of moving subjects cannot be displayed smoothly. -
Page 49: Remote Capture Using Wft Server
Remote Capture Using WFT Server Using a web browser, you can view images on a memory card in the camera and download them to a computer. Additionally, you can shoot remotely over a wireless or wired LAN. Note that bulb and movie shooting are not supported. -
Page 50: Configuring Wft Server Communication Settings
Configuring WFT Server Communication Settings These instructions are continued from Chapter 1. Press <0>. Turn the <5> dial to select the set number, and then press <0>. Press <0> again. After the connection wizard is closed, the display reverts to the menu screen. The <LAN>... - Page 51 Configuring WFT Server Communication Settings Turn the <5> dial to select [WFT account], and then press <0>. When changing the port number, turn the <5> dial to select [Port number] and press <0>. Note that there is normally no need to change the port number (80).
-
Page 52: Displaying Wft Server
Displaying WFT Server In the web browser, display WFT Server, a screen for transmitter operations. Make sure you have already established a connection between the camera and computer. Start the web browser. First, start Internet Explorer or another web browser. Enter the URL. -
Page 53: Viewing Images
Viewing Images Browse images on the camera’s memory card as follows. Click [Viewer]. The image viewing screen is displayed. Select the memory card. Click [CF], [SD], or the external media. Click the [DCIM] folder and select the folder containing the images. Select an image. - Page 54 Viewing Images Download images to the computer. Click a thumbnail. The image is displayed at a larger size. To download the image to your computer, click < >. Click [Return] to return to the image viewing screen. Although actual RAW images and movies are not displayed here, they can be downloaded to the computer the same way as JPEGs.
-
Page 55: Remote Capture [Camera Control]
Remote Capture [Camera control] First, prepare the camera for Live View shooting. Note that remote capture of movies is not supported. For web browsers that do not support JavaScript, refer to page 59, “Remote Capture.” Click [Camera control]. The advanced capture screen is displayed. ①... - Page 56 Remote Capture [Camera control] Set the lens focus mode switch to <f>. Under these conditions, click the release button (⑤). When you let go of the mouse button, the camera autofocuses and shoots. (See step 5.) With One-Shot AF, the camera does not shoot unless focus is achieved.
- Page 57 Remote Capture [Camera control] Configure the shooting settings. Click setting items (such as quality) to view the setting details, which you can configure. Complete the settings as needed. Take the picture. Click the release button (⑤). When you let go of the mouse button, the camera shoots.
-
Page 58: Remote Capture [Simple Control]
Remote Capture [Simple control] First, prepare the camera for Live View shooting. Note that remote capture of movies is not supported. For web browsers that do not support JavaScript, refer to page 59, “Remote Capture.” Click [Simple control]. The basic capture screen is displayed, and Live View image is displayed. -
Page 59: Remote Capture
Remote Capture The following instructions are for remote capture with web browsers that do not support JavaScript. First, prepare the camera for Live View shooting. Note that remote capture of movies is not supported. Click [Capture]. The capture screen is displayed. Live View image is not displayed. -
Page 61: Linked Shooting
Linked Shooting With linked shooting, up to 10 slave cameras can be linked in a wireless network (via IEEE 802.11g in ad hoc mode) to the master camera on which you will release the shutter. Any cameras compatible with linked shooting, when they have WFT series transmitters attached, can be used as slave cameras, regardless of model. -
Page 62: Setting Up Linked Shooting
Setting Up Linked Shooting First, establish a connection from the slave cameras to the master camera. Because linked shooting utilizes a wireless connection via IEEE 802.11g in ad hoc mode, it is not available over wired LANs. Display the transmitter menu. On the camera, press the <7>... - Page 63 Setting Up Linked Shooting Set up the master camera. Configure the settings on the master camera following steps 1-3 on the previous page, and then select [Master]. The following screen is displayed. At this point, switch to setting up the slave cameras.
-
Page 64: Arranging The Slave Cameras
Arranging the Slave Cameras Slave camera Slave camera Slave camera Slave camera Master camera Arrange the slave cameras in clear view of the master camera, without objects between them. You can arrange master camera in an overall circumference of up to approximately 100 m / 328 ft. -
Page 65: Managing Settings Information
Managing Settings Information... -
Page 66: Checking Settings
Checking Settings Check the network settings as follows. In [WFT settings], select [Set up]. Select [Confirm settings]. The settings are displayed. Example of FTP transfer and wired LAN settings Example of FTP transfer and wireless LAN settings... -
Page 67: Changing Settings
Changing Settings Settings originally completed using the connection wizard can be changed as follows. You can also change IP security settings (IPsec) not completed using the connection wizard, as well as other settings, such as the setting that determines what happens if an image of the same file name as an existing file is sent to the FTP server. - Page 68 Changing Settings IP Security (IPsec) Configured in [TCP/IP] [Security]. IPsec is a set of standards for encrypted communication over the Internet. It provides effective security for both wireless and wired LANs. To use this function, you must enable IPsec in the network settings of your computer.
-
Page 69: Saving And Loading Settings
Saving and Loading Settings Network settings can be saved on a memory card for use with other cameras. Saving Settings In [WFT settings], select [Set up]. Select [LAN settings]. Select the settings number. Here, select the settings number that identifies the LAN settings. - Page 70 Saving and Loading Settings Select [Save]. The settings are now saved as a file on the memory card. The settings are saved as a file (WFTNPF**.NIF) in the area of the memory card shown when the card is opened (in the root directory). The file name is determined automatically by the camera: WFTNPF, followed by a number (01 to 99) and the extension NIF.
-
Page 71: Using External Media
Using External Media Commercially available external media, connected via USB, can be used the same way as CF and SD cards. You can also back up images from CF and SD cards onto external media. Note that external media must meet the following requirements. Use media conforming to the USB Mass Storage Class Specification. -
Page 72: Connecting External Media
Connecting External Media Before connecting external media to the transmitter, switch the camera’s power switch to <OFF>. Also turn off external media that has its own power supply. When connecting external media, be sure to use the USB cable provided with the camera. The transmitter USB port is not hot-pluggable. - Page 73 Connecting External Media Select [OK]. Camera operations such as shooting, menu display, or image playback are not possible until the connection is established. When the transmitter is connected to the external media, the transmitter’s <USB> lamp is lit in green and a message is displayed indicating that a connection has been established.
-
Page 74: Power Management
Connecting External Media Unplugging External Media from the USB Port Before unplugging external media from the USB port, always select [Disconnect] as shown in step 5. Follow the instructions displayed to terminate the connection. The connection will not be terminated if you simply turn off the camera and external media. If you unplug external media while the connection is still active, plug the external media into the USB port again and follow the preceding steps to terminate the connection. -
Page 75: Choosing Recording Media When Shooting
Choosing Recording Media When Shooting Images can be stored on external media connected via USB just as on CF and SD cards. You can also configure [Record func.], [Record/play], and [Folder] settings (described below) to use the external media. For details, refer to the Camera Instruction Manual (page 56). When recording movies to a hard disk, use a hard disk with fast write speeds. - Page 76 Choosing Recording Media When Shooting [Record/play] Setting When you select external media in [Record/play], the [Select location for DCIM folder] screen is displayed. The DCIM folder contains the EOS1D folder, where images are stored. To create the DCIM folder in the first folder displayed when the external media is opened (that is, the root directory), select the default setting of [/].
-
Page 77: Copying Images
Copying Images Images can be copied to external media connected via USB just as to CF and SD cards. On the [ ] tab, select [Record func+media/folder sel.]. The icon for external media is displayed next to icons for the CF and SD cards. Select the source media in [Record/ play]. -
Page 78: Backing Up On External Media
Backing Up on External Media Images stored on CF or SD cards can be backed up on external media. Initially, captured images are stored in the DCIM folder on CF or SD cards. Selecting [External media backup] backs up this DCIM folder to external media. On the [3] tab, select [External media backup]. - Page 79 Backing Up on External Media Quick Backup A simple method of backup is available, as follows. Select [Quick backup]. Select the source memory card. Select [Start]. Select [OK]. The backup process now begins. When the message indicating completion is displayed, select [OK].
- Page 80 Backing Up on External Media Where the DCIM Folder is Stored The DCIM folder is stored in a directory indicated by a file path such as [u/09103102/]. The target folder name comprises the current date (last two digits of the year, in addition to the month and day) and numbers representing the order the folder was created, in a range of 01 to 99.
- Page 81 Backing Up on External Media Select [Create folder]. Enter the [Folder name]. Always use 8 characters for the folder name. For instructions on entering the folder name, refer to “Virtual Keyboard Operation” (p.27). Select [Start]. Select [OK]. The backup process now begins. When the message indicating completion is displayed, select [OK].
- Page 82 Backing Up on External Media External Media Case The provided external media case can hold portable hard disks up to 120 x 75 x 15 mm/ 4.72 x 2.95 x 0.59 in.
-
Page 83: Using Gps Devices
NMEA 0183 Ver. 3.0.1, as well as some devices that produce Garmin protocol data (as of November 2009). For a list of specific GPS devices supported, contact the Canon Service Center. For GPS device instructions, refer to the device’s instruction manual or contact the... -
Page 84: Connecting Gps Devices With A Usb Cable
Connecting GPS Devices with a USB Cable Turn off the GPS device and camera before connecting them. When connecting GPS devices, be sure to use the USB cable provided with the camera. The transmitter USB port is not hot-pluggable. USB cables cannot be connected or disconnected at any time. - Page 85 Connecting GPS Devices with a USB Cable Select [OK]. After selecting [OK], turn the GPS device on. It may take a few minutes to establish a connection with the GPS device. Camera operations such as shooting, menu display, or image playback are not possible until the connection is established.
- Page 86 Connecting GPS Devices with a USB Cable Unplugging GPS Devices from the USB Port Before unplugging GPS devices from the USB port, always select [Disconnect] as shown in step 5. Follow the instructions displayed to terminate the connection. The connection will not be terminated if you simply turn off the camera and GPS device. If you unplug GPS device while the connection is still active, plug the GPS device into the USB port again and follow the preceding steps to terminate the connection.
-
Page 87: Connecting Gps Devices Via Bluetooth
Connecting GPS Devices via Bluetooth By attaching the Canon Bluetooth Unit BU-30 to the USB port, you can connect Bluetooth® GPS devices wirelessly. (Bluetooth® devices other than GPS devices cannot be connected). When using non-Canon Bluetooth units, confirm normal operation before use. - Page 88 Connecting GPS Devices via Bluetooth Select [OK]. After the Bluetooth unit is attached to the transmitter, the transmitter’s <USB> lamp blinks in green and a message is displayed indicating that a connection has been established. When the confirmation message is displayed, select [OK]. At this point, the menu option [Disconnect] becomes available.
- Page 89 Connecting GPS Devices via Bluetooth When the confirmation message is displayed, select [OK]. The GPS connection status changes to [Connecting]. Pressing <0> under these conditions will enable you to disconnect the GPS device. Take the picture. Make sure the transmitter’s <USB> lamp is lit in green before shooting.
- Page 90 Connecting GPS Devices via Bluetooth Detaching Bluetooth units from the USB port Before detaching Bluetooth units from the USB port, always select [Disconnect] as shown in step 5. Follow the instructions displayed to terminate the connection. The connection with the Bluetooth unit will not be terminated if you simply turn off the camera. If you detach a Bluetooth unit while the connection is still active, attach the Bluetooth unit again and follow the preceding steps to terminate the connection.
-
Page 91: Troubleshooting
Troubleshooting... -
Page 92: Responding To Error Messages
Responding to Error Messages If transmitter errors are displayed on the camera LCD monitor, refer to the examples of corrective actions in this section to eliminate the cause of the error. The error details can also be checked on the [7] tab [WFT settings] [Error description]. - Page 93 Responding to Error Messages 11: Connection target not found Is the pairing software running? Start the pairing software and follow the instructions to re-establish the connection. (p.44) Are the transmitter and wireless LAN terminal configured with the same encryption key for authentication? This error occurs if the encryption keys do not match when the authentication method for encryption is [Open system].
- Page 94 Responding to Error Messages 22: No response from DNS server What to check on the transmitter On the transmitter, the DNS address setting is [Auto assign] or [Manual setting]. Does the error occur under these settings? If no DNS server is used, set the transmitter’s DNS address setting to [Disable]. (p.25) On the transmitter, does the DNS server’s IP address setting match the server’s actual address? Configure the IP address on the transmitter to match the actual DNS server address.
- Page 95 Responding to Error Messages 24: No response from proxy server What to check on the transmitter The transmitter’s proxy server setting is [Enable]. Does the error occur under this setting? If no proxy server is used, set the transmitter’s proxy server setting to [Disable]. (p.30) Do the transmitter’s [Address setting] and [Port No.] settings match those of the proxy server? Configure the transmitter’s proxy server address and port number to match those of the proxy...
- Page 96 Responding to Error Messages 25: Another terminal has set the same IP address Is another device on the transmitter network using the same IP address as the transmitter? This error occurs if the transmitter is connected to a network where another device subsequently connects with the same IP address.
- Page 97 Format the external media with a FAT16 or FAT32 file system using the computer. The GPS device is incompatible with the transmitter. Among GPS devices, we recommend devices for which operation has been verified by Canon. 33: USB device error There is a problem with the external media.
- Page 98 Responding to Error Messages 41: Cannot connect to FTP server What to check on the transmitter On the transmitter, does the FTP server’s IP address setting match the server’s actual address? Configure the IP address on the transmitter to match the actual FTP server address. (p.30) Are the transmitter and wireless LAN terminal configured with the same encryption key for authentication?
- Page 99 Responding to Error Messages Are you connecting to the FTP server via a broadband router? Some broadband routers use a firewall to restrict access to the FTP server. Change the firewall settings to allow access to the FTP server. You may be able to access the FTP server by setting [Passive mode] to [Enable] on the transmitter.
- Page 100 Responding to Error Messages 45: Cannot login to FTP server. Error code received from server. What to check on the transmitter On the transmitter, is the [Login name] entered correctly? Check the logon name for accessing the FTP server. The setting is case-sensitive, so check upper- and lower-case characters.
- Page 101 Responding to Error Messages 47: Image file transfer completion not confirmed by FTP server This error occurs if, for some reason, the transmitter fails to receive confirmation from the FTP server that image file transfer is complete. Restart the FTP server and camera and send the images again. 51: Connection with Bluetooth unit lost Is the Bluetooth unit too far from the GPS device? Bring the GPS device closer to the Bluetooth unit.
- Page 102 Responding to Error Messages 61: Same SSID wireless LAN terminal not found Are any obstacles blocking the line of sight between the transmitter and the antenna of the wireless LAN terminal? Move the antenna to a position clearly visible from the point of view of the transmitter. (p.106) What to check on the transmitter On the transmitter, does the SSID setting match that of the wireless LAN terminal?
- Page 103 Responding to Error Messages 63: Wireless LAN authentication failed Are the transmitter and wireless LAN terminal configured for the same authentication method? The transmitter supports these authentication methods: [Open system], [Shared key], [WPA-PSK], and [WPA2-PSK]. (p.21) When using an AirPort for communication in infrastructure mode, [Open system] is not supported.
- Page 104 Responding to Error Messages 66: Incorrect wireless LAN encryption key Are the transmitter and wireless LAN terminal configured with the same encryption key for authentication? The setting is case-sensitive, so check upper- and lower-case characters. Make sure the correct encryption key for authentication is entered on the transmitter and wireless LAN terminal.
- Page 105 Responding to Error Messages 71: Cannot connect to slave cameras Are you following the correct procedure to establish the connection with slave cameras? Operate slave cameras by following the correct instructions (p.62, 63). Are the slave cameras too far from the master camera? Bring the slave cameras closer to the master camera.
-
Page 106: Wireless Lan Notes
Wireless LAN Notes When using the transmitter with a wireless LAN, try the following corrective actions if the transmission rate drops, the connection is lost, or other problems occur. Wireless LAN Terminal Installation and Antenna Position When using the transmitter indoors, install the wireless LAN terminal in the same room where you are shooting. -
Page 107: Checking Network Settings
Checking Network Settings Windows Click the Windows [Start] button [All Programs] [Accessories] [Command Prompt]. Type ipconfig/all and press the <Enter> key. The IP address assigned to the computer is displayed, as well as the subnet mask, gateway, and DNS server information. To avoid using the same IP address for the computer and other devices on the network when configuring the IP address assigned to the camera (page 25), change the rightmost numbers here. -
Page 109: Reference
Reference... -
Page 110: Creating And Registering Captions
Creating and Registering Captions Follow these steps to create captions and register them on the camera, as introduced in “Adding a Caption Before Transfer” (p.35). When creating and registering captions, use a computer on which EOS Utility is installed. Before you begin, attach the transmitter to the camera and use the USB cable provided with the camera to connect the camera to the computer. -
Page 111: Specifications
Specifications Type Type: Image transfer accessory that can be used in wireless LANs and over Ethernet in wired LANs (IPsec-compatible). Can be connected via USB to external media, GPS devices, and Bluetooth units. Wireless LAN Standards compliance: IEEE 802.11a (WFT-E2 IIA/B/C) and ARIB STD-T71 IEEE 802.11b and ARIB STD-T66 IEEE 802.11g and ARIB STD-T66 Transmission method:... -
Page 112: Operating Environment
Operating Environment Temperature: 0°C - 45°C / 32°F - 113°F Humidity: 85% or less All preceding specifications are based on Canon testing standards. Transmitter specifications and appearance are subject to change without notice Model Number WFT-E2 IIA : DS585802 WFT-E2 IIB... - Page 116 Con la presente Canon Inc. dichiara che questo CH9-1161 è conforme ai requisiti essenziali ed alle altre disposizioni pertinenti stabilite dalla direttiva 1999/5/CE. Ar šo Canon Inc. deklar , ka CH9-1161 atbilst Direkt vas 1999/5/EK b tiskaj m pras b m un citiem ar to saist tajiem noteikumiem.
- Page 117 For body worn operation, this model has been tested and meets the FCC RF exposure guidelines when used with the CANON INC. Cameras supplied or designated for this product. Use of other Cameras may not ensure compliance with FCC RF exposure guidelines.
-
Page 118: Index
Index Infrastructure......... 8, 21 Wireless and Wired IP address........... 25, 30 IPsec ............68 LAN Functions JPEG............33 Account ............. 50 Ad hoc ........... 8, 21 Area of use ..........8 Key format..........22 Authentication........21, 68 Keyboard........... 27 Auto power off ........... 17 LAN cable .......... - Page 119 Index Backup ..........71, 80 Bluetooth........... 87 Select folder ..........31 Bus-powered..........71 Settings information........65 Shared key ..........21 Simple control..........58 Copying images ........77 Slave camera ..........62 SSID ............21 Stealth functions........23, 24 Storage............41 Error ............
- Page 120 JAPAN 16-6, Kohnan 2-chome, Minato-ku, Tokyo 108-8011, Japan This instruction manual is current as of November 2009. For information on using the transmitter with accessories introduced after this date, contact your nearest Canon Service Center. CT1-7835aE-001 © CANON INC. 2010...