ZyXEL Communications NSA310 Quick Start Manual
1-bay media server
Hide thumbs
Also See for NSA310:
- User manual (576 pages) ,
- Support note (22 pages) ,
- Specifications (4 pages)

Related Manuals for ZyXEL Communications NSA310


Summary of Contents for ZyXEL Communications NSA310
-
Page 1: Table Of Contents
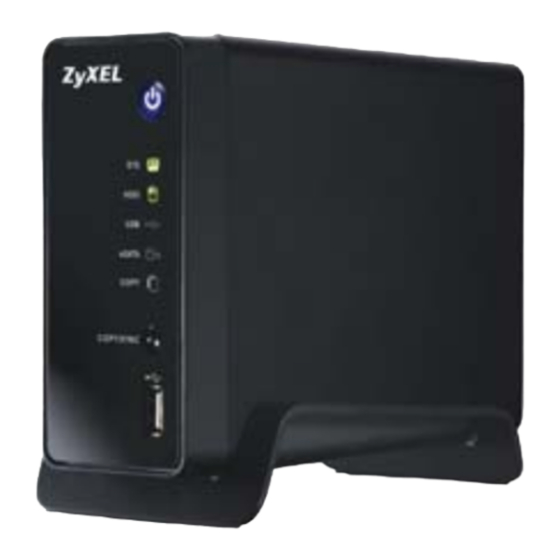
NSA310 Quick Start Guide 1-Bay Media Server Firmware Version 4.21 Edition 2, 7/2012 DEFAULT LOGIN DETAILS Web Address nsa310 Password 1234 CONTENTS ENGLISH DEUTSCH ESPAÑOL FRANÇAIS ITALIANO NEDERLANDS SVENSKA 2012 ZyXEL Communications Corporation www.zyxel.com... - Page 2 Device Panels On / Off SYS LED HDD LED USB LED eSATA LED COPY LED COPY/SYNC button USB Port eSATA Port USB Port LAN Port RESET Power...
-
Page 3: English
ENGLISH Introduction The NSA lets you share files and back up data on your home network. You can also play video, music, and photo files stored on the NSA using your computer or a media client such as the DMA2501. How It Works Above is the NSA in a home network. -
Page 4: Before You Begin
Before You Begin You need the following before you start: • NSA • Included CD containing the NAS Starter Utility and User’s Guide • Power adapter • Included Ethernet cable • One SATA II or SATA III compatible hard disk •... - Page 5 2. Place the NSA on a flat surface with the bottom panel facing up. This exposes the bottom panel where the thumbscrew is located. Loosen the thumbscrew using a flat head screwdriver or a coin. 3. Bring the NSA to an upright position and take off the front lid to open the hard disk tray as shown in the following: 4.
- Page 6 Connect the NSA 1. Use the included Ethernet cable to connect the LAN port on the rear of the NSA to a computer, switch, or router on your network. 2. Connect one end of the power cord to the POWER socket on the rear of the NSA and the other end to the external power supply.
- Page 7 2. The installation wizard begins. Follow the installer instructions. Click Finish to complete the installation. 3. In Windows, click Start > All Programs > ZyXEL > NAS Starter Utility > ZyXEL NAS Starter Utility to run the NAS Starter Utility.
- Page 8 NSA Initialization Make sure you have installed the hard drive before following these steps. 1. Click NSA310. 2. Click Run the Initialization Wizard.
- Page 9 3. Enter the default username ‘admin’ and password ‘1234’ and click Next. The username and password are case sensitive. You may need to make sure you don’t have the caps lock on. 4. Choose Default Configuration (recommended) or manual configuration.
- Page 10 • Click Import files or folders with zPilot to launch zPilot. Drag files onto the zPilot icon to move them to the NSA. Media files are automatically sorted into the Music, Photo, and Video folders. Other types of files go to the Public folder. For folders of files you are prompted to choose the target destination.
- Page 11 Log into the NSA This section shows you how to log into the NSA from your web browser. If you cannot get to the login screen, see the troubleshooting section at the end of this guide. 1. Open your web browser and type in the server name of the NSA (“nsa310”...
-
Page 12: Troubleshooting
Troubleshooting Try the following if you cannot get to the NSA login screen. • Make sure the NSA is turned on. • Check the NSA’s cable connections. Make sure the NSA’s LAN LED (located on the LAN port) is on or flashing. •... -
Page 13: Deutsch
DEUTSCH Einführung Mit dem NSA können Sie in Ihrem Heimnetzwerk von verschiedenen Geräten aus gemeinsam auf Dateien zugreifen und Daten sichern. Sie können mit einem Medien-Client wie dem DMA2501 auch Video-, Musik- und Fotodateien abspielen, die auf dem NSA gespeichert sind. So funktioniert es Die obige Abbildung zeigt den NSA in einem Heimnetzwerk. - Page 14 • Anmelden, • Problembeseitigung, Vor der Installation Bevor Sie anfangen, benötigen Sie Folgendes: • Den NSA • Die mitgelieferte CD (mit dem NSA Starter Utility-Programm und dem Benutzerhandbuch) • Netzadapter • Das mitgelieferte Ethernet-Kabel • Eine Festplatte mit 15-poligen SATA-Anschlussen, die mit SATA II oder SATA III kompatibel sind.
- Page 15 Beim Erstellen eines Volumes werden die Festplatten formatiert. Alle Daten gehen verloren. Bevor Sie die Festplatte im dem NSA installieren, sollten Sie alle anderen Dateien unbedingt an einem vorhandenen Speicherort sichern. 1. Stellen Sie sicher, dass das Netz- und das Ethernetkabel vom NSA abgetrennt sind.
- Page 16 4. Schieben Sie die Festplatte in die Lade, bis sie ganz im NSA sitzt. 5. Befestigen Sie die vordere Abdeckung wieder, um die Festplatte zu verdecken. Legen Sie den NSA wieder mit der Unterseite nach oben auf eine flache Unterlage, und ziehen Sie die Schraube fest.
- Page 17 3. Drücken Sie auf die Ein/Aus-Taste an der Vorderseite des NSA, um das Gerät einzuschalten. Die LED-Anzeigen befinden sich an der Gerätevorderseite. Wenn keine Anzeige leuchtet, prüfen Sie noch einmal die Kabelanschlüsse und die Stromquelle. • Die Betriebsanzeige-LED leuchtet blau. •...
- Page 18 Sie die Anweisungen auf dem Bildschirm aus. Klicken Sie auf Finish (Fertig stellen), um die Installation abzuschließen. 3. Um das Discovery Utility zu starten, klicken Sie bei Windows auf Start > Alle Programme > ZyXEL > NSA Starter Utility > ZyXEL NSA Starter Utility. NSA Initialisierung Stellen Sie sicher, dass die Festplatte installiert ist, bevor Sie diese Schritte ausführen.
- Page 19 1. Klicken Sie auf NSA310. 2. Klicken Sie auf Run the Initialization Wizard (Initialisierungsassistent starten).
- Page 20 3. Geben Sie den Standard-Benutzernamen ‘admin’ und das Standard- Kennwort ‘1234’, und klicken Sie auf Next (Weiter). Achten Sie bei der Eingabe des Benutzernamens und des Kennworts auf Groß- und Kleinschreibung. Die Feststelltaste darf nicht aktiviert sein. 4. Wählen Sie die Option Default Configuration (Standardkonfiguration) (empfohlen), oder manuelle Konfiguration.
- Page 21 • Klicken Sie auf Import files or folders with zPilot (Dateien oder Ordner mit zPilot importieren), um zPilot zu starten. Verschieben Sie Dateien auf das zPilot-Symbol, um sie auf den NSA zu verlagern. Mediendateien werden automatisch in die Ordner Music (Musik), Photo (Foto) und Video sortiert.
- Page 22 NSA Anmelden In diesem Abschnitt erfahren Sie, wie Sie sich über ihren Internetbrowser beim NSA anmelden. Wenn das Anmeldefenster nicht angezeigt wird, lesen Sie im Abschnitt Problembeseitigung am Ende dieser Anleitung nach. 1. Öffnen Sie Ihren Internetbrowser, und geben Sie den Servernamen des NSA (standardmäßig "nsa310") ein.
- Page 23 Problembeseitigung Wenn Sie nicht das Anmeldefenster des NSA aufrufen können, versuchen Sie Folgendes. • Stellen Sie sicher, dass der NSA eingeschaltet ist. • Prüfen Sie die Kabelverbindungen des NSA. Stellen Sie sicher, dass die LAN-LED des NSA (am LAN-port) leuchtet oder blinkt. •...
-
Page 24: Español
ESPAÑOL Introducción El NSA le permite compartir archivos y copiar datos en su red doméstica. También puede reproducir vídeo, música y archivos de fotos guardados en el NSA utilizando su ordenador o un cliente de medios como el DMA2501. Cómo funciona Arriba el NSA está... -
Page 25: Antes De Comenzar
• Inicio de sesión al NSA, • Solución de problemas, Antes de comenzar Necesita lo siguiente antes de comenzar: • NSA • El CD incluido que contiene la utilidad NSA Starter y la Guía del usuario • Adaptador de corriente •... - Page 26 2. Coloque el NSA en una superficie plana con el panel inferior mirando hacia arriba. Esto deja expuesto el panel inferior donde está situado el tornillo. Afloje el tornillo con un destornillador de cabeza plana o con una moneda. 3. Coloque el NSA hacia arriba y quite la tapa frontal para abrir el disco duro.
- Page 27 Conectar el NSA 1. Utilice el cable Ethernet incluido para conectar el puerto LAN de la parte posterior del NSA a un ordenador, switch o router en su red. 2. Conecte un extremo del cable de alimentación en el zócalo POWER de la parte posterior del NSA y el otro extremo en la fuente de alimentación externa.
- Page 28 Apague el NSA, presione el botón de encendido y manténgalo hasta que escuche un sonido. Luego suelte el botón. Acceso al NSA310 Utilice NAS Starter Utility para acceder al NSA. Siga estos pasos: 1. Inserte el CD incluido en la unidad de CD-ROM. Haga clic en Setup (Instalar) en la pantalla que aparece.
- Page 29 3. En Windows, haga clic en Inicio > Todos los programas > ZyXEL > NAS Starter Utility > ZyXEL NAS Starter Utility para ejecutar la utilidad discovery. Inicialización del NSA Asegúrese de haber instalado la unidad de disco duro antes de seguir estos pasos.
- Page 30 3. Introduzca el nombre de usuario predeterminado ‘admin’ y la contraseña ‘1234’ y haga clic en Next (Siguiente). El nombre de usuario y contraseña distinguen mayúsculas. Asegúrese de no tener el bloqueo de mayúsculas si no lo necesita. 4. Elija Default Configuration (Configuración predeterminada) (recomendado) o configuración manual.
- Page 31 • Haga clic en Import files or folders with zPilot (Importar archivos o carpetas con zPilot) para abrir zPilot. Arrastre archivos al icono de zPilot para moverlos al NSA. Los archivos de medios son organizados automáticamente en las carpetas Music (Música), Photo (Fotos) y Video (Vídeo).
- Page 32 Inicio de sesión al NSA Esta sección le muestra cómo iniciar sesión en el NSA desde su explorador de web. Si no puede ir a la página de inicio de sesión, consulte la sección solución de problemas al final de esta guía. 1.
- Page 33 Solución de problemas Intente lo siguiente si no consigue acceder a la pantalla de inicio de sesión del NSA. • Asegúrese de que el NSA esté encendido. • Compruebe las conexiones de cables del NSA. Compruebe que el LED del NSA LAN (situado en el puerto LAN) esté encendido o parpadeando.
-
Page 34: Français
FRANÇAIS Introduction Le NSA vous permet de partager des fichiers et de sauvegarder des données sur votre réseau domestique. Vous pouvez également lire des fichiers vidéo, audio et images stockés dans le NSA en utilisant un client multimédia comme le DMA2501. Comment cela fonctionne-t-il Ci-dessus se trouve le NSA dans un réseau domestique. -
Page 35: Avant De Commencer
• Accéder au NSA310, • NSA Ouvrir une session, • Dépanner votre équipement, Avant de commencer Vous avez besoin des éléments suivants avant de commencer: • NSA • CD inclus contenant l’utilitaire de Starter du NSA et le guide de l’utilisateur •... - Page 36 1. Assurez-vous que les cordons d’alimentation et Ethernet sont déconnectés du NSA. 2. Placez le NSA sur une surface plane avec le panneau inférieur dirigé vers le haut. Cela expose le panneau inférieur à l'endroit où se trouve la vis de serrage à main. Desserrez la vis à...
- Page 37 Si vous désirez utiliser deux disques durs et les configurer en volumes RAID, vous devez avoir: 1) un disque dur SATA installé; et 2) un disque dur eSATA avec son câble. Il est recommandé d'utiliser la même taille et le même modèle de disque pour obtenir les meilleures performances.
- Page 38 • Le témoin du bouton d’alimentation s’allume en bleu. • Le voyant SYS s'allume en vert après le démarrage (cela prend environ 50 secondes). • Les voyants HDD s’allument si le NSA détecte les disques durs dans les baies de disques. •...
- Page 39 Cliquez sur Finish (Terminer) pour terminer l'installation. 3. Dans Windows, cliquez sur Start (Démarrer) > All Programs (Tous les programmes) > ZyXEL > NSA Starter Utility > ZyXEL NAS Starter Utility pour exécuter l’utilitaire de découverte. Initialisation du NSA...
- Page 40 1. Cliquez sur NSA310. 2. Cliquez sur Run the Initialization Wizard (Lancer l'assistant d'initialisation).
- Page 41 3. Entrez le nom d'utilisateur ‘admin‘ et le mot de passe ‘1234‘ par défaut et cliquez sur Next (Suivant). Le nom de l'utilisateur et le mot de passe tiennent compte de la casse. Vérifiez que le verrouillage de majuscule n’est pas activé. 4.
- Page 42 • Cliquez sur Import files and follow the screens to configure the (Importer les fichiers/dossiers avec zPilot) pour lancer zPilot. Déplacez les fichiers dans l'icône zPilot pour les déplacer vers le NSA. Les fichiers multimédia sont automatiquement triés dans les dossiers Music, Photo, et Video.
- Page 43 NSA Ouvrir une session Cette section vous montre comment se connecter au NSA à partir de votre navigateur Web. Si vous n’arrivez pas à accéder à l’écran d’ouverture de session, consultez la section de dépannage à la fin de ce guide. 1.
- Page 44 Dépanner votre équipement Procédez de la manière suivante si vous n’arrivez pas à obtenir l’écran NSA d’ouverture de session. • Assurez-vous que le NSA est allumé. • Vérifiez les connexions des câbles du NSA. Vérifiez que la LED LAN du NSA (située sur le port LAN) est allumée ou clignote. •...
-
Page 45: Italiano
ITALIANO Introduzione L'NSA consente di condividere file e di eseguire il backup di dati nella propria rete. È anche possibile riprodurre video, musica e visualizzare file fotografici memorizzati sull'NSA utilizzando il computer o un client multimediale come il DMA2501. Come funziona L'illustrazione si riferisce all'NSA in una rete domestica. - Page 46 • NSA - Login, • Risoluzione dei problemi, Prima di iniziare Prima di iniziare è necessario disporre di: • NSA • Il CD fornito a corredo contenente l'utilità di analisi NSA e la Guida utente • Adattatore di corrente • Cavo Ethernet fornito a corredo •...
- Page 47 2. Posizionare il NSA su una superficie piatta con il pannello inferiore rivolto verso l'alto. In tal modo, il pannello inferiore viene esposto in modo da evidenziare la vite di fissaggio. Stringere la vite di fissaggio utilizzando un cacciavite a testa piatta o una moneta. 3.
- Page 48 Collegare l'NSA 1. Utilizzare il cavo Ethernet fornito a corredo per collegare la porta LAN sul retro dell'NSA a un computer, switch o router nella rete. 2. Collegare un'estremità del cavo di alimentazione alla presa POWER (alimentazione) che si trova dietro l'NSA e l'altra estremità...
- Page 49 Per spegnere NSA, tenere premuto il pulsante di accensione/spegnimento fino a sentire un segnale acustico. A questo punto rilasciare il pulsante. Accesso all'NSA310 Utilice NAS Starter Utility para acceder al NSA. Siga estos pasos: 1. Inserire il CD fornito a corredo nell'unità CD-ROM. Fare clic su Setup (installa) nella schermata visualizzata.
- Page 50 3. In Windows, scegliere Start > Tutti i programmi > ZyXEL > NAS Starter Utility > ZyXEL NAS Starter Utility per avviare l'utilità di analisi. NSA Inizializzazione Prima di seguire i seguenti passaggi, assicurarsi di aver installato il disco fisso.
- Page 51 3. Immettere il nome utente ‘admin’ e è la password ‘1234’ predefiniti, quindi fare clic su Next (avanti). Per nome utente e password viene fatta distinzione tra maiuscole e minuscole. Può essere necessario verificare di non avere il Blocco maiuscole attivato.
- Page 52 5. Adesso, è possibile utilizzare il NSA per effettuare le seguenti operazioni: • Fare clic su Import files or folders with zPilot (importa file o cartelle con zPilot) per avviare zPilot. Trascinare file sull'icona di zPilot per spostarli nell'NSA. I file multimediali vengono ordinati automaticamente nelle cartelle Music (musica), Photo (foto) e Video.
- Page 53 NSA - Login In questa sezione viene spiegato come effettuare l'accesso nell'NSA dal browser. Se non si riesce a visualizzare la schermata di login, vedere la sezione sulla risoluzione dei problemi che si trova alla fine di questa guida. 1.
- Page 54 Risoluzione dei problemi Se non si riesce a visualizzare la schermata di login dell'NSA, provare con le istruzioni seguenti. • Verificare che l'unità NSA sia accesa. • Controllare i collegamenti dei cavi dell'NSA. Verificare che il LED LAN dell'NSA (che si trova sulla porta LAN) sia acceso o lampeggiante.
- Page 55 Ai sensi dell'art. 13 del Decreto Legislativo 25 luglio 2005, n.151"Attuazione delle Direttive 2002/95/CE, 2002/96/CE e 2003/108/ CE, relative alla riduzione dell'uso di sostanze pericolose nelle apparecchiature elettriche ed elettroniche, nonché allo smaltimento dei rifiuti" Il simbolo del cassonetto barrato riportato sull'apparecchiatura o sulla sua confezione indica che il prodotto alla fine della propria vita utile deve essere raccolto separatamente dagli altri rifiuti.
-
Page 56: Nederlands
NEDERLANDS Inleiding De NSA maakt het mogelijk dat u bestanden deelt en van belangrijke bestanden een backup kan worden gemaakt binnen uw thuisnetwerk. U kunt ook video's en muziek afspelen en op de NSAopgeslagen fotobestanden tonen met gebruik van een mediaclient zoals de DMA2501. - Page 57 • Sluit de NSA aan, • Toegang tot de NSA310, • Login, • Troubleshooting, Voor u Begint Voor u begint heeft u het volgende nodig • NSA • Bijgevoegde CD die de NSA Discovery Utility en Gebruikershandleiding bevat • Voedingsadapter •...
- Page 58 Het creëren van een volume formatteert de harde schijven. Alle gegevens zullen verloren gaan. Maak een reserve kopie op een andere locatie van de bestanden van de schijf alvorens de schijf in de NSA te installeren. 1. Zorg ervoor dat de stroom- en ethernetkabels van de NSA losgemaakt zijn.
- Page 59 4. Schuif de harddisk in de houder tot deze goed passend in de NSA zit. 5. Sluit het voorpaneel zodat de houder weer afgesloten is. Plaats de NSA weer op een vlak oppervlak met de onderkant naar boven en draai het schroefkapje weer vast. Als u twee harde schijfstations wilt gebruiken en deze als RAID volumes wil configureren, dan moet u: 1) een SATA harddisk installeren in de NSA;...
- Page 60 3. Druk op de aan/uit knop op de voorkant van de NSA om hem aan te zetten. Kijk naar de lampjes op het voorpaneel. Als er geen lampjes aan gaan, controleer dan of de stroomkabel niet los zit en of de stroombron gevoed wordt. •...
- Page 61 2. De installatiewizard wordt gestart. Volg de instructies van het intallatieprogramma. Klik op Beëindigen om de installatie te voltooien. 3. Klik in Windows op Start > Alle Programa's > ZyXEL > NAS Starter Utility > ZyXEL NAS Starter Utility om het programma te starten. NSA Initialiseren Zorg dat het harde schijfstation is geïnstalleerd voor de stappen worden...
- Page 62 Klik op NSA310. 2. Klik op de Run the Initialization Wizard (wizard initialisatie uitvoeren).
- Page 63 3. Voer zowel de standaardgebruikersnaam ‘admin’ als het standaardwachtwoord ‘1234’ in en klik op Next (volgende). De gebruikersnaam en het paswoord zijn hoofdlettergevoelig. Controleer of u niet de hoofdlettertoetsen aan heeft staan. 4. Kies Default Configuration (standaardconfiguratie) (aangeraden) of handmatige configuratie.
- Page 64 • Klik op Import files or folders with zPilot (bestanden of mappen met de zPilot importeren) om de zPilot te lanceren. Sleep bestanden naar het pictogram zPilot om ze naar de NSA te verplaatsen. Mediabestanden worden automatisch in de mappen Music (muziek), Photo (foto) en Video gesorteerd.
- Page 65 NSA Login Dit deel toont u hoe u zich vanuit uw webbrowser kunt aanmelden bij de NSA. Als u niet in het login scherm kunt komen, wordt verwezen naar de het deel "troubleshooting" achterin deze handleiding. 1. Open uw webbrowser en typ de naam van de server van de NSA (standaard “nsa310”).
- Page 66 Troubleshooting Probeer het volgende als u het NSA login scherm niet inkomt. • Zorg dat de NSA aan staat. • Controleer de kabelaanluitingen van de NSA. Controleer of de NSA LAN LED van de (die zich van in de LAN poort bevindt) aan is of knippert.
-
Page 67: Svenska
SVENSKA Introduktion NSA låter dig dela filer och säkerhetskopiera data på ditt nätverk i hemmet. Du kan även spela upp video, musik och visa fotofiler som är lagrade i NSA med hjälp av en medieklient som t.ex. DMA2501. Så här fungerar det Ovanför visas NSA i ett hemmanätverk. - Page 68 Innan du börjar Du behöver följande innan du kan komma igång: • NSA • Den medföljande CD-skivan innehåller NSA-upptäcktsverktyg och bruksanvisning • Nätadapter • Medföljande Ethernet-kabel • En SATA II eller SATA III kompatibel hårddisk • eSATA-hårddisk och sladd (tillval) •...
- Page 69 2. Placera NSA på ett plant underlag med den undre panelen uppåtvänd. Detta frilägger den undre panelen där vingskruven sitter. Lossa vingskruven med en skruvmejsel med platt huvud eller ett mynt. 3. Flytta NSA till ett upprätt läge och avlägsna den främre luckan för att öppna hårddisken enligt följande anvisningar: 4.
- Page 70 Anslut NSA 1. Använd bifogad Ehternet-kabel för att ansluta LAN - porten på baksidan av NSA till en dator, switch, eller router på ditt nätverk. 2. Anslut nätkabelns ena ände till uttaget POWER på baksidan av NSA och den andra änden till den externa strömförsörjningen.
- Page 71 2. Installationsguiden startar. Följ installationsprogrammets instruktioner. Klicka på Finish (slutför) för att slutföra installationen. 3. I Windows, klicka på Start > All Programs > ZyXEL > NAS Starter Utility > ZyXEL NAS Starter Utility för att köra upptäcktsverktyget. NSA Initiering...
- Page 72 1. Klicka på NSA310. 2. Klicka på Run the Initialization Wizard (kör installationsguide).
- Page 73 3. Ange standardanvändarnamnet ‘admin’ och standardlösenordet ‘1234’ och klicka på Next (nästa). Användarnamn och lösenord är skiftlägeskänsliga. Kontrollera att du inte har låst tangentbordet i läget för versaler (tangenten Caps Lock). 4. Välj Default Configuration (standardkonfiguration) (rekommenderas) eller manuell konfiguration. Om du väljer det manuella alternativet, se hjälpen eller bruksanvisningen för mer information.
- Page 74 • Klicka på Import files or folders with zPilot (importera filer eller mappar med zPilot) för att starta zPilot. Dra filer till zPilot-ikonen för att flytta dem till NSA. Mediefiler sorteras automatiskt i mapparna Music (musik), Photo (foto) och Video. Andra typer av filer placeras i mappen Public (allmän).
- Page 75 Loggar in på NSA Detta avsnitt visar hur du loggar in på NSA från din webbläsare. Om du inte kan komma till inloggningsskärmen, se felsökningsavsnittet i slutet av denna guide. Ö ppna din webbläsare och skriv in servernamnet för NSA ("nsa310” som standard).
- Page 76 Felsökning Pröva följande om du inte lyckas komma till inloggningsskärmen för NSA. • Kontrollera att NSA är påslagen. • Kontrollera NSAs kabelanslutningar. Kontrollera att NSAs LAN- lampa (som sitter på LAN-porten) lyser eller blinkar. • Om du försökte logga in direkt genom att ange servernamn (standard nsa310) i webbläsarens adressfält, kontrollera att du skrev in det rätt.
- Page 77 DMA-2501 DMA-2501 Intrusion Detection and Prevention • • NSA 80 • NSA 81 • NSA 85...
- Page 78 • NSA • • • • SATA II SATA III ( • eSATA • USB USB2.0 • (NIC) TCP/IP •...
- Page 79 RAID SATA eSATA...
- Page 80 POWER • • ) SYS • •...
- Page 81 CD-ROM Setup ( NAS Starter Utility (NAS "Setup.exe" Windows > > ZyXEL > NSU (NAS Starter Utility)
- Page 82 NSA310 NSA310...
- Page 83 admin 1234 ...
- Page 84 • zPilot zPilot zPilot Music ( ) Photo ( Video Public ( • admin 1234...
- Page 85 nsa310) admin 1234...
- Page 86 • • LAN LED • nsa310) NAS Starter Utility (NAS NSA) • User's Guide • (Windows " " " " " " " " " " ping ping 192.168.1.33) Enter • Explorer 7.0 Mozilla Firefox 3.6 JavaScript...
- Page 87 • Select your product from the • Gehen Sie auf www.zyxel.com. • Vaya a www.zyxel.com. drop-down list box on the ZyXEL • Wählen Sie Ihr Produkt aus der • Seleccione el producto que desea home page to go to that product's...
-
Page 88: Declaration Of Conformity
The TCF-File is located at: Local contact for regulatory topics only : Company Name : ZyXEL Communications Corporation Company Address : Hsinchu Office : No. 2, Gongye E. 9th Rd., East Dist., Hsinchu City 300,Taiwan : No. 6, Innovation Road II, Science-Park,Hsin-Chu,300,Taiwan TAIPEI Office :11F., NO.223, SEC. - Page 89 ENGLISH DEUTSCH Green Product Declaration Grünes Produkt Erklärung RoHS Directive 2011/65/EU RoHS Richtlinie 2011/65/EU ElektroG WEEE Directive 2002/96/EC Richtlinie 2002/96/EG (WEEE: Waste Electrical and Electronic (WEEE: Über Elektro- und Equipment) Elektronik-Altgeräte) 2003/108/EC 2003/108/EC Declaration Signature: Unterschrift des Erklärenden: Name/Title: Thomas Wei / Quality Management Name/Title: Thomas Wei / Quality Management Department/ Senior Director.
- Page 90 ITALIANO NEDERLANDS Prodotto dichiarazione di verde Productmilieuverklaring Direttiva RoHS 2011/65/UE RoHS Richtlijn 2011/65/EU Direttiva RAEE 2002/96/CE AEEA-Richtlijn 2002/96/EG (RAEE: Rifiuti di Apparecchiature (AEEA: Afgedankte Elektrische en Elettriche ed Elettroniche) Elektronische apparatuur) 2003/108/CE 2003/108/EG Firma dichiarazione: Verklaringshandtekening: Nome/titolo: Thomas Wei / Quality Management Naam/titel: Thomas Wei / Quality Management Department/ Senior Director.