Table of Contents
Advertisement
Quick Links
00 Cvr
6/15/04
5:23 PM
O P E R AT I N G INSTRUCTIONS FOR
MOBILE NAV I G ATION SYSTEMS:
N o t h i n g comes close to a Cobra
Our thanks to yo u , About GPS nav i g a t i o n and About the Cobra NAV ONE system
Our thanks to you
Thank you for purchasing a Cobra NAV ONE
mobile navigation system. Properly used and
maintained, this Cobra NAV ONE product
will provide many years of reliable service.
About GPS navigation
The Global Positioning System consists of
land-based control stations and a constellation
of satellites circling the earth that send continuous,
coded radio signals containing time and position
information. GPS receivers, such as the one
built into the NAV ONE, use those signals to
determine their position on the earth (latitude
and longitude).
For more information on the Global Positioning
System, see Appendix C. However, the NAV ONE's
built-in features and uncomplicated interface allows
navigating without much concern for GPS details.
NOTE
Cobra recommends reading at least the
Important safety information and all of
Part II — Getting Started in this manual
before using the unit.
Trim Line for short fold
Page A1
2 0 0 0
3 0 0 0
®
About the Cobra
NAV ONE system
The NAV ONE unit is a specialized, portable navigation
system for use in vehicles. It provides turn-by-turn
route guidance by combining: a Global Positioning
System (GPS) receiver to detect position; a detailed
map of the 48 contiguous United States, Hawaii and
major metropolitan areas in Canada (see note); a
unique microcomputer that stores and processes
map and route information; a gyro to detect heading
independently of the GPS signal (NAV ONE 3000 only),
all in a remarkably compact and stylish package.
The NAV ONE can help navigate from point A to point
B using a single destination mode or from point A to
points B, C, D, etc., in turn using trip planner mode.
The NAV ONE 2000 detects heading information only
from GPS data about a moving vehicle's direction of
travel. The most recent heading will be retained when
the GPS signal is lost or the vehicle is stopped.
The Cobra-developed microcomputer built into
NAV ONE uses GPS information to locate its position
on the map contained in its memory. As the unit
moves with a vehicle, the computer is able to track
its changing position and heading relative to the
map and provides comprehensive information
about present location, heading and trip.
The gyro is a non-magnetic turn-rate sensor that
provides directional information during brief losses
of GPS signal (as would happen when passing through
a tunnel) and maintains the correct heading information
at the bottom of the LCD of the NAV ONE 3000.
This NAV ONE is not for hiking, marine navigation
or other non-vehicular applications. Other fine Cobra
products are available for those uses. Please visit
our website www.cobra.com to see our complete
product line.
NOTE
NAV ONE 3000 makes the entire map with street
level details and database available. NAV ONE 2000
includes one available region with street level detail
and database as well as Route USA, a nationwide
major road network. Additional regions can be
purchased as accessories. (See the separate NAV
ONE 2000 Regional Maps booklet.) In addition to
the detailed regional map(s), Route USA provides
information on those roads needed to navigate
among the 500 most populous cities in the
United States.
Printed in the Philippines
Part No. 480-101-P
E n g l i s h
A1
Advertisement
Table of Contents

Related Manuals for Cobra NavOne 2000


Summary of Contents for Cobra NavOne 2000
-
Page 1: Our Thanks To You
N o t h i n g comes close to a Cobra ® E n g l i s h Our thanks to yo u , About GPS nav i g a t i o n and About the Cobra NAV ONE system Our thanks to you About the Cobra map and provides comprehensive information about present location, heading and trip. -
Page 2: Table Of Contents
Navigation using map screen ......71 About the Cobra NAV ONE system ..... . A1 Navigation using planned route screen. -
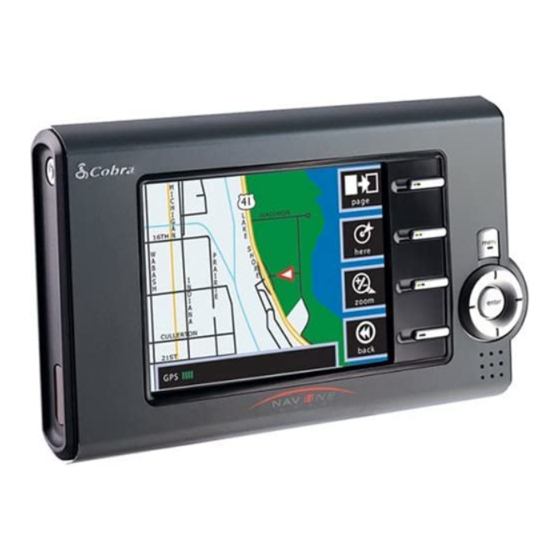
Page 3: Features To Make Travel Easier
Can be moved from vehicle to vehicle or used information during losses of GPS signal. to program trip plans at home or office using a Select destinations in 120V optional Cobra indoor adapter. any convenient way: On-screen and voice directions Large, backlit color LCD For turn-by-turn navigation from origin to destination. - Page 4 I m p o rt a n t ..B e fore installing and using the Cobra NAV ONE system, please read these general precautions safety and wa rn i n g s. Also read all of Pa rt II — Getting Start e d in this manual to learn the basics of i n f o rm a t i o n installing and operating the system.
-
Page 5: Important Safety Information
Do not disassemble or modify the unit as this may lead to damage. If a problem occurs, stop using the system immediately and system or other contact a Cobra dealer. Changes or modifications to the unit may void its compliance with FCC rules and make it illegal to use. equipment. -
Page 6: Included In This Package
Quick reference card This operating instructions Regional Maps booklet manual for Mobile Navigation (only included with the Systems NAV ONE 2000 model) P a rt I — Intro d u c t i o n Nothing comes close to a Cobra ®... -
Page 7: How To Use This Manual
This material introduces the NAV ONE system as well They describe actions the user will need to know how to perform selection and programming, as its controls, features and safety information. Cobra whenever operating the system. All of the system operation route guidance, off route... -
Page 8: System Overview
Arrival the LCD. each maneuver. each maneuver. location and heading. announcement These are described in the Route guidance sections. P a rt II — Getting Start e d Nothing comes close to a Cobra ®... -
Page 9: System Functions And Their Icons
01 Intro 6/15/04 5:25 PM Page 8 System overview and System functions and their icons Off route events ..If the driver misses a turn or otherwise deviates from the route developed by the NAV ONE system, the system will prompt the driver to return to the route or will recalculate the route from the current location. - Page 10 SPELL function is available to icon will be gray rather toggle from list than at full contrast to spell mode. as shown at right. P a rt II — Getting Start e d Nothing comes close to a Cobra ®...
-
Page 11: Installation
01 Intro 6/15/04 5:25 PM Page 10 Installation I n s t a l l a t i o n ..The NAV ONE requires very little installation beyond the need to put it at a convenient location and to secure it in place. - Page 12 A t t a ch the unit to the mounting brack e t . 7. Plug the power cord into the unit and the vehicle’s 12 volt power socket. P a rt II — Getting Start e d Nothing comes close to a Cobra ®...
- Page 13 The supplied bracket may be removed or left attached when an alternative mounting arrangement is employed. Additional mounting bracket options, that may be more suited to your vehicle, are available at www.cobra.com. Check for ... .
- Page 14 To use the NAV ONE at home or in the office to program a trip plan: unit at home or 1. Connect the unit to an electrical outlet using an optional Cobra indoor in the office adapter developed especially for use with the NAV ONE. See the Accessories and order form section on page 102 for information on ordering a Cobra adapter.
-
Page 15: Start-Up
01 Intro 6/15/04 5:26 PM Page 14 Start-up S t a rting the unit Once the NAV ONE is installed, learning how to use the system can begin. While working through the routines in this manual and trying them out on the NAV ONE, keep in mind that a wrong button press will not break anything. - Page 16 When restarting, are illuminated. the POWER button needs The system will turn on and the Cobra screen will appear on the LCD. The Cobra screen to be pressed to turn will be visible briefly, then change to the PLEASE DRIVE SAFELY screen .
- Page 17 02 B Startup 6/15/04 5:28 PM Page 16 Exit sleep mode ..While the Display Saver screen is shown: 1. Press any button to return to the PLEASE DRIVE SAFELY screen ...
- Page 18 02 B Startup 6/15/04 5:28 PM Page 17 Acknowledge the ..Acknowledging the safety reminder enables the system to proceed to the navigation functions safety reminder for which it was purchased. The menu that will appear after this screen depends upon what was in progress when the system was last turned off —...
- Page 19 02 B Startup 6/15/04 5:28 PM Page 18 Destination ... The following sections of the manual describe how to use each of the five destination selection options on the Main menu selection options ...
- Page 20 , start a new process of destination selection or function use as described at No navigation was in progress on page 19. Main menu See note on this page See page 60 P a rt II — Getting Start e d Nothing comes close to a Cobra ®...
-
Page 21: Setting Operating Preferences
..At the Main menu NOTE options menu 1. Press the OPTION function button to proceed to the Option Menu Cobra recommends that the where there are five choices: system be used for a while ... - Page 22 Set clock is a function. It is available only at the the Preferences menu (see clock icon). such as at an airport lot. Cobra recommends this Set preferences ..At the Option menu feature be left at the ...
- Page 23 04 B Set Oper Pref 6/15/04 5:28 PM Page 22 L a n g u a g e ..If the system language was not changed to the user’s preference during the start up sequence, it can be changed at the ...
- Page 24 04 B Set Oper Pref 6/15/04 5:28 PM Page 23 Set current ... At the Option menu location 1. Scroll to [Vehicle Position] and press ENTER. 2.
- Page 25 04 B Set Oper Pref 6/15/04 5:28 PM Page 24 ... . The System Information screen NOTE S y s t e m allows a check of software and database versions At the ...
- Page 26 The hour will be accepted and the system will return to the Preferences menu See note NOTE This Map Regions menu will only appear on the NAV ONE 2000. P a rt II — Getting Start e d Nothing comes close to a Cobra ®...
-
Page 27: Text And List Entries (List And Spell Modes)
05 D Txt Lst Entry 6/15/04 5:29 PM Page 26 Text and list entries (list and spell modes) Scroll feature in spell mode NOTE Scroll to move through Non-English the endless loop of characters characters, in both directions. such as ñ... - Page 28 06 B Txt Lst Entry 6/15/04 5:29 PM Page 27 NOTE List mode ..buttons scroll through list items one-by-one. When in either list or spell Inactive For example, at the ...
- Page 29 06 B Txt Lst Entry 6/15/04 5:29 PM Page 28 Spell mode .. NOTE buttons scroll through the alphanumeric and numeric loops. button scrolls toward the end of the alphabet — from A to B to C. The first character defaults to the first ...
- Page 30 06 B Txt Lst Entry 6/15/04 5:29 PM Page 29 Smart spelling .. NOTE As spelling progresses, the system uses Smart Spelling to show only letters for which a corresponding name exists in Whether by selection from a list or by spelling, the only ...
- Page 31 06 B Txt Lst Entry 6/15/04 5:29 PM Page 30 . . . Entry example This example uses [Main St] as the desired entry and [Lincolnshire, Illinois] as having already been chosen for the city and state — shown in the Address menu .
- Page 32 For example, a street in the borough of Queens, NY will be found under both that listing and under New York, NY. P a rt II — Getting Start e d Nothing comes close to a Cobra ®...
- Page 33 07 D Add/Intr 6/15/04 5:29 PM Page 32 Address/intersection and Previous destination Main menu D e s t i n a t i o n A d d re s s / i n t e r s e c t i o n s e l e c t i o n The NAV ONE system allows selection of any street address or intersection Once a destination...
- Page 34 14 B Trp Planner 6/15/04 5:36 PM Page 53 NOTE 3 . At the Mondays Trip screen , press the ADD function button to proceed to the Add Destination to Trip menu Pressing ENTER instead of the ADD function button 4.
- Page 35 14 B Trp Planner 6/15/04 5:36 PM Page 54 6. After selecting the destination, press ENTER to return to the Mondays Trip screen 7. Repeat steps 3 to 6 as often as necessary to add up to nine more destinations to the trip, returning each time to the ...
- Page 36 14 B Trp Planner 6/15/04 5:36 PM Page 55 Modify a trip ..A saved trip can be modified in four ways: Change the trip name. Change the name of a destination. ...
- Page 37 14 B Trp Planner 6/15/04 5:36 PM Page 56 At the Trip Planner menu Change a destination 1. Scroll to the name of the trip with the destination to be modified name and press the EDIT function button. ...
- Page 38 14 B Trp Planner 6/15/04 5:36 PM Page 57 At the Trip Planner menu Delete a destination 1. Scroll to the name of the trip to be modified and press the from a trip EDIT function button. ...
- Page 39 14 B Trp Planner 6/15/04 5:36 PM Page 58 Select and ..At the Trip Planner menu navigate a trip 1. Scroll to the trip to be navigated and press ENTER. ...
-
Page 40: Part Iii - Operating The System Destination Selection And Programming
[Discontinue Trip] and press ENTER to terminate the trip and return to the Main menu See page 60 P a rt III — Operating the System: Destination selection and pro g r a m m i n g Nothing comes close to a Cobra ®... - Page 41 15 D Select Route Criteria 6/15/04 5:36 PM Page 60 Route selection limits and Route calculation Before the system can provide guidance information to the selected destination, it needs to know the user’s preferences and to calculate the route to be navigated from the current location. Route selection limits (select route criteria) The final step in all of the preceding destination selection routines has been to press ENTER or the GO function button to proceed to the ...
-
Page 42: Address/Intersection
12 B Add Bk 6/15/04 5:34 PM Page 47 3. At the menu corresponding to the method chosen, proceed with the programming sequence for that choice: Address/intersection — Address menu — see page 32. Point of interest — Select POI Search Method menu ... -
Page 43: Previous Destination
12 B Add Bk 6/15/04 5:34 PM Page 48 Entry using ... At the Select POI Search Method menu point of interest 1. Enter the point of interest using the programming sequence described in the Point of interest section, then press ENTER or the SAVE function button. - Page 44 12 B Add Bk 6/15/04 5:34 PM Page 49 Infrared ....The infrared port on the NAV ONE (NAV ONE 3000 only) can receive data from PDA’s if they are equipped with a compatible port. To use this feature, the data item(s) to be transferred to the NAV ONE system must be selected and prepared for transmission according to the operating instructions for the sending device.
- Page 45 12 B Add Bk 6/15/04 5:34 PM Page 50 If the data transfer is successful, the system will briefly display the address validation Transfer screen ( Address Book screen ), then return to the Address Book menu complete ...
- Page 46 GO function button to proceed to the Select Route Criteria menu See page 60 P a rt III — Operating the System: Destination selection and pro g r a m m i n g Nothing comes close to a Cobra ®...
-
Page 47: Trip Planner
13 D Trp Planner 6/15/04 5:35 PM Page 52 Trip planner Main menu Trip planner In addition to individual destinations, the GPS Navigation System allows up to five trips to be stored with up to ten destinations to be visited in sequence on each tri p. Trips stored in system memory can be repeatedly recalled and used;... - Page 48 10 B POI 6/15/04 5:33 PM Page 39 IN THIS MANUAL At the Main menu S t a rt destination These select by selection by 1. Scroll to [Point of Interest] and category procedures point of interest press ENTER.
- Page 49 10 B POI 6/15/04 5:33 PM Page 40 At the Select Listing Preference menu Sort by distance 1. Scroll to [Sort by Distance] and press ENTER. 2. At the Airport menu , scroll to the desired location and press ENTER or the GO function button to proceed to the ...
- Page 50 10 B POI 6/15/04 5:33 PM Page 41 At the Select Listing Preference menu Sort alphabetically 1. Scroll to [Sort Alphabetically] and press ENTER. 2. At the Airport menu (an alphabetic list of locations in the state that are within ...
- Page 51 10 B POI 6/15/04 5:33 PM Page 42 Select by name ..At the Select POI Search Method menu IN THIS MANUAL 1. Scroll to [By Name] and press ENTER. These select by name Allows the name of the procedures use entries...
- Page 52 10 B POI 6/15/04 5:33 PM Page 43 At the Select Listing Preference menu Sort by distance 1. Scroll to [Sort by Distance] and press ENTER. 2. At the Point of Interest menu (showing the abridged list sorted by distance from the current location with the closest point at the top of the list), ...
- Page 53 10 B POI 6/15/04 5:33 PM Page 44 At the Select Listing Preference menu Within a city 1. Scroll to [Within a City] and press ENTER. 2. At the Select City menu (an alphabetic list of cities in the state having a location on ...
- Page 54 1. Press ENTER or the BACK function button to return to the Enter Phone Number screen to enter a different telephone number. See page 60 P a rt III — Operating the System: Destination selection and pro g r a m m i n g Nothing comes close to a Cobra ®...
- Page 55 11 D Add Bk 6/15/04 5:34 PM Page 46 Address book Main menu A d d ress book This feature allows users to store up to 100 destinations of their choice for ready reference and retrieval. Address book destination entries can be added and named, edited and deleted with the NAV ONE system resources.
- Page 56 . See that section at page 60 for further information. See page 60 P a rt III — Operating the System: Destination selection and pro g r a m m i n g Nothing comes close to a Cobra ®...
- Page 57 09 D POI 6/15/04 5:32 PM Page 38 Point of interest Main menu Point of intere s t ( P O I ) NOTE Selecting a destination by POI allows a public place to be found without If a desired list item is needing to know the address.
- Page 58 08 B Add/Intr 6/15/04 5:30 PM Page 33 ....S t a rt At the Main menu NOTE d e s t i n a t i o n When using the address/intersection method, 1.
- Page 59 08 B Add/Intr 6/15/04 5:30 PM Page 34 Start address ..At the Address menu entry with state 1. Scroll to [State] and press ENTER. 2. At the Select State menu , scroll to the desired state name and press ENTER.
- Page 60 08 B Add/Intr 6/15/04 5:30 PM Page 35 ..Navigate to At the filled in Address or Intersection menu the destination 1. Press the GO function button to accept the address or intersection and proceed to the ...
- Page 61 08 B Add/Intr 6/15/04 5:30 PM Page 36 P revious destination The NAV ONE system saves the most recent origin and the last nine destinations in memory for quick r e t ri eva l . The recent origin is always first on the list and a new destination entry bumps the oldest, once the list is full.
- Page 62 20 B Off Route Events 6/15/04 5:39 PM Page 77 C h a n g e s ..At any time during a trip, the route can be changed or cancelled from the Planned Route screen .
- Page 63 20 B Off Route Events 6/15/04 5:39 PM Page 78 At the Select Detour Criteria menu Avoid current road 1. Scroll to [Avoid Current Road] and press ENTER. The system will recalculate the route and show the modified route on the Map screen ...
- Page 64 20 B Off Route Events 6/15/04 5:39 PM Page 79 Change ....Rather than use detour, it can be useful just to change the route criteria for a trip, route criteria such as when it becomes apparent that using toll roads will be an advantage.
- Page 65 20 B Off Route Events 6/15/04 5:39 PM Page 80 Cancel navigation ..This choice can be used to cancel the current trip and start over with the entry of a new destination. Or, it can be used to simply turn guidance off. At the ...
- Page 66 The reset will be confirmed and the system will return to the Edit Data Field menu Main menu / See note B1 Main menu / See note B2 P a rt III — Operating the System: Route guidance Nothing comes close to a Cobra ®...
- Page 67 19 D Off Route Events 6/15/04 5:39 PM Page 76 Off route events Main menu O ff route events During a trip, the NAV ONE system offers help if a turn is missed or a side trip is taken from a calculated route. It also allows changes to be made enroute — including detours, changing route criteria, changing trip plans and canceling navigation.
-
Page 68: Route Guidance
18 B Route Guidance 6/15/04 5:38 PM Page 65 During navigation with route guidance, there are three navigation screens available. Whichever is most useful at any given time can be selected: Map — shows the map on the LCD with the route highlighted in light green. ... -
Page 69: Useful Tools
18 B Route Guidance 6/15/04 5:38 PM Page 66 Useful tools In addition to the three navigation and trip data screens, the NAV ONE system provides several features to allow adjustments and provide extra information: Pan function — allows scrolling the map and obtaining address information with the cross-arrows. ... - Page 70 18 B Route Guidance 6/15/04 5:38 PM Page 67 S c roll map ... . To shift the map image at Map screen 1. Press the buttons to move the current location in the corresponding direction on the Map image.
- Page 71 18 B Route Guidance 6/15/04 5:38 PM Page 68 H e re function ..The here function provides the vehicle’s current location in both the reference and navigation versions of the Map screen , as well as from the Add to Address Book menu (see Address book section).
- Page 72 18 B Route Guidance 6/15/04 5:38 PM Page 69 Address book entry ..At the Map screen 1. Press the HERE function button to proceed to the Current Location screen 2. Press ENTER or the SAVE function button to proceed to the Save or Edit Name menu 3.
-
Page 73: Map As Reference
18 B Route Guidance 6/15/04 5:38 PM Page 70 Next ....As a maneuver is approached, the system automatically provides voice prompts such as, maneuver “In two miles turn left.” In addition, shortly before the maneuver is to be executed, the system will switch to the ... -
Page 74: Navigation Using Map Screen
18 B Route Guidance 6/15/04 5:38 PM Page 71 Navigation using map scre e n The Map screen is the entry point for navigation with the NAV ONE system and is reached from the Main menu , the ... -
Page 75: Navigation Using Guide Screen
18 B Route Guidance 6/15/04 5:38 PM Page 72 Navigation using guide scre e n The Guide screen can replace the graphic Map screen and the descriptive Planned Route screen with enlarged detail of the next maneuver to be executed. It can be displayed at any time during a trip. ... - Page 76 18 B Route Guidance 6/15/04 5:38 PM Page 73 Trip data during The Trip Data screen can be displayed at any time during navigation to see n a v i g a t i o n information about the current trip. While trip data is displayed, navigation voice prompts and the ...
- Page 77 18 B Route Guidance 6/15/04 5:38 PM Page 74 At the bottom of the screen are two fields that can display any two data items of the user’s choice. Average speed Maximum speed Total trip time Stopped time ...
- Page 78 16 B Select Route Criteria 6/15/04 5:37 PM Page 61 Select ... . . At the Select Route Criteria menu NOTE route criteria If all criteria are as desired, go straight to the 1.
- Page 79 16 B Select Route Criteria 6/15/04 5:37 PM Page 62 Route calculation The Calculating a Route screen Calculating ..indicates that the NAV ONE has begun the process of a route developing the route to be navigated. During calculation, the indicator bar at the top of the screen will extend from left to right to show its progress and completion as shown on the ...
- Page 80 Main menu to permit rapid changes by selective editing. Main menu P a rt III — Operating the System: Destination selection and pro g r a m m i n g Nothing comes close to a Cobra ®...
- Page 81 17 D Route Guidance 6/15/04 5:37 PM Page 64 Route guidance, Navigation and Trip data See note A1 See note A2 NOTE Route guidance A1. Map when no trip is active. When no trip is in progress, the Map screen can be viewed Has no route highlight and no trip data in screen footer.
-
Page 82: Off Route Events
See the Start-up section for information about start-up and instructions on resuming or discontinuing a trip at the Continue route guidance menu See page 60 P a rt III – Operating the System: Off route events Nothing comes close to a Cobra ®... - Page 83 21 D Trail Mode 6/15/04 5:40 PM Page 82 Trail mode Trail mode IN THIS MANUAL This feature can be used on or off the road to record vehicle move m e n t s. These trail procedures use Instead of guiding the vehicle on a route calculated in adva n c e, it captures Trail 1 as an example.
- Page 84 W 88° 07’ 30” SAVE SAVE HERE SAVE Press SAVE to accept. Press SAVE to accept. BACK ZOOM BACK BACK BACK Part III — Operating the System: Trail mode Nothing comes close to a Cobra ®...
- Page 85 Appendix A — Function buttons icons and Option choices Function ... Enables users to find which region or regions button icons Adds an address, trip plan or trail to memory. contain detailed information on a city, state or zip code.
-
Page 86: Part Iv - Helpful Information
On or off cannot be seen: Vehicle icon White and magenta triangle Key Click On > On or off 1. Scroll until it comes on the screen. Part IV — Helpful Information: Appendices Nothing comes close to a Cobra ®... -
Page 87: B - Point Of Interest Categories
Appendix B — Point of interest categories ... . Point of The point of interest (POI) categories included in the NAV ONE system include the following: interest categories Airport Court House Parking Garage Amusement Park Ferry Terminal... -
Page 88: C - Gps System Characteristics And Operation
NAV ONE system can compute its own position: latitude and longitude. Part IV — Helpful Information: Appendices Nothing comes close to a Cobra ®... -
Page 89: D - Nav One System Specifications
Appendix D — NAV ONE system specifications Physical ... . Performance ..Unit dimensions Receiver specifications 4.73" H x 7.91" W x 2.28" D 12 Parallel Channels for (201 mm x 120 mm x 65 mm) tracking up to 12 satellites Unit weight... -
Page 90: Maintenance And Service
Do not apply pressure to the LCD screen. Consult the Cobra web site (www.cobra.com) for the latest software and database versions and compare them to those stored in your unit to determine if updating is needed. Software and information updates are also available in DVD ROM format and can be purchased as accessories. -
Page 91: Product Service
If this product should require factory service, please call Cobra first before sending the product. This will ensure the fastest turn-around time on any repair. If Cobra asks that the product be sent to its factory, it will be necessary to furnish the following to have the product serviced and returned: 1. -
Page 92: Customer Assistance
Should you encounter any problems with this product, or not understand its many features, please refer to this owner’s manual. assistance If you require further assistance after reading this manual, Cobra Electronics offers the following customer assistance services: Cobra Electronics Corporation For assistance in the U.S.A. -
Page 93: User License
Cobra Electronics Corporation and its licensors. Cobra grants the purchaser a limited license for use of this document and the software incorporated in the NAV ONE for its normal operation. By using the NAV ONE, the purchaser agrees to be bound by the terms and conditions of this license agreement. -
Page 94: Warranty
U.S.A. Caution: Cobra makes no warranty as to the accuracy or completeness of the map data in the NAV ONE and disclaims any and all express, implied or statutory warranties, including any implied warranty of merchantability or fitness for a particular purpose. -
Page 95: Index
Index ........... . . - Page 96 Tripod socket: A2 Quick release lever: A2 End trail recording: 87 SmartPower: 21 Troubleshooting: 95 Name the new trail: 85 Spanish manual: 22, 97 Speaker: A2 Specifications: 94 Part IV — Helpful Information: Index Nothing comes close to a Cobra ®...
- Page 97 Please visit our website at: www.cobra.com. *The Map Update is available only by download from www.cobra.com or on DVD by telephone to Cobra’s consumer response group at 773-889-3087. Optional ... .
- Page 98 Accessories Order Info Ordering From U.S.A. Call 773-889-3087 for pricing or visit www.cobra.com. For Credit Card Orders Call 773-889-3087 [Press one from the main menu] 8:00 a.m. to 6:00 p.m. Central Time, Monday through Friday. Make Check or Money Order Payable To Cobra Electronics, Attn: Accessories Dept.,...
- Page 99 The Cobra line of quality products includes: CB Radios microTALK Radios ® Radar/Laser Detectors Safety Alert Traffic Warning Systems ® Handheld GPS Receivers Mobile GPS Navigation Systems HighGear Accessories ® CobraMarine VHF Radios ™ Power Inverters Accessories For more information or to...
- Page 100 22 B Trail Mode 6/15/04 5:40 PM Page 83 NOTE Utilities While on or viewing a trail, the here and zoom functions are available on the map as described in the Useful tools discussion on page 66. In addition, the system treats a trail as a trip relative If the trail book is empty, to the page function.
- Page 101 22 B Trail Mode 6/15/04 5:40 PM Page 84 At the Trail Book menu NOTE Navigate an .. existing trail Selecting [End] as 1. Scroll to the name of the trail to be navigated the starting point for and press ENTER.
- Page 102 22 B Trail Mode 6/15/04 5:40 PM Page 85 Name the ... . At the Name Trail Book Entry menu NOTE n ew trail If the trail book is ...
- Page 103 22 B Trail Mode 6/15/04 5:40 PM Page 86 Add waypoints ..At any place on the trail, while at the Trail Mode screen to the trail 1. Press the HERE function button to proceed to the GPS Data screen ...
- Page 104 22 B Trail Mode 6/15/04 5:40 PM Page 87 End trail recording ..When the end of the trail is reached, while at the Trail Mode screen 1. Press the STOP function button to proceed to the Stop Trail screen 2.
- Page 105 22 B Trail Mode 6/15/04 5:40 PM Page 88 Change a trail name ..At the Trail 1 menu 1. Scroll to [Edit Name] and press ENTER. 2. At the Name Trail menu , press the CLEAR function button to clear the current name.