Linksys WAP54G Quick Installation Manual
Instant wireless series wireless-g access point
Hide thumbs
Also See for WAP54G:
- Quick installation manual (293 pages) ,
- User manual (84 pages) ,
- Quick installation (2 pages)

Related Manuals for Linksys WAP54G


Summary of Contents for Linksys WAP54G
- Page 1 Instant Wireless ® Series Wireless-G G Access P P oint Use this guide to install the following: WAP54G Quick Installation Guide...
- Page 2 Table of Contents English Français Deutsch Italiano Portuguese Español COPYRIGHT & TRADEMARKS Copyright © 2003 Linksys, All Rights Reserved. registered trademarks of Linksys. registered trademarks of Microsoft Corporation. All other trademarks and brand names are the property of their respective proprietors. FCC STATEMENT The Wireless-G Access Point has been tested and complies with the specifications for a Class B digital device, pursuant to Part 15 of the FCC Rules.
- Page 3 Netherlands NL License required for outdoor installations. Check with reseller for procedure to follow. • Nederlands NL Licentie verplicht voor gebruik met buitenantennes. Neem contact op met verkoper voor juiste procedure. QIG-WAP54G-EU-021226-NC BW Wireless-G Access Point Table of Contents Package Contents Step 1: Connecting the Wireless-G...
-
Page 4: Package Contents
Package Contents • One Wireless-G Access Point with Detachable Antennas (1) • One Power Adapter (2) • One Setup Wizard CD-ROM with User Guide (3) • One Category 5 Ethernet Network Cable (4) • One Quick Installation Instant Wireless® Series Wireless-G Access Point Step 1: Connecting the Wireless-G Access Point... - Page 5 D. Connect the AC power adapter to the Access Point’s Power port. Only use the power adapter supplied with the Access Point. Use of a different adapter may result in product damage. Proceed to “Step 2: Setting up the Wireless-G Access Point.” Note: In order for all other wireless devices to communicate with the Access Point, those devices must be operating in infrastructure mode.
- Page 6 C. You can configure the Access Point through any PC connected to your Ethernet network. Make sure the Access Point is connected to one of your network switches or hubs. Click the Next button. D. The next screen will display a list of access points on your network, along with the status information for each access point.
- Page 7 H. The Security screen will appear. Set the Wired Equivalent Privacy (WEP) encryption for your wireless network. Select c o n f i g u r a t i o n method passphrase. Then click Next button. I. The second Security screen shows the WEP key.
- Page 8 COPYRIGHT & MARQUES DE COMMERCE Copyright © 2003 Linksys. Tous droits réservés. Instant Wireless et Linksys sont des marques déposées de Linksys. Microsoft, Windows et le logo Windows sont des marques déposées de Microsoft Corporation. Tous les autres noms de marque et marque de commerce sont la propriété...
- Page 9 Renseignez-vous auprès de votre fournisseur sur la procédure à suivre. • Nederlands NL Licentie verplicht voor gebruik met buitenantennes. Neem contact op met verkoper voor juiste procedure. QIG-WAP54G-EU-021226-NC BW Point d’accès sans fil G Table des matières Contenu de l’emballage Étape 1 : Branchement du point...
- Page 10 Contenu de l’emballage • Un point d’accès sans fil G avec antennes amovibles (1) • Un adaptateur électrique (2) • Le CD-ROM Setup Wizard (Assistant de configuration) contenant le guide de l’utilisateur (3) • Un câble de catégorie 5 pour réseau Ethernet (4) •...
- Page 11 D. Branchez l’adaptateur secteur sur le port Power (Alimentation) du point d’accès. N’utilisez que l’adaptateur électrique fourni avec le point d’accès. De fait, le branchement d’un autre adaptateur pourrait endommager le produit. Passez à l’étape 2 « Configuration du point d’accès sans fil G » Remarque : tous les autres périphériques sans fil doivent fonctionner en mode réseau d’infrastructure afin qu’ils puissent communiquer avec le point d’accès.
- Page 12 C. Vous pouvez configurer le point d’accès depuis n’importe quel ordinateur relié à votre réseau Ethernet. Vérifiez que le point d’accès est bien branché sur l’un des commutateurs ou concentrateurs de votre réseau. Cliquez sur le bouton Next (Suivant). D. L ’écran suivant affiche une liste des points d’accès de votre réseau, ainsi que les données relatives au statut de chaque point d’accès.
- Page 13 H. L’écran Security (Sécurité) apparaît. Définissez cryptage (Wired Equivalent Privacy) de votre réseau sans (WEP). Sélectionnez méthode configuration WEP, ainsi qu’une phrase passe. Cliquez bouton Next (Suivant). I. Le second écran Security (Sécurité) indique la clé WEP. Si vous avez entré une phrase mot de passe, le champ Key 1 (Clé...
- Page 14 COPYRIGHT & MARKEN Copyright © 2003 Linksys. Alle Rechte vorbehalten. Instant Wireless und Linksys sind eingetragene Marken von Linksys. Microsoft, Windows und das Windows-Logo sind eingetragene Marken der Microsoft Corporation. Alle anderen Marken sind Eigentum ihrer jeweiligen Rechtsinhaber. FCC STATEMENT The Wireless-G Access Point has been tested and complies with the specifications for a Class B digital device, pursuant to Part 15 of the FCC Rules.
- Page 15 Niederlande NL: Anmeldung im Outdoor-Bereich notwendig. Bitte mit Händler die Vorgehensweise abstimmen. • Nederlands NL Licentie verplicht voor gebruik met buitenantennes. Neem contact op met verkoper voor juiste procedure. QIG-WAP54G-EU-021226-NC BW Access Point Inhalt Lieferumfang Schritt 1: Anschließen des Wireless-G Access Point...
- Page 16 Lieferumfang • Ein Wireless-G Access Point mit abnehmbaren Antennen (1) • Ein Netzstromadapter (2) • Eine Setup Wizard CD-ROM (Setup-Assistenten-CD-ROM) mit Benutzerhandbuch (3) • Ein Ethernet-Netzwerkkabel der Kategorie 5 (4) • Eine Kurzanleitung Instant Wireless®-Serie Access Point Schritt 1: Anschließen des Wireless-G Access Point A.
- Page 17 D. Schließen Sie den Wechselstromadapter an den Stromanschluss des Access Point an. Verwenden Sie nur den im Lieferumfang des Access Point enthaltenen Netzstromadapter. Bei Verwendung eines anderen Adapters kann das Produkt beschädigt werden. Fahren Sie mit Schritt 2 „Einrichten des Wireless-G Access Point“ fort. Hinweis: Damit alle anderen drahtlosen Geräte mit dem Access Point kommunizieren können, müssen diese Geräte über die Option Infrastructure Mode (Infrastrukturmodus) betrieben werden.
- Page 18 C. Sie können den Access Point über jeden an das Ethernet-Netzwerk angeschlossenen PC konfigurieren. Stellen Sie sicher, dass der Access Point an einen der Netzwerk- Switches bzw. -Hubs angeschlossen ist. Klicken Sie auf Next (Weiter). D. Im nächsten Fenster wird eine Liste der Zugriffspunkte in Ihrem Netzwerk zusammen mit den Statusinformationen für jeden der Zugriffspunkte angezeigt.
- Page 19 Das Fenster Security (Sicherheit) wird angezeigt. Richten WEP- Ve r s c h l ü s s e l u n g (WEP; Wired Equivalent Privacy) für Ihr drahtloses Netzwerk ein. Wählen eine WEP- K o n f i g u r a t i o n s - methode und eine Passphrase.
- Page 20 COPYRIGHT & MARCHI Copyright © 2003 Linksys. Tutti i diritti riservati. Instant Wireless e Linksys sono marchi registrati di Linksys. Microsoft, Windows e il logo Windows sono marchi registrati di Microsoft Corporation. Tutti gli altri marchi e nomi commerciali appartengono ai rispettivi proprietari.
-
Page 21: Contenuto Della Confezione
Netherlands NL License required for outdoor installations. Check with reseller for procedure to follow. • Nederlands NL Licentie verplicht voor gebruik met buitenantennes. Neem contact op met verkoper voor juiste procedure. QIG-WAP54G-EU-021226-NC BW Wireless-G Access Point Indice Contenuto della confezione Fase 1: collegamento... - Page 22 Contenuto della confezione • Un dispositivo Wireless-G Access Point con antenne smontabili (1) • Un adattatore di corrente (2) • Un Setup Wizard (CD per l’installazione guidata) con la User Guide (Guida per l’utente, solo in inglese) (3) • Un cavo di rete Ethernet Categoria 5 (4) •...
- Page 23 D Collegare l’adattatore di corrente CA alla porta Power (Alimentazione) del dispositivo Access Point. Utilizzare solo l’adattatore di corrente fornito con il dispositivo Access Point. L’utilizzo di un adattatore diverso da quello fornito può causare danni al prodotto. Continuare con la “Fase 2: configurazione di Wireless-G Access Point”. Nota: tutti gli altri dispositivi wireless devono funzionare in modalità...
- Page 24 C. È possibile configurare il dispositivo Access Point tramite qualsiasi PC collegato alla rete Ethernet. Verificare che il dispositivo Access Point sia collegato a uno degli switch o degli hub di rete. Fare clic sul pulsante Next (Avanti). D La schermata successiva visualizza un elenco dei punti di accesso della rete e le informazioni sullo stato relativo a ciascuno di essi.
- Page 25 H. Viene visualizzata la schermata Security ( S i c u r e z z a ) . Impostare cifratura (Wired Equivalent Privacy) per la rete w i r e l e s s . Selezionare metodo c o n f i g u r a z i o n e WEP e passphrase.
- Page 26 DIREITOS DE AUTOR E MARCAS COMERCIAIS Copyright © 2003 Linksys. Todos os direitos reservados. Instant Wireless e Linksys são marcas registadas da Linksys. Microsoft, Windows e o logótipo do Windows são marcas registadas da Microsoft Corporation. Todas as outras marcas comerciais e nomes de marcas são propriedade dos respectivos proprietários.
- Page 27 • Nederlands NL Licentie verplicht voor gebruik met buitenantennes. Neem contact op met verkoper voor juiste procedure. QIG-WAP54G-EU-021226-NC BW Ponto de acesso sem fios-G Índice Conteúdo da embalagem Passo 1: Ligar o Ponto...
- Page 28 Conteúdo da embalagem • Um Ponto de acesso sem fios-G com antenas amovíveis (1) • Um transformador (2) • Um CD-ROM do Setup Wizard (Assistente de configuração) com um Manual do Utilizador (3) • Um cabo de rede Ethernet de categoria 5 (4) •...
- Page 29 D. Ligue o transformador CA à porta de alimentação do Ponto de acesso. Utilize apenas o transformador fornecido com o Ponto de acesso. A utilização de um transformador diferente poderá resultar em danos para o produto. Avance para o “Passo 2: Configurar o Ponto de acesso sem fios-G”. Nota: para que todos os outros dispositivos sem fios comuniquem com o Ponto de acesso, têm de estar a funcionar no modo de infra-estrutura.
- Page 30 C. É possível configurar o Ponto de acesso através de um computador ligado à rede Ethernet. Certifique-se de que o Ponto de acesso está ligado a um dos comutadores ou concentradores da rede. Clique no botão Next (Seguinte). D. O ecrã seguinte apresentará a lista de pontos de acesso da rede, juntamente com as informações relativas ao estado de cada ponto de acesso.
- Page 31 H. Será apresentado o ecrã Security (Segurança). Defina a encriptação WEP (Wired Equivalent Privacy) para a rede sem fios. Seleccione método configuração WEP e uma frase-passe. Em seguida, clique no botão Next (Seguinte). I. O segundo ecrã S e c u r i t y (Segurança) mostra a chave WEP.
- Page 32 COPYRIGHT Y MARCAS REGISTRADAS Copyright © 2003 Linksys. Todos los derechos reservados. Instant Wireless y Linksys son marcas comerciales registradas de Linksys. Microsoft, Windows y el logotipo de Windows son marcas comerciales registradas de Microsoft Corporation. Todas las demás marcas registradas y nombres de marcas son propiedad de sus respectivos dueñ...
-
Page 33: Contenido Del Paquete
• Nederlands NL Licentie verplicht voor gebruik met buitenantennes. Neem contact op met verkoper voor juiste procedure. QIG-WAP54G-EU-021226-NC BW Punto de acceso Wireless-G Contenido Contenido del paquete Paso 1: Conexión del punto de acceso Wireless-G Paso 2: Configuración del punto... - Page 34 Contenido del paquete • Un punto de acceso Wireless-G con antenas desmontables (1) • Un adaptador de corriente (2) • Un Setup Wizard CD-ROM (CD-ROM del asistente de configuración) (3) • Un cable de red Ethernet de categoría 5 (4) •...
-
Page 35: Configuración Del Punto
D. Conecte el adaptador de corriente CA al puerto de alimentación del punto de acceso. Utilice únicamente el adaptador de corriente que se incorpora con el punto de acceso. Si utiliza un adaptador distinto puede provocar daños al producto. Siga en el paso 2: “Configuración del punto de acceso Wireless-G”. Nota: para que los demás dispositivos inalámbricos establezcan comunicación con el punto de acceso, deben funcionar en modo de infraestructura. - Page 36 C. Puede configurar el punto de acceso en cualquier PC conectado a la red Ethernet. Asegúrese de que el punto de acceso está conectado a un conmutador o concentrador de la red. Haga clic en el botón Next (Siguiente). D. La siguiente pantalla muestra una lista de puntos de acceso de la red, así como información sobre el estado de cada uno.
- Page 37 H. Aparece la pantalla S e c u r i t y ( S e g u r i d a d ) . Establezca encriptación WEP ( P r i v a c i d a d equivalente conexión) de la red i n a l á...
- Page 38 www.linksys.com © Copyright 2003 Linksys, All Rights Reserved.
- Page 39 ® Instant Wireless Series Wireless-G Access Point User Guide Use this guide to install: WAP54G-EU...
- Page 40 COPYRIGHT & TRADEMARKS Specifications are subject to change without notice. Copyright © 2002 Linksys, All Rights Reserved. Instant Wireless, Linksys, and the Linksys logo are registered trademarks of Linksys Group, Inc. Microsoft, Windows, and the Windows logo are registered trade- marks of Microsoft Corporation.
-
Page 41: Table Of Contents
Note: Combinations of power levels and antennas resulting in a radiated power level of above 100 mW equivalent isotropic radiated power (EIRP) are considered as not com- pliant with the above mentioned directive and are not allowed for use within the European community and countries that have adopted the European R&TTE directive 1999/5/EC and/or the CEPT recommendation Rec 70.03. -
Page 42: Chapter 1: Introduction
Appendix B: Setting Up the TCP/IP and IPX Protocols Setting Up TCP/IP in Windows TCP/IP Setup for Windows 98 and Millennium IPX Setup for Windows 98 and Millennium TCP/IP Setup for Windows NT 4.0 IPX Setup for Windows NT 4.0 TCP/IP Setup for Windows 2000 IPX Setup for Windows 2000 TCP/IP Setup for Windows XP... -
Page 43: Chapter 2: Planning Your Wireless Network
Chapter 2: Planning Your Wireless Network Network Topology A wireless LAN is a group of computers, each equipped with one Instant Wireless Series adapter. Computers in a wireless LAN must be configured to share the same radio channel. The Instant Wireless Series adapters provide access to a wired LAN for wire- less workstations. -
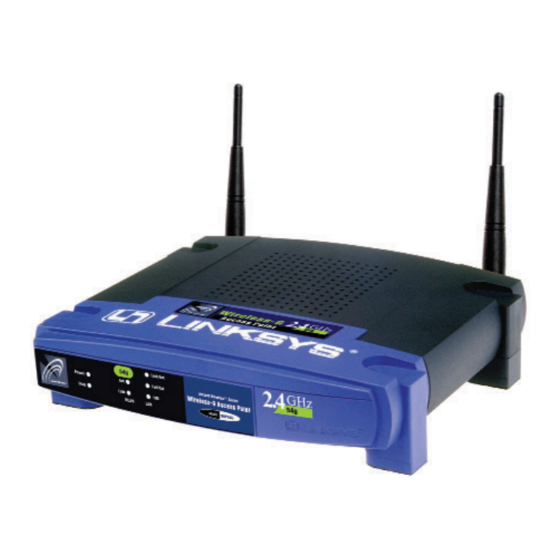
Page 44: The Wireless-G Access Point's Front Panel
The Wireless-G Access Point’s Front Panel Figure 3-2 Green. The Power LED lights up when the Access Point is Power powered on. Red. The Diag LED indicates the Access Point’s self-diagnosis Diag mode during boot-up and restart. It will turn off upon com- pleting the diagnosis. -
Page 45: Chapter 5: Setting Up The Wireless-G Access Point
Chapter 5: Setting Up the Wireless-G Access Point Have You: Connected the Access Point to a hub, switch or router on your wired network as shown in Chapter 4: Connecting the Wireless-G Access Point? The Access Point can only be set up through your wired network. - Page 46 4. The next screen to appear, shown in Figure 5-3, will display a list of access points on your network along with the status information for each access point. If this is the only access point on your network, it will be the only one displayed.
- Page 47 7. As shown in Figure 5-6, the Basic Settings screen will appear. Enter your wireless network’s SSID and select the channel at which the network broad- casts its wireless signal. Then, click the Next button to continue or Back to return to the previous page.
- Page 48 9. The second Security Settings screen, shown in Figure 5-8, shows the WEP key. If you entered a passphrase, then the Key 1 field will display the auto- matically generated WEP key. If you did not enter a passphrase, then enter a WEP key in the Key 1 field.
-
Page 49: Chapter 6: Configuring The Wireless-G Access Point
Chapter 6: Configuring the Wireless-G Access Point Note: The Access Point is designed to function properly after using the Setup Wizard. This chapter is provided solely for those who wish to perform more advanced configuration or monitoring. The Access Point has been designed to be functional right out of the box, with the default settings in the Setup Wizard. - Page 50 Wireless MAC Address. The MAC Address of the 2.4 GHz, Draft 802.11g interface • is displayed here. Mode. Select Mixed and both Wireless-G and Wireless-B computers will be • allowed on the network, but the speed will be reduced. Select G-Only for maximum speed, but no Wireless-B users will be allowed on the network.
-
Page 51: The Password Tab
The Password Tab The Password tab, shown in Figure 6-5, allows you to change the Access Point’s password and restore factory defaults. Figure 6-5 • AP Password. Changing the password for the Access Point is as easy as typing the password into the AP Password field. Then, type it again into the second field to confirm. -
Page 52: The Status Tab
Note: In Wireless Bridge mode, the Access Point can ONLY be accessed by another access point in Wireless Bridge mode. In order for your other wireless devices to access the Access Point, you must reset it to Access Point mode. The two modes are mutually exclusive. Figure 6-7 Instant Wireless ®... -
Page 53: The Log Tab
• MAC Address. The MAC Address of the LAN interface is displayed here. Configuration Type. This displays how the Access Point is assigned an IP • address, either Automatic Configuration - DHCP, if assigned by DHCP server, or Static IP Address and its IP Address, Subnet Mask, and Default Gateway address, if assigned by Static IP Address server. -
Page 54: The Help Tab
The Help Tab For help on the various tabs in this Web-based Utility, along with upgrading the Access Point’s firmware and viewing this User Guide, click the Help tab, shown in Figure 6-10. The help files for the various tabs in this Web-based Utility are listed by tab name on the lefthand side of the screen. -
Page 55: The Advanced Wireless Tab
Figure 6-12 Above the MAC Address fields, there is a pull-down menu. This pull-down menu is for selecting the number of computers on your wireless network. For computers one through ten on your wireless network, 1~20 is selected by default. If you have more than twenty computers on your wireless network, use this pull-down menu to select 21~40. -
Page 56: The Snmp Tab
Beacon Interval. This value indicates the frequency interval of the beacon. • The default value is 100. Enter a value between 20 and 1000 milliseconds. The Beacon Interval value indicates the frequency interval of the beacon. A beacon is a packet broadcast by the Access Point to synchronize the wire- less network. -
Page 57: Appendix A: Troubleshooting
Appendix A: Troubleshooting This chapter provides solutions to problems usually encountered during the installation and operation of the Access Point. Read the description below to solve your problems. If you can’t find an answer here, check the Linksys web- site at www.linksys.com. Frequently Asked Questions Can the Access Point act as my DHCP Server? No. - Page 58 worldwide. This presents a truly revolutionary opportunity to place convenient high speed wireless capabilities in the hands of users around the globe. What is Spread Spectrum? Spread Spectrum technology is a wideband radio frequency technique devel- oped by the military for use in reliable, secure, mission-critical communica- tions systems.
-
Page 59: Appendix B: Setting Up The Tcp/Ip And Ipx Protocols
What is the maximum number of users the Access Point facilitates? No more than 65, but this depends on the volume of data and may be less if many users create a large amount of network traffic. How many channels/frequencies are available with the Access Point? Using 802.11b or draft 802.11g, there are 13 available channels, ranging from 1 to 13. -
Page 60: Tcp/Ip Setup For Windows 98 And Millennium
The following instructions are provided as examples for reference only. For complete instructions on installing and troubleshooting TCP/IP and IPX, con- sult your Windows operating system documentation. TCP/IP Setup for Windows 98 and Millennium 1. Click the Start button, select Settings, and open the Control Panel. Inside the Control Panel, double-click the Network icon. -
Page 61: Tcp/Ip Setup For Windows 2000
2. When the Network window appears, click the Protocols tab. Then, click the Add button. 3. Find the IPX/SPX protocol in the Select Network Protocol field. Click it once and click the OK button. TCP/IP Setup for Windows 2000 1. At the Windows 2000 desktop, right click My Network Places and select Properties. -
Page 62: Appendix C: Glossary
Appendix C: Glossary 802.11b - One of the IEEE standards for wireless networking hardware. Products that adhere to a specific IEEE standard will work with each other, even if they are manufactured by different companies. The 802.11b standard specifies a maximum data transfer rate of 11Mbps, an operating frequency of 2.4GHz, and WEP encryption for security. - Page 63 unique IP address. When an organization sets up its computer users with a con- nection to the Internet, an IP address must be assigned to each machine. Without DHCP, the IP address must be entered manually at each computer and, if computers move to another location in another part of the network, a new IP address must be entered.
- Page 64 IEEE (The Institute of Electrical and Electronics Engineers) - The IEEE describes itself as "the world's largest technical professional society, promoting the development and application of electrotechnology and allied sciences for the benefit of humanity, the advancement of the profession, and the well-being of our members."...
- Page 65 RTS (Request To Send) - An RS-232 signal sent from the transmitting station to the receiving station requesting permission to transmit. Server - Any computer whose function in a network is to provide user access to files, printing, communications, and other services. Software - Instructions for the computer.
-
Page 66: Appendix D: Specifications
Appendix D: Specifications Standards Draft 802.11g, 802.11b Channels 13 Channels (Europe) 14 Channels (Japan) Port One 10/100, Auto-Crossover (MDI/MDI-X) Port Cabling Type Category 5 or better Data Rate Up to 54Mbps (Wireless), 10/100Mbps (Ethernet) LEDs Power, Diag Link/Act, Full/Col, 100 WLAN Act, Link Transmit Power... - Page 67 http://www.linksys.com © Copyright 2003 Linksys, All Rights Reserved.