Pioneer DJM-850 Operating Instructions Manual
Dj mixer
Hide thumbs
Also See for DJM-850:
- Operation manual (18 pages) ,
- Firmware update manual (7 pages) ,
- Quick start manual (6 pages)
Table of Contents
Advertisement
Advertisement
Table of Contents

Related Manuals for Pioneer DJM-850


Summary of Contents for Pioneer DJM-850
-
Page 1: Operating Instructions
DJ MIXER DJM-850-K DJM-850-S http://pioneerdj.com/support/ The Pioneer website shown above offers FAQs, information on software and various other types of information and services to allow you to use your product in greater comfort. Operating Instructions... - Page 2 Thank you for buying this Pioneer product. Please read through these operating instructions so you will know how to operate your model properly. After you have finished reading the instructions, put them away in a safe place for future reference.
-
Page 3: Operating Environment
FEDERAL COMMUNICATIONS COMMISSION DECLARATION OF CONFORMITY This device complies with part 15 of the FCC Rules. Operation is subject to the following two conditions: (1) This device may not cause harmful interference, and (2) this device must accept any interference received, including interference that may cause undesired operation. - Page 4 Do not place the unit, a piece of furniture, etc., on the power cord, or pinch the cord. Never make a knot in the cord or tie it with other cords. The power cords should be routed such that they are not likely to be stepped on.
-
Page 5: Table Of Contents
Contents How to read this manual The names of displays, menus, and buttons in this manual are enclosed in brackets. (e.g. [MASTER] channel, [ON/OFF], [File] menu) Before start Features ....................... 6 What’s in the box ..................6 Connections Rear panel ....................7 Connecting input terminals ............... -
Page 6: Before Start
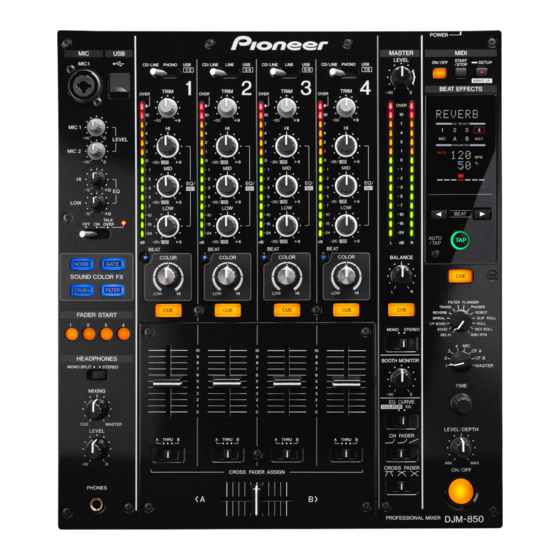
Features The simple, straightforward layout of the control panel not only makes for easy DJ performances, it also allows DJs using it for the first time to operate it without hesitation. This unit is a 4-channel DJ mixer carrying over the technology of the Pioneer DJM series, the world standard for club sound. -
Page 7: Connections
Connections Be sure to turn off the power and unplug the power cord from the power outlet whenever making or changing connections. Refer to the operating instructions for the component to be connected. Connect the power cord after all the connections between devices have been completed. -
Page 8: Connecting Input Terminals
Connecting input terminals ! When creating a DVS (Digital Vinyl System) combining a computer, audio interface, etc., be careful in connecting the audio interface to this unit’s input terminals and in the settings of the input selector switches. Also refer to the operating instructions of the DJ software and audio interface. -
Page 9: Connecting To The Control Panel
About the driver software and setting utility software Be sure to connect using the included USB cable. The driver software is required to input and output the sound of a com- Computers puter using this unit’s built-in USB sound card. Prepare a computer on which a Windows or Mac operating system is installed and the pro- prietary driver software provided by Pioneer. -
Page 10: Cautions On Installation
® version Windows Vista Home Basic/Home Premium/Business/ sion, confirming to Pioneer in writing that You have done so. Sections Ultimate 2.2, 2.3, 2.4, 3, 4, 5 and 6 will continue in effect after this Agreement’s 64-bit version termination. 32-bit ®... -
Page 11: About The Setting Utility Software
! The message [Installing device driver software] may appear when If [Hardware Installation] appears on the screen while the installa- this unit is first connected to the computer or when it is connected to tion is in progress, click [Continue Anyway] and continue with the a different USB port on the computer. - Page 12 None None 1 The audio data is output with the same volume at which it is input to this unit, regardless of the [USB Output Level] setting. 2 When using for any purposes other than sound recording, pay attention to set the DJ software so that sound loops are not generated.
-
Page 13: Operation
- 24 - 24 - 24 AUTO / TAP BEAT BEAT BEAT BEAT COLOR COLOR COLOR COLOR BALANCE NOISE GATE SOUND COLOR FX CRUSH FILTER FILTER FLANGER TRANS PHASER FADER START REVERB ROBOT SPIRAL SLIP ROLL UP ECHO ROLL MONO STEREO... - Page 14 BEAT button (page 17) When the button is pressed while SOUND COLOR FX is turned on, B TIME control (page 17) the effect sound is associated to the beat (change in volume) of the Adjusts the BEAT EFFECT’s time parameter. currently playing track.
-
Page 15: Basic Operation
Connecting input terminals on page 8. Turn the [EQ/ISO (HI, MID, LOW)] controls for the The fader start function can be switched on and off for all DJ players all at once. For the switching procedure, see Changing the settings on page respective channels. -
Page 16: Using A Microphone
3 Set the crossfader. stereo audio. Rotating to the leftmost position outputs only the left Set to the edge opposite the side on which the channel you want to use sound of stereo audio. with the fader start function is set. -
Page 17: Advanced Operations
! When the BPM is set using the [TAP] button, the beat fraction is set [AUTO] lights when the BPM measurement mode is to [1/1] and the time of one beat (quarter note) is set as the effect AUTO (TAP) set to the auto mode. - Page 18 3 Press the [START/STOP] button for [MIDI]. to be sent to the DJ software as MIDI signals. This unit can be used as a The MIDI start message is sent.
-
Page 19: Types Of Effects
BEAT c, d buttons Use these to set a time delay of 1/8 – 16/1 with A delay sound is output once according to the beat fraction set with the (parameter 1) respect to the time of one beat of the BPM. - Page 20 The further the control is turned clockwise, the more LEVEL/DEPTH control the effect is stressed. (parameter 3) When turned all the way counterclockwise, only the The sound is cut according to the beat fraction set with the [BEAT c, d] original sound is output. buttons. ROBOT Time 1/1 beat The original sound is changed to a sound like one produced by a robot.
- Page 21 ROLL. (parameter 3) terminal. 1 If the sound of the channel you want to monitor is not output from the [MASTER] channel when [CF.A], [CF.B] or [MASTER] is selected ROLL with the [1, 2, 3, 4, MIC, CF.A, CF.B, MASTER] selector switch, the...
-
Page 22: List Of Midi Messages
List of MIDI Messages ! “CC” is the abbreviation of “control change”. A control change is a type of MIDI signal used to transmit various types of control information, such as timbre, volume, etc. On this unit, values from 0 to 127 are output as CC mainly when controls and faders are operated. CC are also output when certain buttons are operated. - Page 23 2 When switched from one position to another position, the MIDI ON and OFF signals are sent respectively from both positions. When the [START/STOP] button is pressed for over 1 second, MIDI messages corresponding to the positions of the buttons, faders and controls are sent in a bundle (Snapshot).
-
Page 24: Changing The Settings
USB cable is connected. Factory Reset INITIAL YES, NO* Restores all the settings to their factory defaults. 1 Note that the output sound may be distorted even if the master level indicator does not light up to the very top. -
Page 25: Additional Information
Troubleshooting ! Incorrect operation is often mistaken for trouble or malfunction. If you think that there is something wrong with this component, check the points below. Sometimes the trouble may lie in another component. Inspect the other components and electrical appliances being used. If the trouble cannot be rectified after checking the items below, ask your nearest Pioneer authorized service center or your dealer to carry out repair work. - Page 26 Is an audio interface for computers connected If the audio interface for computers has a line level output, connect it to the [CD/ the [TRIM] control is turned. between the analog player and this unit? LINE] or [LINE] terminal.
-
Page 27: Block Diagram
Level 3posi TalkOver ON/OFF FILTER Return detect MIC1,2 COMMON [BEAT EFFECT (SND/RTN)] [BEAT EFFECT(Others)] [Mono Split / Stereo SWITCH & MIXING] Effect CH Select Effect CH Select Effect Out Effect CH Select Effect SW Mixing CHx Cue On/Off SW BEAT... -
Page 28: About Trademarks And Registered Trademarks
Main unit weight ................7.7 kg (17 lb) Mini phone jack (Ø 3.5 mm) ............4 sets Max. dimensions ....... 320 mm (W) × 108 mm (H) × 381 mm (D) (12.6 in. (W) × 4.3 in. (H) × 15 in. (D)) —... -
Page 31: Limited Warranty
Pioneer, without charge to you for parts or labor for actual repair work if such products fail to function properly under normal use due to a manufacturing defect. - Page 32 URLs : Pour enregistrer votre produit, trouver le service après-vente agréé le plus proche et pour acheter des pièces de rechange, des modes d’emploi ou des accessoires, reportez-vous aux URL suivantes : In the USA & Canada/Aux Etats-Unis & Canada http://www.pioneerelectronics.com...