
Related Manuals for Smeg SCV38X


Summary of Contents for Smeg SCV38X
- Page 1 START START STOP STOP MANUALE D'USO USER GUIDE BETRIEBSANLEITUNG GUIDE D'UTILISATION MANUAL DE UTILIZACIÓN Forno Oven Backofen Four Horno S S C C V V 3 3 8 8 X X...
-
Page 2: Table Of Contents
• • Preprogrammed cooking time _________________________________ • • Steam cooking ______________________________________________ • • Cancelling cooking in progress ________________________________ • • At the end of a cooking programme ____________________________ • • Water management __________________________________________ • • Delayed cooking_____________________________________________ • • Using the timer function ______________________________________ •... -
Page 3: Information For The User
Steam is also appropriate for blanching, defrosting and reheating or even keeping warm, especially sauces. First use a very small amount of fat to heat meats like poultry, veal and pork so that they take on an appetizing browned appearance. Then finish cooking them using the steam method. -
Page 4: Safety Instructions
1 / INFORMATION FOR THE USER Warning Keep this user guide with your appliance. If the appliance is ever sold or transferred to another person, ensure that the new owner receives the user guide. Please become familiar with these recommendations before installing and using your oven. They were written for your safety and the safety of others. -
Page 5: Care For The Environment
— Your appliance also contains many recyclable materials. It is therefore marked with this logo to indicate that used appliances must not be mixed with other waste. Recycling of the appliances organised by your manufacturer will thus be undertaken in optimum conditions, in accordance with European directive EC/2002/96 relating to electrical and electronic equipment waste. -
Page 6: Installing Your Appliance
We cannot be held responsible for any accident or incident resulting from non- existent, defective or incorrect earthing. If the electrical installation in your residence requires any changes in order to hook up your appliance, call upon a professional electrician. -
Page 7: Electric Connection
220-240V~ 50Hz Monophase line 220-240 V ~ 10A fuse or differential circuit breaker Electrical outlet 2 prong receptacle +e e a a r r t t h h CEI Standard 60083 Power supply cable length 1.50 m approx. • • ELECTRIC CONNECTION... -
Page 8: Description Of Your Appliance
WAY until you feel the tank LOCK INTO this is the steam generator. POSITION. There is no need to add water to the cooking dish. To guarantee REAL STEAM COOKING, Warning your oven is furnished with specially designed When in use, the appliance becomes cookware that will allow for perfect cooking. -
Page 9: Accessories
Dish that makes it possible to recover the condensation water. When cooking place the fig.1 dish on the fig.2 dish in reverse order so that that do not fit into each other (see diagram). When storing place the fig.1 dish on the fig.2... -
Page 10: Introduction To The Programmer
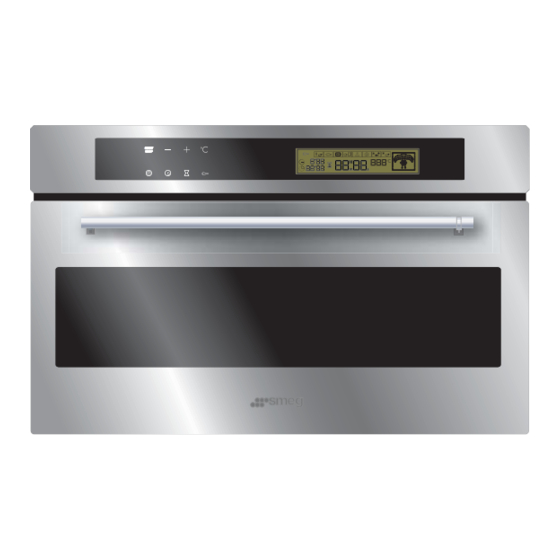
3 / DESCRIPTION OF YOUR APPLIANCE • • INTRODUCTION TO THE PROGRAMMER Control panel lock indicator Clock or timer display (child safety device). Timer indicator Cooking time indicator Cooking end time display Cooking modes display Cooking end time indicator Water circuit problem indicator... -
Page 11: Using Your Appliance
T T i i m m e e M M i i n n . . s s e e t t t t i i n n g g t t i i m m e e M M a a x x . . s s e e t t t t i i n n g g t t i i m m e e T T e e m m p p e e r r a a t t u u r r e e °... -
Page 12: Steam Cooking
E E T T T T I I N N G G T T H H E E C C O O O O K K I I N N G G T T I I M M E E... -
Page 13: Cancelling Cooking In Progress
4 / USING YOUR APPLIANCE CANCELLING COOKING IN PROGRESS • • You can stop cooking at any time by pressing the Stop touch control (press and hold for START START STOP STOP approximately one second). If steam generation has not yet begun (approximately 1 minute), the oven stops immediately and the time disappears. -
Page 14: Delayed Cooking
f... -
Page 15: Using The Timer Function
Once the time has expired, the timer emits a series of beeps to notify you. The beeps can be stopped by pressing any touch control. Warning It is possible to change or cancel the timer programme at any time by turning it to 0:00 and pressing the START/STOP. LOCKING THE CONTROLS (CHILD SAFETY) •... -
Page 16: Display Stand-By Mode
A A C C T T I I V V A A T T I I O O N N O O F F S S T T A A N N D D - - B B Y Y... -
Page 17: Display Demo Mode
• • A A C C T T I I V V A A T T I I N N G G D D E E M M O O M M O O D D E E : :... -
Page 18: Function Description And Cooking Chart
S S t t e e a a m m c c o o o o k k i i n n g g m m o o d d e e m m o o s s t t... - Page 19 FOOD TIMES °C PREPARATIONS NOTES whatever the quantity Artichokes (small) Placed upside down in the dish 40 to 45 min. 100 • These times For tips only, decrease cooking depend on the Asparagus 35 to 40 min. 100 time type, size and...
- Page 20 Cocotte: See detailed recipes. Place directly in a dish then cover with water or milk. The steam is not enough to saturate these inflating foods. Place a sheet of aluminium foil on the dish to prevent water droplets from falling in.
-
Page 21: Cleaning The Outer Surfaces
CLEANING THE CAVITY • • (AFTER EACH USE) Wipe the cavity with a dry cloth after the steam generator has cooled or let the cavity air-dry by leaving the door open. CLEANING THE WATER INTAKE TUBE • •... -
Page 22: Troubleshooting
- - O O v v e e n n i i s s n n o o t t c c o o n n n n e e c c t t e e d d t t... -
Page 23: Changing The Bulb
7 / TROUBLESHOOTING Warning - Disconnect your oven before performing any task on the bulb to avoid the risk of electric shock and, if necessary, let the appliance cool down. To unscrew the port and the bulb, use a rubber glove, which will make disassembly easier. -
Page 24: After-Sales Service
.