Yamaha MU100 Owner's Manual
Yamaha mu100 synthesizer: owners manual
Hide thumbs
Also See for MU100:
- Manuel du propriétaire (178 pages) ,
- Supplementary manual (110 pages) ,
- Service manual (38 pages)
Table of Contents
Advertisement
Advertisement
Chapters
Table of Contents

Related Manuals for Yamaha MU100


Summary of Contents for Yamaha MU100
- Page 1 TONE GENERATOR OWNER'S MANUAL BEDIENUNGSANLEITUNG MODE D'EMPLOI...
- Page 2 If these corrective measures do not produce satisfactory results, please contact the your local retailer authorized to distribute this type of product. If you can not locate the appropriate retailer, please contact Yamaha Corporation of America, Electronic Service Division, 6600 Orangethorpe Ave, Buena Park, CA 90620 The above statements apply ONLY to those products distributed by Yamaha Corporation of America or its subsidiaries.
-
Page 3: Special Message Section
This product should be used only with the components supplied or; a cart, rack, or stand that is recommended by Yamaha. If a cart, etc., is used, please observe all safety markings and instructions that accompany the accessory product. - Page 4 TONE GENERATOR OWNER'S MANUAL BEDIENUNGSANLEITUNG MODE D'EMPLOI...
- Page 5 The MU100 has a convenient A/D input that allows you to connect a mi- crophone, electric guitar or other instrument, and mix those signals with the MU100’s Voices. A plug-in connector is also built into the MU100 for easy integration with the XG Plug-in System.
-
Page 6: Unpacking
Unpacking Your MU100 package should include the items listed below. Make sure that you have them all. Also, write down the serial number of your MU100 in the box below, for future reference. MU100 PA-5B AC Power Adaptor* Owner’s Manual CD-ROM “XGtools”... -
Page 7: Table Of Contents
The Controls of the MU100 ... 15 Front Panel ... 15 Rear Panel ... 18 The MU100 — What It Is and What It Can Do ... 19 What It Is..19 About General MIDI ... 19 About XG-format ... 20 What It Can Do... -
Page 8: Table Of Contents
Edit Menu Parameters ... 52 Changing the Filter and EG Settings of a Part ... 52 On Your Own..54 Editing Drum Voices — with the Drum Setup Controls ... 55 Making Changes to Individual Drum Sounds — the "Drum" Parameters ... 56 On Your Own... - Page 9 TABLE OF CONTENTS Multi Edit Mode ... 100 Filter ... 100 Envelope Generator (EG) ... 102 Equalizer (EQ) ... 105 Vibrato ... 106 Others ... 107 Drum Setup Controls ... 114 Performance Mode ... 119 Performance Part Control ... 120 All Part ...
- Page 10 Prior to Installation ... 166 Basic Information ... 166 Backing Up Data ... 166 The Performance Mode ... 166 Installing a Plug-in Board into the MU100 ... 167 Troubleshooting ... 170 Error Messages ... 171 Specifications ... 173 Glossary ... 175 Index ...
-
Page 11: How To Use This Manual
“on-de- mand” basis, going directly to the information you need as you need it. However, to get the most out of your MU100, we strongly suggest that you read the following sections in the order given:... -
Page 12: Precautions
SAVING USER DATA • Save all data to an external device such as the Yamaha MIDI Data Filer MDF3, in order to help prevent the loss of important data due to a malfunction or user operating error. -
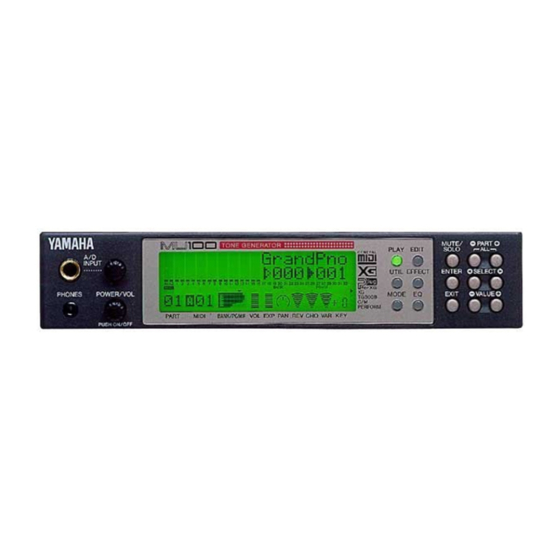
Page 13: The Controls Of The Mu100
The Controls of the MU100 Front Panel 1 A/D INPUT For connection of a microphone, electric guitar or other electronic instruments (stereo 1/4” plug). 2 A/D INPUT level control For control of the level of the A/D input. 3 PHONES jack For connection to a set of stereo headphones (Stereo Mini-pin). -
Page 14: Edit Button
The Controls of the MU100 5 PLAY button For entering the Play mode and switching among the different Play displays. (See page 40.) 6 EDIT button For entering the Edit mode. (See page 52.) 7 UTIL (UTILITY) button For entering the Utility mode. (See page 31.) 8 MODE button For entering the Sound Module mode. - Page 15 For example, to rapidly advance (increase) the value, hold down the [VALUE + ] button and simultaneously press and hold down the [VALUE - ] button. The Controls of the MU90R The Controls of the MU100...
-
Page 16: Rear Panel
The Controls of the MU100 Rear Panel MIDI THRU I N-A 1 MIDI THRU, MIDI OUT and MIDI IN A/B terminals For connection to other MIDI devices, such as a MIDI keyboard, tone genera- tor, sequencer, or to a computer that has a MIDI interface. MIDI IN A and B are independent MIDI ports, allowing full 32-channel MIDI input. -
Page 17: The Mu100 - What It Is And What It Can Do
46 drum Voices. The MU100 has 64-note polyphony and is 32-Part multi-timbral. In other words, the MU100 has 32 different Parts, each with its own Voice, so that up to 32 different Voices can be sounded simultaneously. Since the MU100 features dual MIDI input ports (A and B), 16 Parts can be played from one MIDI port and the remaining 16 from the other port. -
Page 18: About Xg-Format
Voices and the XG-related parameters. What It Can Do... Here are a few ideas on how you can use the MU100. The list below is not comprehensive, but is meant to be a general guide to the possibilities and pro- vide a starting point or springboard for your own creative ideas and explora- tions. -
Page 19: Using With The Xg Plug-In System
Similarly, you can connect a laptop or a MIDI data filer and playback song data with the MU100’s Voices. Plug a microphone into one of the A/D inputs and a guitar into the other, and you can mix your own live performance with the sequencer tracks. -
Page 20: About The Modes Of The Mu100
Which mode the MU100 is in depends on the selected Sound Module mode. If XG, TG300B or C/M are selected, the MU100 automatically sets itself to the Multi mode. When PFM is selected, the MU100 is in the Perfor- mance mode. (For information on selecting the Sound Module mode, see page 156.) -
Page 21: Play Modes And The Part Controls
Once the operating mode of the MU100 is set (Multi or Performance), there are two main ways you can use the MU100: playing and editing. In the Play modes, you play the Voices; in the various Edit modes, you change their settings. -
Page 22: Modes And Function Tree
[SELECT </>] Copy [ENTER] [SELECT </>] Store [ENTER] [SELECT >] Recall [ENTER] The MU100 — What It Is and What It Can Do When the sound module mode is ”PFM”) [SELECT <] Filter Edit [ENTER] [SELECT </>] EG Edit [ENTER] [SELECT </>] EQ Edit [ENTER]... - Page 23 Push on the SELECT buttons either < or > for SELECT < / >. Push on the PART + and - simultaneously for PART ++ -. The MU100 — What It Is and What It Can Do Modes and Function Tree P.
- Page 24 The MU100 — What It Is and What It Can Do...
-
Page 25: Guided Tour
UIDED When using your MU100 for the first time, read through this short section of the manual. It guides you step-by-step in us- ing many of the basic operations: setting the instrument up, connecting it properly to other equipment, and — most im- portantly —... -
Page 26: Setting Up Your Mu100
Other setup examples are covered in later sections; for example, setting up for use with a computer is on page 35. Once you’ve set up the MU100, we urge you to play the Demo song (page 31) and hear what the instrument is capable of. - Page 27 DC IN PHONES Now that you’ve set up the MU100, we urge you to go on to the next section, turn on the instrument, and play the Demo song (page 31) to hear what the instrument is capable of. If you need information on setting up the MU100 for a different type of system, refer to “Setting Up the MU100 in Your...
-
Page 28: Powering Up
This includes the MU100 and any connected equipment. 4 Turn on the amplifier/speaker system. 5 Set the volume controls. First, set the volume control on the MU100 to about the mid- way position, then set the volume on the amplifier to a suitable level. -
Page 29: Playing The Demo Song
Now that you’ve set everything up properly, try playing the built-in Demo song. This showcases the high-quality Voices and the AWM2 tone genera- tion system of the MU100. It also is an excellent demonstration of the 32- part multi-timbral capacity and the various expressive controls and effects that can be used simultaneously. - Page 30 Playing the Demo Song 4 Stop playback of the song. Press the [EXIT] button. 5 Exit from the Demo Song function. Press the [EXIT] button again — twice to return to the Play mode. (Or you can simply press the [PLAY] button.) Guided Tour...
-
Page 31: Setting Up The Mu100 In Your Music System
Setting Up the MU100 in Your Music System As you learned in the section The MU100 — What It Is and What It Can Do on page 19, the MU100 can be integrated into a variety of setups. It would be impossible to cover all connection possibilities in a short manual as this;... - Page 32 In this example, a Yamaha MDF3 MIDI Data Filer is used. To back up data, connect the MIDI IN of the MDF3 to the MIDI OUT of the MU100. To restore the data to the MU100, connect the MIDI OUT of the MDF3 to the MIDI IN of the MU100.
-
Page 33: Connecting Directly To A Computer
The MU100 features a built-in host computer interface, allowing you to di- rectly connect it to your computer — eliminating the need of installing a special MIDI interface to your computer. The MU100 can be used with the following computers: Apple Macintosh and compatibles, IBM PC/AT and compatibles. - Page 34 In this menu, you should be able to set separate MIDI outputs to access the two MIDI ports on the MU100. For example, the device for MIDI OUT 1 should be set to “Yamaha MU100” (or “MU80,” if “MU100” is not avail- able).
-
Page 35: Ibm Pc/At And Compatibles
Follow these instructions if you have an IBM PC/AT or compatible com- puter not equipped with an external MIDI interface. Connect the TO HOST terminal on the MU100 to one of the computer’s serial ports, COM 1 or COM 2. - Page 36 In this menu, you should be able to set separate MIDI outputs to access the two MIDI ports on the MU100. For example, MIDI OUT 1 should be set to “Yamaha CBX A Driver” (or “Windows MIDI, Output 1”). Similarly, MIDI OUT 2 should be set to “Yamaha CBX B Driver”...
-
Page 37: Selecting And Playing The Performances
Selecting and Playing the Performances As pointed out on page 59, the Performances of the MU100 let you play four Voices together over one MIDI channel. These specially programmed Per- formances (100 Preset and 100 Internal) take full advantage of the MU100 dynamic voices and flexible editing functions —... - Page 38 Selecting and Playing the Performances 3 Press the [PLAY] button to go to the Performance Play mode. You can press the [EXIT] button for this as well. “All” and keyboard player icon indicate All Part display of Performance Play mode. If the All Part display above (with the keyboard player icon) is not shown, press both [PART-/+] buttons simultaneously.
- Page 39 If you’ve carefully followed all instructions up to now, the “level meter” bars in the display should move — and you should be able to hear the sound of the MU100 as you play. The “level meter” bars indicate the “level” (velocity) of the incom- ing MIDI data.
-
Page 40: Selecting And Playing Individual Voices
Selecting and Playing Individual Voices Selecting and Playing Individual Voices The MU100 has a stunningly huge variety of Voices — a total of 1267. In this section, you’ll select and play Voices in the XG mode, which features 1074 different Voices. -
Page 41: Selecting Voice Banks And Voices From The Panel
32 Parts inde- pendently over different MIDI channels. Which mode the MU100 is set to depends on the selected Sound Module mode. The XG, TG300B and C/M settings are all Multi mode. When PFM is selected, the MU100 is in the Performance mode. - Page 42 3 Change the bank number. Use the [VALUE -/+] buttons or data dial. Notice that the bank numbers “jump” as they are selected — the MU100 skips bank numbers that have the same Voice as bank “000.” In the XG mode, several banks of Voices are available. Each bank contains up to 128 different Voices, for a total of 1074 Voices.
- Page 43 Details • The MU100’s Voices and program numbers follow the GM (General MIDI) for- mat. This means that you can select a Voice type by its number, then select Voice variations by bank. For example, all the nylon guitar Voices are at pro- gram number 25.
- Page 44 XG Voice banks. (See the “Sound List & MIDI Data” booklet.) • Though the MU100 skips over bank numbers with identical Voices (see step 3 above), it can be set to not skip bank numbers, if desired. (See page 147: Utility mode/System/Display Bank Select.)
-
Page 45: Selecting Voices From A Midi Keyboard
Details • Depending on what keyboard you are using to control the MU100, you may need to be careful in selecting program numbers. The MU100’s program num- bers start at “001,” but some keyboards have different numbering systems. For example, some start at “0”... -
Page 46: Editing In The Multi Mode
Editing in the Multi Mode Editing in the Multi Mode This section takes you step-by-step through an example editing session in the Multi mode. The operations and techniques you learn here enable you to perform any editing operation in the Multi mode. There are two separate sections of the Multi mode that are devoted to editing: the Single/All Part controls, and the Edit menus. -
Page 47: Single Part Controls
Single Part Controls You can make changes to each individual Part by using the Single Part con- trols. These are displayed in the Multi Play mode, and give you at-a-glance confirmation and control of the important basic settings of the selected Part. If the Multi mode was active when you last turned the power off, the next time you turn the power on, the Single Part controls are automatically called Let’s take a look at the Play display again:... -
Page 48: Changing The Volume And Pan Settings Of A Part
Editing in the Multi Mode Changing the Volume and Pan settings of a Part Here, we’ll change the Volume and Pan settings of one Part’s Voice. Operation 1 Select the desired Part. Use the [PART -/+] buttons to select Part 1. 2 Select the desired control. -
Page 49: On Your Own
On Your Own... If you want to, try making changes to some of the other Part controls. The procedure is the same: 1) Select a Part with the [PART -/+] buttons. 2) Select a control for editing with the [SELECT </>] buttons. 3) Change the setting with the [VALUE -/+] buttons or data dial. -
Page 50: Edit Menu Parameters
Editing in the Multi Mode Edit Menu Parameters The Edit Menu Parameters provide more detailed and advanced controls over the Parts. These are powerful tools that let you subtly enhance or fine- tune the sound of a Voice — or radically change its character for some wild and unique sounds. - Page 51 5 Select the “LPF Cutoff” parameter. Use the [SELECT </>] buttons. Selected Part The bars graphically indicate pa- flashes. rameter values for each Part. Indicates no other parameters are available (to the left). 6 Adjust the value while listening to the sound. Hold down a note on the connected keyboard and turn the data dial to adjust the value, swinging between the maximum (+63) and minimum (-64) values.
-
Page 52: On Your Own
Editing in the Multi Mode a Adjust the value while listening to the sound. Try setting this to around “+30” and play the keyboard. Notice how the attack of the sound has become slower. b Select and adjust the “Release Time” parameter. Use the [SELECT </>] buttons, then set this to around “+50.”... -
Page 53: Editing Drum Voices - With The Drum Setup Controls
Editing Drum Voices — with the Drum Setup Controls The Drum Setup Controls provide a comprehensive set of tools for control- ling and changing the drum Voices. These parameters can be set individually for each sound in a Drum Part. Up to four of your original editing setups can be permanently stored. -
Page 54: Making Changes To Individual Drum Sounds - The "Drum" Parameters
Editing in the Multi Mode Making Changes to Individual Drum Sounds — the “Drum” Parameters The Drum parameters provide extraordinary flexibility, since they allow you to make independent settings for the individual drum/percussion sounds in a Drum Part. We’ll explore a couple of the possiblilities here: Operation 1 Select “DRUM”... - Page 55 5 Select “F#3: Timbale L.” Play F#3 on the connected keyboard, or use the [PART -/+] buttons to select “F#3.” 6 Select the LPF Cutoff parameter, and set it to –40. 7 Select the LPF Resonance (LPF Reso) parameter, and set it to +63.
-
Page 56: On Your Own
Editing in the Multi Mode On Your Own... While you’re at it , try making changes to some of the other Drum param- eters. The procedure is the same: 1) Select a Drum Part with the [PART -/+] buttons. 2) Call up the Edit menus by pressing the [EDIT] button. 3) Select the “DRUM”... -
Page 57: Editing In The Performance Mode
Editing in the Performance Mode The Performance mode is an exceptionally powerful and flexible mode that allows you to combine four different Voices (including both A/D inputs) and play them from a single MIDI channel. The potential applications of the Performance mode are enormous, and we’ll touch on some of the main ones here. -
Page 58: All Part Controls
Editing in the Performance Mode All Part Controls You can make changes to the overall Performance by using the All Part controls. These are displayed in the Performance Play mode, and give you at-a-glance confirmation and control of some important basic settings of the selected Performance. -
Page 59: Transposing The Overall Key Of A Performance
Transposing the Overall Key of a Performance In this example, you’ll change the System Transpose setting for the “Rich Piano” Performance. This All Part control is useful for instantly changing the key to match the range of a vocalist, or for ease in playing difficult keys. Operation 1 Select the “Rich Piano”... -
Page 60: Single Part Controls - Selecting Different Voices For The Performance
Editing in the Performance Mode Single Part Controls — Selecting Different In this next section, you’ll use the Single Part controls to change the Voice settings of the Performance. Operation 1 Call up the Single Part controls. From the All Part controls, simultaneously press both [PART -/ +] buttons. -
Page 61: On Your Own
Details • Drum Parts are not available in the Performance mode. However, percussive Voices (numbers 113 – 120) can be selected. When editing a Performance: • Decide how many Parts you want. When creating a Performance, choose a preset that uses the same number of Parts (Voices) you intend to use. -
Page 62: Edit Menu Parameters - Creating A Two-Voice Layer
Editing in the Performance Mode Edit Menu Parameters — Creating a Two-Voice Layer Editing a Performance is almost identical to editing Parts in the Multi mode. The Edit menu tree is slightly different, and certain parameters are different as well. (For a full list and description of Performance Edit parameters, see page 123.) In the following instructions, you’ll use the Edit menu parameters to cre- ate a two-Voice Performance and “fatten”... - Page 63 4 Select Part 1 and select a new Voice for it: “HeavySyn” (082). 5 Select Part 2 and select the “HeavySyn” Voice for it as well. 6 Select the “OTHERS” parameters. Press the [EDIT] button. From the first Edit menu, select and call up “PART,”...
-
Page 64: Setting Up A Keyboard Split
Editing in the Performance Mode ; Change the Vibrato Rate, Depth, and Delay settings. Select one of the Parts and set the Vibrato parameters as follows: Rate: Depth: Delay: This produces a delayed vibrato for Part 1; in other words, the vibrato effect starts after the keys have been held for a while. -
Page 65: On Your Own
If you wish to save this newly created Performance, refer to “Saving Your Original Performance” on page 68. On Your Own... While you’re at it, try making changes to some of the other Edit (part) pa- rameters. The procedure is the same: 1) Call up the Edit menus by pressing the [EDIT] button. -
Page 66: Saving Your Original Performance
Saving Your Original Performance Once you’ve edited a Performance, you can give it a different name and save it for future recall. The MU100 has 100 Internal memory locations for your original Performances. For instructions on naming a newly created Performance, see page 124. -
Page 67: Assignable Controller (Ac1)
Assignable Controller (AC1) The Assignable Controller (AC1) is one of the more powerful features of the MU100 — it gives you extraordinarily flexible and expressive real-time control over the Voices. In this section, you’ll: Learn about MIDI controllers and control numbers, and how they can affect the Voices. -
Page 68: Control Numbers And The Actual Sound
As you might expect, control number 7 (Volume) affects the volume of the connected tone generator. In this example, the foot controller of a keyboard controls the volume on the MU100. MIDI OUT CONTROLLER... -
Page 69: Assigning The Assignable Controller
Assigning the Assignable Controller The Assignable Controller on the MU100 lets you specify the control num- ber to be used and determine which aspect or aspects of the sound will be affected. It also lets you set the degree to which the controller affects the sound. -
Page 70: Using The Assignable Controller - Setting Up
Assignable Controller (AC1) Using the Assignable Controller — Setting Up Operation 1 Set up the MIDI keyboard or instrument. Connect the foot controller to the appropriate jack, and make sure that the instrument is set to transmit over MIDI channel 1. (If your instrument doesn’t have a foot controller, use another controller as described in the next step.) PITCH... -
Page 71: Changing The Brightness On A Piano Voice
MIDI keyboard. It is usually used to produce LFO effects (regular wavering of the sound, like vibrato and tremolo). Since it is so common, the MU100 features various parameters that are reserved strictly for modulation wheel control. In the Multi mode, the modulation wheel can control Pitch LFO. The Per- formance mode features both Pitch LFO and Filter LFO. - Page 72 Assignable Controller (AC1) 4 Try the setting on other Voices. Exit to the Multi Play mode display (press the [PLAY] button) and select other Voices, trying out the new setting, and moving the foot controller up and down as you play. Try out some of these Voices, and notice how the sound changes: SynBass2 (040), Saw Ld (082), Warm Pad (090) —...
-
Page 73: Experssive Volume Control Of A Part
Expressive Volume Control of a Part This example shows you how to use the foot controller as an expression pedal. This may come in handy when use of MIDI Volume (#7) or Expres- sion (#11) is unavailable. Operation 1 Select the desired Part and Voice. Keep the settings you made to Part 1 (in the last example), and select a new Part/Voice for this example. - Page 74 Assignable Controller (AC1) 3 Set the AC1 Filter Control to “+63.” Since you’ve called up the “OTHERS” parameters in the previ- ous step, select “AC1FilCtrl” (with the [SELECT </>] buttons) and set it to “+63” (with the [VALUE -/+] buttons or data dial). 4 Select the “DRUM”...
-
Page 75: On Your Own
On Your Own... While you’re at it, try making some of your own settings. The procedure is the same: 1) Select the desired Part and Voice. 2) Call up the Edit menus by pressing the [EDIT] button. 3) Select “OTHERS” with the [SELECT </>] buttons, then press [ENTER]. -
Page 76: Effects
Effects To complement the huge variety of Voices and the 32-Part multi-timbral capacity, the MU100 features a built-in multi-effect processor with seven independent digital effects: Reverb, Chorus, Variation, Insertion 1 and 2, and EQ. (In this section, we’ll examine the first five; EQ is covered on page 82.) - Page 77 Operation 1 First, set the Send and Return controls to appropriate levels. Before you actually change the Reverb or Chorus settings, you should set the Send and Return controls, in order to properly hear the effect and the changes you make. To do this: 1) Select the desired Part from the Multi Play mode Single Part display.
-
Page 78: Applying Distortion To A Part - Using The Variation Effects
Effects Applying Distortion to a Part — The Variation effect section provides a wealth of additional effects. With a total of 70 different Types, it features some of the same effects found in the Reverb, Chorus and Insertion sections. This is not mere redundancy; it allows you to use two Types of Reverb or Chorus on different Voices. - Page 79 4) If you cannot hear the Distortion effect clearly, select the “Dry/Wet” parameter (with the [SELECT </>] buttons) and adjust it (with the [VALUE -/+] buttons or data dial) until the sound is appropriate. 5) Using the same method (as in step #4), select and adjust other important Distortion parameters as needed, such as “Drive”...
-
Page 80: Equalizer (Eq)
Equalizer (EQ) Equalizer (EQ) The MU100 features an extensive set of equalization controls that give you comprehensive control over the tone quality — both of individual Parts and over the entire instrument sound. In this section, you’ll learn how to: Use the Part EQ edit parameters to adjust the tone of a specific Part. - Page 81 4 Set the specific frequency to be adjusted. For this example, set the Low Frequency value to “315” (Hz). 5 Select the Low Gain parameter and adjust the value. For this example, set the Low Gain value to “+35.” Play the Voice (especially in the lower octaves) and hear how the sound has changed.
-
Page 82: Adjusting The Overall Tone - Multi Eq
Adjusting the Overall Tone — Multi EQ The multi EQ section gives you five-band control (at specific frequencies) over the entire sound of the MU100. Special presets are also available for instantly changing the tone to suit different types of music. -
Page 83: Mute/Solo
Mute/Solo The MU100 has convenient Mute and Solo functions for selectively muting or soloing any of the 32 normal Parts and the A1 and A2 A/D Parts. This is especially useful when playing back several Parts from a connected com- puter or sequencer. - Page 84 Mute/Solo The selected Part is soloed, while all other Parts are muted. All Parts sound normally. Guided Tour...
-
Page 85: A/D Input
The MU100 features a special A/D (Analog-to-Digital) input function that allows you to connect a stereo external signal (microphone, electric guitar, CD player, etc.), with the MU100’s Voices. You can use it to sing or play guitar over backing tracks played from a MIDI sequencer. - Page 86 A/D Input 3 Select the corresponding Part. Use the [PART -/+] buttons. Since you connected to the A/D INPUT 1 jack above, select Part A1 in this step. 4 Select the appropriate bank of presets. Do this in the normal way, using the [SELECT </>] buttons to highlight the bank number parameter, then using the [VALUE - /+] buttons to change the bank.
- Page 87 Bank 001 For input of an electric or electric/acoustic guitar (or other line level instruments). Bank 002 For input of a keyboard (or other line level instruments, such as tone generators, rhythm machines, etc.). Bank 003 For input of audio equipment (such as CD players, cassette decks, etc.). Bank 018 For input of a stereo keyboard (or other stereo signals from line level instruments, such as tone generators, rhythm machines, etc.).
- Page 88 CAUTION! Do not use line level signals (such as from keyboards, etc.) with the mic level banks. The signal may be too high, resulting in damage to the MU100. 5 Select the desired preset. Do this in the normal way (as you selected Voices), using the [SELECT </>] buttons to highlight the program number param-...
-
Page 89: Data Flow Block Diagram
Data Flow Block Diagram When HOST SELECT switch is set to MIDI (31,250 bps): TO HOST When HOST SELECT switch is set to PC-1/MAC (31,250 bps) or PC-2 (38,400 bps): TO HOST Sound Module A1~16CH IN-B IN-A Sound Sound Module Module A1~16CH B1~16CH... -
Page 90: Midi/Computer Connecting Cables
MINI DIN 8-PIN This concludes your basic tour of the important functions of the MU100. To find out more about how to best use your MU100, look through the Reference section that follows and try out some of the functions and operations that interest you. -
Page 91: Reference
EFERENCE The Reference section of this manual covers in detail all of the functions of the MU100. Refer to it when you need information about a specific function, feature or operation. -
Page 92: Multi Mode
In the Multi mode, the MU100 performs as a multi-timbral tone generator capable of playing up to 32 Parts simultaneously, over 32 MIDI channels. Normally, the MU100 should be set to Multi mode when using it with a sequencer and General MIDI song data. There are three Multi modes: XG, TG300B and C/M. -
Page 93: Multi Mode
014, 016 — 022, 024 — 029, 032 — 043, 045, 048, 052 — 054, 064 — 088, 096 — 101, 126, 127 [icon-MU100] 000, 008, 016, 024, 048, 056, 064, 072, 080, 088, 096, 104, 120 [icon-SFX] SFX TG300B: 000, 001 — 011, 016 — 019, 024 —... - Page 94 Expression (Expresn) Range: 000 — 127 This determines the Expression setting for the selected Part’s Voice. Settings: Rnd (Random), L63 — C — R63 This determines the stereo position of the selected Part’s Voice. A setting of “Rnd” (Random) randomly assigns the Voice to a pan position.
-
Page 95: All Part Control
Device Number (DevNo.) Settings: 1 — 16, all This determines the Device Number for the MU100, a kind of MIDI “identifica- tion” number to distinguish between mul- tiple units. For example, if you are using more than one MU100, set a different Device Number for each. - Page 96 Variation Return (VarRtn) Range: 000 — 127 This determines the amount of Variation return in the overall mix. Variation Re- turn is only available when the Variation Connection parameter is set to SYS. (See page 137.) Transpose (Trans) Range: –24 — +24 semitones This determines the overall Transpose setting of the Parts.
-
Page 97: Multi Edit Mode
Path: [EDIT] button Filter —————————————————————————— The MU100 features a digital filter that can be used to change the timbre of the Voices. The filter is affected (together with the level) by the EG (Envelope Generator), which allows you to change the timbre over time as well. - Page 98 LPF Cutoff Frequency (LPF Cutoff) Range: –64 — +63 This determines the cutoff frequency of the low pass filter (LPF). The LPF filters out frequencies higher than the cutoff point and “passes” the lower frequencies. Lower cutoff values create a deeper, more rounded tone, while higher values create a brighter tone.
-
Page 99: Envelope Generator (Eg)
Multi Edit Mode Envelope Generator (EG) Path: [EDIT] button EG (Envelope Generator) ————————————————— The EG parameters allow you to shape the sound of a Part’s Voice — or, in other words, set how the level and timbre of the Voice changes over time. -
Page 100: Pitch Eg Parameters
Level/Filter EG Parameters EG Attack Time Range: –64 — +63 This determines the Attack Time of the EG, or how long it takes for the sound to reach full volume when a note is played. For the Filter, this determines how long it takes for the sound to be affected by the maximum Filter values. - Page 101 Multi Edit Mode Pitch EG Attack Time (PEGAtakTime) Range: –64 — +63 This determines the Attack Time of the Pitch EG, or how long it takes for the pitch to return to normal (from the pitch value set in Initial Level above). Pitch EG Release Level (PEGReleLvel) Range: –64 —...
-
Page 102: Equalizer (Eq)
Equalizer (EQ) Path: [EDIT] button EQ (Equalizer) —————————————————————— The EQ parameters let you adjust and set the tonal quality of a Part’s Voice, such as boosting the bass sound, or making it brighter. This is a two-band equalizer with wide frequency variation for each band, and is independent of the overall EQ controls (see page 142). -
Page 103: Vibrato
Multi Edit Mode Vibrato Path: [EDIT] button Vibrato ————————————————————————— Vibrato produces a quavering, vibrating sound in the Part’s Voice, by regu- larly modulating the pitch. You can control the speed and depth of the Vi- brato, as well as the time it takes before the Vibrato effect is applied. Vibrato Rate Range: –64 —... -
Page 104: Others
Others Path: [EDIT] button Others ————————————————————————— The Others section of parameters contains miscellaneous controls, in- cluding those related to tuning, Part Mode, velocity, portamento, note range, etc. “OTHERS” Detune ... 108 Detune Assignment Parameters ... 108 Part Mode Mono/Poly Mode Portamento Parameters ... -
Page 105: Detune
Multi Edit Mode Detune Detune Range: –12.8 — +12.7 This determines the fine tuning of the Part’s Voice. HINT Detune could be used to slightly detune a Voice compared to the tuning of the rest of the Voices for a richer sound. It could also be used to detune two different Voices being played in unison. -
Page 106: Mono/Poly Mode
Mono/Poly Mode Settings: mono, poly Height of bars indicates selected Mono/Poly Mode setting for each Part. (A single bar indicates “mono” setting, while full height indicates “poly”.) This determines whether the Part’s Voice is played monophonically (only one note at a time) or polyphonically (up to 64 notes at a time). -
Page 107: Note Limit Parameters
Multi Edit Mode Note Limit Parameters The Note Limit Low and High parameters allow you to set the range of notes for a Part’s Voice. Notes outside the range will not be played. HINT Note Limit can be used to set up keyboard splits. -
Page 108: Velocity Sensitivity Offset
Velocity Sensitivity Offset (VelSensOfs) Range: 000 — 127 This determines the volume range over which velocity affects. For lower values, the velocity affects a volume range from minimum to medium-loud. For higher values, velocity affects a range from me- dium-soft to maximum. Velocity NOTE Depending on the Voice used, if Velocity Sen-... - Page 109 Some or all of these may be available on your MIDI instrument, and can be used to control cer- tain functions on the MU100 in real time. Some MIDI instruments allow you to change the con- trol change number for a particular controller: for example, setting the modulation wheel (nor- mally 01) to control Volume (07).
- Page 110 Assignable Controller 1 Amplitude Control (AC1 AmpCtrl) Range: 64 — +63 This determines the degree to which As- signable Controller 1 (AC1) affects the volume (Amplitude) for each Part. For maximum effect, this should be set to one of the extreme values, negative or posi- tive.
-
Page 111: Drum Setup Controls
Multi Edit Mode Drum Setup Controls The Drum Setup controls allow you to make a wide variety of settings for the drum sounds in a Drum Part. These settings include Pitch con- trols, Level, Pan, effect send, filter controls and EG (Envelope Genera- tor), among others. -
Page 112: Pitch Parameters
The Drum Setup parameters are only available when the Part Mode has been set to drumS1 — S4. (See page 108.) Pitch Parameters Pitch Coarse Range: –64 — +63 (XG mode), 000 — 127(TG300B or C/M mode) This determines the coarse pitch setting of the selected drum sound. -
Page 113: Chorus Send (Cho Send)
Multi Edit Mode Chorus Send (Cho Send) Range: 000 — 127 This determines the level of the selected drum sound that is sent to the Chorus ef- fect. A value of 000 results in a completely “dry” drum sound, no matter how much Chorus is applied to the Drum Part. -
Page 114: Eq Parameters
EQ Parameters EQ Low Frequency (Low Freq) Range: 32 Hz — 2.0 kHz This determines the frequency which is boosted or cut (in the Low Gain param- eter below) for the selected drum sound. EQ Low Gain Range: –64 — +63 This determines the level of the selected frequency (in Low Freq above). - Page 115 Multi Edit Mode Note On/Off Parameters Receive Note On (RcvNoteOn) Settings: on, off This determines how the selected drum sound responds to MIDI Note On messages. Normally, this should be set to on so that the corresponding drum sound plays when a MIDI Note On message is received.
- Page 116 Performance Mode In the Performance mode, the MU100 performs as a four-Part tone genera- tor, with all Parts controlled over a single MIDI channel. The Performance mode is so named because it’s ideally suited to live performance situations. It allows you to play four different Voices at the same time from your MIDI keyboard —...
-
Page 117: Performance Mode
Performance Part Control Performance Part Control All Part For basic information on using the All Part controls in the Performance mode, see page System MIDI Channel (Sys CH) Settings: 01 — 16 This determines the MIDI receive chan- nel for all Parts of the Performance. Performance Bank Settings: Pre (Preset), Int (Internal) -
Page 118: Single Part
A1 part: 000 — 003, 018, 019 A2 part: 000 — 003 1 — 4 part: XG Voice banks, MU100 Exclusive Voice banks This determines the bank number of the selected Part’s Voice. (Refer to the SOUND LIST & MIDI DATA booklet.) - Page 119 Performance Part Control Volume Range: 000 — 127 This determines the Volume setting for the selected Part’s Voice. Settings: Rnd (Random), L63 — C — This determines the stereo position of the selected Part’s Voice. A setting of “Rnd” (Random) randomly assigns the Voice to a pan position.
-
Page 120: Performance Edit Mode
Performance Edit Mode The Performance Edit mode features various functions and parameters, grouped in the following sections: Common (related to the Performance as a whole), Part (related to each of the four Parts), and the Copy and Store op- erations. For basic information on using the Performance Edit mode, see page 59. - Page 121 Performance Edit Mode Performance Name Performance Name (Perform Name) This allows you to give a name to your edited Performance. Operation 1 From the Performance Name dis- play, press the ENTER button. Performance name 2 Use the SELECT </> buttons to select the character position (flashing character) in the name and use the VALUE -/+ buttons...
-
Page 122: Pitch Bend
“on,” Parts 3 and 4 are automati- cally set as A/D Parts (A1 and A2). HINT You can use the MU100 strictly as an effect processor for the A/D input (for example, your guitar or microphone) by Soloing the appro- priate A/D Part (A1 or A2). - Page 123 Performance Edit Mode Part Path: [EDIT] button PART ————————————————————————— FILTER EG (Envelope Generator) EQ (Equalizer) Vibrato Others The Part menu contains the Filter, EG, EQ, Vibrato, and Others param- eters for the Performance. “ PART” LPF Cutoff Frequency LPF Resonance HPF Cutoff Frequency Level/Filter EG Parameters EG Attack Time...
-
Page 124: Part
Filter Path:[EDIT] button The Filter section of Performance Edit parameters are the same as the corresponding parameters in the Multi Edit mode. (See page 100.) Path:[EDIT] The EG section of Performance Edit parameters are the same as the cor- responding parameters in the Multi Edit mode. (See page 102.) Path:[EDIT] The EQ Performance Edit parameters are the same as the corresponding parameters in the Multi Edit mode (See page 105). - Page 125 Performance Edit Mode Detune Detune Same as the corresponding parameter in the Multi Edit mode. (See page 108.) Assignment Mono/Poly Mode Same as the corresponding parameter in the Multi Edit mode. (See page 109.) Note Limit Parameters Note Limit Low (NoteLimitL) Same as the corresponding parameter in the Multi Edit mode.
-
Page 126: Copy And Store Operations
Copy and Store Operations The Copy and Store operations allow you to save and organize the Perfor- mances you’ve created. Copy The Copy operation allows you to copy the settings of one Performance program (Preset or Internal) to another Performance number (Internal only). -
Page 127: Store
3 Press the ENTER button to actually execute the Copy operation. An “Executing…” message flashes in the display during the operation. When the data has been copied, the MU100 returns to the Performance Edit menu. To cancel the operation without copying, press the EXIT button (before pressing ENTER). - Page 128 3 Press the ENTER button to actually execute the Store operation. An “Executing...” message flashes in the display during the operation. When the data has been stored, the MU100 returns to the Performance Edit menu. To cancel the operation without saving, press the EXIT button (before pressing ENTER).
-
Page 129: Recall Function
Performance. For example, if you are editing a Performance and inadvertently select a different Performance, the edited Performance would normally be lost. By using Recall before turning off the MU100 or editing another Performance, you can recover the previously edited Performance data. - Page 130 Effect Edit Mode The MU100 features a built-in multi-effect processor with 7 independent digital effects: Reverb, Chorus, Variation, Insertion 1/2, Part EQ and Multi EQ. These are controlled in the Effect Edit mode. In this section, only the effect Types and the global parameters common to all Types are covered.
-
Page 131: Effect Edit Mode
Reverb (REV) Reverb (REV) Reverb recreates the sounds of various performance environments by add- ing an ambient wash of delays or reflections. Several different types of Re- verb effects are available to simulate the ambience of different sized rooms. Explanations of the Reverb Type and Reverb Pan parameters are given below. -
Page 132: Chorus (Cho)
Chorus (CHO) The Chorus section uses pitch modulation to create a variety of rich, spa- cious-sounding effects, including Chorus, Flanger, Symphonic and Phaser. Explanations of the Chorus Type and Chorus Pan parameters are given below. For descriptions and explanations for all other Chorus parameters, refer to the separate SOUND LIST &... -
Page 133: Variation (Var)
The Variation section provides a wealth of additional effects for processing the Voices of the MU100. It features some of the same effects found in the Reverb, Chorus and Insertion sections. This is not mere redundancy; it allows you to use two types of Reverb, Chorus or other effects on different Voices. - Page 134 INS (Insertion), SYS (System) Determines how the Variation effect is connected in the effect chain of the MU100. When set to SYS (System), Variation is applied to all Parts, accord- ing to the amount of Variation Send set for each Part. When set to INS (Insertion),...
-
Page 135: Insertion 1, 2 (Ins 1, 2)
Insertion 1, 2 (INS 1, 2) Insertion 1, 2 (INS 1, 2) The Insertion 1 and 2 effects provide additional effects for processing indi- vidual Parts. Explanations of the Type, Dry/Wet Balance and Part parameters are given below. For descriptions and explanations for all other parameters, refer to the separate SOUND LIST &... -
Page 136: About The Effect Connections - System And Insertion
About the Effect Connections The multi-effects of the MU100 provide not only a wide range of sound processing controls, but also a flexible system for connecting them. Unlike simple effect routing schemes on conventional sound modules that process all voices with the same effects, the MU100 allows you to put independent, special effects on one or two Parts, as well as use overall effects for process- ing all 34 Parts together. - Page 137 About the Effect Connections — System and Insertion When Variation is set to System: Effect Edit Mode...
- Page 138 About the Effect Connections — System and Insertion When Variation is set to Insertion: Effect Edit Mode...
-
Page 139: Equalizer (Multi Eq) Edit
Equalizer (Multi EQ) Edit The Equalizer (Multi EQ) Edit parameters allow you to adjust the over- all tone of the MU100 sound in five separate frequency bands. EQ presets are also provided for instantly calling up tone settings spe- cially suited for different types of music. -
Page 140: Utility Mode
Utility Mode The Utility mode lets you set functions related to the overall operation of the MU100, such as Master Tune, display contrast and playing of the Demo Song. Included also are utility operations, such as various kinds of data transfer with an external data storage device, and initializing of the MU100 settings. -
Page 141: System Functions (System)
System Functions (SYSTEM) System Functions (SYSTEM) The System functions provide various controls of the overall operation of the MU100, such as Master Tune, Mute and A/D Part Lock, some MIDI receive filters and a display Contrast control. Master Tune (M.Tune) Range: –102.4 —... - Page 142 This determines whether Bank Select messages are received or not. Bank Se- lect messages can be sent from another MIDI device to change the banks of Voices on the MU100. (See page 47.) The On setting allows Bank Select messages to be received. Contrast Range: 1 —...
- Page 143 MIDI OUT terminal. This allows you to connect another multi-timbral tone generator to the MU100 and play back data over 48 independent MIDI channels — 32 on the MU100 and another 16 on the connected tone generator. NOTE The MU100 can receive Cable messages (F5) when the TO HOST terminal is connected to the serial terminal of a computer.
- Page 144 MU basic, MU100Native This determines the Voice configuration or assignment of the XG Voice set of the MU100. This parameter should be set to match particular types of song data. For playback of data recorded on or intended for the MU90/90R, MU80, and MU50, set this to “MU basic.”...
-
Page 145: Dump Out Functions (Dumpout)
Dump Out Functions (DUMPOUT) Dump Out Functions (DUMPOUT) The Dump Out functions allow you to save the various settings of the MU100 (such as settings for Parts, Performances, system, etc.) to a MIDI sequencer, computer or a MIDI data recorder (such as the Yamaha MDF3 MIDI Data Filer). - Page 146 3 From the Dump Out menu, select the type of data to be sent: All, Multi or Performance. Then, press the ENTER button to call up the selected data dump. This transmits all MU100 data (including Part, Performance, system, and all parameter values) to the connected device. Utility Mode...
- Page 147 Dump Out menu. NOTE If you have more than one MU100 connected in your MIDI system and wish to send differ- ent sets of data to each, you can specify a different Device Number for each. (See page 98.) You should set the Device Number on each MU100 you use, before dumping the data to a data storage device.
- Page 148 Dump Out Functions (DUMPOUT) To reload the data from the data recorder back to the MU100: Make sure that the devices are properly connected (see the Restoring Data illustrations on page 34), and execute the appropriate data trans- fer operation from the data recorder. (Refer to the owner’s manual of that device for instructions.) The MU100 automatically receives in-...
-
Page 149: Initialize Functions (Initial)
Initialize Functions (INITIAL) Initialize Functions (INITIAL) The Initialize functions allow you to restore the factory settings of the MU100. NOTE Since the Initialize functions replace existing data, you should save any and all important settings to a MIDI data storage device before using these functions. - Page 150 Initialize Functions (INITIAL) Factory Settings (FactSet) This restores the original factory settings of the MU100. Selected Sound Module Mode: Extended General MIDI (XGInit) General MIDI (GM Init) Computer Music (C/MInit) Utility Mode...
- Page 151 • For the PFMInit setting, only the currently selected Performance will be initialized. • For XGInit and GM Init, the initialized settings are the same as when the MU100 is reset upon receiving an XG System On or GM System On message.
-
Page 152: Demo Song Play (Demo)
Demo Song Play (DEMO) The Demo Song function in the Utility menu allows you to play the built-in Demo Song. Operation 1 Press the UTIL button and select “DEMO,” then press the ENTER button. 2 Press the ENTER button to start the Demo Song. The Demo Song starts playing immediately and repeats indefinitely until stopped (in step 4 below). -
Page 153: Sound Module Mode (Mode)
EDIT, UTIL, EFFECT or EQ) to use the MU100 in the current mode. NOTES • When the MU100 is not set to the XG mode and an XG System On message is received, the MU100 changes to the XG mode after a slight pause of 0.5 seconds. -
Page 154: Miscellaneous Functions
Miscellaneous Functions Show Control Change This function allows you to view the currently used control change number, its type and its value (in decimal format). It also lets you transmit the dis- played value with a single button press. Operation 1 From the Multi Play mode or Performance Play mode, double- click the ENTER button (press it twice quickly). -
Page 155: Miscellaneous Functions
128-number limit of MIDI's hexadecimal system. For example, the XG Voices are contained on banks 000 - 127; these banks are selected over MIDI with the MSB value of 000. MU100 Exclusive Voice banks are at MSB 048. Miscellaneous Functions... -
Page 156: Show Exclusive
Show Exclusive This function allows you to view the current system exclusive message (in hexadecimal format). It also lets you transmit the displayed value with a single button press. Operation 1 Double-click the ENTER button (press it twice quickly). (The Show Exclusive display appears.) 2 To transmit the currently displayed message, press the ENTER button again. - Page 157 Miscellaneous Functions...
-
Page 158: Appendix
PPENDIX... -
Page 159: Installing The Optional Xg Plug-In System
XG Plug-in Boards. The number of connectors available will be different according to the type of XG Plug-in System-compatible equipment that you have. The MU100 is equipped with one plug-in connector. Make sure that your XG tone generator or synthe- sizer is XG Plug-in System-compliant. -
Page 160: Xg Plug-In System Integration
MU100. Since the digital signal of the plug-in board is sent in the same way as a Part from the MU100, the entire range of the main unit’s features including system effects, insertion effects, system EQ, etc. -
Page 161: Introducing The Xgworks Plug-In System
XGworks/XGworks lite software applications. XGworks/ XGworks lite gives you the power to easily create music that you may never have dreamed possible. The CD-ROM that comes with the MU100 contains several different XGworks plug-ins. VL Visual Editor This application allows you to create, edit and save voices generated on PLG100-VL. -
Page 162: Installation
MU100 as backup data to the plug-in board. It takes some time for the main unit to backup data when some of the external MIDI parameters are changed via the main unit’s control panel. -
Page 163: Installing A Plug-In Board Into The Mu100
Installing a Plug-in Board into the MU100 Warning Installation and removal of a plug-in board into the MU100 initializes some of the setup and multi-part settings of the main unit. Be sure to save any of your important settings onto a personal computer or MIDI Data Filer MDF3 before installing or removing a plug-in board. - Page 164 Do not touch any of the patterned surfaces of the board or its connector. 5 Insert the expansion connector of the MU100 into the connec- tor of the XG Plug-in Board.
- Page 165 XG Plug-in Board 7 Secure the installation lid back onto the MU100 using the same four (4) silver screws that were removed in Step 2. Secure the screws in the order shown in the illustration.
-
Page 166: Troubleshooting
MIDI IN of the MU100, and that the MIDI IN of the external device is connected to the MIDI OUT of the MU100. (See pages 33 – 35.) Or, if you are using the TO HOST terminal with a computer, make sure that the terminal is properly connected to the computer and that the HOST SELECT switch is properly set for your particular com- puter. -
Page 167: Error Messages
A data error resulted during reception of MIDI messages. Try transmitting the data again, or turn the MU100 off and back on again. MIDI Buffer Full! Too much MIDI data is being received by the MU100 at one time. Reduce the amount of data being sent to the MU100. No Parameter The selected parameter for use with the Show Exclusive function does not exist as a valid parameter. - Page 168 Error Messages Select drumS1 This message appears when editing a drum voice if the Part mode is set to Drum. It appears as a reminder that the Part Mode must be set to drumS1-4 before the drum voice can be edited. SysEx Adrs ERROR! The data of the received System Exclusive message is incorrect.
-
Page 169: Specifications
Specifications Tone Generation Method AWM2 (Advanced Wave Memory 2) Maximum Simultaneous Polyphony 64-note Sound Module Modes XG, TG300B, C/M, and Performance Multi-timbral Capacity 32-Part (on 32 MIDI channels; with element reserve priority for later notes and dynamic Voice allocation) Internal Voice/Program Structure Normal Programs Total Voices ... - Page 170 Yamaha PA-5B AC Adaptor (included) Dimensions (W 210 44 mm (8-11/16" 8-1/4" Weight 1.3 kg (2 lbs., 14 oz.) Included Accessories Owner’s Manual, Yamaha PA-5B AC Adaptor, XGtools Setup Guide, CD-ROM “XGtools” 1-3/4") * Specifications subject to change without notice. Appendix...
-
Page 171: Glossary
Glossary A/D input Abbreviation for analog-to-digital. The A/ D inputs of the MU100 allow you to process analog inputs (such as a microphone, electric guitar, CD player, or another electronic instrument) with the digital effects of the MU100 and mix them with the internal Voices. - Page 172 The Pitch Bend Control parameter on the MU100 allows you to set the range over which the pitch can be changed. polyphony The number of notes that can be sounded simultaneously by an electronic instrument.
-
Page 173: Index
MIDI data flow (diagram) ... 91 MIDI data storage device ... 34 MIDI devices, connecting to ... 33 MIDI keyboard, playing the MU100 with ... 33 MIDI keyboard, selecting Voices with ... 47 MIDI, Receive Channel ... 96, 120 MIDI, Receive Port ... 96... - Page 174 LFO Filter Modulation Depth ... 125 Modulation Wheel — LFO Pitch Modulation Depth ... 112, 124 Mono/Poly Mode ... 109, 128 MU100 Exclusive Voice ... 46 Multi Edit mode ... 100 Multi mode ... 85 Multi Mode Equalizer Lock ... 144 Mute ...
- Page 175 Index VL Visual Editor ... 165 Voice Map ... 147 Voices, selecting ... 42 Volume (Multi mode) ... 96 Volume (Performance mode) ... 120, 122 XG mode ... 22, 42 XG Plug-in System ... 163 XGworks ... 165 XGworks lite ... 165 XGworks Plug-in System ...
- Page 176 Memo...
- Page 177 For details of products, please contact your nearest Yamaha or the authorized distributor listed below. Pour plus de détails sur les produits, veuillez-vous adresser à Yamaha ou au distributeur le plus proche de vous figurant dans la liste suivante. NORTH AMERICA CANADA Yamaha Canada Music Ltd.
- Page 178 M.D.G., EMI Division, C Yamaha Corporation 1998, Printed in Japan V319070 810CRIT5.2-01A0...