Table of Contents
Advertisement
Quick Links
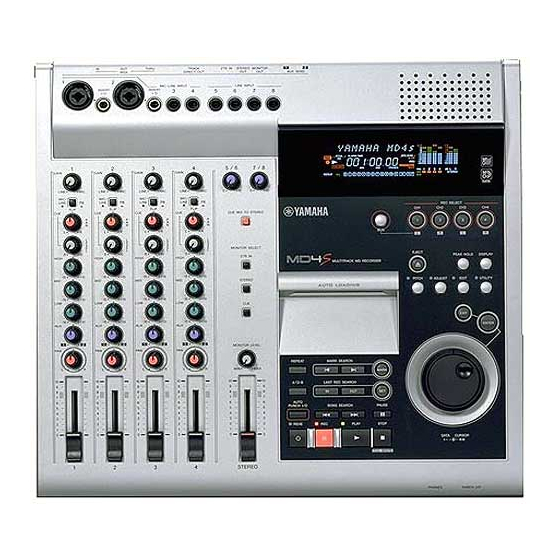
MULTITRACK MD RECORDER
Owner's Manual
1
GAIN
LINE
MIC/
LINE
CUE
L
0
HIGH
–15
MID
–15
LOW
–15
AUX
1
PAN
L
10
9
8
7
6
5
4
3
2
1
0
IN
OUT
THRU
TRACK
MIDI
DIRECT OUT
2
MIC/LINE INPUT
INSERT
INSERT
3
4
5
I/O
I/O
1
2
3
4
GAIN
GAIN
GAIN
MIC
LINE
MIC
LINE
MIC
LINE
MIC
MIC/
MIC/
MIC/
PB
LINE
PB
LINE
PB
LINE
PB
FLIP
FLIP
FLIP
FLIP
CUE
CUE
CUE
P
P
P
P
A
A
A
A
N
N
N
N
R
L
R
L
R
L
R
L
L
L
L
E
E
E
E
V
V
V
V
E
E
E
E
L
L
L
L
10
0
10
0
10
0
10
HIGH
HIGH
HIGH
+15
–15
+15
–15
+15
–15
+15
MID
MID
MID
+15
–15
+15
–15
+15
–15
+15
LOW
LOW
LOW
+15
–15
+15
–15
+15
–15
+15
AUX
AUX
AUX
2
1
2
1
2
1
2
PAN
PAN
PAN
R
L
R
L
R
L
R
10
10
10
9
9
9
8
8
8
7
7
7
6
6
6
5
5
5
4
4
4
3
3
3
2
2
2
1
1
1
0
0
0
1
2
3
4
2TR IN
STEREO
MONITOR
1
2
OUT
OUT
AUX SEND
LINE INPUT
6
7
8
5 / 6
7 / 8
0
10
0
10
CUE MIX TO STEREO
MONITOR SELECT
2TR IN
MULTITRACK MD RECORDER
STEREO
CUE
MONITOR LEVEL
REPEAT
MARK SEARCH
MIN
MAX
10
10
A
B
LAST REC SEARCH
9
9
8
8
IN
OUT
7
7
6
6
AUTO
PUNCH I/O
5
5
SONG SEARCH
4
4
3
3
2
2
REHE
REC
PLAY
1
1
0
0
STEREO
REC SELECT
CH1
CH2
CH3
CH4
1
2
3
4
BUS
L
R
L
R
EJECT
PEAK HOLD
DISPLAY
PITCH
ADJUST
EDIT
UTILITY
EXIT
ENTER
MARK
SET
PAUSE
STOP
DATA
CURSOR
TOC WRITE
PHONES
PUNCH I/O
E
Advertisement
Table of Contents

Related Manuals for Yamaha MD4S


Summary of Contents for Yamaha MD4S
- Page 1 MULTITRACK MD RECORDER Owner’s Manual MIDI INSERT GAIN GAIN LINE LINE MIC/ MIC/ LINE LINE FLIP FLIP HIGH HIGH –15 –15 –15 –15 –15 –15 THRU TRACK 2TR IN STEREO MONITOR DIRECT OUT AUX SEND MIC/LINE INPUT LINE INPUT INSERT 5 / 6 7 / 8 GAIN...
- Page 2 If you can not locate the appropriate retailer, please contact Yamaha Corporation of America, Electronic Service Division, 6600 Orangethorpe Ave, Buena Park, CA 90620 The above statements apply ONLY to those products distributed by Yamaha Corporation of America or its subsidiaries. IMPORTANT Please record the serial number of this unit in the space below.
-
Page 3: Safety Instructions
CAUTION RISK OF ELECTRIC SHOCK DO NOT OPEN CAUTION: TO REDUCE THE RISK OF ELECTRIC SHOCK, DO NOT REMOVE COVER (OR BACK). NO USER-SERVICEABLE PARTS INSIDE. REFER SERVICING TO QUALIFIED SERVICE PERSONNEL. The above warning is located on the bottom or rear of the unit Read Instructions —... - Page 4 Important Important Read the Following Before Operating the MD4S Warnings • Do not place a container with liquid or small metal objects on top of this unit. Liquid or metal objects inside this unit are a fire and electrical shock hazard.
- Page 5 • This unit must not be operated in a tilted position. Doing so can cause malfunctions. Copyright © 1998 Yamaha Corporation. All rights reserved. No part of the MD4S software or this Owner’s Manual may be reproduced or distributed in any form or by any means without the prior written authorization of Yamaha Corporation. Trademarks: MD DATA and MiniDisc are trademarks of Sony Corporation.
-
Page 6: Table Of Contents
Contents Contents Welcome to the MD4S ... 9 MD4S Features ...9 Mixer... 9 Recorder ... 9 Buying discs for the MD4S...10 MD DATA and MiniDisc ... 10 MD4S TOC ...11 To update the TOC ... 11 Recording modes and recording times...11 MD4S songs and blank areas ...12... - Page 7 Adjusting the display brightness ...88 Selecting the type of Frame display...88 Using a Foot switch ...89 MIDI functions ...90 Synchronizing the MD4S with a MIDI sequencer ...90 About MTC and MIDI Clock ...91 Synchronization using MTC...91 Synchronization using MIDI Clock...92 Synchronizing two MD4S recorders...94...
- Page 8 Contents Appendix ... 100 Q&A Section ...100 Troubleshooting ...101 Display Messages ... 103 Modes of the MD4S transport ...104 Specifications ...105 Recorder ... 105 Mixer... 105 General... 106 Dimensions... 106 Block Diagram ...107 Glossary...108 Tempo Map Chart...111 MIDI Implementation Chart ... 112 Index...
-
Page 9: Welcome To The Md4S
Welcome to the MD4S MD4S Features Mixer The mixer section is an analog mixer with four MIC/LINE and four LINE inputs. • Continuously variable GAIN controls are provided on input channels 1–4, accepting signals ranging from mic input to line level. -
Page 10: Buying Discs For The Md4S
MIDI sequencer or other external device. Buying discs for the MD4S The MD4S can use two types of disc: MD DATA and MiniDisc. MD DATA discs can be used for 4-track recording/playback, and MiniDiscs can be used for recording/playback of up to two tracks. -
Page 11: Md4S Toc
When you record a new song or edit the song title, the TOC EDIT indicator of the MD4S will light to indicate that the TOC needs to be updated. -
Page 12: Md4S Songs And Blank Areas
Welcome to the MD4S MD4S songs and blank areas On the MD4S, recordings are made in units called “songs.” Each song is assigned a number indicating the order in which it was recorded. For example if you have recorded two songs on a disc, song 2 will be recorded immediately after song 1, as shown in the following diagram. -
Page 13: Front And Rear Panel
Front and rear panel This section explains the names and functions of each part of the MD4S. Mono Inputs GAIN control GAIN This adjusts the input sensitivity of the MIC/LINE input jack (jacks panel). Input channels 1–4 can accommodate signals of any level from mic input to the LINE line level signals produced by devices such as synthesizers. -
Page 14: Cue Pan/Cue Level Controls
Welcome to the MD4S CUE PAN/CUE LEVEL controls These two controls adjust the pan and signal level of the signal that is sent to the CUE bus. The signal that is sent to the CUE bus will depend on the setting of the FLIP switch EQ controls These controls are used to adjust the high, middle, and low frequency bands. -
Page 15: Stereo Inputs
Stereo Inputs Level (5/6), (7/8) controls These controls adjust the level of the signals input from STEREO INPUT jacks 5/6 or 7/8. These input signals are always sent to the ST bus, and are mixed with the signals from input channels 1–4 and the playback signals of the tracks. -
Page 16: Disc Transport Section
Welcome to the MD4S Disc transport section * Please remove the protective film from the panel. Disc transport buttons button ... This button is used to rehearse punch-in/out. During rehearsal the REHE REHE button ... This button is used to record. When you press the REC button during button ...This button is used to begin normal playback, recording, and rehearsal. -
Page 17: Auto Punch I/O Button
1 and 3, and the R channel of the ST bus signal will be sent to tracks 2 and 4. EJECT button This button ejects the disc from the MD4S. If you press the EJECT button while the TOC EDIT indicator (display ) is lit, the TOC will be updated before the disc is ejected. -
Page 18: Function Buttons
Use this button to set functions. DATA dial (DATA+ –) When the MD4S is stopped or paused, rotating the DATA dial will move through the song in frame steps. When editing various functions (when one of the function buttons has been pressed), the DATA dial is used to modify parameter values. -
Page 19: Display
This indicator will light when the TOC (table of contents) needs to be updated, such as after a new recording or edit. If the power of the MD4S is turned off while the TOC EDIT indicator is lit, the recorded or edited content may be lost. When you update the TOC, the indicator will go dark. - Page 20 MD4S will transmit MIDI Clock and will function as the master of a synchronized MIDI system. In this case, the MD4S can be controlled from an external device such as a MIDI sequencer. the signal from the input channel is recorded directly).
-
Page 21: Marker Indicators
Auto punch indicator This indicator shows the status of the auto punch-in/out function..This will light when you select Single Take Auto Punch-in/out AUTO PUNCH SINGLE (in which auto punch-in/out will occur only once)..This will light when you select Multi Take Auto Punch-in/out (in AUTO PUNCH MULTI which you can perform auto punch-in/out repeatedly, and then select the best take). -
Page 22: Top Panel Connectors
Welcome to the MD4S Top panel connectors MIC/LINE INPUT 1,2 jacks Balanced dynamic mics or line-level devices with balanced output can be connected to these inputs. Unbalanced outputs such as on synthesizers can also be connected here. These jacks will accommodate either XLR plugs or TRS phone plugs. -
Page 23: Rear Panel
These are RCA phono jacks which individually output the signals from tracks 1–4 (the signals currently being recorded/played). Normally they are used to connect the MD4S to the input jacks of a large mixer when you wish to use an external mixer to mix the playback of the MD4S recorder tracks. -
Page 24: Front Panel
(See “Using a Foot switch” on page 89 for more information.) —Owner’s Manual connector. This is used when synchronizing the MD4S with a MIDI sequencer or rhythm machine. connector. This is used when controlling the transport of the MD4S from an external MIDI sequencer. -
Page 25: Basic Operation
This chapter explains the process of recording instruments separately on each of the four tracks, and finally mixing down to a master recorder. Before you begin Example connections Guitar Synthesizer Guitar effects processor YAMAHA Microphone THRU TRACK MIDI DIRECT OUT MIC/LINE INPUT INSERT... -
Page 26: Turning On The Md4S
Recording the first track (Direct Recording) On the MD4S, the signals that are input to the MIC/LINE INPUT jacks 1–4 can be recorded directly to tracks 1–4 (direct recording). Since you simply need to connect the audio source to MIC/ LINE INPUT jack 1 if you wish to record on track 1, or to MIC/LINE INPUT jack 3 if you wish to record on track 3, this method is convenient when you will be recording each part separately. -
Page 27: Find A Blank Area
If there is more than one blank area, the time available for consecutive recording may differ depending on the size of the blank area. (See “MD4S songs and blank areas” on page 12 for more information.) Tip: If you press the DISPLAY button to set the... -
Page 28: Start Recording
Basic operation Monitor the signal being recorded on the track Press the MONITOR SELECT CUE switch to turn it on. The MONITOR SELECT switches choose the sig- nal source that will be monitored. When the CUE switch is on, the signal from the CUE bus will be sent to the PHONES jack and the MONITOR OUT jacks, allowing you to monitor the sound through headphones or monitor speakers. - Page 29 Listening to the first track Press the LAST REC SEARCH [IN] button. This will locate to the point at which the previous recording was begun. (For details on the LAST REC SEARCH buttons, refer to page 17.) If this was the first recording, you will always return to the “00:00.00”...
-
Page 30: Overdubbing
Basic operation Overdubbing Now that you have finished recording track 1, let’s record additional audio sources on other tracks while listening to the playback of this track. The basic procedure is the same as in “Recording the first track.” INSERT GAIN GAIN LINE... - Page 31 Simultaneously monitoring the recording source and the track playback While playing the audio source that you wish to record, raise the CUE LEVEL control of input channel 2. Use the CUE LEVEL control of input channel 2 to adjust the monitor level of the signal that will be recorded on track 2.
-
Page 32: Mixdown
Connect the output jacks of your master recorder to the 2TR IN jacks of the MD4S. Adjust the mix balance of each track Set the FLIP switches of input channels 1–4 to the “PB (... - Page 33 When the mix balance is complete, you can record the result to your master recorder. Put your master recorder in record mode, and playback the MD4S song from the beginning. When the mixdown is finished, stop the MD4S and the master recorder.
-
Page 34: After Completing The Basic Operation Section
The following page, “Advanced techniques on the MD4S,” introduces the wide variety of functionality provided by the MD4S. You can look through the list to find a topic in which you are especially interested, and continue reading from the appropriate page. -
Page 35: Advanced Recording Techniques
These functions are actually the core capabilities of the MD4S, and by taking full advantage of them, you will find that the expressive power of the MD4S will take a dramatic leap. Please become familiar with these advanced techniques so that you can enjoy the full potential of the MD4S. -
Page 36: Mixing Multiple Channels As You Record
By combining multiple parts into a pair of tracks, you can record more than four parts on the MD4S. For example if you have recorded drums, bass, and rhythm guitar, you can re-record these three parts in stereo onto two tracks, and then record two other parts on the remaining two tracks. - Page 37 1, and the R channel signal of the ST bus will be assigned to track 2. Press the REC button. The REC indicator will blink, and the MD4S will be in record-pause mode. Set the faders of input channels 1–4 and the STEREO fader to the 7–8 mark.
- Page 38 Advanced recording techniques GAIN GAIN LINE LINE MIC/ MIC/ LINE LINE FLIP FLIP HIGH HIGH –15 –15 –15 –15 –15 –15 —Owner’s Manual GAIN GAIN LINE LINE MIC/ MIC/ LINE LINE CUE bus FLIP FLIP HIGH HIGH –15 –15 –15 –15 –15 –15...
-
Page 39: Ping-Pong Recording
Thus, while a conventional cassette- tape type MTR needs one or two vacant tracks in order to ping-pong, the MD4S allows you to ping-pong even if there are no unused tracks. - Page 40 Advanced recording techniques In the following, we will give an example of mixing previously-recorded tracks 1–4 into a ste- reo pair, and ping-pong recording them to tracks 3 and 4. INSERT GAIN GAIN LINE LINE MIC/ MIC/ LINE LINE FLIP FLIP HIGH HIGH...
- Page 41 When you have finished adjusting the mix balance and recording level, press the SONG SEARCH [ ] button to locate to the begin- ning of the song, and then press the REC but- ton and PLAY button to begin ping-pong recording.
-
Page 42: Adding Sounds During Mixdown
Advanced recording techniques Adding sounds during mixdown The mixer section of the MD4S features an “in-line” design that can simultaneously handle both the input signal from the MIC/LINE INPUT jack and the playback sound from the disk. For example, this allows you to add external input signals during mixdown. This is conve- nient, for example, when you wish to layer some sound effects onto the introduction of a song that you completed on the MD4S. - Page 43 After you have adjusted the input signal levels from MIC/LINE INPUT jacks 1 and 2, start recording on your master recorder, and play- back the MD4S from the beginning of the song. When recording is completed, playback the master recorder to hear the recorded result.
-
Page 44: Applying Effects
SEND jack. Using the INSERT I/O jacks Input channels 1 and 2 of the MD4S provide INSERT I/O jacks for inserting external effect processors. By using these jacks, you can apply an effect only to a specific channel/track as you record a track or while you mixdown. - Page 45 HIGH –15 –15 INSERT –15 Signal flow through the INSERT I/O jack and the insertion cable In order to use the INSERT I/O jack to apply an external effect, you will a special insertion cable as shown in the above diagram. Use the insertion cable to connect the external effect processor as shown in the following diagram.
-
Page 46: Using The Aux Send Jacks
Advanced recording techniques Using the AUX SEND jacks When the AUX SEND jacks of the MD4S are used, a single external effect processor can be used simultaneously by two or more input channels. For example when you are re-recording several channels to two tracks or when mixing down, you can use this method to apply an effect such as delay or reverb while adjusting the depth of the effect independently for each channel (track). -
Page 47: Applying Effects During Mixdown
Applying effects during mixdown Applying an effect such as reverb to each track during a mixdown is an example of a situation in which you would connect the external effect processor to the AUX SEND jack. In this case, you can use the AUX control of each input channel to adjust the effect depth for each track. INSERT GAIN GAIN... -
Page 48: Applying An Effect During Ping-Pong Recording
Advanced recording techniques Applying an effect during ping-pong recording By using the AUX SEND jacks you can apply spatial-type effects such as reverb or chorus dur- ing ping-pong recording as well. This technique is particularly useful when you wish to ping- pong in stereo down to two tracks. - Page 49 On the input channels to which you wish to apply the effect, rotate the AUX control toward the “1” position. The signals from the input channels will be mixed in monaural according to the position of each AUX control, and will be sent via the AUX SEND 1 jack to the external effect processor.
-
Page 50: Applying An Effect Only To The Monitor Signal
Advanced recording techniques Applying an effect only to the monitor signal By making skillful use of direct recording and the MONITOR SELECT switches, you can apply effects only to the monitor signal so that tracks are recorded without effects. For exam- ple when recording vocals, you can let the vocalist monitor their voice with reverb, but record the vocal on the track without effects. - Page 51 GAIN GAIN GAIN GAIN LINE LINE LINE LINE MIC/ MIC/ MIC/ MIC/ LINE LINE LINE LINE FLIP FLIP FLIP FLIP HIGH HIGH HIGH HIGH –15 –15 –15 –15 –15 –15 –15 –15 –15 –15 –15 –15 Signal flow when applying an effect only to the monitor signal MONITOR CUE Bus ST Bus...
-
Page 52: Punch-In/Out
Wrong notes Manual punch-in/out Here’s how to use the MD4S’s REC button and REC SELECT buttons (or an optional FC5 foot switch) to perform manual punch-in/out. Punch-in/out using the REC button 1. Connect the audio source to the MD4S. - Page 53 7. When you have finished adjusting the recording level, press the STOP button to temporarily cancel record-pause mode. 8. Press the PLAY button to begin playback. 9. At the location where you wish to punch-in, press the REC button. The REC indicator will light, and from this point recording will begin for the track that was selected by the REC SELECT buttons.
- Page 54 If you connect a separately sold FC5 foot switch to the PUNCH I/O jack located on the front panel of the MD4S, you can punch-in/out using the foot switch. This method is convenient when the same person is both playing an instrument and operating the MD4S to punch-in/ out.
-
Page 55: Auto Punch-In/Out
“Post-roll time” is the length of playback that will occur immediately after the punch- out point. On the MD4S, the pre-roll and post-roll times are each set to 5 seconds, but you can modify this if desired. The location at which the pre-roll starts is called the “pre-roll point,”... - Page 56 Here we will explain the procedure for single- take auto punch-in/out. 1. Connect the audio source to the MD4S, and press the REC SELECT button (or the BUS button + REC SELECT button) to select the track that you wish to record.
- Page 57 Actually performing the auto punch-in/out (single-take) 6. When stopped or paused, press the REC button. The REC indicator will blink, the display will indicate “A.Pnch,” and the MD4S will be in auto punch-in/out record-pause mode. 7. Press the PLAY button to begin the actual auto punch-in/out.
- Page 58 99 takes, as long as blank area remains. 1. Connect an audio source to the MD4S, and press a REC SELECT button (or the BUS button + REC SELECT button) to select the track that you wish to record.
- Page 59 13. Rotate the DATA dial to select the take that you wish to hear, and press the ENTER button to playback the selected take. When you reach the post-roll point (or press the STOP button), the MD4S will stop, and you will again be able to select a take.
- Page 60 Advanced recording techniques 16. Rotate the CURSOR shuttle toward the right to make the display read “TAKE X:FIX.” 17. Press the ENTER button. The display will ask “FIX TAKE X?” If at this time you press the EXIT button, you will again return to the step of selecting a take.
-
Page 61: Quick Search Functions
If you press the SONG SEARCH [ locate to the beginning of the song and then pause. If you press the SONG SEARCH [ button while a song is playing, the MD4S will locate to the beginning of the song and then immediately begin playback. -
Page 62: Locating To The Last Record In/Out Point
Note: The last record in/out points will be lost when the MD4S is turned off. Searching for Markers The MD4S lets you place up to ten markers in each song. You can use the MARK SEARCH ] button to locate immediately to markers that you inserted. Markers are especially convenient when you need to repeatedly jump to specific points in a song. -
Page 63: Adjusting The Location Of A Marker Or Auto Punch-In/Out Point
2. Press the TOC WRITE button to update the TOC. Note: If you turn off the power of the MD4S without updating the TOC, the marker settings will be lost. Locating to a marker 3. Use the MARK SEARCH[ The MARK SEARCH [... - Page 64 6. When you have finished making adjustments, press the ENTER button. The new location will be finalized, and the MD4S will locate to that spot. The display will return to the state in which it was before you press the ADJUST button in step 2.
-
Page 65: Erasing A Marker Or Auto Punch-In/Out Point
Here’s how to erase a marker location or auto punch-in/out point that you have set. This pro- cedure can be performed when the MD4S is either stopped or in playback-pause mode. 1. Press a MARK SEARCH or LAST REC SEARCH button to locate to the marker or the auto punch-in/out point that you wish to erase. -
Page 66: Various Playback Functions
Advanced recording techniques Various playback functions This section explains the various playback functions offered by the MD4S. Play forward/backward at various speeds (Cue/Review) During playback, you can operate the CURSOR shuttle to play forward (cue) or backward (review) at various speeds. This is a convenient way to find the desired location within a song. -
Page 67: Playback At Half Speed (X1/2 Play)
MD4S is playing, stopped, or paused. Note, however, that the One Song Repeat/All Songs Repeat functions are disabled for MIDI sync operation. In this case, you can use the One Song Repeat function only on the MD4S that has been assigned as the MTC master. -
Page 68: Repeating A Specific Portion Of A Song (A-B Repeat)
B to playback repeatedly. The A and B points can be in different songs if desired. The A and B points can be set while the MD4S is playing, stopped, or in playback-pause mode. 1. At the beginning of the desired repeat, press the A The Repeat indicator in the display will indicate “REPEAT A,”... - Page 69 7. Press the ENTER button once again. The display will indicate the first step (A), and the MD4S will be in Cue List playback-pause mode. (During cue list playback, the steps will be shown as uppercase letters A–Z.) At this time you can rotate the DATA dial to change the step at which cue list playback will begin.
- Page 70 Advanced recording techniques Note: In rare circumstances, playback may skip between steps of Cue List playback. Note: Cue List program contents are remembered even when the MD4S is turned off. Creating a new song from a Cue List (Cue List Copy) The playback order that you have programmed in a cue list can be rewritten into a new song.
-
Page 71: Programming The Song Playback Order (Program Play)
Programming the song playback order (Program Play) Program Play is a function that lets you program the playback order of the songs on disc. You can specify up to 36 steps of song numbers for playback. 1. Press the UTILITY button. 2. - Page 72 6. After you have entered all of the desired steps, press the ENTER button. The display will show the first step (S1), and the MD4S will be in Program Play playback- pause mode. (In Program Play, the S for “Step” will be show as an uppercase character.) At this time, you can use the SONG SEARCH buttons to change the step at which Program Play will begin.
-
Page 73: Editing Functions
Editing functions This sections explains the track and song editing functions that are provided on the MD4S. Copying a portion of a track (Part Copy) Part Copy is a function that copies a portion of a track to a different location within the same track or to the desired location in another track. -
Page 74: Erasing A Section Of A Track (Part Erase)
(DIR) for the copy destination track will light. If you press the STOP button at this time, the copy can be interrupted. When the copy is completed, the MD4S will stop. Note: When you execute the copy operation, the content that had been recorded on the copy destination track will be erased. -
Page 75: Copying An Entire Track To Another Track (Track Copy)
STOP button at this time. When the track copy has been completed, the MD4S will stop. Note: When you execute the copy operation, any content that had been recorded on the copy destination track will be erased. -
Page 76: Erasing An Entire Track (Track Erase)
Advanced recording techniques Erasing an entire track (Track Erase) Track Erase is a function that erases an entire track. You can select one or more tracks to erase. The erased track(s) will contain only silence. 1. Press the EDIT button, and rotate the DATA dial to make the display read “Track Erase.”... - Page 77 3. Press the ENTER button once again. The display will indicate the recording mode and track order of the copy source song. If you wish to create a complete duplicate of the song without changing the recording mode or track order, proceed to step 7. Changing the record mode 4.
-
Page 78: Erasing A Song (Song Erase)
The display will indicate “CopyTo X” (X is the song number of the copy destination) for a time, and when the copy is completed, the TOC will be updated automatically and the MD4S will select the copy destination song and then stop. -
Page 79: Splitting A Song Into Two (Song Divide)
4. Press the ENTER button once again to execute the Song Erase operation. The display will indicate “Erase EXE..”, and the TOC will be updated automatically when the song has been erased. Tip: If there are three consecutive songs as shown in the following diagram, erasing the middle song will create a new blank area that is independent of the other blank area. -
Page 80: Joining Divided Songs Together (Song Combine)
Advanced recording techniques Song 1 before division Song 1 after division Song 2 Note: When a song is divided, the song numbers of all subsequent songs will be updated. For example if you divide song 1, the first part of the divided song will be Song 1, the remainder will be Song 2, and the previous Song 2 will be renumbered as Song 3. -
Page 81: Moving A Song (Song Move)
Song 1 before combining Song 2 before combining Song 1 after combining Point at which songs were joined Note: If the total number of markers in the song (including the marker added at the point where the songs were joined) is eleven or more, it will not be possible to recall the eleventh or subsequent markers. -
Page 82: Exchanging The Order Of Songs (Song Renumber)
Advanced recording techniques 5. Press the ENTER button. The display will ask “Move EXE?” If you decide to cancel the Song Move operation, press the EXIT button. 6. Press the ENTER button once again to execute the Song Move operation. The display will indicate “MoveTo BX”... - Page 83 When the songs have been renumbered, the TOC will automatically be updated. Note: Some MD recorders other than the Yamaha MD4S, MD4 or MD8 divide the song data into multiple areas on the disc. Song Renumber cannot be used on such songs.
-
Page 84: Other Functions
4. When you have finished setting the Pitch function, press the ENTER button to return to normal operation. Note: The amount of pitch change for VARI (variable) is remembered even if the MD4S is turned off. However, the next time that the power is turned on, this function will automatically be set to FIX. -
Page 85: Titling Discs And Songs
3. When you have finished inputting the title, press the EDIT button once again to return to normal operation. 4. Press the TOC WRITE key to update the TOC. Note: When a titled disc is inserted into the MD4S, the title will appear in the display for a time. Titling a song 1. -
Page 86: Erasing A Disc (Disc Erase)
Disc Erase is a function that erases all the songs on a disc. When you execute the Disc Erase function, the entire disc will be a blank area. Before a MD DATA disc that was used to store computer data can be used with the MD4S, you must first execute the Disc Erase operation on that disc. -
Page 87: Changing The Recording Mode
When Disk Information for a disc including such songs is viewed on the MD4S, songs that are divided will be indicated by a “#” character. Songs that are indicated by “#” cannot be directly edited by the MD4S. However if you use the Song Copy function (page 76) to copy that song, the copy destination song can be edited by the MD4S. -
Page 88: Adjusting The Display Brightness
Note: The recording mode setting is not reset when the power is turned off. If a recordable MiniDisc is inserted into the MD4S, it will automatically switch to 2TR mode, meaning that if you later insert an MD DATA disc and wish to perform 4 track recording, you will need to reset the recording mode to 4TR. -
Page 89: Using A Foot Switch
If an optional FC5 foot switch is connected to the PUNCH I/O jack, you can use the foot switch to perform not only punch-in/out but a variety of other transport operations. When the foot switch is pressed, the MD4S will perform the following operations. Flashing... -
Page 90: Midi Functions
The MD4S can be connected to a synchronized MIDI sequencer system in a wide variety of ways, but the most common setup is for acoustic sounds to be recorded on the MD4S, and other parts to be played by the sequencer on a MIDI tone generator. In such a system, you would monitor the sounds of the MIDI tone generator as you recorded vocals and guitar to the MD4S. -
Page 91: About Mtc And Midi Clock
When you create a tempo map on the MD4S, the time display will indicate measures/beats/ clocks just as on a MIDI sequencer. In this case if you start the MD4S song from “measure 10,” the MIDI sequencer will synchronize and start playing from “measure 10.” If you need to syn- chronize the MD4S to a MIDI sequencer or MIDI rhythm machine that does not support MTC, you should use MIDI Clock synchronization. -
Page 92: Synchronization Using Midi Clock
Synchronization using MIDI Clock Transmit MIDI Clock from the MIDI OUT connector of the MD4S Make MIDI Sync settings so that the MIDI OUT connector of the MD4S will transmit MIDI Clock messages. 1. Press the UTILITY button, rotate the DATA dial to make the display read “MIDI Sync,”... - Page 93 When setting Meter (time signature) data When setting Tempo data 4. Rotate the CURSOR shuttle to the right to select the meter/tempo parameter, and rotate the DATA dial to set the meter or tempo. It is not possible to set the measure location of step A. The range of settings is as follows. Meter ...1–99/2, 4, 8, 16 Tempo ...
-
Page 94: Synchronizing Two Md4S Recorders
MD4S will follow the MTC Master and run in synchronization. In this setup, you can connect the STEREO OUT jacks of the MTC Slave MD4S to LINE INPUT jacks 5 and 6 of the MTC Master MD4S so that the signals of the ST bus of both units can be combined by the MTC Master MD4S. - Page 95 • Punch-in/out using a foot switch Synchronized recording on a slave MD4S If you first put the MTC slave MD4S into Record-Pause mode, then you will be able to per- form Record-Start and Pause operations from the MTC master MD4S.
- Page 96 MTC master MD4S. Note: The MTC slave MD4S is able to receive an MTC frame rate of 30 frames/second. If you are using a device other than an MD4S as the MTC master, you must set the frame rate to 30 frames/second.
-
Page 97: Synchronizing To Mtc With A Specified Offset (Time Difference)
Synchronizing to MTC with a specified offset (time difference) When using the MD4S as an MTC slave, you can assign an offset (time difference) that will be applied to the MTC time data received from the external device. Note: The offset setting affects only the MTC slave MD4S. Even if you specify an offset for the MTC master MD4S, it will not affect the MTC that is transmitted from the MTC master. -
Page 98: Controlling The Md4S By Mmc
MMC, an MMC-compatible MIDI sequencer or other device can control the trans- port of the MD4S. In this case, the device that transmits MMC data will be the MMC Master, and the device that receives MMC data will be the MMC Slave. - Page 99 4. Press the UTILITY button or the EXIT button to return to normal operation. If MMC reception was turned on, the MD4S will be the MMC Slave, and can be operated by MMC messages received from the external device. Tip: This setting is remembered even if the power is turned off.
-
Page 100: Appendix
All discs recorded on the Yamaha MD4 can be used by the MD4S. Discs recorded on the Yamaha MD8 can be used by the MD4S if they are converted by the MD8 to 4TR mode. What happens if I insert an MD DATA Disc into a MiniDisc deck? The disc will not be recognized. -
Page 101: Troubleshooting
Up to 254. Do I have to clean the MD4S heads? Troubleshooting If you’re having difficulty operating the MD4S or if it doesn’t seem to work as expected, look up the symptoms in the following table and follow the advice provided. Symptom Make sure the power cord is connected to a suitable AC wall outlet and plugged into the AC IN connector at the rear of the MD4S. - Page 102 If the song was recorded on an MD recorder other than the MD4S or the Yamaha MD8/MD4, it is possible that the song may be copy- protected (by SCMS).
-
Page 103: Display Messages
Song Divide function, or MD4S cannot edit this type of song. Can’t Copy This song cannot be copied because it’s copy protected. The MD4S cannot record over this type of song, so you cannot overwrite this Can’t REC song. The MD4S does not have permission to record in this mode, so you cannot Can’t Rehe... -
Page 104: Modes Of The Md4S Transport
New song recording is paused. The Auto Punch In/Out function has been acti- — — vated and the MD4S is standing by to start the Auto Punch recording sequence. The Auto Punch recording sequence has — started and is currently between the Pre-Roll point and the Punch IN point. -
Page 105: Specifications
Specifications Recorder Sampling Frequency: 44.1 kHz Frequency Response: 20 Hz–20 kHz, +1 dB, –3 dB Digital/Audio THD+N: Less than 0.02% (1 kHz) S/N: 96 dB typ. 4-track independent simultaneous record/play (Recording time: 37 min) Dubbing with 4-track playback Auto & Manual Punch In/Out (11.6 ms accuracy) Rec/Play Four-track (37 min), Stereo (74 min), or Mono (148 min) record/play Repeat play A-B, Single song, All song... -
Page 106: General
Appendix General Power Requirements Power Consumption Dimensions (W x H x D) Weight Operating Conditions Supplied Accessories Optional Accessories Dimensions Specifications subject to change without notice. —Owner’s Manual USA & Canada: 120 V/60 Hz, Others: 230 V/50 Hz 24 W 413 x 109.5 x 388 mm 5.2 kg Temperature: 5˚C–35˚C (41˚F–95˚F), Humidity: 10%–95%... -
Page 107: Block Diagram
Block Diagram * MIC/LINE INPUT jacks 1 and 2 accept either phone or XLR plugs. Only one plug can be inserted in each jack. INSERT I/O 3 Band EQ MIC/ LINE FLIP GAIN INSERT I/O 3 Band EQ MIC/ LINE FLIP GAIN MIC/LINE... -
Page 108: Glossary
Clipping—The unwanted distortion effect of overloading an audio circuit with a signal that is too large. Care must be taken when setting the MD4S GAIN controls so as not to overload the recording circuits. See “Recording the first track (Direct Recording)” on page 26. - Page 109 See “Setting the pre-roll/post-roll times” on page 55 for more information. Post Fader—A point in the signal path after a fader. The signals for the MD4S AUX controls are sourced post-fader. So as well as turn up the AUX control, you must also raise the fader.
- Page 110 Unity Gain—A gain of one. That is, the signal is output from a circuit at the same level at which it entered. Once passed the MIC/LINE amplifier, a unity gain system minimizes signal noise and distortion. The unity gain position for the MD4S faders is at the 7–8 mark. —Owner’s Manual...
-
Page 111: Tempo Map Chart
Tempo Map Chart Meter Step Measure Time Step Measure -Beat Signature Tempo Map Chart Tempo Tempo 001–1 —Owner’s Manual... -
Page 112: Midi Implementation Chart
YAMAHA [Multitrack Recorder] Model: MD4S Function... Basic Default Channel Changed Default Mode Messages Altered Note Number True Voice Note On Velocity Note Off After Keys Touch Ch’s Pitch bend Control Change Prog Change :True# System Exclusive :Song Pos System :Song Sel... -
Page 113: Index
Index Numerics 2TR IN jacks 23 2-track (2TR) 11 4-track (4TR) 11 B button 68 A-B Repeat 68 B repeat button 17 AC IN 23 Adding sounds during mixdown 42 ADJUST button 18 Advanced recording techniques 35 All Song Repeat 67 Applying an effect during ping-pong recording 48 Applying an effect only to the monitor... - Page 114 Index MMC Slave 98 monaural (MONO) 11 Monitor CUE 109 MONITOR LEVEL control 15 MONITOR OUT jacks 23 MONITOR SELECT switches 15 Monitor/Master section 15 Mono Inputs 13 MTC 91 MTC Master 94 MTC Slave 94 Multi-take 58 One Song Repeat 67 Overdub Recording 109 Overdubbing 30 PAN control 14...
- Page 115 YAMAHA CORPORATION Pro Audio & Digital Musical Instrument Division V291240 R2 1 IP 116 P.O. Box 3, Hamamatsu, 430-8651, Japan 01 03 1500 CP Printed in Japan...