Yaesu VL-1000 Operating Manual
Linear amplifier
Hide thumbs
Also See for VL-1000:
- Technical supplement (132 pages) ,
- Technical overview (10 pages) ,
- User manual
Table of Contents
Advertisement
VL-1000
YAESU MUSEN CO., LTD.
1-20-2 Shimomaruko, Ota-Ku, Tokyo 146-8649, Japan
YAESU U.S.A.
17210 Edwards Rd., Cerritos, CA 90703, U.S.A.
YAESU EUROPE B.V.
Snipweg 3, 1118DN Schiphol, The Netherlands
YAESU UK LTD.
Unit 12, Sun Valley Business Park, Winnall Trading Estate
Winchester, Hampshire, SO23 0LB, U.K.
YAESU GERMANY GmbH
Am Kronberger Hang 2, D-65824 Schwalbach, Germany
YAESU HK LTD.
11th Floor Tsim Sha Tsui Centre, 66 Mody Rd.,
Tsim Sha Tsui East, Kowloon, Hong Kong
Advertisement
Table of Contents

Related Manuals for Yaesu VL-1000


Summary of Contents for Yaesu VL-1000
- Page 1 VL-1000 YAESU MUSEN CO., LTD. 1-20-2 Shimomaruko, Ota-Ku, Tokyo 146-8649, Japan YAESU U.S.A. 17210 Edwards Rd., Cerritos, CA 90703, U.S.A. YAESU EUROPE B.V. Snipweg 3, 1118DN Schiphol, The Netherlands YAESU UK LTD. Unit 12, Sun Valley Business Park, Winnall Trading Estate Winchester, Hampshire, SO23 0LB, U.K.
-
Page 2: General Description
The separate VP-1000 Power Supply Unit provides the +48 Volts required by the PA transis- tors, as well as all required control voltages for the amplifier. The VL-1000 normally is powered via 220 Volt AC mains, although it can be operated, at the 500 Watt level, from 117 Volt AC power. -
Page 3: Installation
220 Volt circuit to be used, especially if this circuit is shared with household appliances. It always is preferable to operate the VL-1000 from a dedicated 220 Volt circuit with its own circuit breaker. - Page 4 (B) above), and +48 V DC supply voltage On/Off control (if the REMOTE switch on the rear panel of the VL-1000 is set to the ON position). Typical installation diagrams are shown below. When two exciters are utilized, be cer-...
-
Page 5: Antenna Connections
The voltage range provided from the VL-1000 is 0 to Volts DC, and this is compatible with all Yaesu transceivers as well as many exciters of other manufacture. -
Page 6: Plug Pinout
B A N D -D ATA 1 as viewed from rear panel B A N D -D ATA 2 as viewed from rear panel VL-1000 Operating Manual 13.5V TX GND BAND DATA A BAND DATA B BAND DATA C BAND DATA D TX INH 13.5V... -
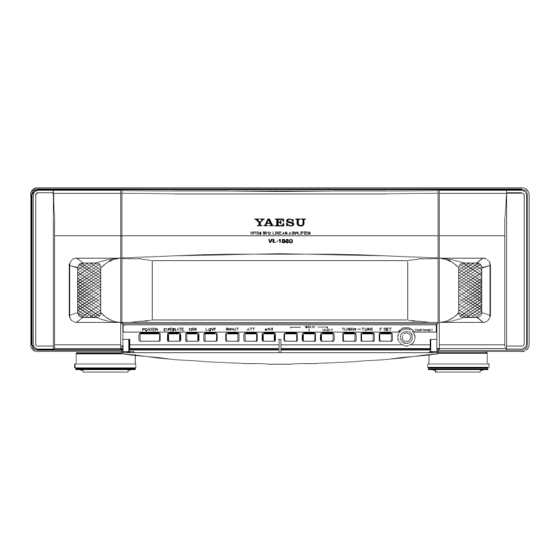
Page 7: Front Panel Controls And Switches
Front Panel Controls and Switches 1. POWER Switch This switch turns the VL-1000 on and off. When the amplifier is turned off, the INPUT 1 jack is connected directly to the ANT 1 jack. If using a Yaesu transceiver with a B cable, the VL-1000 AC power will be remotely controlled by the transceiver’s power switch... -
Page 8: Tuner Switch
13. F SET Switch Press this switch to activate the exciter and tune up the VL-1000 automatically when us- ing the FT-1000MP (with the cable shown on page 4 connected between the BAND DATA... -
Page 9: Rear Panel Connectors And Switch
When this switch is in the ON position, the VP-1000’s +48V DC supply voltage will be con- trolled by the transceiver’s power switch if you are using a Yaesu transceiver with a B cable. 3. BAND-DATA 1 Jack This 8-pin DIN jack provides for a supplied... -
Page 10: Operating Advice
Before commencing initial checkout, verify that the R OFF . If the R switch is on, and the VL-1000 is not connected to a Yaesu transceiver EMOTE providing remote power actuation, Error Message #1005 (which warns of “Excessive PA DC Voltage”) will appear following the “Self Test”... -
Page 11: Operation
RIVE exciter so as to provide 50 Watts of less of drive power to the VL-1000. 2. Press the F SET key on the VL-1000 mo- mentarily, then press the P the exciter to activate the transmitter. If necessary, close your key to allow a car- rier to be transmitted for a few seconds. - Page 12 Pressing the DISPLAY SELECT switch allows you to choose from among these options. There are also two “Display Memory” switches on the front panel of the VL-1000, which you may use to store and recall your most-used metering choices. To store a meter selection, press and hold in for ½...
- Page 13 Make sure that the OPERATE and TUNER switches on the VL-1000 are both off. Connect a 100-watt dummy load to the ANT 1 jack on the VL-1000, if available. If a dummy load is not available, connect an antenna which presents a 50 load to the ANT 1 jack.
- Page 14 As you move around the band, new antenna tuning settings will be recorded on the Graphical SWR Meter, giving you a clear picture of the tuning action of the VL-1000’s automatic antenna tuner. If “ ” does not appear, it means that an excessively-high SWR exists on the coaxial line;...
-
Page 15: Beeper On/Off
Do not transmit when turning the POWER switch or the ATT switch on or off. When changing bands, always make certain that the VL-1000 is set for the same band as the transceiver before transmitting, and that the proper antenna is connected. Remem- ber that ANT 1 is automatically selected when the VL-1000 is switched off. -
Page 16: Warning Messages
VL-1000 and/or the VP-1000. This Warning only appears when using the Yaesu VP-1000 power supply unit. The VL-1000 and the transceiver are set up with conflicting band selection, due to a logic error in the Band Data matrix, a failure in the cable, or similar problem. -
Page 17: Specifications
Tuning Memory Register: Specifications are subject to change, in the interest of technical improvement, without nortice or oblogation. Changes or modifications to this device not expressly approved by Yaesu Musen could void the user’s authorization to operate this device. Page 16... - Page 18 Copyright 1997 Yaesu Musen Co., Ltd. All rights reserved No portion of this manual may be reproduced without the permission of Yaesu Musen Co., Ltd. Printed in Japan E08971000 (9708B-0K)