Table of Contents
Advertisement
Advertisement
Table of Contents
Troubleshooting

Related Manuals for Xerox CopyCentre C35


Summary of Contents for Xerox CopyCentre C35
- Page 1 Quick Reference Guide 604P12740...
- Page 2 Quick Reference Guide 604P12753 MAXIMIZE YOUR PRODUCTIVITY..by taking advantage of all the capabilities of your device. A Training and Information CD was supplied with your product. The CD provides animated tutorials and interactive screens. When installed on your network it will always be available to everyone, or load it on your hard drive for easy access.
- Page 3 The information in this document is correct at the time of publication. Xerox reserves the right at any time to change the information without notice. Changes and technical updates will be added in subsequent editions of the documentation. For the latest information go to www.xerox.com.
-
Page 4: Table Of Contents
US Regulatory Information for the Fax Kit option...1-12 Canadian Regulatory Information for the Fax Kit option ...1-14 Illegal Copying...1-15 2 Product Overview ...2-1 Introduction ...2-2 CopyCentre C35/C45/C55 ...2-3 WorkCentre M35/M45/M55...2-5 WorkCentre Pro 35/45/55...2-7 3 Getting Started...3-1 Control Panel Overview...3-2 Power On or Off...3-3... - Page 5 Loading Paper ... 3-4 Making Copies... 3-5 Sending an Embedded Fax ...3-6 Sending a Server Fax ...3-7 Sending an Internet Fax ...3-8 Scanning a Document to a File... 3-9 Sending an E-mail ...3-10 Printing from a PC ... 3-11 Printing with Internet Services ... 3-12 Logging On / Logging Off ...3-13 Customizing your Machine ...3-14 Further Assistance ...3-15...
- Page 6 5 Fax...5-1 Fax ...5-2 Basic Faxing - Embedded Fax ...5-3 Dialing Options...5-4 Resolution ...5-6 Sides Scanned ...5-7 Image Adjustment ...5-8 Image Quality ...5-9 Original Input...5-10 Bound Originals...5-11 Added Fax Features...5-12 Fax Sending Features...5-12 Fax Reports...5-18 Mailboxes ...5-19 Comment Setup ...5-20 Advanced Fax Features ...5-20 Dial Directory Setup ...5-23 Basic Faxing - Server Fax ...5-24...
- Page 7 Reply To...6-14 Message Body ...6-15 Authentication Mode ... 6-16 7 Network Scanning... 7-1 Scan ... 7-2 Scanning Resources ...7-2 Network Scanning...7-3 Repositories ...7-4 Template Overview ...7-4 Template Destinations ... 7-5 Destination Details ...7-6 Image Adjustment ...7-7 Image Quality ... 7-8 More Image Quality...7-9 Sides Scanned ...7-10 Edge Erase ...
- Page 8 Cleaning the Machine ...10-3 Further Assistance...10-4 11 Troubleshooting ...11-1 General...11-2 Fault Clearance ...11-3 Paper jams ...11-3 Document jams ...11-3 Xerox Welcome and Support Center...11-4 Locating the serial number...11-4 Troubleshooting Tips ...11-5 Power ...11-5 Document Handler ...11-5 Paper Handling ...11-6 Finisher ...11-7 Output Quality ...11-8...
- Page 9 Page vi Quick Reference Guide...
-
Page 10: Welcome
1 Welcome Introduction... 1-2 Additional Resources ... 1-3 Conventions ... 1-4 Overview of Features at the Machine... 1-6 Overview of Features at the Workstation ... 1-8 Safety ... 1-9 Environmental Compliance ...1-11 Regulatory Information ... 1-12 Illegal Copying... 1-15 Quick Reference Guide Page 1-1... -
Page 11: Introduction
Introduction Welcome to your new Xerox machine. This Quick Reference Guide provides you with an overview of the features and options that may be available on your machine. To help you familiarize yourself with your new machine please refer to:... -
Page 12: Additional Resources
Additional Resources System Administration CD (CD1) Contained in the CD Pack delivered with your machine, the System Administration CD (CD1) offers detailed information on configuring your machine for network printing and installing any of the optional features. The System Administration CD (CD1) is intended for System/Machine Administrators. -
Page 13: Conventions
Conventions Throughout this Guide, you will find that some terms are used interchangeably: Paper is synonymous with media. Document is synonymous with original. Page is synonymous with sheet. CopyCentre/WorkCentre/WorkCentre Pro is synonymous with the machine. The following pages offer further information about the conventions used within this Guide. -
Page 14: Bracket Text Typeface
Bracket text typeface: The [Bracket Text] typeface is used to emphasise the selection of a feature mode or button. For example: Select [Machine Details]. Notes Notes are statements that provide additional information. For example: NOTE: Originals must be loaded in the Document Handler when using this feature. Hints Hints help users to perform a task. -
Page 15: Overview Of Features At The Machine
Overview of Features at the Machine Using the powerful features available on your machine you can: Scan Once and Print Many When making copies your machine only has to scan a document once regardless of the number of copies needed. This reduces the risk of jams and damage to originals. - Page 16 Use the Mixed Size Originals feature to copy mixed size originals simultaneously. Produces copies on uniform size paper or mixed size paper. Be Environmentally Friendly This product complies with a variety of international standards for environmental protection and is compatible with most recycled paper. Scan Documents to Create Electronic Files (Optional) This feature, available on the WorkCentre Pro configuration, allows you to create electronic files from your originals which can be:...
-
Page 17: Overview Of Features At The Workstation
Overview of Features at the Workstation If your machine is connected to a network you can use the following features. Contact your System Administrator to get connected. CentreWare Print Drivers The Print Driver extends the productivity power of your machine to your desktop. Options include: •... -
Page 18: Safety
Safety Introduction Your Xerox product and supplies have been designed and tested to meet strict safety requirements. These include safety agency approval and compliance to established environmental standards. Please read the following instructions carefully before operating the product and refer to them as needed to ensure the continued safe operation of your product. -
Page 19: Laser Safety
This product contains laser warning labels. These labels are intended for use by Xerox Service Representatives and are placed on or near panels or shields that require special tools for removal. Do not remove any of the panels. There are no operator serviceable areas inside these covers. -
Page 20: Environmental Compliance
Environmental Compliance ENERGY STAR As an ENERGY STAR partner, Xerox Corporation has determined that this product meets the ENERGY STAR guidelines for energy efficiency. ENERGY STAR and the ENERGY STAR mark are registered U.S. marks. Products that carry the ENERGY STAR label are designed to be energy efficient and help protect the environment. -
Page 21: Regulatory Information
Changes or modifications to this equipment not specifically approved by the Xerox Corporation may void the user’s authority to operate this equipment. WARNING:Shielded cables must be used with this equipment to maintain compliance with FCC regulations. - Page 22 US:AAAEQ##TXXXX. The digits represented by ## are the REN without a decimal point (e.g., 02 is a REN of 0.2). If this Xerox equipment causes harm to the telephone network, the telephone company will notify you in advance that temporary discontinuance of service may be required.
-
Page 23: Canadian Regulatory Information For The Fax Kit Option
Repairs to the machine should be made only by a Xerox representative or an authorized Xerox service agency. This applies at any time during or after the service warranty period. -
Page 24: Illegal Copying
Illegal Copying Congress, by statute, has forbidden the copying of the following subjects under certain circumstances. Penalties of fine or imprisonment may be imposed on those guilty of making such copies. Obligations or Securities of the United States Government, such as: Certificates of Indebtedness Coupons from Bonds Silver Certificates... - Page 25 Copyrighted material (unless permission of the copyright owner has been obtained or the copying falls within the “fair use” or library reproduction provisions of the copyright law). Further information of these provisions may be obtained from the Copyright Office, Library of Congress, Washington, DC 20559 (circular R21) Certificates of Citizenship or Naturalization.
-
Page 26: Product Overview
2 Product Overview Introduction ...2-2 CopyCentre C35/C45/C55 ...2-3 WorkCentre M35/M45/M55...2-5 WorkCentre Pro 35/45/55 ...2-7 Quick Reference Guide Page 2-1... -
Page 27: Introduction
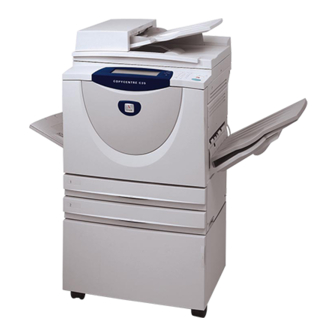
35, 45 or 55 copies/prints a minute. All three configurations are fully upgradable so as to meet any future requirements you may have. Please contact your local Xerox representative for further information. CopyCentre C35/C45/C55 - A stand-alone copier which offers the copying functionality available on conventional copiers, combined with the added feature capabilities of the digital copier technology. - Page 28 CopyCentre C35/C45/C55 Control Panel (Touch Screen and Numeric Keypad) Bypass Tray (Folds up when not in use) Paper Trays 1 & 2 Stand Quick Reference Guide Document Handler Finisher Document Glass (under the Document Handler) Offsetting Catch Tray High Capacity Feeder (Paper Trays 3 &...
- Page 29 The following options are available for the CopyCentre. Document Feeds single or double sided documents. Fitted instead of the Document Cover. Handler Document Fitted instead of the Document Handler. Glass Cover High Capacity Holds Paper Trays 3 and 4. Both Trays have a larger capacity than Trays 1 and 2, Feeder therefore reducing the number of times you need to replace paper in the machine.
- Page 30 WorkCentre M35/M45/M55 Control Panel (Touch Screen and Numeric Keypad) Shelf Bypass Tray (Folds up when not in use) Paper Trays 1 & 2 Stand Quick Reference Guide Document Handler Offsetting Document Glass Cover Catch Tray Document Glass (under the Document Handler) Finisher High Capacity...
- Page 31 The following options are available for the WorkCentre: Document Feeds single or double sided documents. Fitted instead of the Document Cover. Handler Document Fitted instead of the Document Handler. Glass Cover High Capacity Holds Paper Trays 3 and 4. Both Trays have a larger capacity than Trays 1 and 2, Feeder therefore reducing the number of times you need to replace paper in the machine.
-
Page 32: Workcentre Pro 35/45/55
WorkCentre Pro 35/45/55 Control Panel (Touch Screen and Numeric Keypad) Shelf Bypass Tray (Folds up when not in use) Paper Trays 1 & 2 Quick Reference Guide Document Handler High Capacity Feeder (Paper Trays 3 & 4) Document Glass (under the Document Handler) Finisher Page 2-7... - Page 33 The following options are available for the WorkCentre Pro: Offset Catch Delivers output either face up or face down, collated or uncollated. Each set or Tray stack will be offset from the previous to enable easy separation. Fitted instead of the Finisher.
-
Page 34: Getting Started
3 Getting Started Control Panel Overview ...3-2 Power On or Off ...3-3 Loading Paper ...3-4 Making Copies ...3-5 Sending an Embedded Fax ...3-6 Sending a Server Fax ...3-7 Sending an Internet Fax ...3-8 Scanning a Document to a File...3-9 Sending an E-mail ...3-10 Printing from a PC ... -
Page 35: Control Panel Overview
Control Panel Overview NOTE: The Touch Screen displayed is for a fully configured WorkCentre Pro configuration. The touch screen Displays and selects all the available programming features, plus fault clearance procedures and general machine information. Features Displays the job features on the screen. -
Page 36: Power On Or Off
Power On or Off To power ON: Press the ON/OFF switch. The powering up process takes less than 3 minutes. NOTE: Certain functions of the machine, e.g. copying, will be available before other functions e.g. printing. To power OFF: Press the ON/OFF switch. A confirmation screen will appear asking you to select a power down option. -
Page 37: Loading Paper
Loading Paper Open the required paper tray. NOTE: Paper trays 1 and 2 are fully adjustable for all stock sizes between 8.5" x 5.5" to 11" x 17". Paper trays 3 and 4 are dedicated paper trays which can be adjusted to hold either 8.5"... -
Page 38: Making Copies
Making Copies Load the documents either in the Document Handler or on the Document Glass. NOTE: Documents in the handler are only scanned once. Access the Basic Copy screen - if necessary select the Features button on the control panel. Select the required features on the touch screen. -
Page 39: Sending An Embedded Fax
Sending an Embedded Fax Embedded Fax is an optional walk up fax feature on your machine. If the Basic Fax screen matches that displayed in step 2 then Embedded Fax is enabled. Please contact your System Administrator for further assistance. NOTE: Both Embedded and Server Fax can be installed on the WorkCentre Pro at the same time, however only one service can be enabled for use. -
Page 40: Sending A Server Fax
Sending a Server Fax Server Fax is an optional feature which is only available on the WorkCentre Pro configuration. If the Basic Fax screen matches that displayed in step 2 then Server Fax is enabled. Please contact your System Administrator for further assistance. NOTE: Both Embedded and Server Fax can be installed on the WorkCentre Pro at the same time, however only one service can be enabled for use. -
Page 41: Sending An Internet Fax
Sending an Internet Fax Internet Fax is an optional feature which is only available on the WorkCentre Pro configuration. Please contact your System Administrator for further assistance. Load the documents either in the Document Handler or on the Document Glass. NOTE: Documents in the handler are only scanned once. -
Page 42: Scanning A Document To A File
Scanning a Document to a File Network Scanning is only available on the WorkCentre Pro configuration. Please contact your System Administrator for further assistance. Load the documents either in the Document Handler or on the Document Glass. NOTE: Documents in the handler are only scanned once. -
Page 43: Sending An E-Mail
Sending an E-mail E-mail is an optional feature which is only available on the WorkCentre and WorkCentre Pro configuration. Please contact your System Administrator for further assistance. NOTE: E-mail is only supported on the WorkCentre via the Ad Hoc E-mail options kit. -
Page 44: Printing From A Pc
Printing from a PC If your machine is connected to a network, documents can be printed directly from your PC via the CentreWare print driver supplied. Select [Print] in your application. Select your machine as the printer. Select [Properties], make your selections and click [OK]. -
Page 45: Printing With Internet Services
Printing with Internet Services Internet Services uses the embedded Web User Interface which enables communication between the HTTP server and your machine. This option is available when your machine is connected to a network. Open your Web Browser, then enter: http:// and the printer TCP/IP address. -
Page 46: Logging On / Logging Off
Logging On / Logging Off If the Internal Auditron or the optional Network Accounting has been enabled, a valid User Number needs to be entered in order to access the machine functions. The Internal Auditron automatically tracks Copy jobs for billing purposes, as well as preventing unauthorized access to the machine. -
Page 47: Customizing Your Machine
Customizing your Machine Your machine can be customized to suit your working environment and practices. The System Management Tools enable your System or Machine Administrator to setup, customize and maintain the machine. After your machine is installed, it is recommended that the settings and options are customized to fully meet the requirements of the Users. -
Page 48: Further Assistance
Refer to the Training and Information CD (CD2), contained in the CD Pack delivered with your machine. Contact your System and/or Machine Administrator. Visit our Customer Web Site at www.xerox.com or contact the Xerox Welcome and Support Center quoting the machine serial number Press the Machine Status button on the control panel. - Page 49 Page 3-16 Quick Reference Guide...
-
Page 50: Copy
4 Copy Copy ...4-2 Basic Copying ...4-3 Image Adjustment ...4-10 Output Format...4-17 Job Assembly ...4-26 Quick Reference Guide Page 4-1... -
Page 51: Copy
Copy The Copy feature is standard on your machine. Access to the Copy features is gained using the Features button on the control panel. Depending on the options enabled and how your machine has been configured, you may have to select All Services in the top right-hand corner first. This chapter contains information about the options available within Copy. -
Page 52: Basic Copying
Basic Copying The Basic Copying tab is the default Copy screen. Use the Basic Copying tab to select the standard features for a copy job. Depending on the options enabled and how your machine has been configured, you may have to select the All Services button in the right-hand corner to access Copy. Touch any of the top level buttons to select a feature. -
Page 53: Output
Output Output is used to select the finishing requirements for the job. The options will depend on the finishing output device available. Options: Select Collated for output stacked in sets to match the sequence of the originals. Collated Select Uncollated for output sorted into stacks of individual pages. Uncollated Available if your machine is equipped with a finisher. -
Page 54: 2-Sided
2-Sided Double-sided copies, ranging in size from 8.5” x 5.5” to 11” x 17” can be made automatically from one or two-sided originals. Options: Use this option for 1 sided originals and 1 sided copies are required. 1 Sided Use this option for 1 sided originals and 2 sided copies are required. 2 Sided This option produces 2 sided copies from 1 sided originals and rotates every second 2 Sided,... - Page 55 Use this option for 2 sided originals and 1 sided copies are required. 1 Sided This option produces 1 sided copies from 2 sided originals and rotates every second 1 Sided, side image. It should be used for “head to toe” orientation or calendar style originals, Rotate Side 2 to ensure the output images are all in the same orientation.
-
Page 56: Reduce/Enlarge
Reduce/Enlarge The Reduce / Enlarge option provides a variety of reduction and enlargement options. Originals placed on the Document Glass or sent to the machine electronically can be reduced or enlarged between 25% and 400%. Originals fed through the Document Handler can be reduced or enlarged between 25% and 200%. -
Page 57: Paper Supply
Use this option to adjust the height (Y) and the width (X) dimensions for reduction Custom or enlargement of each dimension independently. NOTE: Output will NOT be reduced or enlarged proportionally. Custom options are as follows: 100% X50% Y100% Paper Supply Use the Paper Supply options to select Auto Paper or a paper tray for the copy job. - Page 58 Use this option to select the paper loaded in Tray 3. Tray 3 (Optional) Tray 3 holds 2000 sheets of 20lb, substance 20 paper. Weight ranges from 16 - 53lb, substance 16 - 53. The tray can be adjusted to hold either 8.5” x 11” or A4 LEF size paper.
-
Page 59: Image Adjustment
Image Adjustment The Image Adjustment tab provides copy features used for adjusting the appearance of the copy output. NOTE: If the ’More Copy Features’ tab is displaying, this must be selected to access the Image Adjustment tab. Review Summary Touch any of the top level buttons to select a feature. To view all the options for a feature, select the feature required. -
Page 60: Image Quality
Image Quality Use this feature to enhance the quality of your output. Options: Use this option to enhance the copy quality of the output based on the type of Original Type original being scanned. Original Type options are as follows: ORMAL ALFTONE HOTO... -
Page 61: More Image Quality
More Image Quality Use this feature in addition to the settings selected using the Image Quality option, to further enhance the quality of your output. Options: This option controls the differences between the image densities within the copy. Contrast Select a lower setting to improve the copy quality of pictures. Select a higher setting to produce more vivid blacks and whites for sharper text and lines. -
Page 62: Bound Originals
Bound Originals This feature is used to copy pages from bound documents onto separate single- sided or double-sided pages. The bound original is placed face down on the Document Glass with the spine of the book lined up with the marker on the rear edge of the glass. Align the top of the bound original against the rear edge of the document glass. -
Page 63: Edge Erase
Erases a specified area from the centre of the book to eliminate unwanted marks Binding Erase caused by scanning the binding. When Left Page or Right Page is selected between 0 and 1.0 inch can be erased. When Both Pages is selected, between 0 and 2.0 inches can be erased. -
Page 64: Original Input
Original Input Use this option to program the size of the originals being scanned or enable the machine to recognize the size of the originals. Options: Use this option to allow the machine to recognize the size of the originals being fed Auto through the Document Handler. -
Page 65: Image Shift
Image Shift This feature enables the position of the image on the page to be adjusted. Options: The image position is not adjusted. No Shift Use to automatically center the scanned image on the output paper. Auto Center Use to create a binding edge for the document. The image can be adjusted up or Margin Shift down on the page and/or shifted to the right or left. -
Page 66: Output Format
Output Format The Output Format tab is used to produce different options for the finished output. NOTE: If the ’More Copy Features’ tab is displaying, this must be selected to access the Output Format tab. Review Summary Touch any of the top level buttons to select a feature. To view all the options for a feature, select the feature required. -
Page 67: Transparencies
Transparencies Use this feature to add either a blank or printed divider between each transparency within a set. Always load transparencies in the Bypass Tray. Transparency jobs will be delivered single-sided, collated with no finishing. The quantity can only be set to one for this feature. Options: The feature is switched off. -
Page 68: Booklet Creation
Booklet Creation Use this feature to create multipage booklets from a sequential set of either single- sided or double-sided originals. The machine will reduce and correctly position each image to fit on the required page. When the page is folded a booklet will be created. NOTE: Your originals should be loaded Long Edge Feed (LEF) in the Document Handler with the output paper loaded Short Edge Feed (SEF) in the paper tray. -
Page 69: Multi-Up
Multi-Up This feature is used to create documents with multiple images on each page. It is ideal for creating handouts, storyboards or documents used for archival purposes. NOTE: Originals must be loaded in the Document Handler when using this feature. Options: The feature is switched off. -
Page 70: Invert Image
Invert Image This feature enables Mirror Image or Negative Image copies to be produced. Options: Use this option to change the direction of the original image, creating a mirror of the Mirror Image original. This option is primarily used to change the position of a graphic. Use Negative Image to create copies that are the opposite of the original document, Negative Image the white areas become black and the black areas become white. -
Page 71: Covers
Covers Use this feature to automatically add covers to your copied set using stock taken from a different tray than the copies. HINT: Covers and Inserts can be selected in the same job. Options: The feature is switched off. No Covers Use this option to add a front cover to the copies. - Page 72 Use this option to select the imaging requirements for the covers. Output Cover Output Cover Images options are as follows: Images LANK IDED IDED IDED Use this option to select the tray required for the cover stock. Cover Stock Quick Reference Guide Adds Blank covers to the copies.
-
Page 73: Inserts
Inserts Use this feature to add up to two additional stock types to your job. For example, you can separate sections using blank sheets or tab stock, or print the first page of each section on different colored stock to separate chapters. A combination of standard size media, tab stock, card or colored paper can be used for the inserts. - Page 74 If a second stock is required, use this option to program the inserts requiring a Second Insert different stock. Tray Select the Second Insert Tray option. Using the up/down arrow keys, enter the page number of the first insert and select Add Insert. The page number displays in the Insert Page as Side window.
-
Page 75: Job Assembly
Job Assembly The Job Assembly tab is used to combine multiple documents into a single job, produce a sample set of a job or for storing the programming of up to 10 jobs. NOTE: If the ’More Copy Features’ tab is displaying, this must be selected to access the Job Assembly tab. - Page 76 To use Build Job, split the job into programming and scanning segments. Ensure Build Job is selected and program and scan the first segment. Continue to program and load segments until the whole job has been scanned. Select End Build Job when the entire job has been scanned.
-
Page 77: Sample Set
Sample Set This feature is used to review the output to ensure that it is exactly what is required prior to printing a large quantity. Options: The feature is switched off. Use to enable the Sample Set feature. One complete set of the job will be printed. To print the remainder of the job, press the Job Status button and select your job in the queue. -
Page 78: Stored Programming
Stored Programming Use this feature to program up to 10 commonly used programming sequences. For example, combinations of selections such as Edge Erase and Bound Originals. The machine stores only the programming features for the job, NOT the images. Each time a stored job is used the images must be scanned. To use this feature, use the up and down scroll buttons on the scrolling list to select the required storage location, then select a function button - Store or Recall Programming. - Page 79 Page 4-30 Quick Reference Guide...
-
Page 80: Fax
5 Fax Fax ...5-2 Basic Faxing - Embedded Fax...5-3 Image Adjustment ...5-8 Added Fax Features ...5-12 Basic Faxing - Server Fax...5-24 More Fax Features ...5-28 Authentication Mode ...5-33 Quick Reference Guide Page 5-1... -
Page 81: Fax
Fax is an optional feature which may not be available on your machine. There are two types of Fax service - Embedded Fax and Server Fax. Although both Fax services can be installed, only one fax service can be enabled. Your System Administrator will set up the default fax service. -
Page 82: Basic Faxing - Embedded Fax
Basic Faxing - Embedded Fax The Basic Faxing tab is the default Embedded Fax screen. Use the options available on this screen to enter the recipient telephone number and to select the standard features for your fax job. Access to the Basic Faxing features is gained using the Features button on the control panel. -
Page 83: Dialing Options
Dialing Options Use the Dialing Options to enter an individual fax number or a group of fax numbers already stored within the Send List. Special dialing characters can also be added to your fax number from here. There are two methods of entering a phone number - Manually using the keypad or by selecting a number already stored within the Send List. - Page 84 Dialing characters are special characters used for entering fax numbers. They are Dialing entered as part of the telephone number: Characters DTMF [*] EGIN DTMF [#] AIT FOR ULSE TO WITCH EADABILITY [( )] TART IGNALLING AUSE RIVATE ELIMITER ELECTION DENTIFIER ELECTION DENTIFIER...
-
Page 85: Resolution
Resolution The Resolution affects the appearance of the fax at the receiving fax terminal. A higher resolution produces better quality for photos. However, a lower resolution reduces communication time. Options: 200 x 100 dpi - Recommended for text documents. It requires less communication Standard time, but does not produce the best image quality for graphics and photos. -
Page 86: Sides Scanned
Sides Scanned This is used to specify whether the originals are single-sided or double-sided. For 2-sided originals the orientation can also be programmed. Options: Use this option for originals that are printed on one side only. 1 Sided Use this option for originals that are printed on both sides. 2 Sided Quick Reference Guide Page 5-7... -
Page 87: Image Adjustment
Image Adjustment The Image Adjustment tab provides further features that can be applied to your fax job. NOTE: If the ’More Fax Features’ tab is displaying, this must be selected to access the Image Adjustment tab. Review Summary Touch any of the top level buttons to select a feature. To view all the options for a feature, select the feature required. -
Page 88: Image Quality
Image Quality Use this feature to enhance the quality of the outgoing fax. Options: Use this option to enhance the quality of the fax based on the type of original being Original Type scanned. Original Type options are as follows: ORMAL ALFTONE HOTO... -
Page 89: Original Input
Original Input This feature enables users to specify the size of the original document when scanning from the Document Glass or Document Handler. The machine uses this information to calculate the size of your original and the scanned image. Options: This is the default option. -
Page 90: Bound Originals
Bound Originals Use this option to program which page or pages of a bound document are to be scanned and faxed. The bound original is placed face down on the Document Glass with the spine of the book lined up with the marker on the rear edge of the glass. Align the top of the bound original against the rear edge of the document glass. -
Page 91: Added Fax Features
Added Fax Features The Added Fax Features tab provides further fax features which can be used when transmitting faxes. NOTE: If the ’More Fax Features’ tab is displaying, this must be selected to access the Added Fax Features tab. Touch any of the top level buttons to select a feature. To view all the options for a feature, select the feature required. -
Page 92: Transmission Options
Transmission Options Allows transmission information to be included with your fax job. Options: This report contains details about the fax together with a reduced copy of the Transmission image from the first page. When sending a fax to multiple recipients, a Broadcast Report Report will be printed listing all of the recipients. - Page 93 Reduce/Split Use this option to choose how your faxed document is printed if your document paper size is larger than the receiving machines capability. Options: Reduces the faxed document to fit the paper size of the receiving fax machine. Reduce to fit If this option is selected the receiving fax machine will either split the faxed Split across document into two equal parts, or print the majority of the image on to one page and...
-
Page 94: Cover Letter
Cover Letter Use this option to add a cover letter to your fax job. Users can add text in the ’To’, ’From’ and ’Comment’ fields. NOTE: The Cover Letter title is added automatically. Options: Displays the recipient’s fax number or name. Select the keyboard button to amend the recipient’s name. -
Page 95: Starting Rate
Starting Rate Use this option to set the transmission speed of your fax job. Options: Used in areas of low quality communication, when experiencing telephone noise or Forced 4800 bps when fax communications are susceptible to errors. Determines the communication mode to be used based on the maximum Super G3 (33.6 capabilities of the remote machine. -
Page 96: Delayed Send
Delayed Send Use Delayed Send to specify a time at which to send a fax. The time can be set between 15 minutes and 23 hours 59 minutes. This feature is very useful when transmitting faxes during off-peak hours or when sending to another country or time zone. -
Page 97: Fax Reports
Fax Reports This feature enables you to obtain hard copy information about the status of the fax feature on your machine. Options: Fax Reports options are as follows: CTIVITY EPORT ROUP EPORT PTIONS ENDING EPORT Page 5-18 Displays the last 50 fax activities completed on the machine. EPORT Lists all the numbers stored in the Dial Directory. -
Page 98: Mailboxes
Mailboxes Enabled by your System Administrator, this option allows you to store documents in a mailbox. The mailbox can be located on the same machine you are using (local mailbox), or sent to a mailbox on a remote machine (remote mailbox). Documents held within the mailbox are recognized as stored for polling, printing or deleting by the user. -
Page 99: Comment Setup
Comment Setup This feature allows you to create, modify or delete comments that you want to appear on the fax Cover Letter. Up to 10 comments can be stored on the machine. To add or modify a comment select an empty entry from the comment list and select Edit. - Page 100 Build Job Use this feature to fax a job that requires different settings for each page or a segment of pages. This feature is also useful if your fax job has more than 70 pages which exceeds the maximum capacity of the Document Handler. NOTE: The destination fax number must be entered prior to using Build Job.
- Page 101 Polling Polling enables you to store fax documents into the machine’s memory for retrieval by another remote fax machine, or poll a remote fax machine or mailbox Options: This option allows users to scan documents and store them. When remote Store for Polling machines poll the device, they are able to retrieve the scanned document(s).
-
Page 102: Dial Directory Setup
Dial Directory Setup Use this feature to store destination names, fax numbers and transmission settings in your machine. Entries stored here will be available for selection within the Send List feature on the Basic Faxing tab. Dialing Groups can also be set up, comprising of many individual entries. HINT: This feature saves time when sending faxes to frequently used destinations. -
Page 103: Basic Faxing - Server Fax
Basic Faxing - Server Fax The Basic Faxing tab is the default Server Fax screen. Use the options available on this screen to enter the recipient telephone number and to select the standard features for a fax job. Access to the Basic Faxing features is gained using the Features button on the control panel. -
Page 104: Dialing Options
Dialing Options The Dialing Options area contains a window where the telephone number entered is displayed. Once it is displayed, it can be added to a list of destination telephone numbers, a special character can be added, or a list of up to 30 stored telephone numbers can be accessed. -
Page 105: Resolution
ULSE WITCH AIT FOR ETECTION OCAL HARACTER ID [ OCAL HARACTER The Phone List can store up to 30 fax numbers. Enter the fax number and select Phone List Phone List. Select an empty number and then Enter Phone List, the number will be stored. -
Page 106: Sides Scanned
Sides Scanned This is used to specify whether the originals are single-sided or double-sided. For 2-sided originals the orientation can also be programmed. Options: Use this option for originals that are printed on 1 side only. 1 Sided Use this option for originals that are printed on both sides. 2 Sided Use this option for double-sided originals which are in the “head to toe”... -
Page 107: More Fax Features
More Fax Features The More Fax Features tab provides additional fax features which can be used with your fax job. Review Summary Touch any of the top level buttons to select a feature. To view all the options for a feature, select the feature required. -
Page 108: Image Quality
Image Quality Use this feature to enhance the quality of the outgoing fax. Options: Use this option to enhance the quality of the fax based on the type of original being Original Type scanned. Original Type options are as follows: ORMAL ALFTONE HOTO... -
Page 109: More Image Quality
More Image Quality Use this feature in addition to the settings selected using the Image Quality option, to further enhance the quality of your output. Options: Adjusts the difference between the image densities within the scanned image. Contrast Adjusts the balance between sharp text and moiré (patterns within the image). Sharpness Page 5-30 Quick Reference Guide... -
Page 110: Original Input
Original Input Use this option to program the size of the originals being scanned or enable the machine to recognize the size of the originals automatically. Options: Use this option to enable the machine to recognize the size of the originals being Auto fed through the Document Handler. -
Page 111: Delayed Send
Delayed Send Use Delayed Send to specify a time, within the next 24 hours, at which to send a fax. This feature can be used to transmit faxes during off-peak hours or is useful when sending to another country or time zone.The time to send is added to the job information sent to the fax server with the scanned image. -
Page 112: Authentication Mode
Authentication Mode Authentication is a useful network security management tool - limiting, restricting and monitoring access to the network via the machine. Authentication can be set up by the System Administrator to restrict access to the features within Scan to E-mail, Network Scanning, Server Fax and Internet Fax. - Page 113 Page 5-34 Quick Reference Guide...
- Page 114 6 Internet Fax Internet Fax...6-2 Image Adjustment ...6-6 Output Format...6-12 Authentication Mode ...6-16 Quick Reference Guide Page 6-1...
-
Page 115: Internet Fax
Internet Fax Internet Fax is an optional feature which is only available on the WorkCentre Pro configuration. This chapter contains information about the options available within Internet Fax. Internet Fax allows you to send your scanned images as an e-mail attachment to a specified recipient or recipients. -
Page 116: Send
Send: Use the Send options to enter recipient information. Options: Use this option to enter the From e-mail address. From NOTE: If you accessed Internet Fax via Authentication Mode, the From e-mail address will be linked with the login name and cannot be changed. Use this option to enter the e-mail address of the required recipient. -
Page 117: Entering An E-Mail Address For Internet Fax
Entering an E-mail Address for Internet Fax E-mail addresses can be entered in one of two ways - manually or via an address book. NOTE: When entering e-mail details you can change the keypad to show upper or lower case, accented characters or numbers by selecting any Back button. Manually If you already know the full SMTP e-mail address of your recipient, or if you know that the recipient is not in any of the configured address books, you can select the... -
Page 118: Public Address Book
Address Book Types If configured there are two different types of address book on your machine, Public and Internal. Public Address Book The Public Address Book stores external company addresses on the machine. The address book contains a list of user names and their e-mail addresses. The file must be a CSV (Comma Separated Value) format for your machine to be able to read the file contents. -
Page 119: Image Adjustment
Image Adjustment The Image Adjustment tab is used to temporarily program features to enhance the appearance and style of the scanned Internet Fax image. Touch any of the top level buttons to select a feature. To view all the options for a feature, select the feature required. -
Page 120: Image Quality
Image Quality Use this feature to enhance the quality of your scanned originals. Options: Use this option to enhance the quality of the output based on the type of original Original Type being scanned. Original Type options are as follows: ORMAL ALFTONE HOTO... -
Page 121: More Image Quality
More Image Quality Use this feature in addition to the settings selected using the Image Quality option, to further enhance the quality of your output. Options: This option controls the differences between the image densities within the copy. Contrast Select a lower setting to improve the copy quality of pictures. Select a higher setting to produce more vivid blacks and whites for sharper text and lines. -
Page 122: Sides Scanned
Sides Scanned This feature is used to specify whether the originals are single-sided or double- sided. For 2-sided originals the orientation can also be programmed. Options: Use this option for originals that are printed on 1 side only. 1 Sided Use this option for originals that are printed on both sides. -
Page 123: Resolution
Resolution Resolution affects the appearance of the scanned image. The higher the scanning resolution the better the image quality. Options: Produces the smallest image file size and is only recommended for use with simple 200x100 text documents. (Standard) NOTE: 200x100 is disabled if the Document Format is PDF. Recommended for use with average quality text documents and line art. -
Page 124: Original Input
Original Input Use this option to program the size of the originals being scanned or program the machine to determine the size of the originals automatically. Options: Use this option to allow the machine to determine the size of the originals being fed Auto through the document handler automatically. -
Page 125: Output Format
Output Format Use this feature to temporarily change the settings required for the scanned image. Touch any of the top level buttons to select a feature. To view all the options for a feature, select the feature required. Multiple options can be selected for each fax job if required. -
Page 126: Document Format
Document Format Use the Document Format option when your job is to be sent with a different file format than that set as the default. Options: Multi-Page Tagged-Image File Format. One TIFF file containing several pages of Multi-page Tiff scanned images. Portable Document Format. -
Page 127: Acknowledgment Report
Acknowledgment Report Use this feature to print a report containing the delivery status of your job. The report will include the number of successful, failed and unconfirmed recipients. Options: Use this option to print a status report after the job has been sent. Enabled Use this option to switch the feature off. -
Page 128: Message Body
Message Body Use this feature to edit the default e-mail message being transmitted with the job. The message body is the text contained within the e-mail and not the e-mail subject line. The message entered will only be available for the current job. NOTE: The default message is set up by your System Administrator. -
Page 129: Authentication Mode
Authentication Mode Authentication is a useful network security management tool - limiting, restricting and monitoring access to the network via the machine. Authentication can be set up by the System Administrator to restrict access to the features within Scan to E-mail, Network Scanning, Server Fax and Internet Fax. -
Page 130: Network Scanning
7 Network Scanning Scan...7-2 Network Scanning...7-3 Image Adjustment ...7-7 Output Format...7-14 Refresh Destinations ...7-18 Authentication Mode ...7-19 Quick Reference Guide Page 7-1... -
Page 131: Scan
Services open your web browser and enter the machine’s IP Address in the Address or Location field. Resources Provided on the World Wide Web www.xerox.com www.centreware.com Contains CentreWare general information with links to Page 7-2 This is a source of general solution overview and options for upgrade. -
Page 132: Network Scanning
Network Scanning Access to the Network Scanning features is gained using the Features button on the control panel. Depending on the options enabled and how your machine has been configured, you may have to select All Services in the top right-hand corner first. Use the Network Scanning tab on the touch screen to select the standard features for a scan job. -
Page 133: Repositories
Repositories Repositories are directories or filing locations set up on a server where your scanned files are held. Before you can use Network Scanning your System Administrator must set up the repositories available to your machine. The repositories are defined in the template and cannot be changed at the machine. Up to 5 repositories (1 default and 4 additional) can be defined. -
Page 134: Template Destinations
Template Destinations The Template Destination lists the templates stored on the machine. On installation the factory default template ’DEFAULT’, in upper case, will be displayed in the Template Destination list. The default template appears at the top of the list and is selected automatically. -
Page 135: Destination Details
Destination Details The Destination Details section on the right side of the screen displays information about the selected template. Each time you select another template file, this area will update to display information associated with the selected template. NOTE: Any changes made to the template at the machine are temporary. Permanent changes must be made with the same utility that created the template. -
Page 136: Image Adjustment
Image Adjustment The Image Adjustment tab is used to program features relating to the scanned images. Review Summary Touch any of the top level buttons to select a feature. To view all the options for a feature, select the feature required. Multiple options can be selected for each scan job if required. -
Page 137: Image Quality
Image Quality Use this feature to enhance the quality of your scanned originals. Options: Use this option to enhance the quality of the output based on the type of original Original Type being scanned. Original Type options are as follows: ORMAL ALFTONE HOTO... -
Page 138: More Image Quality
More Image Quality Use this feature in addition to the settings selected using the Image Quality option, to further enhance the quality of your output. Options: This option controls the differences between the image densities within the copy. Contrast Select a lower setting to improve the copy quality of pictures. Select a higher setting to produce more vivid blacks and whites for sharper text and lines. -
Page 139: Sides Scanned
Sides Scanned This is used to specify whether the originals are single-sided or double-sided. For 2-sided originals the orientation can also be programmed. Options: Use this option for originals that are printed on 1 side only. 1 Sided Use this option for originals that are printed on both sides. 2 Sided Use this option for originals that are printed on both sides. -
Page 140: Edge Erase
Edge Erase Use this feature to “refresh” the quality of an original that has become torn or frayed at the edges, or that has hole punch, staple or other marks. Options: Erases equal amounts on all edges of your output image. Up to 2.0 inches in Border Erase 0.05 in. -
Page 141: Original Input
Original Input Use this option to program the size of the originals being scanned or enable the machine to recognize the size of the originals. Options: Use this option to allow the machine to determine the size of the originals being fed Auto through the document handler. -
Page 142: Resolution
Resolution Resolution affects the appearance of the scanned image. The higher the scanning resolution the better the image quality. Options: Recommended for use with average quality text documents and line art. Does not 200x200x1 produce the best image quality for photos and graphics. Recommended for use with high quality text documents, that are destined to pass 300x300x1 through OCR applications. -
Page 143: Output Format
Output Format Use the features available to temporarily change the format of the scanned image file at the destination server. Touch any of the top level buttons to select a feature. To view all the options for a feature, select the feature required. Multiple options can be selected for each scan job if required. -
Page 144: If File Already Exists
If File Already Exists Use this option to tell the machine what to do when the document destination folder already contains a document with the same name as your current scan job. Options: Use this option when you want the machine to name the new file (or folder) with a Rename New unique name. -
Page 145: Document Format
Document Format Use this feature to temporarily change the file type of the scanned image file at the destination server. The default setting is the same as the value entered in the selected template. Options: Tagged-Image File Format. A graphic file that can be opened in a variety of graphic Tiff software packages across a variety of computer platforms. -
Page 146: Document Management Fields
Document Management Fields Document Management Fields allows you to enter information into the template from your machine which is unique to your scanning requirements. These fields must be enabled when creating the template at the Web UI. NOTE: If your selected template does not contain any enabled fields the Document Management Fields button will not be available. -
Page 147: Refresh Destinations
Refresh Destinations Select the Refresh Destinations tab to access the Update Template List feature. Touch the Update Template List button if the template has been recently created or modified. The system automatically updates the Template List. Page 7-18 Quick Reference Guide... -
Page 148: Authentication Mode
Authentication Mode Authentication is a useful network security management tool - limiting, restricting and monitoring access to the network via the machine. Authentication can be set up by the System Administrator to restrict access to the features within Scan to E-mail, Network Scanning, Server Fax and Internet Fax. - Page 149 Page 7-20 Quick Reference Guide...
-
Page 150: 8 E-Mail
8 E-mail E-mail...8-2 Image Adjustment ...8-6 Output Format...8-13 Authentication Mode ...8-16 Quick Reference Guide Page 8-1... -
Page 151: E-Mail
E-mail E-mail is an optional feature which is only available on the WorkCentre and WorkCentre Pro. This chapter contains information about the options available within E-mail. NOTE: E-mail is only supported on the WorkCentre via the Ad Hoc E-mail options kit. -
Page 152: Send
Send: Use the Send options to enter recipient information. Options: Use this option to enter the From e-mail address. From NOTE: If you accessed E-mail via Authentication Mode, the From e-mail address will be associated with the login name and cannot be changed. Use this option to enter the e-mail address of the recipient. -
Page 153: Address List
Address List Displays all the recipient addresses entered for the current scan to e-mail job. Up to 128 recipients addresses can be entered in the list. Entering an E-mail Address The e-mail address can be entered in one of two ways - manually or via an address book. - Page 154 Continue this process until you have added all the required recipients and on completion select Done. The entered e-mail addresses will be shown in the Address List. Address Book Types If configured there are two different types of address book on your machine, Public and Internal.
-
Page 155: Image Adjustment
Image Adjustment The Image Adjustment tab is used to temporarily programme features to enhance the appearance and style of the scanned e-mail image. Touch any of the top level buttons to select a feature. To view all the options for a feature, select the feature required. -
Page 156: Image Quality
Image Quality Use this feature to enhance the quality of your scanned originals. Options: Use this option to enhance the quality of the output based on the type of original Original Type being scanned. Original Type options are as follows: ORMAL ALFTONE HOTO... -
Page 157: More Image Quality
More Image Quality Use this feature in addition to the settings selected using the Image Quality option, to further enhance the quality of your output. Options: This option controls the differences between the image densities within the copy. Contrast Select a lower setting to improve the copy quality of pictures. Select a higher setting to produce more vivid blacks and whites for sharper text and lines. -
Page 158: Sides Scanned
Sides Scanned This is used to specify whether the originals are single-sided or double-sided. For 2-sided originals the orientation can also be programmed. Options: Use this option for originals that are printed on 1 side only. 1 Sided Use this option for originals that are printed on both sides. 2 Sided Use this option for originals that are printed on both sides. -
Page 159: Edge Erase
Edge Erase Use this feature to “refresh” the quality of an original that has become torn or frayed at the edges, or that has hole punch, staple or other marks. Options: Erases equal amounts on all edges of your output image. Up to 2.0 inches in Border Erase 0.05 in. -
Page 160: Original Input
Original Input Use this option to programme the size of the originals being scanned or enable the machine to recognize the size of the originals automatically. Options: Use this option to allow the machine to recognize the size of the originals being fed Auto through the document handler. -
Page 161: Resolution
Resolution Resolution affects the appearance of the scanned image. The higher the scanning resolution the better the image quality. Options: Recommended for use with average quality text documents and line art. Does not 200x200x1 produce the best image quality for photos and graphics. This is the default option. Recommended for use with high quality text documents, that are destined to pass 300x300x1 through Optical Character Recognition (OCR) applications. -
Page 162: Output Format
Output Format Use this feature to change the Reply To e-mail address and to identify the file format required for the e-mail scanned image. Review Summary Touch any of the top level buttons to select a feature. To view all the options for a feature, select the feature required. -
Page 163: Document Format
Document Format Use the Document Format option when the job is to be sent with a different file format than that set as the template default. Options: Tagged-Image File Format. A graphic file that can be opened in a variety of graphic Tiff software packages across a variety of computer platforms. -
Page 164: Reply To
Reply To Use the Reply To feature to alter the default address to which replies to an e-mail job can be sent. Message Body Use this feature to edit the default e-mail message. The message body is the text contained within the e-mail and not the e-mail subject line. Quick Reference Guide Page 8-15... -
Page 165: Authentication Mode
Authentication Mode Authentication is a useful network security management tool - limiting, restricting and monitoring access to the network via the machine. Authentication can be set up by the System Administrator to restrict access to the features within Scan to E-mail, Network Scanning, Server Fax and Internet Fax. -
Page 166: Print
9 Print Introduction to Print...9-2 Print Driver Features...9-3 Print Drivers ...9-4 Quick Reference Guide Page 9-1... -
Page 167: Introduction To Print
Introduction to Print The Xerox WorkCentre and WorkCentre Pro printer produces high quality prints from electronic documents. Simply access the printer from your PC application as normal. A print driver converts the code within the electronic document into a language that the printer can understand. Although generic print drivers can be used on this printer they will not enable all the features. -
Page 168: Print Driver Features
Print Driver Features Control Options There are a number of options which appear on all of the printer driver screens: Saves all the new settings and closes the driver or dialog. These new settings remain in effect until changed. Closes the dialog and returns all settings in the tabs to the values that were in place Cancel before the dialog was opened. -
Page 169: Print Drivers
Print Drivers NOTE: The following provides an overview of the features available on the WorkCentre Pro Postscript Print Driver. For more information about a specific feature, please refer to the on-line Help facility provided as part of the Print Driver software. -
Page 170: Advanced
Advanced Select this tab to access the postscript options and advanced programming features for your print job. Use the scroll arrows to move through the options. Clicking on a plus symbol will display further choices. Image Options Use the options available in this tab to modify the appearance of your print job. This feature can also be used to set the margins. -
Page 171: Layout/Watermark
Layout/Watermark Used to change the layout of a document and add watermarks. Documents can be printed 1 Up, 2 Up and so on, up to 16 Up. Booklets can also be created. Use the Watermark option to display, for example, the word DRAFT or CONFIDENTIAL across each page. -
Page 172: Maintenance
10Maintenance Customer Replaceable Units ...10-2 Cleaning the Machine ...10-3 Further Assistance ...10-4 Quick Reference Guide Page 10-1... -
Page 173: Customer Replaceable Units
Training and Information CD (CD2), contained in the CD Pack delivered with your machine. HINT: To place an order for replaceable units or any other Xerox consumables, please contact your local Xerox Representative giving your Company Name, product number and the machine serial number. -
Page 174: Cleaning The Machine
Document Glass and Constant Velocity Transport Glass Apply Xerox Cleaning Fluid or Xerox Anti-Static Cleaner, to a to a lint-free cloth. Liquid should never be poured directly onto the glass. -
Page 175: Further Assistance
Further Assistance For any additional help visit our customer web site at www.xerox.com or contact the Xerox Welcome and Support Cente Press the Machine Status button on the control panel. The Machine Information screen will be displayed. Select [Machine Details]. -
Page 176: Troubleshooting
11Troubleshooting General ... 11-2 Fault Clearance ... 11-3 Xerox Welcome and Support Center ... 11-4 Troubleshooting Tips... 11-5 Quick Reference Guide Page 11-1... -
Page 177: General
General A variety of situations can affect the quality of your output. For optimal performance, ensure the following guidelines are followed: • Do not position the machine in direct sunlight or near a heat source such as a radiator. • Avoid sudden changes in the environment surrounding the machine. When a change occurs, allow the machine at least two hours to adjust to its new environment, depending on the extent of the change. -
Page 178: Fault Clearance
If you are unable to clear the fault, refer to the next section to contact your local Xerox Welcome and Support Center for assistance. NOTE: For additional Troubleshooting information please refer to the Training and Information CD (CD2) or the System Administration CD (CD1). -
Page 179: Xerox Welcome And Support Center
If a fault cannot be resolved by following the touch screen instructions, check the Troubleshooting Tips in the next section - they may help to solve the problem quickly. If the difficulty persists, contact the Xerox Welcome and Support Center. The Welcome and Support Center will want to know the following information: The nature of the problem, the Machine Serial number, the fault code (if any) plus the name and location of your company. -
Page 180: Troubleshooting Tips
Troubleshooting Tips For additional Troubleshooting information please refer to the Training and Information CD (CD2) or the System Administration CD (CD1). Power The machine will not power on: Check to see that the machine is not in Low Power Mode as indicated by the green light on the control panel. -
Page 181: Paper Handling
Paper Handling Repeated paper jams, misfeeds or multisheet feeds Ensure that the correct paper size is displayed on the Touch Screen. Ensure that the paper tray is not filled above the MAX line. Ensure that the edge guides are adjusted to touch the sides of the paper. Flip the paper over in the paper tray, ’fanning’... -
Page 182: Finisher
Check that the Touch Screen is displaying the correct size for the paper in use. Load fresh paper. Repeated Check Tray Messages on the Touch Screen and the paper is loaded in the tray Adjust the edge guides against the stack of paper in the tray. If the edge guides were not set against the paper stock in the tray when Start was selected, delete the job in the job queue and begin again. -
Page 183: Output Quality
Output Quality Stray marks or black marks from hole punched originals are not removed Use the Edge Erase to erase the edge with the drilled holes. Copy from the document glass with the Document Cover down. Images are out of sequence or upside down when the Booklet Creation Feature is used Ensure that the originals are in the correct sequence. - Page 184 Image Loss When copying a document from a larger paper size to a smaller size, use Auto% to reduce the image onto the smaller size. Use reduction i.e., copy at 90% instead of 100%. Select [Auto Center] and run the job again. If scanning from the Document Glass, select [Manual Platen Input] and define the document size.
-
Page 185: Fault Messages Will Not Clear
Jobs scan but do not print Some jobs require image processing before printing. This may take as long as 2 seconds per page. Check the Job Status queue to determine if a job is processing. There may be a job in the queue with a status of paused. Delete this job if it remains in the state over 3 minutes. - Page 186 12Index Numerics 2-Sided Copy 4-5 Acknowledgment Report Internet Fax 6-14 Add File Destination Network Scanning 7-17 Added Fax Features Embedded Fax 5-12 Additional Resources 1-3 Address List E-mail 8-4 Advanced Print 9-5 Advanced Fax Features Embedded Fax 5-20 Authentication Mode E-mail 8-16 Internet Fax 6-16 Network Scanning 7-19...
- Page 187 Server Fax 5-25 Dialling Options Embedded Fax 5-4 Document Format E-mail 8-14 Internet Fax 6-13 Network Scanning 7-16 Document Handler Troubleshooting Tips 11-5 Document Management Fields Network Scanning 7-17 Document Name Network Scanning 7-14 Edge Erase Copy 4-14 E-mail 8-10 Network Scanning 7-11 E-mail 8-2 ENERGY STAR 1-11...
- Page 188 Machine Features Overview 1-6 Mailboxes Embedded Fax 5-19 Maintenance Power On or Off 3-3 Making Copies 3-5 Message Body E-mail 8-15 Internet Fax 6-15 More Fax Features Server Fax 5-28 More Image Quality Copy 4-12 E-mail 8-8 Internet Fax 6-8 Network Scanning 7-9 Server Fax 5-30 Multi-up...
- Page 189 Training and Information CD Additional Resources 1-3 Transmission Options Embedded Fax 5-13 Transparencies Copy 4-18 Troubleshooting Tips 11-5 Utilities CD Additional Resources 1-3 WorkCentre Overview 2-5 WorkCentre Pro Overview 2-7 Workstation Features Overview 1-8 Xerox Welcome and Support Center 11-4 Quick Reference Guide...