Table of Contents
Advertisement
OWNER'S MANUAL
XM14A
P
OWER
C 1
C 2
CAM ERA
C 3
C 4
P 1
P 2
POSITION
P 3
P 4
Cente r
Sweep
SCAN
.
.
A
O
C
.
.
M
.
.
E
.
.
K
G
Normal
Pro gra m
I
CR14A
R
EMOTE
M
VK75A P
'
T
ODEL
AN
N
I
ZC15A P
'
T
B
NCLUDES
AN
N
ILT
, CR14A
,
POWER SUPPLY
REMOTE
S
UPPLY
XC18A C
AMERA
ZC15A
P
'
AN
N
T
B
ILT
ASE
C
S
ILT
AMERA
YSTEM
, XM14A
ASE
ADDRESSABLE
XC18A C
AND
AMERA
Advertisement
Table of Contents

Related Manuals for X10 Ninja VK75A


Summary of Contents for X10 Ninja VK75A
- Page 1 OWNER'S MANUAL XM14A OWER UPPLY CAM ERA POSITION Cente r Sweep XC18A C SCAN Normal Pro gra m CR14A EMOTE ZC15A VK75A P ODEL AMERA ZC15A P , XM14A NCLUDES , CR14A XC18A C POWER SUPPLY REMOTE AMERA YSTEM ADDRESSABLE AMERA...
-
Page 2: Table Of Contents
NTRODUCTION The VK75A includes the ZC15A Pan ‘n Tilt Camera Base with XM14A remote controlled power supply, the XC18A Wireless Camera, and the CR14A remote control. The wireless camera is attached to the Pan ‘n Tilt Camera Base. The camera sends the picture and sound to a receiver that you connect to your TV, up to 100 ft. -
Page 3: Ontrols And
(supplied). Outdoors Indoors Plug power supply in here. Set the code used to turn on and off from XM14A X10 remote controls. 4 4 4 4 4 VR36A V IDEO ECEIVER Video Out Jack outdoor use). 2.4 GHz Channel Switch... - Page 4 THEN ATTACH THE RACKET TO A WALL The camera included with the VK75A is already attached to the Pan 'n Tilt Base for your convenience. If however you want to remove the camera for any reason, please see the following instructions to reattach it.
-
Page 5: Receiver
11. Set the channel switch on the camera to the same setting as the one on the VR31A or VR36A Video Receiver (A, B, C, or D). 12.Adjust the antenna if necessary to aim it in the direction of the TV that you will view the camera on. -
Page 6: Emote
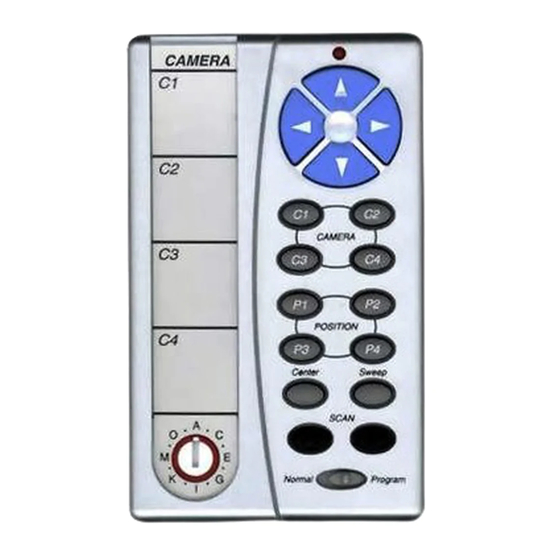
EMOTE ONTROL The Remote lets you move the camera from left to right (Pan) and up and down (Tilt). You can store 4 positions for the camera and use the remote to "Sweep" between these positions. Install 4 AAA alkaline batteries (sold separately) in the remote’s battery compartment. -
Page 7: Amera Systems
ULTI AMERA YSTEMS STOP! If you only own one Pan 'n Tilt Camera, you don't need to read any further. Important: For a Multi Camera system you will need to install a Transceiver (Model RR501 OR TM751, each sold separately). Set its Housecode to match the CR14A Remote, and XM14A power supplies you've installed. -
Page 8: Sweep
Press C1 then Sweep to sweep through camera 1's 4 stored positions. Press C2 then Sweep to sweep through camera 2's 4 stored positions. Press C3 then Sweep to sweep through camera 3's 4 stored positions. Press C4 then Sweep to sweep through camera 4's 4 stored positions. To stop a sweep: If you press C2, C3, or C4 while camera C1 is sweeping, it will continue to sweep. -
Page 9: Supply
If you are experiencing interference between X10 Cameras and some other equipment that uses 2.4 GHz, check the other device's owner's manual for the frequencies of each channel that it uses. X10 cameras use the following frequencies: Channel A: 2.411 GHz, Chan B: 2.434 GHz, Chan C: 2.453 GHz, Chan D: 2.473 GHz. - Page 10 ONTH IMITED ARRANTY X10.COM A DIV . OF X10 WIRELESS TECHNOLOGY, INC. (X10) WARRANTS ITS PRODUCTS TO BE FREE FROM DEFECTIVE MATERIAL AND WORKMANSHIP FOR A PERIOD OF ONE (1) YEAR FROM THE ORIGINAL DATE OF PURCHASE AT RETAIL. X10 AGREES TO REPAIR OR REPLACE, AT ITS SOLE DISCRETION, A DEFECTIVE X10 PRODUCT IF RETURNED TO X10 WITHIN THE WARRANTY PERIOD AND WITH PROOF OF PURCHASE.
- Page 11 X10.com, a division of X10 Wireless Technology, Inc. (Returns Depot), 3824 North 5th St., Suite C, North Las Vegas, NV 89032 Web Site: www.x10.com/support VK75A-01/02...