Table of Contents
Advertisement
Available languages
Available languages
Quick Links
Operator's Manual
CRAFTSMAN °
LAW
TRACTOR
26.0 HR* 54" Mower
Electric Start
Automatic Transmission
Model No.
917.28990
, EspaSol, p. 35
I
This product has a low emission
engine which operates
I
differently from previously built engines. Before you start the
I
engine, read and understand
this Owner's Manual.
iMPORTANT:
Read and follow all Safety
Rules and instructions
before
operating this equipment.
For answers to your questions
about this product, Call:
1-800 -659-5917
Sears Craftsman Help Line
5 am- 5 pm, Mon - Sat
SEARS, ROEBUCK AND CO., HOFFMAN ESTATES, IL 60179 U.S.A.
Visit our Craftsman website:www.sears.com/craftsman
*As rated b ythe engine manufacturer
Advertisement
Table of Contents

Related Manuals for Craftsman 917.28990


Summary of Contents for Craftsman 917.28990
- Page 1 Read and follow all Safety Rules and instructions operating this equipment. SEARS, ROEBUCK AND CO., HOFFMAN ESTATES, IL 60179 U.S.A. Visit our Craftsman website:www.sears.com/craftsman engine which operates this Owner's Manual. For answers to your questions about this product, Call:...
- Page 2 This charge will be waived if you transport the tractor to an authorized Craftsman drop-off location. For the nearest authorized location, call 1-800-4-MY-HOME®.
- Page 3 _DANGER: This cutting machine throwing objects. Failure to observe the following in serious injury or death. _WARNING: In order to prevent acci- dental starting when setting up, transport- ing, adjusting or making repairs, always disconnect spark plug wire and place wire where it cannot contact spark plug.
- Page 4 II.SLOPE OPERATION Slopes area major factor r elated t otoss of control and tip-over accidents, which can result insevere i njury ordeath. O pera- tiononallslopes r equires you cannot back up the slope or if you feet uneasy on it, do not mow it. •...
- Page 5 Remove gas-powered thetruck ortrailer a ndrefuel itonthe ground. Ifthisisnotpossible, then refuel such equipment witha portable container, rather than from a gasoline dispenser nozzle. Keep t henozzle i ncontact with therim ofthefuel t ank orcontainer opening at alltimes until f ueling i scomplete. Donot use a nozzle l ock-open device.
-
Page 6: Specifications
REPAIR PARTS manual). REPAIR AGREEMENTS Congratulations on making a smart pur- 0-5.5 chase. Your new Craftsman® product is 0-2.4 designed and manufactured for years of dependable operation. But like all products, it may require repair from time to time. That's when having a Repair Protection Agreement can save you money and aggravation. - Page 7 Mower Front Wheel (1)Wheel @ (1) Locknut 3/8-16 (1) 1-1/40.D. Washer Mower (1) Front Link (_. (5) Large Retainer Springs - 7/16 (1) Anti-Swar Bar (1) 3/40.D. Washers (2) Small Retainer Springs - 5/16 (2) Rear Lift Link Assemblies (3) 1-3/16 O.D. Washers Mower Install Slope Sheet Sheet...
- Page 8 Your new tractor has been assembled at the factory with the exception of those parts left unassembted for shipping purposes. TOOLS REQUIRED ASSEMBLY A socket wrench set will make assembly easier. Standard wrench sizes you need are listed below. (1) 3/4" wrench (1) Pliers (1) 9/16"...
- Page 9 iNSTALL MOWER AND DRIVE BELT See MOWER AND DRIVE BELT AS- SEMBLY Supplement Sheet for additional guidance on this assembly. Be sure tractor is on level surface and engage parking brake. 1. Lower attachment lift lever to it's lowest position. _, CAUTION: Lift lever is spring loaded.
- Page 10 10. T urn s teering wheel toposition wheels straight forward. 11. A TTACH FRONT LINK (E) - Work f rom left s ide oftractor. Insert rodend oflink assembly through front h ole intractor front suspension bracket (F) a nd secure with retainer spring ( G) t hrough hole in link located behind thebracket.
- Page 11 CHECK TIRE PRESSURE The tires on your tractor were ovednflated at the factory for shipping purposes. rect tire pressure is important for best cutting performance. * Reduce tire pressure to PSI shown on tires. CHECK DECK LEVELNESS For best cutting results, mower hous- ing should be properly leveled.
- Page 12 These symbols may appear on your tractor or in literature supplied with the product. Learn and understand their meaning. REVERSE NEUTRAL ENGINE REVERSE OPERATION SYSTEM (ROS) LIGHTS FUEL BATTERY ATTACHMENT ATTACHMENT CLUTCH DISENGAGED CLUTCH FREE WHEEL (Automatic Models only) Failure to follow instructions could result in serious injury or death.
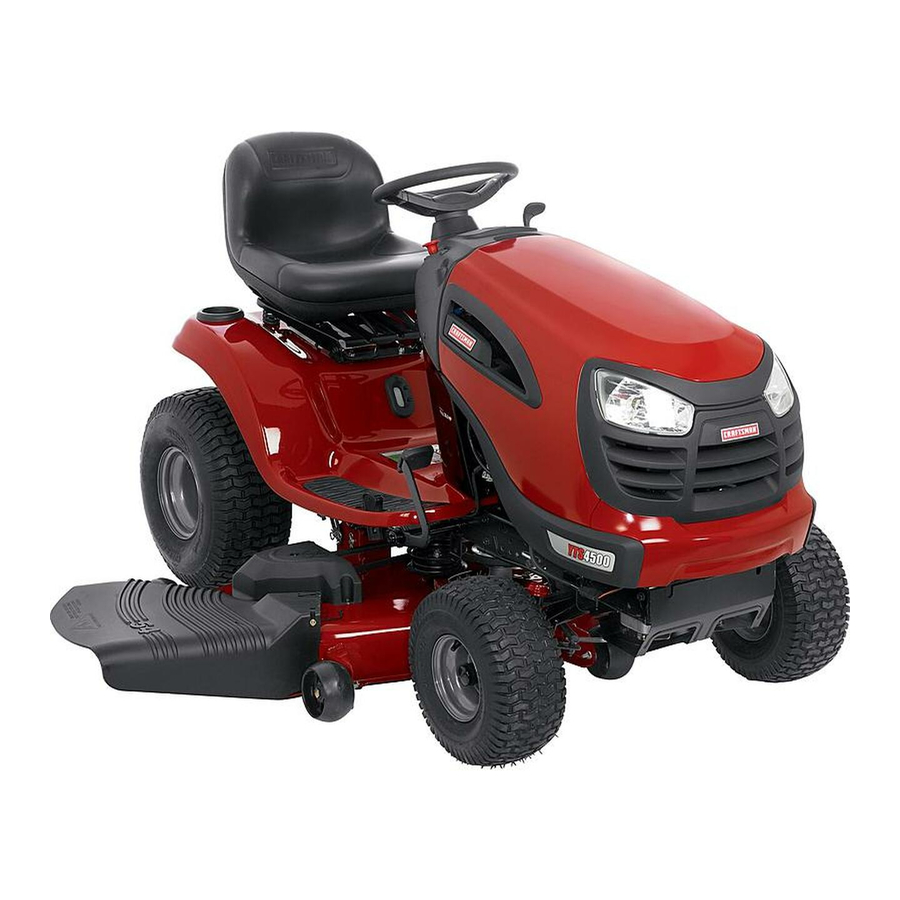
- Page 13 KNOW YOUR TRACTOR READ THiS OWNER'S TRACTOR Compare the illustrations with your tractor to familiarize yourself with the locations of various controls and adjustments. Our tractors conform to the applicable safety standards of the (A) ATTACHMENT LIFT LEVER - Used to raise and lower the mower or other at- tachments mounted to your tractor.
- Page 14 The operation of any tractor can result in foreign objects thrown into the eyes, which can result in severe eye damage. Always wear safety glasses or eye shields while operating your tractor or performing any adjustments or repairs. We recommend standard safety glasses or a wide vision safety mask worn over spectacles.
- Page 15 Start tractor and release parking brake. Slowly depress forward (K) or reverse (L) drive pedal to begin movement. Ground speed increases the further down the pedal is depressed. TO USE CRUISE CONTROL The cruise control feature can be used for forward travel only.
- Page 16 TOSTOP MOWER B LADES - disengage attachment clutch control. CAUTION: Donotoperate themower without either theentire grass c atcher, onmowers soequipped, orthedeflector shield (S)inplace. REVERSE OPERATION Your t ractor isequipped with a Reverse Operation System (ROS). Any attempt by theoperator totravel inthereverse direc- tionwiththeattachment clutch engaged wilt s hut o fftheengine u nless i gnition k ey isplaced i ntheROS "ON"...
- Page 17 SERVICE REMINDER/HOUR Service reminder shows the total number of hours the engine has run and flashes to indicate that the engine or mower needs servicing. When service service reminder wilt flash for two hours. To service engine and mower, see the Maintenance section NOTE: Service reminder runs when the igni-...
- Page 18 AUTOMATIC TRANSMISSION Before d riving t heunit i ncold weather, the transmission should bewarmed 1. Besure thetractor i sonlevel g round. 2. Release theparking b rake andtetthe brake s lowly r eturn t ooperating position. 3. Allow oneminute f ortransmission warm up.
- Page 19 MAINTENANCE SCHEDULE Check Brake Operation Check Tire Pressure Check Operator Presence & ROS System_ Check for Loose Fasteners ChecWReplace Mower Blades Lubrication Chart 0 Check Battery Level Clean Batte_ and Terminals Check Transaxle Cooling Check Mower Levelness Check V-Belts Check Engine Oil Level Chanqe...
- Page 20 TRACTOR Always observe safety rules when per- forming any maintenance. BRAKE OPERATION If tractor requires more than five (5) feet to stop at highest speed in highest gear on a level, dry concrete or paved surface, then brake must be serviced. (See "TO CHECK BRAKE"...
- Page 21 2. Rinse t he battery with plain water and dry. 3. Clean t erminals andbattery c able ends with wire brush until b right. 4. Coat terminals with grease o rpetroleum jelly. 5. Reinstall battery ( See "REPLACING BATTERY" intheSERVICE AND AD- JUSTMENTS section o fthismanual).
- Page 22 Open door (A) on the blower housing to access the air cleaner element (B). 2. Unhook the latch (C) and remove the element. 3. Gently tap the paper element to dis- lodge dirt. 4. Clean all air cleaner components any accumulated dirt or foreign mate- rial.
- Page 23 DECK WASHOUT PORT Your tractor's deck is equipped washout port on its surface as part of its deck wash system. It should be utilized af- ter each use. Drive the tractor to a level, clear spot on your lawn, near enough to a water spigot for your garden hose to reach.
- Page 24 SERVICE OR ADJUSTMENTS: ,_WARNING: TO AVOID SERIOUS iNJURY, BEFORE PERFORMING 1. Depress brake pedal fully and set parking brake. 2. Place attachment clutch in "DISENGAGED" 3. Turn ignition key to "STOP" and remove key. 4. Make sure the blades and all moving parts have completely stopped. 5.
- Page 25 TO INSTALL MOWER Follow procedure described in "INSTALL MOWER AND DRIVE BELT" in the As- sembly section of this manual. TO LEVEL MOWER Make sure tires are properly inflated to the PSi shown on tires. or under inflated, it may affect the appear- ance of your lawn and lead you to think the mower is not adjusted properly.
- Page 26 NOTE: Each full turn of the adjustment nut will change mower height about 1/8". Recheck measurements, essary until front tip of blade is 1/8" to 1/2" lower than the rear tip. • Hold adjustment nut in position with wrench and tighten jam nut securely against adjustment nut.
- Page 27 4. Install belt on centerspan idler (E). 5. Install belt through stationary idler (C) and clutching idler (D). 6. Reinstall anti-rotation link (B) on right side of tractor. Tighten securely. 7. Reconnect clutch harness (A). 8. Make sure belt is in all pulley grooves and inside all belt guides and keepers.
- Page 28 REPLACING BATTERY AI_WARNING: Do not short battery terminals by allowing a wrench or any other object to contact both terminals at the same time. Before connecting battery, remove metal bracelets, wristwatch bands, rings, etc. Positive terminal must be connected first to prevent sparking from accidental grounding.
- Page 29 immediately prepare your tractor for stor- age at the end of the season or if the trac- tor wilt not be used for 30 days or more. _WARNING: Never store the tractor with gasoline in the tank inside a building where fumes may reach an open flame or spark.
- Page 30 TROUBLESHOOTING See appropriate section in rnanual unless directed to Sears service center PROBLEM Will not start Hard to start Engine will not turn over CHART: CAUSE Out of fuel. Engine not "CHOKED" properly. Engine flooded. Bad spark plug. Dirty air filter. Dirty fuel filter.
- Page 31 TROUBLESHOOTING See appropriate section in manual unless directed to Sears service center PROBLEM Engine clicks but will not start Loss of power Excessive vibration Engine continues t¢ run when operator leaves seat with attachment clutch engaged CHART: CAUSE Weak or dead battery. Corroded battery terminals.
- Page 32 TROUBLESHOOTING See appropriate section in manual unless directed to Sears service center PROBLEM Poor cut - uneven cutting Mower blades will not rotate Poor grass discharge Headlight(s) working (if so equipped) Battery will not charge CHART: CAUSE Worn, bent or loose blade. Mower deck not level.
- Page 33 TROUBLESHOOTING See appropriate section in manual unless directed to Sears service center PROBLEM Engine "backfires" when turning engine "OFF" Engine dies when tractor is shifted into reverse .EED M oRE.. - Find this and all. your o Get answers from our team :: o Get a personalized maintenance...
- Page 34 SUGGESTED GUIDE FOR SIGHTING SLOPES down the face of slopes, never across the face. Do not mow ARNING: To avoid serious injury, operate slopes greater than 15 degrees. Make turns gradually tipping or loss of control. Exercise extreme changing direction on slopes.
- Page 35 Operaci6n ... Mantenimiento ... GARANTiA LIMITADA DE CRAFTSMAN DOS ANOS PARA TRACTORES Si opera y mantiene este tractor segOn todas las instrucciones debido a defectos del material o de la mano de obra dentro de los dos aSos posteriores a la fecha de compra, comuniquese al 1-800-4-MY-HOME®...
- Page 36 _PELIGRO: Esta Maquina cortadora objetos, si no se observan las instrucciones lesiones graves o la rnuerte. _ADVERTENCIA: Siempre desconecte el alambre de la bujia y p6ngalo donde no pueda entrar en contacto con la bujia, para evitar el arranque por accidente, durante la preparaci6n, el transporte, el ajuste o cuando se hacen reparaciones.
- Page 37 • Escoger una velocidad de marcha baja de modo que no sea necesario pararse o cam- biar estando en una pendiente. • No cortar la hierba mojada. Las ruedas pueden perder tracci6n. Porter siempre una marcha cuando se esta en pendientes. No porter en punto muerto e ir cuesta abajo.
- Page 38 • Mantener la m&quina libre de hierba, u otros residuos acumulados. salpicaduras de aceite o carburante cualquier cosa mojada con carburante. que la m&quina se enfrie • Si se golpea un objeto ajeno, pararse e inspeccionar la m&quina. si es necesario, antes de volver marcha.
- Page 39 Ingles del dueSo.) ACUERDOS LA REPARACION (11,36 L) Congratulaciones Sin Plomo Su nuevo producto Craftsman(_> esta diseSado y fabricado para funcionar de modo fiable por muchos aSos. Pero como todos los productos, (Debajo 32°F/0°C) puede necesitar alguna reparaci6n de tanto 61 oz.
- Page 40 (1) Rueda (_ (5) Resorte de Retenci6n (2) Resorte de Retenci6n (3) 1-3/16 O.D. Arandela (2) Llaves (1) Tubo de desagi_e Rueda delantera de la segadore (1) 1-1/40.D. Arandela Segadora (1) 3/40.D. Arandela Instalaci6n la segadora (1) Tuerca de Seguridad 1) Barra Antioscilaci6n (1) Montaje de la pieza...
- Page 41 Su tractor nuevo ha sido montado montado por razones de envio. Cuando en este manual se mencionan los t@minos "mano derecha" o "mano izquierda" se refiere a cuando usted se encuentra en la posici6n de operaci6n (sentado/a detr&s del volante de direcci6n). HERRAMIENTAS NECESARIAS EL MONTAJE...
- Page 42 JNSTALE LA SEGADORA DE TRANSMISJON Para obtener m&s indicaciones con respecto a este procedimiento, ver el Apendice sobre MONTAJE DE LA SE,GADORA Y DE LA COR- REA DE TRANSMISION. AsegQrese de que el tractor se encuentre en una superficie nivelada, y ponga el freno de mano. 1.
- Page 43 9. Realice elmismo procedimiento lado d el t ractor. 10. H aga g irar el volante para que las ruedas queden bien derechas. 11. FIJE LA PIEZA DE UNION ANTERIOR -Trabaje por el lado izquierdo del tractor. Introduzca el extremo de la barra de la pieza de uni6n por el orificio anterior de la barra de suspensi6n anterior del tractor (F), y suj@elo por medio de un resorte de contenci6n (G)
- Page 44 REVISI6N DE LA PRESION LLANTAS Las Ilantas en su unidad fueron infladas de- masiado en la f&brica por razones de envio. La presiSn de las Ilantas correctas es importante para obtener el mejor rendimiento • Reduzca la presiSn de los neum&ticos a la PSi que se indica en estos.
- Page 45 Estos simbolos pueden aparecer sobre su tractor o en la literatura proporcionada Aprenda y comprenda sus significados. MARCHA ATRAS NEUTRO MOTOR APAGADO SISTEMA FUNCIONAMIENTO ATRAS (ROS) LUCES ENSENDIDAS COMBUSTIBLE ACCESORIO DEL ACCESORIO DEL EMBRAGUE EMBRAGUE ENGANCHADO DESENGANCHADO RUEDA LIBRE (Solamente para los modelos automatico) &...
- Page 46 FAMIMARICESE CON SU TRACTOR LEA ESTE MANUAL DEL DUEI_IO Y LAS REGLAS SU TRACTOR Compare las ilustraciones con su tractor para familiarizarse controles y ajustes. Guarde este manual para referencia en el futuro. Nuestros tractores cumplen con los esta.ndares de seguridad del (A) PALANCA DEL LEVANTAMIENTO ACOESORaO - Se usa para levantar, bajar y...
- Page 47 La operaci6n de sus ojos, de seguridad haga ajustes de visi6n amplia COMO USAR SU TRACTOR PARA AJUSTAR EL FRENO DE ESTACIONA- MIENTO Su tractor viene equipado sensor que exige la presencia Cuando el motor est& funcionando, si el operador trata de bajarse del asiento sin primero aplicar el freno de estacionamiento, 1.
- Page 48 UTILIZAR ELMANDO CRUCERO El m ando crucero sepuede utilizar s61o durante lamarcha hacia a delante. CARACTER(STICAS TECNICAS El c ontrol develocidad crucero s61o debe u sarse mientras el tractor este en labores o transportaci6n, moviendose cies que esten relativamente Otras condiciones de trabajo, como la poda, que requiere velocidades bajas, podrian...
- Page 49 FUNCIONAMIENTO ATRAS Tu tractor est& equipado con el Sistema de Fun- cionamiento Atr&s (ROS). Cualquier tentativa del operador de viajar marcha atra.s con el embrague puesto apagara, el motor a menos que la Ilave de ignici6n se ponga en la posici6n de "ON" del ROS. ATENCION: Jr marcha atr&s con el embrague puesto para cortar, no es recomendable.
- Page 50 ANTES HACER ARRANCAR MOTOR REVISE EL NIVEL DE ACEITE El motor en su tractor ha sido enviado f&brica Ileno con aceite de calidad Revise el aceite del motor terreno nivelado. Destornille y remueva la tapa/varilla dora de nivel de relleno aceite.
- Page 51 CALENTAMIENTO PARA LA TRANSMISION AUTOMATICA Antes de conducir la unidad en un tiempo frio, la transmisi6n debe ser calentada como las instrucciones siguientes: 1. AsegQrese que el tractor este situado en una superficie nivelada. Alivie el freno de estacionamiento el freno vuelva a la posici6n de operaci6n. Permita que la transmisi6n se caliente durante un minuto.
- Page 52 PROGRAMADE MANTENIMIENTO Revisar la operaci6n del freno Revisar la presJ6n Ilantas Verifi6z la commande de pr6sence d'operateur et le sistema d ROS A Rev_ar s_ hay s uietaa ... _to_ Afilar/cambiar cuchillas de la segadora Tabla de lubdcaci6n Revisar el nivel Limpiar la bateria y los...
- Page 53 TRACTOR Siempre observe las reglas de seguridad cuando de mantenimiento. OPERAOION DEL FRENO Si el tractor necesita m&s de cinco (5) pies para detenerse a la m&xima velocidad al cambio mas alto en una superficie nivelada, de hormig6n pavimentada, hay que hacerle el servicio al freno. Ver "PARA VERIFICAR SI FUNCIONA FRENO"...
- Page 54 Cubra los terminales Reinstale baterJa (Vea Bateria" en la secci6n de Servicio de este manual). ENFRIAMIENTO DEL TRANSEJE Las aletas de enfriamiento y el ventilador de la transmisi6n tienen que mantenerse limpios para asegurar el enfriamiento No trate de limpiar el ventilador o la transmisi6n cuando el motor este funcionando transmisi6n este caliente.
- Page 55 PARA DAR SERVICIO AL CARTUCHO Cambie un cartucho que este sucio, do- blado o da_ado. Maneje el cartucho nuevo cuidadosamente; no Io utilice si el sello de goma esta da_ado AVlSO: No lave el cartucho de papel o use aire a presi6n, pues esto da_ara el cartucho. 1.
- Page 56 PUERTO LAVADO La cubierta de su tractor est& equipada puerto de lavado sobre la superficie parte del sistema de lavado beria utilizar cada vez que se haya usado el tractor. Lleve el tractor a un despejado de su cesped, de una boca de riego como la manguera...
- Page 57 ADVERTENCIA:PARA SERVICIO O DE HACER AJUSTES: 1. Presione el pedal de freno completamente Ponga el embrague del accesorio en la posici6n desenganchado Ponga la Ilave de ignici6n en la posici6n de apagado (STOP) y remuevala. AsegQrese que las cuchillas y que todas las partes movibles se hayan detenido comple- tamente.
- Page 58 PARA NIVELAR LA SEGADORA AsegQrese de que los neum&ticos esten inflados a la PSI que se indica en estos. masiado inflados o poco inflados, el cesped no le quedar& bien cortado, Io cual podr& Ilevarlo a pensar que la,SEGADORA no esta. bien regulada. REGULACION VISUAL DE LADO A LADO 1.
- Page 59 NOTA: Cada vuelta completa de la tuerca de ajuste har& variar la altura de la cortadora • Vuelva a verificar las medidas y ajuste nue- vamente, en caso necesario, hasta que la punta anterior de la hoja de la cuchilla quede 1/8"...
- Page 60 MONTAJE DE LA CORREA 1. Instale lacorrea nueva pasandola deatra.s a laparte d eadelante del t ractor, por e ncima delaplaca d e direcci6n vastago del p edal del e mbrague Jale la correa hacia la parte de adelante del tractor y pa.sela alrededor del embrague y por sobre la polea del motor (G).
- Page 61 IMPORTANTE: Su tractor esta equipado con un sistema de 12 volts. El otro vehiculo tambien tiene que tener un sistema de 12 volts. No use la bateria de su tractor para hacer arrancar a otros vehiculos. PARA ADJUNTAR LOS CABLES DE EMPALME - 1.
- Page 62 MOTOR El mantenimiento, la reparaci6n, o el reemplazo de cualquier dispositivos o sistemas del control de la emisi6n, los cuales sean hechos al costo del cliente, pueden ser realizados por cualquier individuo o establecimiento motor. Los reparos que caen bajo garantia deben ser realizados por un establecimiento servicio de reparaci6n de motor autorizado.
- Page 63 Inmediatamente prepare su tractor para el almacenamiento al final de la temporada o si el tractor no se va a usar por 30 dias o m&s. _ADVERTENCIA: Nunca almacene el trac- tor con gasolina en el estanque dentro de un edificio en donde los gases pueden alcanzar una llama expuesta o una chispa.
- Page 64 IDENTIFICACION DE PROBLEMAS: Yea la secci6n apropiada Sears, PROBLEMA CAUSA 1. Sin combustible. NO arranca 2. Motor sin la "ESTRANGULACION' (CHOKE) adecuada. 3. Motor ahogado. 4. Bujia male. 5. Bateria baja o descargada. 6. Filtro de aire sucio. 7. Filtro de combustible 8.
- Page 65 IDENTIFICACI6N DE PROBLEMAS: Yea la seccJ6n apropJada Sears, PROBLEMA CAUSA Perdida de fuerza 4. Filtro de aire sucio. (continuado) 5. Nivel de aceite bajo/aceite sucio. 6. BujJa fallada. 7. Filtro de combustible 8. Combustible 9. Agua 10.Alambrado 11 .Rejilla/aletas de aire del motor sucias.
- Page 66 IDENTIFICACI6N DE PROBLEMAS: Yea la seccJ6n apropJada Sears, IPROBLEMA CAUSA Las cuchillas 3. Polea de guia atascada. segadoras no rotan 4. Mandril de la cuchilla atascado. (continuado) Mala descarga 1. Velocidad del motor muy lenta. cesped 2. Velocidad de recorrido demasiado 3.
- Page 67 GUJA S UGERiDA PARA MEDIR LAS PENDIENTES CON LA VISTA PARA UNA OPERACION SEGURA ADVERTENCIA: Para evitar dafios graves, y abajo de las pendientes, pendientes. No cortar pendientes virajes gradualmente para evitar volcarse Tenga mucho cuidado cuando 1. Plegar esta pagina a Io largo de la linea punteada 2.
- Page 68 repair lawn owner's For repair of carry-in products like vacuums, lawn equipment, and electronics, call or go on-Nne for the nearest or maintenance agreement (Canada) on a product serviced by Sears: 1-800-827-6655 (U.S.A.) Para pedirservicio de reparacion a domicilio, y para ordenar piezas: 1-888_U-HOGAR _ (o SearsBrands,LLC ®...