Sharp ER-A247 Instruction Manual
Electronic cash register
Hide thumbs
Also See for ER-A247:
- Instruction manual (213 pages) ,
- Manuel d'instructions (109 pages) ,
- Instruction manual (109 pages)
Table of Contents
Advertisement
Quick Links
Download this manual
See also:
Instruction Manual
Advertisement
Table of Contents

Related Manuals for Sharp ER-A247


Summary of Contents for Sharp ER-A247
- Page 1 ELECTRONIC CASH REGISTER CAISSE ENREGISTREUSE ELECTRONIQUE MODEL MODELE INSTRUCTION MANUAL MANUEL D’INSTRUCTIONS English ER-A247 ER-A247A...
- Page 2 In U.S.A.: FCC Regulations state that any unauthorized changes or modifications to this equipment not expressly approved by the manufacturer could void the user’s authority to operate this equipment. Note: This equipment has been tested and found to comply with the limits for a Class A digital device, pursuant to Part 15 of the FCC Rules.
-
Page 3: Introduction
Please keep this manual for future reference. It will help you if you encounter any operational problems. IMPORTANT • Be careful when removing and replacing the printer cover, as the cutter mounted on it is sharp. • Install the cash register in a location not subject to direct sunlight, unusual temperature changes, high humidity or splashing water. -
Page 4: Table Of Contents
CONTENTS INTRODUCTION ...1 IMPORTANT ...1 CONTENTS ...2 1 Parts and Their Functions ...6 External View ...6 Front view ...6 Rear view ...6 Printer ...7 Keyboard ...8 Keyboard layout ...8 Function key list ...8 Displays ...9 Operator display ...9 Customer display ...10 Screen save mode ...10 2 Selecting an Operating Mode ... - Page 5 Printing of non-add code numbers ...28 Payment Treatment ...28 Currency conversion ...28 Received-on-account entries ...29 Paid-out entries ...30 No-sale (exchange) ...30 Electronic Journal View ...31 TRAINING Mode...31 5 Correction...32 Correction of the Last Entry (Direct Void) ...32 Correction of the Next-to-Last or Earlier Entries (Indirect Void)...33 Subtotal Void...34 Correction after Finalizing a Transaction ...34 6 Special Printing Function ...35...
- Page 6 Currency conversion (CONV1, CONV2) ...57 Function Text Programming ...58 Personnel Programming ...59 Clerk ...59 Manager ...60 Mode Pass Code ...60 Training Clerk ...60 Terminal Programming...61 Date/Time Setting ...61 Date/time ...61 Optional Feature Selection ...62 Basic System ...63 Function Prohibit ...64 Function Authority ...65 Function Selection ...66 Print Selection ...67...
- Page 7 In Case of Printer Error ...97 Cautions in Handling the Printer and Recording Paper ...97 Cautions in handling the printer ...97 Cautions in handling the recording paper (thermal paper) ...97 Installing Batteries ...98 Replacing the Paper Roll ...99 Recording paper specifications ...99 Installing the Paper Roll ...99 Replacing the receipt paper roll ...100 Removing a Paper Jam ...100...
-
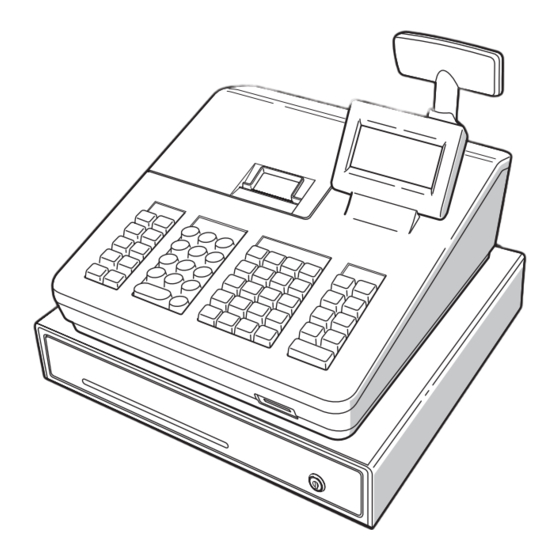
Page 8: Parts And Their Functions
Parts and Their Functions External View ■ Front view Printer cover Keyboard Drawer Check slot ■ Rear view Drawer lock Customer display RS232 connector Operator display SD card slot (Refer to the “SD CARD Mode” section.) -
Page 9: Printer
Printer The printer is a thermal printer, and therefore it does not require any type of ink ribbon or cartridge. The average life of the printer is approximately 6 million lines. When removing the printer cover, lift up from the rear. When installing the printer cover, hook it on the pawls at the front of the cabinet and shut it. -
Page 10: Keyboard
Keyboard ■ Keyboard layout ■ Function key list Receipt paper feed key Receipt print key Function menu key Auto key Tax1 shift key Percent 1 key Discount key Void key Help key Refund key Multiplication key Decimal point key Clear key Numeric key PLU/sub-department key Department code entry key Department shift key... -
Page 11: Displays
Displays ■ Operator display • Screen example 1 (REG mode) Mode name Receipt ON/OFF status indicator (R) Electronic journal near full indicator ( ) : Appears ( ) when the used memory is 80%. Sentinel mark (X) • Screen example 2 (PROGRAM mode) Mode name Sales information area: When a transaction information occupies more than 2 lines, you can scroll to the direction by using the just entered such as items and prices will appear... -
Page 12: Customer Display
The backlight in display is a consumable part. When the LCD display may no longer be adjusted and become darker, you should replace the LCD unit. Consult your authorized SHARP dealer for further details. The display can be tilted back and forth to the best operational viewing angle. -
Page 13: Selecting An Operating Mode
Selecting an Operating Mode When you turn the register on and press the listing available operating modes as shown below. Mode selection window Operating Modes You can select any mode other than REG from the list in the mode selection window. Your register supports the following operating modes: This mode allows you to enter various sales information. -
Page 14: Mode Selection
Mode Selection Procedure Press the key. The following mode screen is displayed. Use one of the following ways: • Move the cursor to the desired option by using the key, and press the key. • Enter the desired option number by using a numeric key and press the key. -
Page 15: Prior To Making Entries
Prior to Making Entries Preparations for Entries ■ Receipt paper roll If the receipt paper roll is not set in the register or it is getting low, install a new one according to section “Replacing the Paper Roll” under “Operator Maintenance.” ■ Receipt ON/OFF function You can disable receipt printing in the REG mode to save paper using the receipt function. Press the key. -
Page 16: Selecting The Function From The Menu
Error escape function To quit a transaction due to an error or an unforeseen event, use the error escape function as shown below: To clear the error state Transaction The transaction is voided (treated as a subtotal void) and the receipt is issued by this function. If you have already entered a tendered amount, the operation is finalized as a cash sale. -
Page 17: Help Function
HELP Function The HELP function allows you to print guidance messages for basic operation procedure of the register. ■ The HELP menu and guidance messages Press the key to display the operation menu. This menu provides a list of the procedures for which you can perform it or print the guidance messages. Procedure The operation menu is displayed. -
Page 18: Entries
Entries Item Entries ■ Single item entries Department entries For a merchandise classification, the register provides a maximum of 99 departments. To the departments, group attributes such as taxable status are applied to items when they are entered. When those departments for which the unit price has been programmed as zero (0) are entered, NOTE only the sales quantity is added. - Page 19 Key operation Example PLU/sub-department (open price) entries For another merchandise classification, the register provides a maximum of 2500 PLUs/sub-departments. PLUs are used to call up preset prices by a code entry. Sub-departments are used to classify merchandise into smaller groups under the departments. Every PLU and sub-department has a free code from 1 to 99999, and should belong to a department to obtain attributes of that department.
-
Page 20: Repeat Entries
■ Repeat entries You can use this function for entering a sale of two or more the same items. You can simply press the department key, Key operation Example Repeated department entry (direct) Repeated department entry (indirect) Repeated PLU entry Repeated subdepartment entry , or key to repeat entry. -
Page 21: Multiplication Entries
■ Multiplication entries Use this feature when you need to enter two or more the same items. This feature helps you when you sell a large quantity of items or need to enter quantities that contain decimals. Procedure When you use a programmed unit price Q ’t y Unit price... -
Page 22: Split-Pricing Entries
■ Split-pricing entries You will use this function when your customer wants to purchase more or less than the base quantity of a loose item. Procedure Selling q’ty Base q’ty • Selling quantity: Up to four-digit integer + three-digit decimal • Base quantity: Up to two digits (integer) Example Key operation When you use a programmed... -
Page 23: Single Item Cash Sale (Sics)
■ Single item cash sale (SICS) • This function is useful when a sale is for only one item and is for cash; such as a pack of cigarettes. This function is applicable only to those departments that have been set for SICS or to their associated PLUs or subdepartments. -
Page 24: Finalization Of Transaction
Finalization of Transaction ■ Cash or check tendering Press the key to get an including-tax subtotal, enter the amount tendered by your customer, then press the key if it is a cash tender or press the tendered is greater than the amount of the sale, your register will show the change due amount and the symbol “CHANGE.”... -
Page 25: Cash Or Check Sale That Does Not Need Any Tender Entry
■ Cash or check sale that does not need any tender entry Enter items and press the register will display the total sales amount. Key operation Example ■ Charge (credit) sale Enter items and press the key. Key operation Example Amount tendering operations (i.e. change calculations) can be achieved by the NOTE “Media Key Programming” allows them. ■... -
Page 26: Tax Calculation
Tax Calculation ■ Automatic tax When the register is programmed with a tax rate (or tax table) and the tax status of an individual department is set for taxable, it computes the automatic tax on any item that is entered directly into the department or indirectly via a related PLU. -
Page 27: Tax Delete
■ Tax delete The automatic tax (tax 1, tax 2, or all tax (tax1 – tax 4)) can be deleted. Procedure 7 TAX DELETE The “4 PST DELETE” function becomes effective only when the Canadian tax is selected. NOTE Example:Selling a $7.25 item (dept. 1, taxable 1) and another $5.15 item (dept. 11, taxable 2) for cash and entering the sale as non-taxable Key operation Select “TAX1 DELETE”... -
Page 28: Auxiliary Entries
Auxiliary Entries ■ Percent calculations (premium or discount) • Your register provides percent calculations for a subtotal or each item entry depending on the programming. • Percentage: 0.01 to 100.00% Percent calculation for a subtotal Example Key operation (When a discount of 10% is programmed for ¡ key.) Percent calculation for item entries Example Key operation (When a premium of 15% is... -
Page 29: Discount Entries
■ Discount entries Your register allows you to deduct a certain amount less than a programmed upper limit after the entry of an item or the computation of a subtotal depending on the programming. Discount for a subtotal Example Key operation Discount for item entries Example Key operation ■ Refund entries For a refund entry, press the The operation before pressing the refund item is the one entered into a department, enter the amount of the refund, then press the... -
Page 30: Printing Of Non-Add Code Numbers
■ Printing of non-add code numbers Enter a non-add code number such as a guest code number within a maximum of 16 digits and press the key at any point during the entry of a sale. The non-add code is printed on the receipt. Example Key operation Payment Treatment... -
Page 31: Received-On-Account Entries
Example Preset conversion rate (0.8063) :CONV 1 Key operation Currency conversion Amount tendered in foreign currency Example Open conversion rate (1.275) :CONV 2 Key operation Currency conversion Conversion rate Amount tendered in foreign currency ■ Received-on-account entries When you receive on account from a customer, use this function. From the FUNCTION MENU, select RA option to proceed the operation. You cannot receive RA in foreign currency. -
Page 32: Paid-Out Entries
■ Paid-out entries When you pay an amount to a vendor, use this function. From the FUNCTION MENU, select PO option to proceed the operation. Procedure 2 ***P O Key operation Example (Selection “2 ***PO”) ■ No-sale (exchange) Simply press the key without any entry. The drawer will open and the printer will print “NO SALE” on the receipt. -
Page 33: Electronic Journal View
Electronic Journal View The transaction data is kept in the electronic journal memory. To display the journal data, press the To retroact to past transaction data, press the To exit the electronic journal view, press the TRAINING Mode The training mode is used when the operator or the manager practices register operations. When a clerk set in training is selected, the register automatically enters the training mode, while a clerk not set in training is selected, the register automatically enters the ordinary REG mode. -
Page 34: Correction
Correction Correction of the Last Entry (Direct Void) If you make an incorrect entry relating to a department, PLU/subdepartment, percentage ( ), or item refund, you can void this entry by pressing the Key operation Example key immediately after the incorrect entry. 1250 " ¡ ¡ ,%2), discount Display... -
Page 35: Correction Of The Next-To-Last Or Earlier Entries (Indirect Void)
Correction of the Next-to-Last or Earlier Entries (Indirect Void) If you find an incorrect entry before finalizing the transaction (e.g. before pressing the can void the entry by the cursor operation or the key sequence operation. Indirect void by cursor operation You can void department, PLU/subdepartment, item refund, amount discount/premium and percent entries. Move the cursor to the item to be voided, and press the Indirect void by key sequence operation You can void department, PLU/subdepartment and item refund. -
Page 36: Subtotal Void
Subtotal Void You can void an entire transaction. Once subtotal void is executed, the transaction is aborted and the register issues a receipt. Key operation Example Subtotal void Correction after Finalizing a Transaction When you need to void incorrect entries that are found after finalizing a transaction or cannot be corrected by direct, indirect or subtotal void, follow this procedure. -
Page 37: Special Printing Function
Special Printing Function Copy Receipt Printing If your customer wants a receipt after you have finalized a transaction with the receipt ON-OFF function in the OFF status (no receipting), press the receipt when the receipt ON-OFF function is in the “ON” status. Procedure Printing a receipt after making the entries shown below with the receipt ON-OFF function Example “OFF”... -
Page 38: Manager Mode
Manager Mode The manager mode is used when managerial decisions must be made concerning register entries, for example, for overriding limitations and for other various non-programming managerial tasks. Normal register operations may also be performed in this mode. NOTE Entering the Manager Mode To enter the manager mode, use the following procedure in the REG mode: Procedure Manager code Example... -
Page 39: Reading (X) And Resetting (Z) Of Sales Totals
Reading (X) and Resetting (Z) of Sales Totals • Use the reading function (X) when you need to take the reading of sales information entered after the last resetting. You can take this reading any number of times. It does not affect the register’s memory. • Use the resetting function (Z) when you need to clear the register’s memory. Resetting prints all sales information and clears the entire memory except for the GT1 through GT3, reset count, and consecutive number. - Page 40 Report type GENERAL General report General report and GENERAL+EJ electronic journal <PLU MENU> PLU sales report by BY RANGE specified range PLU report by BY DEPT associated department <CLERK MENU> ALL CLERK All clerk report IND. CLERK Individual clerk report Hourly report (all or by HOURLY specified range) Hourly report (all)
-
Page 41: Daily Sales Totals
Daily Sales Totals ■ General report • Sample report *1: When you take X1 report, “X1” is printed. *2: Printed in the Z1 report only. *3: When the Canadian tax system is selected, the following is printed here. Mode title*1 Reset counter Net grand total (GT2-GT3) Grand total of plus registration... -
Page 42: Plu Report By Designated Range
■ PLU report by designated range • Sample report PLU code Item label * When you take Z1 report, “Z1” is printed. In case of a PLU X report only header NOTE information is stored in the Electronic Journal file. ■ Clerk reports Individual clerk report • Sample report *: When you take OPZ report, “OPZ” is printed. Full clerk report The report prints in the same format as in the sample report of individual clerk, but all clerk’s sales... -
Page 43: Periodic Report Sample
Periodic Report Sample ■ General information The periodic reading or resetting reports are the same in format as those in the X1/Z1 report for daily sales. The mode indicator will read “X2” or “Z2”. • Sample report (Full sales report) Mode title *1 Reset counter of daily total Reset counter of periodic consolidation Grand totals... -
Page 44: Prior To Programming
Prior to Programming When you are in the PROGRAM mode, the keyboard layout will be set to one of the programming layouts as shown below. Programming Keyboard Layout : Used for programming characters. For more information about programming characters, see the section “How to Program Alphanumeric Characters.” Also the : Used to move the cursor. -
Page 45: How To Program Alphanumeric Characters
How to Program Alphanumeric Characters This section discusses how to program alphanumeric characters for various texts. ■ Mobile phone method Entering alphanumeric characters To enter a character, simply press a corresponding character key on the programming keyboard. To enter “A”, press the “8” key. To enter “B”, press the “8” key twice. To enter “C”, press the “8”... -
Page 46: Entering Character Codes
■ Entering character codes Numerals, letters and symbols are programmable by entering the following procedure with the cursor placed at the position where you want to enter characters: To enter a digit, simply press a corresponding numeric key. XXX : character code (3 digits) Character code: 032 - 047... -
Page 47: Programming
Programming This chapter explains how to program various items. Before you start programming, press the MODE” by using the key and press the Basic Instructions This section illustrates the basic programming by using an example of programming for departments. ■ Programming screen Opening screen: When you select the “6 PROGRAM MODE”, your display will show a programming opening screen corresponding to the mode you selected. -
Page 48: Programming Example
■ Programming example Procedure The following example shows how to program 2.00 for the unit price, “ABCDE” for the description, and "non-taxable 1" for department 1. In the PROGRAM MODE screen, select “2 SETTING” by using the key and press the •... - Page 49 The following sections describe how to program each item which is contained in a programming group. On the first page of the “01” window, program the unit price and description as follows: NOTE There are three entry patterns for the programming: the numeric entry, character entry, and selective entry.
-
Page 50: Dept/Plu Programming
DEPT/PLU Programming Use the following procedure to select any option included in the department/PLU programming group: Procedure The following illustration shows those options included in this programming group. 1 DEPT/PLU 1 DEPARTMENT 2 PLU 3 PLU RANGE In the SETTING window, select “1 DEPT/PLU” •... -
Page 51: Department
■ Department The register can be equipped with maximum of 99 departments. Use the following procedure to program for department. NOTE To delete a department item in the "DEPARTMENT" window, select the item and press the A confirmation window appears to ask you whether to delete the item, select the option you prefer. Procedure Select a pertinent dept. -
Page 52: Plu
■ PLU • To delete a PLU item in the “PLU” window, select the item and press the NOTE window appears to ask you whether to delete the item, select the option you prefer. Procedure Select a pertinent PLU code, or directly enter a PLU code. -
Page 53: Functional Programming
Functional Programming Use the following procedure to select any option included in the functional programming group: Procedure The screen continues. The following illustration shows those options included in this programming group. 2 FUNCTIONS 1 $ DISC [(-)] 2 %1 DISC [%1] 3 %2 DISC [%2] 4 MANUAL TAX 5 RA... -
Page 54: Discount ( - )
■ Discount ( Procedure The screen continues. Program each item as follows: • AMOUNT (Use the numeric entry) Discount amount (max. 8 digits) • TEXT (Use the character entry) Description for the discount key. Up to 12 characters can be entered. • SIGN (Use the selective entry) Programming of the + or - sign assigns the premium or discount function to the discount key. -
Page 55: Percent ( , %2)
■ Percent ( , %2) Procedure The screen continues. ■ Manual tax Procedure Program each item as follows: • RATE (Use the numeric entry) Percent rate (0.00 to 100.00) • TEXT (Use the character entry) Description for the percent key. Up to 12 characters can be entered. • SIGN (Use the selective entry) Programming of the + or - sign assigns the premium or discount function to each percent key. -
Page 56: Cash In Drawer
■ RA You can program an upper limit amount and description for received-on-account key. Procedure ■ PO You can program an upper limit amount and description for paid-out key. Procedure ■ Cash in drawer You can program the description and the upper limit amounts for cash in drawer (sentinel). Procedure Program each item as follows: • HALO (High Amount Lockout) (Use the numeric entry) -
Page 57: Media Key Programming
Media Key Programming Use the following procedure to select any option included in the media group: Procedure The following illustration shows those options included in this programming group. 3 MEDIA 1 CASH 2 CHECK 3 CHARGE 4 CONVERSION ■ Cash key (Cash) Procedure In the SETTING window, select “3 MEDIA.” •... -
Page 58: Check Key (Check)
■ Check key (Check) Procedure ■ Charge key (Charge) Procedure Program each item as follows: • TEXT (Use the character entry) Description for the check key. Up to 12 characters can be entered. • HALO (High Amount Lockout) (Use the numeric entry) This function is intended for prevention of accidentally entered unreasonably amounts. Limit amount: 0.00 to 999999.99 • FOOTER PRINT (Use the selective entry) YES: Enables footer printing on the receipt. -
Page 59: Currency Conversion (Conv1, Conv2)
■ Currency conversion (CONV1, CONV2) Procedure The screen continues. Program each item as follows: • PRESET RATE (Use the selective entry) ENABLE: Enables preset rate DISABLE: Disable preset rate • RATE (Use the numeric entry) Currency exchange rate (0.000000 to 999.999999) • TEXT (Use the character entry) Description for the currency exchange key. Up to 12 characters can be entered. • SYMBOL (Use the character entry) Currency descriptor. -
Page 60: Function Text Programming
Function Text Programming You can program a maximum of 12 characters for each function by using the following table: Procedure The screen continues. List of function text Function Net sales total Net taxable 1 subtotal Gross tax 1 total Tax 1 total of refund entries Net tax 1 total Exempt tax 1 Net taxable 2 subtotal... -
Page 61: Personnel Programming
Personnel Programming Use the following procedure to select any option included in the personnel group: Procedure The following illustration shows those options included in this programming group. 5 PERSONNEL 1 CLERK 2 MANAGER 3 MODE PASS CODE 4 TRAINING CLK ■ Clerk Procedure Select a clerk code, or directly enter a clerk code. -
Page 62: Manager
■ Manager You can program a secret code for manager. Procedure ■ Mode Pass Code You can program a secret code for each mode. Procedure The screen continues. ■ Training Clerk You can set the training clerk code and text for the training mode title. Procedure Program each item as follows: • PASS CODE (Use the numeric entry) -
Page 63: Terminal Programming
Terminal Programming Use the following procedure to select any option included in the terminal group: Procedure Date/Time Setting You can set the date and time for the register. ■ Date/time Procedure In the SETTING windows, select “6 TERMINAL.” • The TERMINAL windows will appear. Select any option from the following options list: • MACHINE# (Use the numeric entry) Machine number (max. -
Page 64: Optional Feature Selection
Optional Feature Selection Use the following procedure to select any option included in the optional group: Procedure The following illustration shows those options included in this programming group. 8 OPTIONAL 1 BASIC SYSTEM 2 FUNC.PROHIBIT 3 FUNC.AUTHORITY 4 FUNCTION SELECT 5 PRINT SELECT In the SETTING window, select “8 OPTIONAL.”... -
Page 65: Basic System
■ Basic System Your register allows you to select various item of basic system. Procedure The screen continues. • ERROR (Use the selective entry) Response to an erroneous, invalid key operation LOCK ERROR: Sound a short buzzer for 2 seconds, and display Error. To hide the Error display, press key. -
Page 66: Function Prohibit
■ Function Prohibit Your register allows you to select whether to enable or disable various functions. Procedure The screen continues. • COPY RCPT (Use the selective entry) ENABLE: Enable the receipt copy function DISABLE: Disable the receipt copy function • VOID MODE (Use the selective entry) ENABLE: Enable the void mode DISABLE: Disable the void mode • SUBTOTAL<0 (Use the selective entry) ENABLE: Enable to go negative merchandise subtotal DISABLE: Disable to go negative merchandise subtotal... -
Page 67: Function Authority
■ Function Authority Your register allows you to select whether to public or to limit function authority. Procedure The screen continues. • ITEM VD (Use the selective entry) LIMITED: Allowed only in the Manager mode. PUBLIC: Allowed in the REG mode and the Manager mode. • SBTL VD (Use the selective entry) LIMITED: Allowed only in the Manager mode. PUBLIC: Allowed in the REG mode and the Manager mode. -
Page 68: Function Selection
■ Function Selection Your register enables you to select various functional selections. Procedure The screen continues. • VD MODE TO HOURLY (Use the selective entry) YES: Enable to add to the hourly total in void mode. NO: Disable to add to the hourly total in void mode. • ST BEFORE DIRECT (Use the selective entry) Subtotal entry before direct non-tendering finalization NOT: Not to require entry of subtotal for the non-tendering finalization MUST: Require entry of subtotal for the non-tendering finalization... -
Page 69: Print Selection
■ Print Selection You can program various printing functions. Procedure The screen continues. • PURCHASE NO. (Use the selective entry) YES: Print the number of the purchase No. Not to print the number of the purchase No. • TAX STATUS (Use the selective entry) YES: Print the tax status Not to print the tax status • TAX (Use the selective entry) Tax print format 1 to 4:... - Page 70 • FOOTER (Use the selective entry) ALL: Print the footer in any media BY MEDIA: Print the footer by media • 0 AMT PLU (Use the selective entry) When the PLU unit price is 0, printing the amount is: TEXT ONLY: Print the text only NORMAL: Print the price and the text • ITEM JOURNAL (Use the selective entry) ALL: Print all items on electronic journal...
-
Page 71: Report Programming
Report Programming Use the following procedure to select any option included in the report group: Procedure The following illustration shows those options included in this programming group. 9 REPORT 1 0 SKIP 2 PRINT SELECT 3 Z COUNTER 4 Z1 GENERAL REPORT 5 E. -
Page 72: Zero Skip
■ Zero skip You can program whether or not to skip “0” in each report. Procedure • PLU (Use the selective entry) SKIP: Skips those data that are “0” in the PLU report. NOT SKIP: Does not skip those data that are “0” in the PLU report. • CLERK (Use the selective entry) SKIP: Skips those data that are “0”... -
Page 73: Print Select
■ Print select You can program whether or not to print the item on the report. Procedure The screen continues. • GT2 ON Z (Use the selective entry) YES: Print GT2 on the Z report. NO: Not to print GT2 on the Z report. • GT3 ON Z (Use the selective entry) YES: Print GT3 on the Z report. NO: Not to print GT3 on the Z report. -
Page 74: Z Counter
■ Z Counter Procedure ■ Z1 General report Procedure ■ Electronic Journal Procedure GENERAL Z1: Max.4 digits (0000 to 9999) GENERAL Z2: Max.4 digits (0000 to 9999) • SD: SAVE SALES (Use the selective entry) YES: Save the sales data in the SD card. Not to save the sales data in the SD card. • SD: SAVE EJ (Use the selective entry) YES: Save the electronic journal data in the SD card. -
Page 75: Message Programming
Message Programming Use the following procedure to select any option included in the message group: Procedure The following illustration shows those options included in this programming group. 10 MESSAGE 1 RECEIPT LOGO ■ Receipt logo Your register can print programmed messages for customers on every receipt. The logo text is printed in a centering form on the receipt. -
Page 76: Device Configuration Programming
• The EFT function is not appeared in the Quebec fiscal type. NOTE • The SRM function is appeared in the Quebec fiscal type only. • For enable/disable of the Quebec fiscal mode, please contact your authorized SHARP dealer. ■ Keyboard Procedure In the SETTING window, select “11 DEVICE CONFIG.”... -
Page 77: Display
Procedure • The EFT function is not appeared in the Quebec fiscal type. NOTE • For enable/disable of the Quebec fiscal mode, please contact your authorized SHARP dealer. Program each item as follows: • POWER SAVE (Use the numeric entry) Time of the power save (2 digits: 0,1 to 99 minutes 0:100 minutes) • P. SAVE AT TM (Use the selective entry) -
Page 78: Rs Port
■ RS port Procedure For the Quebec fiscal type is as follows. NOTE Procedure ■ On-line Procedure The screen continues. • LINE FORM (Use the selective entry) Programming of the modem control FULL: Full duplex system HALF: Half duplex system • BAUD RATE (Use the selective entry) Transmission data rate 38400 bps 19200 bps 9600 bps 4800 bps • START CODE (Use the numeric entry) -
Page 79: Srm (Sales Recording Module)
■ SRM (Sales Recording Module) Procedure • The SRM function is appeared in the Quebec fiscal type only. NOTE • For enable/disable of the Quebec fiscal mode, please contact your authorized SHARP dealer. Program each item as follows: • PRINTER (Use the selective entry) T88(3)+LOGO T88(3) • AUTO CUT (Use the selective entry) YES: The auto-cut finction is used. -
Page 80: Tax Programming
Tax Programming Use the following procedure to select any option included in the tax group: The register is adapted to US and Canadian tax systems. If the Canadian tax system is required, NOTE the tax system must be changed (see page 79 for tax system selections), then program the tax rate or tax table and quantity for doughnut exempt which are described in this section. -
Page 81: Tax System
■ Tax system Procedure Tax system: NOTE • For US tax system, select “AUTO TAX”. • For Canadian tax, from the table below, specify a tax system suitable for your province (if necessary contact your local tax office for correct sales tax information) and for your type of retail business. -
Page 82: Tax 1 Through 4
■ Tax 1 through 4 Procedure (To the following table tax or % tax) • Table tax Procedure The screen continues. The programming data of tax table are as follows. Selection of tax method TABLE TAX: Programmed tax table is used. % TAX: Programmed % tax rate is used. Selection of the interval • INTERVAL (Use the selective entry) LOW 0.99: Less than 0.99 (max. - Page 83 <Sample tax table> Tax table: 6% To program a tax table, first make a table like the right table shown below. Range of sales amount Taxes Minimum breakpoint 1.11 1.23 1.39 1.57 1.73 1.89 2.11 From the tax table, calculate the differences between a minimum break point and the next one (A). Then, from the differences, find irregular cycles (B) and regular cycles (C and D).
-
Page 84: Doughnut Exempt
Sample tax table Example 8% Minimum breakpoint 1.11 1.26 1.47 1.68 1.89 2.11 Example data of above tax table (8%) TAX RATE: 8.0000 (enter 8) CYCLE: 1.00 INITIAL TAX: 0.01 LOWER TAX: 0.11 BREAK POINT1: 0.26 BREAK POINT2: 0.47 BREAK POINT3: 0.68 BREAK POINT4: 0.89 BREAK POINT5: 0.89 BREAK POINT6: 1.11 BREAK POINT7: 1.11 BREAK POINT8: 1.11 • % Tax Procedure ■... -
Page 85: Automatic Sequencing Key Programming
Automatic Sequencing Key Programming If you program frequently performed key operations for the simply by pressing the corresponding ■ Key Sequence Procedure Example In case of the X1 General report printing. key, you can enter those key operations key in key operations. In the SETTING window, select “13 AUTO KEY.” •... -
Page 86: Reading Of Stored Programs
Reading of Stored Programs You can read programs stored in the PROGRAM mode. ■ Program reading sequence To read those programs stored in the PROGRAM mode, use the following procedure: 1. Select the PROGRAM mode from the mode selection window. 2. Select “1 READING” from the PROGRAM mode to display the items list, and press the Select an item listed in the table shown later. -
Page 87: Sample Printouts
■ Sample printouts • Departments Operating mode Report type Dept. code Description • PLU Report type PLU code Description Tax status Unit price Function programming Amount entry type 0:Inhibit 1:Open SICS 0:No 1:Yes 2:Preset HALO limit 3:Open&Preset Associated dept. code Amount entry type Unit price... - Page 88 • Functions • Media Report type Sign (plus/minus) Function text Type I=Item S=Subtotal Rate HALO limit Report type HALO Programming data (00) Function text Entry of amount tendered (0:Non-Compulsory, 1:Compulsory) Programming data (00) Footer print on receipt (0:No, 1:Yes) Entry of amount tendered (0:Inhibit, 1:Compulsory) Footer print on receipt (0:No, 1:Yes)
- Page 89 • Function text The text of “GST EXMPT”, “PST TTL” and “GST TTL” appears only when Canadian tax is NOTE selected. • Clerk Report type Function Text • Manager Report type Clerk code Clerk name Auto key operation /Pass code 0: Enable 1: Disable Report type Pass code...
- Page 90 • Mode pass code • Optional feature • Training clerk Report type Mode Pass code Report type Item Setting Report type Training clerk code Training mode title text...
- Page 91 • Report setting • Message Report type Setting Item Report type Receipt logo text...
- Page 92 • Device configuration (The Quebec fiscal type is as follows.) Report type Setting Item Report type Setting Item...
- Page 93 • Tax • AUTO key Report type Tax no. Tax system Tax table • ROM version Tax rate Lower taxable amount Report type Key operation Report type...
-
Page 94: Eft Test Function
EFT Test Function The EFT Test function appears only when the RS port is programmed to “EFT” in “Device Configuration Programming”. Use the following procedure to perform the EFT test function. Procedure When the EFT terminal (CREDIT CARD terminal) is not connected, the EFT test function causes NOTE an error. -
Page 95: Sd Card Mode
SD CARD Mode You can exchange data through an SD memory card between your register and a PC when managing the data in your register by using the SHARP’s PC software “PC-Link”. For “PC-Link”, consult your dealer. You can also save all necessary data in the register to an SD memory card for backup. -
Page 96: Folder Name Selecting
■ Folder name selecting Procedure (1) Select “3 FOLDER CONTROL” in the SD CARD mode and press the CONTROL window is displayed. (2) Select “2 SELECT FOLDER” and press the (3) Select the required folder name from the list, and press the To cancel the operation, press the ■... -
Page 97: Data Loading
The designated file is not found. NO FOLDER The user folder is not found. (SHARP/ECRER2X7/user folder name) The maximum allowable number of times of sales data writing is exceeded. Delete unnecessary data from the SD memory card on a PC or replace the OVER LIMIT. -
Page 98: Electronic Journal
Electronic Journal ■ Electronic journal This function is intended to record the journal data in the electronic journal file (memory) instead of journal paper. • Recording data The register records the printing output to the journal printer in all modes into the electronic journal file. • Reporting (X report) The register reports the journal data (same as normal journal formats) in the electronic journal file by the report printer. -
Page 99: Operator Maintenance
• Never touch the surface of the printer head and print roller. ■ Cautions in handling the recording paper (thermal paper) • Use only the paper specified by SHARP. • Do not unpack the thermal paper until you are ready to use it. • Avoid heat. The paper will color at around 70°C. -
Page 100: Installing Batteries
Installing Batteries This register displays a low battery warning message “LOW BATTERY” when the batteries are low, and displays a no battery warning message “NO BATTERY” when batteries are extremely low or batteries are not installed. If no batteries are installed, install two new alkaline batteries LR6 (“AA” size) at once. If batteries are already installed, replace them with new ones as soon as possible. -
Page 101: Replacing The Paper Roll
Replacing the Paper Roll ■ Recording paper specifications Be sure to use paper rolls specified by SHARP. The use of any other paper rolls than specified could cause paper jamming, resulting in register malfunction. Paper specification Paper width: 57.5 ± 0.5 mm Max. outside diameter: 80 mm Quality: High quality (0.06 to 0.08 mm thickness) -
Page 102: Replacing The Receipt Paper Roll
When colored dye appears on the edges of the paper roll, it is time to replace the paper roll. Use paper of 57.5 ± 0.5 mm in width. To prevent jamming be sure to use paper specified by SHARP. Confirm that the REG mode has been selected. -
Page 103: Cleaning The Printer (Printer Head/Sensor/Roller)
Cleaning the Printer (Printer Head/Sensor/Roller) When the printed text is getting dark or faint, paper dust may be stuck to the printer head, sensor and/or roller. Clean them as follows: CAUTION: Never touch the printer head with a tool or anything hard as it may damage the head. The paper cutter is mounted on the printer cover. Be careful not to cut yourself. Printer head Sensor Roller Print roller arm Select the OFF mode. Remove the printer cover. Lift up the print roller arm. -
Page 104: Drawer And Drawer Lock Key
Drawer and Drawer Lock Key ■ Removing the Till The till in the register is detachable. After closing your business for the day, remove the till from the drawer and keep the drawer open. The coin case is also detachable from the till. • For ER-A247 •... -
Page 105: Before Calling For Service
The temperature/voltage of printer head is too high. Turn off the power, and repair the printer. Then turn on the power and press key. Turn off the power, and consult a Sharp Authorized Servicer. Desired code is not programmed yet. Checking key. -
Page 106: Specifications
Specifications Model: ER-A247 ER-A247A Dimensions: 16.7 (W) x 15.6 (D) x 12.6 (H) in. (425 (W) x 395 (D) x 320 (H) mm) Weight: Approx. 24.3 Ib (11 kg) Power Source: 120V AC, 60Hz Power Consumption: Stand-by: 6.3 W Operating: 12.8 W (max.) Working Temperature: 32 to 104 °F (0 to 40 °C) Humidity:... - Page 107 Sharp. You should be aware, however, that Sharp does not itself extend any warranties, either express or implied, directly to you, the enduser, and no one is authorized to make any representations or warranties on behalf of Sharp.
- Page 108 Sharp. You should be aware, however, that Sharp does not itself extend any warranties, either express or implied, directly to you, the enduser, and no one is authorized to make any representations or warranties on behalf of Sharp.
- Page 109 SHARP ELECTRONICS CORPORATION Sharp Plaza, Mahwah, New Jersey 07495-1163 1-800-BE-SHARP For additional information and product registration, www.sharpusa.com please visit SHARP ELECTRONICS OF CANADA LTD SHARP ÉLECTRONIQUE DU CANADA LTÉE 335 Britannia Road East, Mississauga, Ontario L4Z 1W9 http://www.sharp.ca...