
Related Manuals for Soundstream VIR-7860


Summary of Contents for Soundstream VIR-7860
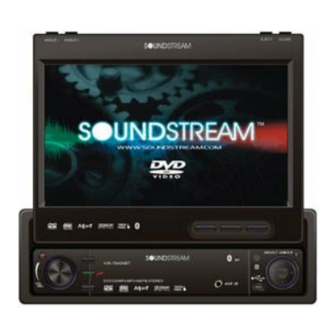
- Page 1 In-Dash Fully Motorized 7” Touch Screen Monitor TV/FM/AM Receiver/ DVD Player Operating manual...
-
Page 2: Safety Information
SAFETY INFORMATION PLEASE READ COMPLETELY AND BECOME FAMILIAR WITH THE CONTENTS OF THIS MANUAL BEFORE INSTALLATION AND OPERATION OF THIS UNIT, AND KEEP IT CAREFULLY FOR FUTURE REFERENCE. This unit is a class 1 laser product. The laser beam may cause hazardous radiation if exposure to laser system directly. - Page 3 Cautions: To reduce the risk of fire or electric shock, and annoying interference, use only the recommended accessories. While driving, keep the volume level low enough to be aware of road and traffic conditions. Parking in direct sunlight can produce very high temperatures inside your vehicle. Give the interior a chance to cool down before starting playback.
-
Page 4: Features
FEATURES - ISO/1-DIN Size (178mm x 54mm) - DVD/DVD-R/DVD-RW/VCD/CD/CD-R/CD-RW/MP3 Compatible - 7" Wide-Screen TFT/LCD Display - Touch Screen Panel Control - Graphic User Interface - High Brightness: 400 cd/m - Resolution: 1440 x 234 - Color, Contrast, Brightness, Tint controls - Fully Motorized Viewing Angle Adjustment - Last Angle Memory for Panel - Jumbo Size Front Panel Color LCD Display... -
Page 5: Table Of Contents
TABLE OF CONTENTS Safety Information………………………………………………….………………………….1 Features……………………………………………………………….……………………… 3 Table of Contents…………………………………….…………….………………………...4 Accessories………………………………………….…….…………………………………..5 Unit Installation………………………………………….….………………………………….6 Unit Removal…………………………………………….…….……………………………...8 Wiring Connection…………………………………………..………………………………...9 Front Panel………………………………………………………..…..………………………12 Remote Control……………………………………………………………………………….17 Basic Operation……………………………………………………………………………….21 Touch Screen Operations…………………………………………………….……………..23 Touch Screen Calibrate……………………………………….………………………..23 Main Menu…………………………………………………….…………………………24 Radio Operations…………………………………………………….……………….…25 DVD Operations…………………………………………………….……………….…..28 USB Operations…………………………………………………….………………..…30 TV Operations…………………………………………………….………………..……31 iPod Operations…………………………………………………….………………..…32 AV IN Operations…………………………………………………….…………………34 CDC Operations…………………………………………………….…………….……35 GPS Operations…………………………………………………….…………….……36... -
Page 6: Accessories
ACCESSORIES Bolt Connecter Wire x 1 Operational Manual x 1 Box x 1 Steel Bar x 1 Trim Bezel x 1 Mounting Sleeve x 1 Nut M5 x 1 M5X5 Screws x 4 Remote Control x 1 Keys x 2... -
Page 7: Unit Installation
UNIT INSTALLATION Please read all of the instructions before beginning the installation. Recommend having your unit installed by a professional installation shop. Tools and Supplies: You will need these tools and supplies to install your unit: - Torx type, flat-head and Philips screwdrivers - Wire cutters and strippers - Tools to remove existing radio (screwdriver, socket wrench set or other tools) - Electrical tape... - Page 8 ● Securing the Unit to the Mounting Bracket. Installation Method 1. Install the front panel into the unit. 2. Bend the claws outward for tight fit, if necessary. Install the Mounting Box into the dashboard, tighten the unit in place. 3.
-
Page 9: Unit Removal
UNIT REMOVAL 1. Detach the front panel. 2. Insert the keys that supply to the unit at both sides of the unit (shown as illustrated) until pull the keys to make it possible to remove the unit from the dashboard. -
Page 10: Wiring Connection
WIRING CONNECTION Cautions: -To prevent short circuits, remove the key from the ignition and disconnect the terminal of the battery. -Make the proper input and output cable connections for each unit. -Connect the wiring harness cables in the following order: ground wire, battery wire, ignition wire. - Page 11 Wiring Diagram Notes: -If the TV antenna is mounted near a radio antenna, reception quality may be affected during simultaneous reception of TV and Radio broadcasts. -Please separate Battery Units before setting products to prevent from fire and electric shock. Mounting the antenna near to a radio antenna will result in noise. In this case, consult your dealer concerning mounting location.
- Page 12 Wiring Diagram...
-
Page 13: Front Panel
FRONT PANEL 1. ANGLE - 2. ANGLE + 3. EJECT 4. OPEN / CLOSE 5. POWER / SOURCE 6. VOLUME / SEL 7. PLAY / PAUSE 8. MUTE 9. AST 10. REMOTE 11. MINI USB 12. LEFT / UP / RIGHT / DOWN / ENTER / BAND 13. - Page 14 1. [ANGLE -] / 2. [ANGLE +] Adjust the view angle of the monitor to choose the best displaying effect. 1- Continual angle adjustment Hold on pressing the [ANGLE +] / [ANGLE -] buttons to adjust the angle of TFT monitor upward / downward by continual increasing / decreasing.
- Page 15 7. [MUTE] Press the [MUTE] button to switch off the sound; press it again to resume to the previous volume level. 8. [AST] Press to seek radio station / TV channel automatically under RADIO / TV Modes. 9. [ ll] Press to pause playback when playing;...
- Page 16 13. REL Press to flip down the front panel. 14. [EJECT] When flip down the front panel, press to eject / load a disc. 15. [RESET] Press to reset the unit. 16. [OUT] / 17. [IN] Press the [OUT] / [IN] buttons to move the monitor forward / backward by singly step. There are 4 steps to move the monitor forward / backward totally.
- Page 17 3. Disc Icon: It rotates when playing disc under the DVD Mode. 4. Main Display Area: Display the information such as working mode, characters, playback time & number of track, radio frequency, TV channel etc. 5. SCN Icon: It displays when the AST function on. It disappears when the AST function off.
-
Page 18: Remote Control
REMOTE CONTROL 1. POWER / SOURCE 2. MUTE 3. NUMBER BUTTONS 4. MENU 5. AUDIO 6. DISPLAY 7. UP 8. LEFT 9. ENTER / BAND 10. PROGRAM 11. DOWN 12. F.REV 13. F.FWD 14. SLOW 15. RANDOM 16. ZOOM 17. SYSTEM 18. - Page 19 1. [POWER/SOURCE] Same functions as key on front panel. 2. [MUTE] Same functions as key on front panel. 3. [NUMBERS 0~9] For 1~6, press these buttons to store the current radio station or recall the stored station under the Radio Mode. For 0~9, press these buttons to select the tracks, and input the code.
- Page 20 16. [ZOOM] Press to magnify the picture display when play DVD, VCD disc. 17. [SYSTEM] Press to enter / exit the System Parameter Setup menu. 18. [OPEN/CLOSE] Press to open / close the monitor. 19. [SETUP] Press to enter the DVD SETUP menu. 20.
- Page 21 31. [STOP] Press to stop the playback. 32. [A-B] Press to setup A-B repeat playing. 33. [REPEAT] Press to select the chapter / title / disc to repeat playing. 34. [P/N] Press the button to switch the video output (PAL/NTSC) when playing DVD disc. 35.
-
Page 22: Basic Operation
BASIC OPERATIONS Startup Press the [POWER/SOURCE] button on the panel or remote control to startup the power, the TFT monitor will spread out automatically and the system return to the working Mode when last turn off. Turnoff Hold on pressing the [POWER/SOURCE] button on the panel or remote control to turnoff the power, the TFT monitor will retract automatically. - Page 23 Telephone Mute Control Connect the telephone mute control wire TEL_MUTE (see Wiring Diagram). If there is a vehicle call comes in, the sound volume will be automatically reduced to a very small value, and TFT monitor shows: YOU GET A PHONE; when call finished, the sound volume will recover to former volume, and the words YOU GET A PHONE disappear.
-
Page 24: Touch Screen Operations
TOUCH SCREEN OPERATIONS TOUCH SCREEN CALIBRATE Under the RADIO Mode, press the button [SYSTEM] of panel or remote control to enter the CALIBRATE page: 1 ~ 5: TOUCH POINTS To touch the points from 1 to 5 by using a ballpoint pen or pencil, until all points are changed to red color. -
Page 25: Main Menu
MAIN MENU 1, TIME It is time display. Touch the icon “MORE” to enter the 2 page of main menu: 1, RETURN Touch the icon “RETURN” to enter the 1 page of main menu. -
Page 26: Radio Operations
RADIO OPERATIONS Touch the icon “RADIO” to enter the 1st operation page of RADIO Mode: 1, BAND Touch the icon to switch the FM/AM wave band as following: FM1 - FM2 - FM3 - AM1- AM2 - FM1 To press the [BAND/ENTER] button of panel or remote control performs same operation. 2, AST Seeking and store the stations 1. - Page 27 5, MUTE Touch the icon to switch off the sound; touch it again to resume to the previous volume level. 6, NEXT PAGE Touch the icon to enter the 2 7, RETURN Touch the icon to enter the 1 8, RADIO INFORMATION This is the current radio information display including band, frequency, stereo and local etc.
- Page 28 Operation Page of RADIO Mode: 1, LOCAL Touch the icon to set the ON / OFF When you are using the local searching function of LOCAL, you can only receive the radio station with strong enough signals and fine state. 2, STEREO Touch the icon to turn the stereo on / off under Radio Mode.
-
Page 29: Dvd Operations
DVD OPERATIONS Touch the icon “DVD” to enter the DVD Mode if disc inside. The unit will switch to DVD Mode automatically if loading disc. The unit will switch to RADIO Mode automatically if ejecting disc. 1st operation page of DVD Mode: 1. - Page 30 7, MUTE Touch the icon to switch off the sound; touch it again to resume to the previous volume level. 8, NEXT PAGE Touch the icon to enter the 2 9, RETURN Touch the icon to enter the 1 operation page of DVD Mode: 1, MENU Touch the icon to return to the boot menu when playing DVD disc.
-
Page 31: Usb Operations
6, NEXT PAGE Touch the icon to enter the 1 7, RETURN Touch the icon to enter the 1 USB OPERATIONS Touch the icon “USB” to enter the USB Mode if USB connected. The unit will switch to USB Mode automatically if connecting USB. When disconnecting USB, the unit will switch to RADIO Mode automatically if there is no disc in the unit;... -
Page 32: Tv Operations
TV OPERATIONS Touch the icon “TV” to enter the TV Mode: 1, AST Touch the icon to seek all stations with the strongest signal from the lowest frequency point; press any button to stop seeking. The unit will stop on the beginning frequency if no available station after seeking one cycle. -
Page 33: Ipod Operations
IPOD OPERATIONS Touch the icon “IPOD” to enter the IPOD Mode if iPod connected. The unit will switch to IPOD Mode automatically if connecting iPod. The unit will switch to RADIO Mode automatically if disconnecting iPod. NOTE: It is available for iPod operations with an additional iPod cable which is optional accessory. - Page 34 Hold on touching the [STOP] button again to switch to play the music of iPod. To hold on pressing the [STOP] button of remote control performs same operation. NOTE: Under the Music Mode of iPod, it is not effective for the controller of iPod itself, use the keys of unit to control the operation and all operations are same as DVD Mode.
-
Page 35: Av In Operations
AV IN OPERATIONS Touch the icon “AV IN” to enter the AV IN Mode: 1, MUTE Touch the icon to switch off the sound; touch it again to resume to the previous volume level. 2, RETURN Touch the icon to enter the 2 page of main menu. -
Page 36: Cdc Operations
CDC OPERATIONS Touch the icon “CDC” to enter the CDC Mode if CD/DVD changer connected: 1. PLAY / PAUSE Touch the icon to play or pause the disc. To press the [PLAY/PAUSE] button of panel or remote control performs the same operation. -
Page 37: Gps Operations
GPS OPERATIONS Touch the icon “GPS” to enter the GPS Mode: 1, MUTE Touch the icon to switch off the sound; touch it again to resume to the previous volume level. 2, RETURN Touch the icon to enter the 2 page of main menu. -
Page 38: System Setup
SYSTEM SETUP Touch the icon “SYSTEM” or hold on pressing the [VOL / SEL] button of panel to enter the SETUP of system parameters: 1. SCREEN PARAMETER SETUP 2. SOUND PARAMETER SETUP 3. CLOCK SETUP 4. OTHER PARAMETER SETUP Touch the icon 1~4 to select the main menus directly. 5. - Page 39 SCREEN PARAMETER SETUP - 9 ~ + 9 1, CONTRAST: - 9 ~ + 9 2, TINT: - 9 ~ + 9 3, COLOR: - 9 ~ + 9 4, BRIGHTNESS: SOUND PARAMETER SETUP - 9 ~ + 9 1, BALANCE: - 9 ~ + 9 2, FADER: - 9 ~ + 9...
- Page 40 CLOCK SETUP This is the time display. 1, TIME DISPLAY: 00 ~ 23 2, HOUR: 00 ~ 59 2, MINUTE: 12H / 24H 4, CLOCK MODE: OTHER PARAMETER SETUP EUROPE – ASIA – USA – JAPAN – OIRT – EUROPE 1, RADIO AREA: LOCAL –...
-
Page 41: Dvd Setup Menu
DVD SETUP MUNE SETUP MENU OPERATION Press the [SETUP] button of remote control to enter the DVD SETUP Menu. Press the [<] / [>] buttons to switch the main menus as following: SYSTEM – LANGUAGE – AUDIO – VIDEO – SPEAKER – DIGITAL Press the [∧] / [∨] buttons to enter the submenus from main menus. - Page 42 SYSTEM SETUP TV SYSTEM Following options are available for the TV Display: NTSC PAL 60 SCREEN SAVER Select ON or OFF. VIDEO Following options are available for the TV Display: INTERLACE-YUV TV TYPE Following options are available for the TV Display: 4 : 3 PS 4 : 3 LB PASSWORD...
- Page 43 LANGUAGE SETUP OSD LANGUAGE Following options are available for the OSD LANGUAGE: ENGLISH GERMAN ITALIAN RUSSIAN DANISH NORWEGIAN AUDIO LANGUAGE Following options are available for the AUDIO LANGUAGE: ENGLISH GERMAN ITALIAN RUSSIAN DANISH NORWEGIAN SUBTITLE LANGUAGE Following options are available for the SUBTITLE LANGUAGE: ENGLISH GERMAN ITALIAN...
- Page 44 AUDIO SETUP AUDIO OUT Following options are available for the AUDIO OUT: SPDIF / OFF SPDIF / RAW Following options are available for the KEY: VIDEO SETUP BRIGHTNESS Following options are available for the BRIGHTNESS: SPDIF / PCM...
- Page 45 CONTRAST Following options are available for the CONTRAST: Following options are available for the HUE: SATURATION Following options are available for the SATURATION: SPEAKER SETUP DOWNMIX Following options are available for the DOWNMIX: LT / RT Stereo BASS MODE Following options are available for the BASS MODE: ALL LG SPK ALL SM SPK MIXED SPK...
- Page 46 DIGITAL SETUP OP MODE Following options are available for the OP MODE: LINE OUT RF REMOD DYNAMIC RANGE Following options are available for the DYNAMIC RANGE: FULL 6 / 8 4/ 8 2 /8 DUAL MONO Following options are available for the DUAL MONO: STEREO MONO L MONO R...
-
Page 47: Troubleshooting
TROUBLE SHOOTI-NG If any of problem persists after checking the below list, Please consult your nearest service dealer. Never attempt to disassemble and repair unit personally. Problem GENERAL ACC Fuse blown Unit will not power Car battery fuse blown illegal operation Remote control Battery depleted does not... - Page 48 Problem TFT MONITOR Monitor does not TFT Auto Open is turned of open automatically Incorrect connection to parking brake wire PARKING is activated No image parking engaged Flashing image or DVD is not compatible with interference current appears on screen Image blurred, distorted, or dark Prolonged image...
- Page 49 Problem Interruption Disc is dirty or scratched occurred during playback File is damaged/bad recording Incorrect playback Message is longer than LCD can message display displayed Error Messages Message Displayed Loading Disc is being read Disc is dirty Disc is upside down No disc Disc not present in loading compartment...
-
Page 50: Specifications
SPECIFICATIONS GENERAL Supply Voltage Load Impedance Max Power Output Tone Controls Bass 100Hz Treble 10KHz Dimension (approx) Mounting (approx) FM TUNER Frequency Range Usable Sensitivity Stereo Separation Frequency Response AM TUNER Frequency Range Usable Sensitivity TV TUNER Frequency Range DVD PLAYER Signal System Signal-to-noise Radio Distortion... -
Page 51: Disc Notes
DISC NOTES ■ Disc formats supported by this player Handling and Cleaning ● Dirty, dusty, scratched or warped discs will cause misoperation. ● Do not place stickers or make scratches on discs. ● Do not warp discs. ● A disc should always be kept in its case when not in use to prevent from damage. ●...