
Related Manuals for Ericsson GH688


Summary of Contents for Ericsson GH688
- Page 2 Second edition (June 1997) This manual is published by Ericsson Mobile Communications AB, without any warranty. Improvements and changes to this manual due to typographical errors, inaccuracies of current information, or improvements to programs and/or equipment, may be made by Ericsson Mobile Communications AB at any time and without notice.
-
Page 3: The Phone
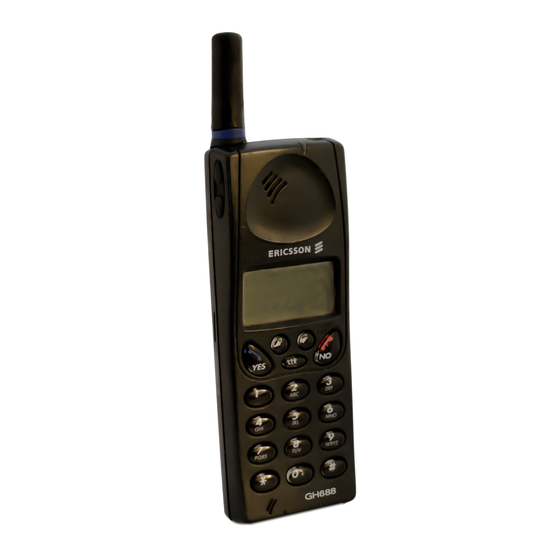
GH688, a product specially suited the heavy user of mobile phones. The GH688 offers advanced data communication functions, up to six hours of uninterrupted talk time and comes with an extra large display. Ericsson’s mobile phones are produced to meet high quality... -
Page 4: Table Of Contents
Guidelines for Safe and Efficient Use ....iv The Phone ....1 Preparing Your Phone for Use . - Page 5 Setting the Time, Date and Alarm . . 27 The Clock ... 27 The Date ... . 27 The Alarm ... 27 Diverting Incoming Calls.
- Page 6 Since its introduction in the mid 1980s the mobile phone is one of the most exciting and innovative products ever developed. Your phone can help you to stay in touch with your office, your home, emergency services and others. Your mobile phone is a radio transmitter and receiver. When the phone is turned on it receives and transmits radio frequency (RF) energy.
- Page 7 Do not use an antenna designed for any other type of portable telephone than the telephone you have purchased. Unauthorized antennas, modifications, or attachments could damage the phone and may violate the appropriate regulations. Check the laws and regulations on the use of telephones in the areas where you drive.
- Page 8 Do not allow children to play with your phone since they could hurt themselves or others or accidentally damage the phone. Turn off your mobile phone when in a “blasting area” or in areas posted “turn off two-way radio” to avoid interfering with blasting operations.
- Page 9 EN/LZT 126 1353 R1B...
-
Page 10: The Sim Card
When you become a subscriber of a network you obtain a SIM (Subscriber Identity Module) card. Your SIM card is supplied with a security code or PIN (Personal Identity Number) which you need in order to gain access to the phone and network. - Page 11 1. Place the battery on top of the phone. 2. Press until you hear a click. Make sure that the phone is turned off before removing the battery. 1. Press the locking catch on the bottom of the battery. 2. Lift the battery up and away from the phone.
-
Page 12: The Low Battery Alarm
As a reminder that the battery soon needs recharging or replacing, an alarm signal (a long beep) sounds and the message Battery low appears for ten seconds in the display. In addition, the indicator light on top of the phone starts blinking red. - Page 13 1. Press and hold down the NO key until you hear a click. The display will prompt you to enter your PIN code. 2. Enter your PIN code. The digits appear as * in the display. If you make a mistake while entering your PIN code erase the faulty digit by pressing the CLR key.
- Page 14 The keys have other functions when you have accessed the phone’s menu system. See To confirm selections and settings and to answer an incoming call. ON/OFF To turn the phone on or off. To cancel selections or reject incoming calls. Left and right arrow keys To access and navigate the menu system.
- Page 15 Signal strength meter The received signal strength displayed as bars. The more bars, the stronger signal. Battery meter The current battery strength. The fuller the icon, the more power there is remaining. Keypad locked The keypad on your phone is locked. Alarm activated The alarm function is activated.
- Page 16 The instructions in this chapter assume that you have turned on your phone and that you are within range of a network. Note! When you are abroad, you may use other networks, provided your home network has an agreement that allows you to do this. See 1.
- Page 17 Enter 112 (the international emergency number) and press YES. The display shows Emergency. Some operators may require that a SIM card has been inserted into the phone, and in some cases that the PIN code has been entered as well. When you receive a call the phone will ring and the indicator light on top of the phone rapidly blinks green.
- Page 18 You can use the volume keys to increase or decrease the ear piece volume. 1. Press and hold down the CLR key. Mute is shown in the display. 2. To resume conversation, release the CLR key. You can enter a phone number on the keypad during a call. When you end the call the number remains in the display.
- Page 19 This chapter describes how to navigate the menu system. The Line 1 tag is only available if you have a SIM card with a double subscription. * If Set VoiceM and Area info have been activated. EN/LZT 126 1353 R1B...
- Page 20 The menus are arranged in a continuous loop. The right and left arrows allow you to access the menu system and then scroll from menu to menu. When you reach the desired menu, press YES to select it. Most of the menus have a number of functions. Scroll with the right and left arrows until you reach the desired function.
- Page 21 1 Space - ? ! , . : “ ' ( ) 1 2 A B C Å Ä Æ à Ç 2 3 D E F è É 3 4 G H I ì 4 5 J K L 5 6 M N O Ñ...
- Page 22 This chapter describes how you can create a personal phone book by storing phone numbers and accompanying names on the SIM card (card memory) and in the phone (phone memory). The menu also includes functions for recalling the last dialled BOOK numbers.
- Page 23 To erase a faulty letter press CLR. Use the right and left arrows to insert or erase letters. 7. Press YES to store the name and number. If you wish to store the phone number in a different position continue to the next instruction.
- Page 24 If the displayed name is not the required one, scroll through the phone book with the right and left arrows until you find the correct name. 5. Press YES to call the name or NO to return to standby. 1. Clear the display by pressing CLR. 2.
- Page 25 2. Press and hold down . The question ‘Erase?’ appears. 3. Press to erase the number. 1. Select Erase all from phone from the 2. Press YES to erase all phone numbers. 1. Select Copy all from the PHONE BOOK 2.
- Page 26 If you subscribe to the Calling Line Identification (CLI) service of your network, the numbers of the last 5 answered calls are stored in the phone. To recall the last answered numbers, see If your SIM card supports this function and allocates 5 or more positions for last dialled numbers, the last numbers called are stored on the SIM.
- Page 27 menu includes a number of functions which let you SETTINGS adapt your phone to your personal needs in different situations. The functions in the menu are described in the order in SETTINGS which they appear when you scroll with the right and left arrows. 1.
- Page 28 1. Select Ring type from the menu. SETTINGS You can set the tone of the ringing signal in three steps: low, medium or high. You can also choose a mixed tone or a melody. If you scroll with the right and left arrows you will hear the various types of ringing signals.
- Page 29 Note! You can have one setting when the phone is used as a handheld unit and another setting when the phone is used together with any Ericsson handsfree equipment. 1. Select Min Minder from the menu. SETTINGS This function gives an indication of the time spent during conversation by entering a short beep every minute.
-
Page 30: The Display Language
Enter the greeting text using the numeric keys. See the table in The Greeting function also lets you turn the greeting text off. If your phone number cannot be retrieved from your SIM card, you can enter it yourself. 1. Select Phone no from the menu. - Page 31 Your SIM card is protected by a card lock which is unlocked with a PIN code. The PIN code is obtained when you purchase your SIM card. Each time you turn on your phone, the PIN code has to be entered to unlock the card.
- Page 32 1. Select Lock card from the menu. ACCESS 2. Press YES. 3. Enter your PIN code and press YES. The message Locked confirms that the card lock is now activated. The phone lock protects the phone against unauthorised use in the event of theft.
- Page 33 Note! This service may not be available on all networks or may require a separate subscription. The Call Barring service of the cellular network allows you to bar different types of outgoing and incoming calls to restrict the use of your phone.
- Page 34 It is possible to lock the keypad so that unintentional key action has no effect if the phone is turned on. An icon in the shape of a key to the left in the middle of the display informs you that the keypad is locked. Note! Calls to the international emergency number 112 can be made when the keypad is locked.
-
Page 35: The Time
menu lets you set the time and date. It also lets you CLOCK activate the alarm function. The time is shown continuously at the bottom of the display when the phone is in standby mode. The hours and minutes can be presented in either the 24-hour format or the 12-hour (a.m./p.m.) format. - Page 36 1. Select Set alarm from the menu. CLOCK 2. Scroll to the New time option by using the right and left arrows. Press YES. 3. Enter the time in hours and minutes. Press YES. Note! If you have chosen the 12-hour format in the Clock mode function you can alternate between a.m.
- Page 37 If you want to make certain that your incoming calls are taken care of when you are unable to answer them, you can use the Call Divert service of the cellular network to divert them to another phone number. The Call Divert service lets you: Divert calls if you already are engaged in a call.
- Page 38 The message Please wait appears followed by either the phone number and Divert On if the call divert is activated, or Divert Off if it is not activated. 1. Select the Check all option from the The message Please wait appears followed by information about all call diverts, whether they are activated or not.
- Page 39 When you turn on the phone, it normally selects its home network. If the home network is not within range, for example when you are abroad, you may use another network, provided your home network has an agreement that allows you to use the network. This is called menu includes a number of functions which you NETWORKS can use to determine how the phone searches for a network.
- Page 40 If no network is within range, the message No network is displayed. If more than one network is within range, the name of the other networks can be displayed by pressing the right arrow. 2. When the network you wish to use is displayed, press YES to select it.
- Page 41 4. Finally, press YES to add the network to the list. 1. Select Edit list from the NETWORKS 2. Scroll to the network you wish to erase and press YES. 3. Scroll until Erase appears. 4. Press YES to delete the network from the list. EN/LZT 126 1353 R1B 1.
- Page 42 You can use your phone to send DTMF (Dual Tone Multi Frequency) tones. This feature can be used for a variety of purposes, such as banking by phone or controlling an answering machine. You can send DTMF tones during a call. You can send the characters 0 –...
- Page 43 1. Call the required phone number and wait until the call has been connected. 2. Recall the code from the phone book. 3. Press YES to send the code. The characters are sent one by one. In the meantime the message Sending is displayed.
- Page 44 The Calling Line Identification (CLI) service allows you to see the caller’s phone number in the display, giving you a chance to identify the caller. This service may not be available on all networks and may require a separate subscription. When an incoming call is received, the caller’s phone number appears in the display.
- Page 45 Normally, your phone number will be sent when you make calls. If you do not wish your phone number to be sent on a particular call, the phone number can be hidden with the Hide Id function in the menu. SPECIAL CHARACTERS Note! This function is operator dependant.
- Page 46 The phone allows you to handle more than one call simultaneously. This means that you may hold a call in progress and make or answer a second call and then switch between the two calls. To be able to receive a second call, you must activate the Call Waiting service.
- Page 47 The waiting call is cleared. If the caller’s network supports it, the caller will hear a busy tone. Note! If Divert On busy is activated, the waiting call is diverted to the number you have specified. 1. Press YES to switch between the active call and the call on hold. 1.
- Page 48 The Conference Call service allows you to have a joint conversation with up to five people. You may put an individual or a group of conference members on hold while you add other people to the conference call. You may also put conference members on hold while you talk to someone privately.
- Page 49 The answering service of your network lets your callers leave a voice message when you cannot or do not wish to answer all calls. This service may not be available on all networks and may require a separate subscription. The Voice mail function makes it easy to call your answering service to listen to recorded voice messages.
- Page 50 The Short Message Service (SMS) allows you to send and receive text messages. A message may contain up to 160 characters. Text messages can be received when the phone is in standby mode, when you are engaged in a call or when incoming calls are diverted to another phone number.
- Page 51 The display shows: Press NO if you want to read the message later on. Press YES if you want to read the message at once. The date and sender will appear in the display. Press YES to read the message. Scroll forward through the message with the right arrow and back through the message with the left arrow.
- Page 52 1. Select Read messages from the MAIL from the Messages memory. Select Card messages to read messages stored in the SIM card memory. 2. Press YES. 3. Scroll with the right and left arrows until you find the message you are looking for. 4.
- Page 53 The ordinary Short Message Service can be defined as a personal service with messages specifically and exclusively directed to you. The Area Information (AI) is another type of text message which is sent to all subscribers in a certain cell of a network at the same time. The information may be a local road report or a local taxi phone number.
- Page 54 You can decide which types of AI messages you wish to receive. The phone’s Area Info list can hold up to 9 codes. Provided you have turned on the presentation of AI messages, you can access the Area info list from the MAIL 1.
- Page 55 Two voice lines with different phone numbers, Line1 and Line2, may be assigned to your phone. The ability to receive and send text messages (SMS), is only available on Line1. The Two Line service may not be available on all networks and may require a separate subscription.
- Page 56 During an outgoing call, the call time is shown in the display. With the Call info function in the SETTINGS the time displayed for all calls, both incoming and outgoing. You can also have the call cost or the number of call units displayed provided your network and your SIM card support this feature.
- Page 57 4. Enter the new currency with the numeric keys , for example GBP for Pounds Sterling, and press YES. 5. Enter the price per call unit, for example 0.25, and press YES. To enter the decimal points, press * or #. 6.
- Page 58 The Fixed Dialling function allows calls to be made only to fixed numbers stored on the SIM card. If an attempt is made to call other numbers, the message Number not permitted appears in the display. It is possible to store partial numbers, for example an area code or an area code followed by the first digits common to several numbers.
- Page 59 The phone can be used with the Ericsson Mobile Office kit. This links the phone to a desktop or laptop PC, allowing you to use data communication and fax services from the PC. The Data menus function in the SETTINGS two data menus.
- Page 60 The phone’s built-in calculator supports the four fundamental rules of arithmetic and percentages. In this example we are going to divide 134 by 32. 1. Scroll to the menu and press YES. CALCULATOR 2. Enter 134. 4. Scroll with the right and left arrows to the division sign (/), and press YES.
- Page 61 Your phone has the capability of handling a range of tones spreading over two octaves. See the table below to understand the relationship between the notes and the numeric keys on the telephone. The simple melody is Do-Re-Me. This song corresponds to the C, D and E notes on a music scale.
- Page 62 Press this: Insert notes. To get a short note press the key for 1–9 a short time. To get a long tone, hold down the key. Increase or decrease the pitch of the note to the left of the cursor in half tone steps. Press once for sharp, twice for flat and three times for normal pitch.
- Page 63 This chapter lists some simple things you should check before calling for service personnel. This could save you the cost of unnecessary service. The battery may have to be charged or replaced. Ensure that the phone is properly inserted in its holder. Check the fuse.
- Page 64 Alarm How to set How to turn off Answered calls How to erase How to review Answered calls memory Answering mode How to select Answering service How to call Area information How to receive How to turn off How to turn on Message list Message types Area information code...
-
Page 65: Key Functions
Charger How to connect How to disconnect Clock How to set Conference call How to initiate Cost of last call How to check Credit limit for calls How to set Data Data menus How to activate Date How to set Date format How to set Dialled numbers memory... -
Page 66: How To Select Search Mode
Line1/Line2 How to answer a call Lines Different settings Melody How to enter Menus How to navigate Message How to read How to repeat How to reply How to store Message signal How to change Message type How to change Messages How to send Messages memory... -
Page 67: Pre-Programmed Dtmf Signalling
PIN code How to change How to enter Wrong PIN2 code How to change Wrong Pre-programmed DTMF signalling How to send code Price per call unit How to enter Re-dial Automatic re-dial Ring signal Compose your own Ring type How to change Ring volume How to change Second call...