Table of Contents
Advertisement
Advertisement
Table of Contents

Related Manuals for Samsung VEGA 700


Summary of Contents for Samsung VEGA 700
- Page 1 ENGLISH...
- Page 2 NOTE • This camera will not function without a battery. • Use one 3V lithium battery(CR-2). • The lens cap automatically opens when the Power button is turned on. • Do not open the lens cap with your fingers. The shutter does not operate in the following circumstances: •...
-
Page 3: Table Of Contents
CONTENTS Thank you for purchasing the SAMSUNG camera. Please read this manual before using your camera. TABLE OF CONTENTS PREPARATION Part names ... 4 LCD panel ... 7 Viewfinder and Indicators ... 8 Loading the battery ... 9 Checking the battery ... 10 Loading the film ... -
Page 4: Part Names
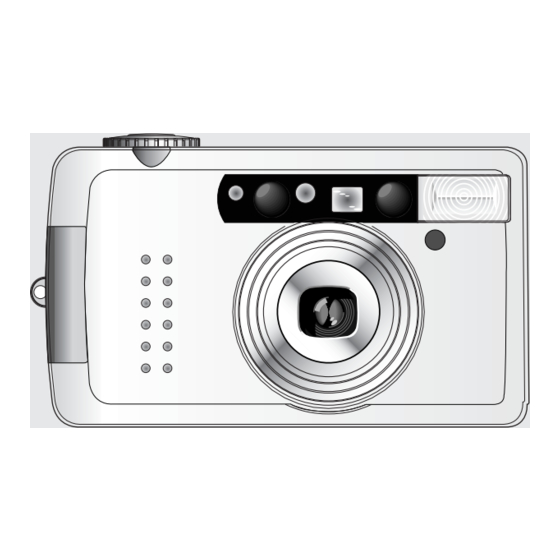
PART NAMES Front / Top Flash button LCD panel (Flash mode selection button) Self mode button Buzzer ON/OFF button Power button DATE or TIME button (Date and Caption selection Shooting mode dial button) Shutter button Remote control sensor (Q.D. Model only) Flash Exposure sensor Lens... - Page 5 Rear / Bottom Flash indicator(Red LED) Autofocus indicator(Green LED) Viewfinder Diopter adjustment dial Tripod socket Normal/Panorama switch Zoom Button(WIDE) Zoom Button(TELE) Strap eyelet Back cover release button Film check window Mid-roll rewind button...
- Page 6 Interior Back cover Film pressure plate Film pressure roller Spool Film sensor DX contacts...
-
Page 7: Lcd Panel
LCD PANEL Macro photography( Snap shooting(SNAP Bulb shooting(B Shutter)( BULB Buzzer indicator( Battery condition indicator Focal length unit(mm) Seconds(s) Date or caption print mark Focal length Exposure counter Date(Year, Month, Date, Time) Caption Letter indicator Film loading failure warning indicator(E) /P.40) Month /P.30) -
Page 8: Viewfinder And Indicators
VIEWFINDER AND INDICATORS Viewfinder Close range picture area mark - WIDE : Optimum picture area when shoot within 0.55m~1.2m - TELE : Optimum picture area when shoot within 0.65m ~ 1.5m Picture area frame - WIDE : Optimum picture area when shoot over 1.2m - TELE : Optimum picture area when shoot over 1.5m Autofocus frame (Focus on the subject with this frame) Indicators... -
Page 9: Loading The Battery
LOADING THE BATTERY 1. Open the chamber cover by sliding the battery chamber cover. 2. Insert a new battery and ensure it is placed in the correct position. 3. Close the chamber cover. NOTE Use one CR-2 battery. The camera will automatically turn the power off when not used after 3 minutes. Remove the battery from the camera when the camera is not used for an extended period. -
Page 10: Checking The Battery
CHECKING THE BATTERY You can check the battery life on the LCD panel 1. Normal operation - The battery condition indicator does not appear. 2. The indicator appears half way. - The battery life is low and you should ensure that a replacement battery is available. 3. -
Page 11: Loading The Film
LOADING THE FILM 1. Open the back cover by sliding the release knob as shown above. 2. Insert a roll of film in the chamber. Do not force the film into position. 3. The film should lie flat. 4. Close the back cover. It will close with a “click”. 5. -
Page 12: Attaching The Strap
ATTACHING THE STRAP Refer to the illustrations above. -
Page 13: Using The Camera
USING THE CAMERA Press the Power button to turn the power on. The indicators will appear on the LCD panel. If the camera is not used for 3 minutes, the power will be turned off automatically. While looking through the viewfinder, aim the camera at the subject and operate the zoom buttons. Press the (Tele) button to move the lens out and press the... -
Page 14: Holding The Camera
HOLDING THE CAMERA NOTE Avoid obstructing the lens when you take a picture. Pictures can be spoiled when a finger, hair or camera strap falls in front of the Lens, Exposure Sensor or Auto-focus Windows. When you take vertical pictures with flash, the flash should be above the lens. In order to avoid camera shake, hold the camera steady, especially when using longer focal lengths (Tele). -
Page 15: Taking Pictures
TAKING PICTURES Aim the Autofocus frame at a subject.(Refer to page 8) Press the Shutter button half way down. The lens is focused when the green lamp turns on. If a subject is between 0.55m (1.8ft) and 1m (3.28ft), the green lamp blinks slowly and Macro mode is set automatically. -
Page 16: Adjusting The Diopter
ADJUSTING THE DIOPTER After taking pictures, turn off the camera. This will protect the lens and prevent unintended shots. (If not used for 3 minutes, the camera will turn off automatically). Pressing the shutter button after initiating the wide mode will activate the zoom lens for accurate focusing. -
Page 17: Buzzer Operation
BUZZER OPERATION According to the function, the buzzer sound is as follows. Buzzer sound Function Peek Selection 1 long beep Warning 3 short beeps Warning 3 short beeps Warning/Error When AF Lock (shorter than minimum shooting range) occurs 3 long beeps Completion The buzzer function can be selected by Buzzer ON/OFF button and it will operate only if the buzzer mark appears... -
Page 18: Rewinding The Film
REWINDING THE FILM 1. Automatic rewinding 2. Mid-roll rewinding Rewind button NOTE After taking all the pictures on a roll of film, the camera will automatically rewind the film. The motor stops when the rewinding is completed. When the rewinding is completed, the icon ( seconds the icon will no longer be displayed. -
Page 19: Date And Caption (Q.d.model Only)
DATE AND CAPTION (Q.D.MODEL ONLY) Use the DATE button to control "Date" and "Caption" 1. Changing "Date" format or selecting the caption <No print> 2. Date Zone <Year-Month-Day> <Month-Day-Year> <Day-Month-Year> <Day-Hour-Minute> NOTE <Selecting caption print> Press the DATE button to select one of the different formats. (Refer to the left sequences) The "PRINT"... - Page 20 3. Changing the date setting 4. Selecting the caption print To change the date or time, press and hold down the DATE button for 2 seconds. The first sector of the date format will blink. To select the sector that you want to change, press the DATE button. Change the date setting by operating Zoom buttons.
-
Page 21: Clock/Calendar Function(Non Q.d. Model Only)
CLOCK/CALENDAR FUNCTION(NON Q.D. MODEL ONLY) 1. Clock/Calendar function With the Non Q.D. version there is a facility to check the time and date via the LCD panel. Simply press the TIME button to select the display you require. NOTE <Year-Month-Day> 2. -
Page 22: Using The Flash Mode
USING THE FLASH MODE You can select the flash mode by pressing the FLASH button. <Red-eye reduction> <Fill-in flash & Red-eye reduction> <Fill-in flash & Back-light control> NOTE <Auto flash> After you shoot once with the Fill-in flash & Back-light control mode, the camera will return to Red-eye reduction mode automatically. -
Page 23: Using The Shooting Mode
USING THE SHOOTING MODE You can select the shooting mode by turning the dial clockwise or counter-clockwise. The lamp beside Mode Dial indicates the mode according to the rotation of the dial. Lamp NOTE After shooting, the shooting mode will remain selected until another mode is chosen. This lamp will not light up if the brightness is LV14 or more. -
Page 24: Using The Self Mode
USING THE SELF MODE You can select the self mode by pressing the SELF button. <Normal photography> <Remote control shooting> <Self-timer> NOTE <Double self-timer> <2 sec. delayed shutter release> With the "Non Q.D. model", the "Remote control shooting" mode does not appear on the LCD panel. -
Page 25: Auto Red-Eye Reduction
AUTO AUTO RED-EYE REDUCTION In low light conditions, the flash will automatically fire to obtain a suitable exposure. You can decrease the red-eye phenomenon automatically when taking a portrait picture in low light. NOTE When you press the shutter button with this mode, the Red-eye reduction lamp will light up. After then, the picture is taken of. -
Page 26: Auto Flash
AUTO AUTO FLASH Select the Auto Mode by pressing the FLASH button 1 times. Auto flash mode activates the flash by measuring the brightness of the object. Flash will not engage when the shooting object is too bright. NOTE Once the Auto Flash Mode is selected, it will remain active even when it is turned off. -
Page 27: Flash Off
FLASH OFF Select this mode by pressing the FLASH button twice. Use this mode when you want to take pictures without flash. NOTE When using the Flash Off function, you may need to use a tripod to avoid camera shake. FILL-IN FILL-IN FLASH Select this mode by pressing the FLASH button 3 times. -
Page 28: Fill-In Flash And Back-Light Control
FILL-IN FILL-IN FLASH and BACK-LIGHT CONTROL You can select this mode by pressing the FLASH button 4 times. Use this mode when you take a picture of a subject in back-light condition. NOTE Be careful to avoid direct sunlight on the lens. <Nomal photography in back-light condition>... -
Page 29: Fill-In Flash And Red-Eye Reduction
FILL-IN FILL-IN FLASH AND RED-EYE REDUCTION Select this mode by pressing the FLASH button 5 times. Use this mode when you take a picture of a person in low light condition. NOTE Use a tripod to avoid camera shake. <Without fill-in flash and red-eye reduction> <With fill-in flash and red-eye reduction>... -
Page 30: Snap Shooting
SNAP SNAP SHOOTING Select SNAP mode by turning Mode Dial . Use this mode when taking a picture of active subjects such as children or pets. (They are difficult to focus on) When you select this mode, the camera will set the wide position (35mm) and the focus is fixed. -
Page 31: Portrait Zoom
PORTRAIT ZOOM Select this mode by turning Mode Dial . Use this mode to maintain a constant subject size within the frame, even though the distance to a subject may vary. Position your subject in the centre of the viewfinder and press the shutter button half-way. -
Page 32: Bulb Shooting(B Shutter)
BULB BULB SHOOTING (B SHUTTER) Select this mode by turning Mode Dial . Use this mode for the exposure time of subjects such as fireworks and night scenes. The shutter remains open as long as the shutter button is depressed. The time selected is shown on the LCD panel and the maximum time is 60 seconds. -
Page 33: Landscape Shooting
LANDSCAPE SHOOTING If you can t shoot clearly distant subjects through a window, use this mode by turning Mode Dial to LANDSCAPE mode and pressing the LANDSCAPE button. NOTE With this mode, the flash does not fire. Use a tripod to avoid camera shake in low light conditions. When LANDSCAPE mode is not in use change this mode into normal mode. -
Page 34: Continuous Shooting
CONTINUOUS SHOOTING Select this mode by turning Mode Dial . Use this mode to take a sequence of pictures. As long as you press the shutter button, the camera will continue to take pictures. NOTE If flash is required, the time between shots will be increased due to the flash recycling. -
Page 35: Using The Focus Lock
USING THE FOCUS LOCK If you want to focus on a subject that is not in the centre of your picture, use the Focus Lock function described below. 1. Aim the camera with the autofocus frame superimposed over the subject. 2. -
Page 36: Self-Timer
SELF-TIMER This can be selected by pressing the SELF button once. You can take a picture of yourself by using this mode. When pressing the shutter button, the self-timer lamp blinks for 7 seconds. Then the lamp blinks rapidly for 3 seconds and the picture is taken. -
Page 37: Double Self-Timer
DOUBLE SELF-TIMER You can select this mode by pressing the SELF button twice. Press the shutter button and a shot will be taken in the same way a self timer shot is taken. A further shot will be made after 2 seconds. NOTE When using the flash, the shooting interval may increase due to the flash recharging time. -
Page 38: Second Delayed Shutter Release
2 SEC. DELAYED SHUTTER RELEASE Use this mode to avoid camera shake caused by camera movement during hand held shots. In this mode, a picture is taken 2 seconds after releasing the shutter button. To use this mode, place the camera on a steady surface, select by pressing the SELF button 3 times before taking the picture. -
Page 39: Remote Control Shooting(Optional)
REMOTE CONTROL SHOOTING (OPTIONAL) Select this mode by pressing the SELF button 4 times. (You can only use this function with the Q.D. model camera) When you select this mode, the self- timer lamp will blink every 2 seconds. To take a picture using a remote control, press the Remote Control shooting button. -
Page 40: Macro Photography
MACRO PHOTOGRAPHY Use this mode to take close-up photographs. When a subject is within 1m (3.28ft), the camera will automatically set this mode. The Macro range is as below: WIDE : 0.55~1m (1.8~3.28ft) TELE : 0.65~1m (2.13~3.28ft) When a subject is within range, the Autofocus Indicator (Green LED) will blink slowly and the Macro mark ( Remember to compose your shot using the macro picture area frame. -
Page 41: Panorama Photography
PANORAMA PHOTOGRAPHY Use this mode to capture a panoramic view. When you set this mode, the viewfinder will alter to indicate the panoramic scene. The picture area with this mode will be narrowed. Select this mode using the PANORAMA switch. The PANORAMA mode can be used on selected frames in a film. -
Page 42: Care And Storage
CARE AND STORAGE If your camera needs cleaning, wipe it with a soft, lintless cloth. The lens should be cleaned only with special lens cleaning tissue and fluid.(Consult your camera retailer.) Do not allow your camera to come into contact with sand or water. Keep your camera in a dry, cool place that is free from high humidity and dust. -
Page 43: Trouble Shooting
TROUBLE SHOOTING If the sutter does not operate after pressing the shutter button. Check point Is the lens cover completely open? Is the battery loaded correctly? Has it been a long time since you used the camera? Change the battery. If a picture is partially dark or out of focus. -
Page 44: Specifications
SPECIFICATIONS TYPE Format Speed FILM Loading Winding Rewinding LENS SHUTTER EXPOSURE VIEWFINDER 35mm fully automatic lens shutter camera. 35mm DX-coded film, 24x36mm Automatic setting with DX-coded film, ISO 50~3200 Automatic advance to the first frame when the back cover is closed. Automatic advance, Single or Continuous shooting Automatic rewinding, Mid-roll rewinding Schneider lens F4.5~8.5 / 35-70mm... - Page 45 70mm(TELE) CONTINUOUS shooting SNAP shooting(between 1.3~6.0m (4.3~19.7ft)) Auto flash 2 sec. delayed shutter release Macro mode All data are based on SAMSUNG’S standard test methods. 5.6m / 18.4ft 8m / 26.2ft 3m / 9.84ft 4.2m / 13.8ft Flash off Fill-in flash Fill-in flash &...
-
Page 46: Checking The Camera
CHECKING THE CAMERA Checking the shutter condition - You can check the condition of the shutter by pressing it. The short click sound will result. Checking the irises - After removing the back cover of a camera, it is normal to see the closed lens opening up when you press the shutter. - Page 48 Internet address - http : //www.samsungcamera.com/ The CE Mark is a Directive conformity mark of the European Community (EC) SAMSUNG OPTO-ELECTRONICS UK LTD. SAMSUNG HOUSE, 3 RIVERBANK WAY, GREAT WEST ROAD, BRENTFORD, MIDDLESEX,TW8 9RE, U.K. TEL : (44) 20-8232-3280 FAX : (44) 20-8569-8385...