Samsung SC-D263 Owner's Instruction Book
Samsung sc-d263: user guide
Hide thumbs
Also See for SC-D263:
- Service manual (244 pages) ,
- Owner's instruction book (114 pages) ,
- Owner's instruction book (106 pages)
Table of Contents
Advertisement
Quick Links
ENGLISH
Digital Video Camcorder
SC-D263/D362/D363/
D364/D365/D366
AF
Auto Focus
CCD
Charge Coupled Device
LCD
Liquid Crystal Display
RoHS compliant
Our product complies with
"The Restriction Of the use of
certain Hazardous
Substances in electrical and
electronic equipment", and we do not use
the 6 hazardous materials- Cadmium(Cd),
Lead (Pb), Mercury (Hg), Hexavalent
Chromium (Cr
), Poly Brominated
+6
Biphenyls (PBBs), Poly Brominated
Diphenyl Ethers(PBDEs)- in our products.
Owner's Instruction Book
Before operating the unit, please read
this Instruction Book thoroughly, and
retain it for future reference.
Use only approved battery packs.
Otherwise, there is a danger of overheating, fire or explosion.
Samsung is not responsible for problems occurring due to
using unapproved batteries.
Videocámara digital
SC-D263/D362/D363/
D364/D365/D366
AF
CCD
LCD
utilizamos los seis materiales peligrosos:
Cadmio Cd), Plomo (Pb), Mercurio (Hg), Cromo
hexavalente (Cr
(PBBs), difenilos éteres polibrominados
(PBDEs)- en nuestros productos.
Manual de instrucciones
Antes de utilizar la cámara lea detenidamente
este manual de instrucciones y consérvelo para
consultas posteriores.
Utilice únicamente baterías aprobadas.
De lo contrario, existe peligro de sobrecalentamiento, incendio o
explosión. Samsung no se hace responsable de problemas que
se produzcan debido al uso de baterías no aprobadas.
ESPAÑOL
Autofoco
Dispositivo acoplado por
carga
Pantalla de cristal líquido
Compatibilidad RoHS
Nuestro producto cumple con "La
restricción de uso de ciertas
sustancias peligrosas en equipo
eléctrico y electrónico", y no
+6
), bifenilos polibrominados
AD68-00970D
Advertisement
Table of Contents

Related Manuals for Samsung SC-D263


Summary of Contents for Samsung SC-D263
- Page 1 Instruction Book thoroughly, and retain it for future reference. Use only approved battery packs. Otherwise, there is a danger of overheating, fire or explosion. Samsung is not responsible for problems occurring due to using unapproved batteries. Videocámara digital SC-D263/D362/D363/...
-
Page 2: Table Of Contents
ENGLISH Contents Notes and Safety Instructions ...5 Getting to Know Your Camcorder ...7 Features...7 Accessories Supplied with Camcorder...8 Front & Left View...9 Left Side View ...10 Right & Top View...11 Rear & Bottom View ...12 Remote Control (SC-D364/D366 only)...13 Preparation...14 Using the Hand Strap &... - Page 3 ENGLISH Contents Advanced Recording ...44 Selecting the Record Mode & Audio Mode...44 Eliminación del ruido del viento (WindCut Plus)...45 Selecting the Real Stereo Function...46 Setting the Shutter Speed & Exposure ...47 Auto Focus / Manual Focus ...48 Programed Automatic Exposure Modes (Program AE)...49 Setting the White Balance...51 Applying Visual Effects ...52 Setting the 16:9 Wide mode...54...
- Page 4 ENGLISH Contents PictBridge (SC-D363/D364/D365/D366 only) ...85 Printing Your Pictures – Using the PictBridge ...85 Connecting To a Printer ...85 Selecting Images ...86 Setting the Number of Prints ...86 Setting the Date/Time Imprint Option ...86 Printing Images...86 Canceling the Printing ...86 IEEE 1394 Data Transfer...87 Transferring IEEE1394 (i.LINK)-DV Standard Data Connections ...87 Connecting to a DV Device (DVD Recorder, Camcorder, etc.) ...87...
-
Page 5: Notes And Safety Instructions
ENGLISH Notes and Safety Instructions Notes regarding the Rotation of the LCD Screen Please rotate the LCD Screen carefully as illustrated. Over rotation may cause damage to the inside of the hinge that connects the LCD Screen to the Camcorder. 1. -
Page 6: Notes Regarding Camcorder
La copia no autorizada de material protegido por dichos derechos puede quebrantar la ley. Todos los nombres de marcas y marcas comerciales registradas mencionados en este manual o el resto de documentación facilitada con el producto Samsung son marcas comerciales o marcas registradas de sus respectivos propietarios. Servicio y piezas de repuesto ■... -
Page 7: Getting To Know Your Camcorder
■ Objetivo de zoom de alta potencia El objetivo del potente zoom permite a los usuarios ampliar el objeto claramente hasta x33 (x30 para la SC-D263/D363). ■ Función de cámara fotográfica digital (sólo SC-D363/D364/D365/D366) Utilización de la tarjeta de memoria, puede fácilmente grabar y reproducir imágenes fotográficas estándar. -
Page 8: Accessories Supplied With Camcorder
Basic Accessories 1. Lithium Ion Battery Pack Lithium Ion Battery Pack AC Power Adapter (AA-E8 TYPE) AC Cord Audio/Video Cable 4. Audio/Video Cable (SC-D263/D363) (SC-D263/D363) Multi Cable (SC-D362/ D364/D365/D366) Instruction Book Lithium Battery for Remote Control (SC-D364/D366 7. Lithium Battery (CR2025) only) or Clock. -
Page 9: Front & Left View
ENGLISH Getting to Know Your Camcorder Front & Left View 1. Lens 2. LIGHT (SC-D362/D364/D365 /D366 only) 3. Remote Sensor (SC-D364/D366 only) 4. TAPE EJECT 5. Internal MIC 1. Lens 2. LIGHT ➥page 43 (SC-D362/D364/D365/D366 only) 3. Remote Sensor (SC-D364/D366 only) 4. -
Page 10: Left Side View
ENGLISH Getting to Know Your Camcorder Left Side View 1. DISPLAY 2. MACRO/PB ZOOM 3. Speaker 4. Mode Switch (MEMORY/TAPE) (SC-D363/D364/D365 /D366 only) 1. DISPLAY ➥page 21 2. MACRO/PB ZOOM ➥page 39 / ➥page 61 3. Speaker 4. Mode Switch (MEMORY/TAPE) (SC-D363/D364/D365/D366 only) 5. -
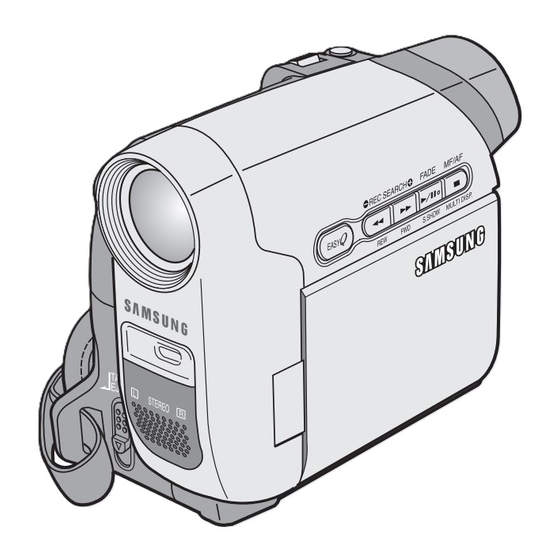
Page 11: Right & Top View
5. Start/Stop Button 6. Power Switch 7. DC Jack 1. Zoom Lever (VOL/Menu Dial) Jacks 2. PHOTO Button ➥page 57 3. QUICK MENU Button SC-D263 4. MENU Button 5. Start/Stop Button 6. Power Switch SC-D363 (CAMERA or PLAYER) 7. DC Jack 8. -
Page 12: Rear & Bottom View
ENGLISH Getting to Know Your Camcorder Rear & Bottom View 1. Lithium Battery Cover 2. Charging Indicator 1. Lithium Battery Cover 2. Charging Indicator 3. Memory Card Slot (SC-D363/D364/D365/D366 only) 4. Tripod Receptacle 5. Battery Release Memory Card Slot (Usable Memory Card) SC-D363/D364 SC-D365/D366 Memory Stick... -
Page 13: Remote Control (Sc-D364/D366 Only)
ENGLISH Getting to Know Your Camcorder Remote Control (SC-D364/D366 only) 1. PHOTO 2. START/STOP 3. SELF TIMER 4. ZERO MEMORY 5. PHOTO SEARCH 6. A.DUB 7. √ √ √ √ (FF) 8. œ œ œ œ (REW) 9. √ √ (PLAY) 10. -
Page 14: Preparation
ENGLISH Preparation Using the Hand Strap & Lens Cover It is very important to ensure that the Hand Strap has been correctly adjusted before you begin your recording. The Hand Strap enables you to: - Hold the Camcorder in a stable, comfortable position. - Press the [Zoom] and [Start/Stop] button without having to change the position of your hand. -
Page 15: Lithium Battery Installation
ENGLISH Preparation Lithium Battery Installation Lithium Battery Installation for the Internal Clock 1. Remove the Battery Pack from the rear of the Camcorder. 2. Open the Lithium Battery Cover on the rear of the Camcorder. 3. Position the Lithium Battery in the Lithium Battery Holder, with the positive ( terminal face up. -
Page 16: Using The Lithium Ion Battery Pack
ENGLISH Preparation Using the Lithium Ion Battery Pack ✤ Use SB-LSM80 or SB-LSM160 Battery Pack only. ✤ The Battery Pack may be charged a little at the time of purchase. Charging the Lithium Ion Battery Pack 1. Turn the [Power] switch Blinking time to [Off]. - Page 17 ENGLISH Preparation The amount of continuous recording time available depends on; - The type and capacity of the Battery Pack you are using. - Ambient temperature. - How often the Zoom function is used. - Type of use (Camcorder/Camera/With LCD Screen etc.). It is recommended that you have several batteries available.
- Page 18 ■ It is recommended you use the original Battery Pack that is available at SAMSUNG retailer. When the Battery reaches the end of its life, please contact your local dealer. The batteries have to be dealt with as chemical waste.
-
Page 19: Connecting A Power Source
ENGLISH Preparation Connecting a Power Source ✤ There are two types of power source that can be connected to your Camcorder. - The AC Power adapter and AC Cord: used for indoor recording. - The Battery Pack: used for outdoor recording. Using a Household Power Source Connect to a household power source to use the Camcorder without worrying about the... -
Page 20: Using The Quick Menu
ENGLISH Preparation Using the QUICK MENU ✤ QUICK MENU is used to access Camcorder functions by using the [QUICK MENU] button. ✤ QUICK MENU provides easier access to frequently used menus without using the [MENU] button. ✤ Functions available using the QUICK MENU are as below: Camera Mode Setting the Digital Image Stabilizer (DIS) ➥page 55 ■... -
Page 21: Osd (On Screen Display) In Camera/Player Modes
ENGLISH Preparation OSD (On Screen Display) in Camera/Player Modes 1. Battery Level ➥page 17 2. Visual Effects Mode ➥page 52 3. EASY.Q ➥page 35 4. DIS ➥page 55 5. Program AE ➥page 49 6. White Balance Mode ➥page 51 7. Shutter Speed ➥page 47 8. -
Page 22: Osd (On Screen Display) In M.cam/M.player Modes (Sc-D363/D364/D365/D366 Only)
ENGLISH Preparation OSD (On Screen Display) in M.Cam/M.Player Modes (SC-D363/D364/D365/D366 only) 1. Photo Quality OSD in M.Cam Mode ➥page 71 2. CARD (Memory Card) Indicator 3. Image Counter (Total number of recordable photo images) 4. Image Recording and Loading Indicator 5. -
Page 23: Initial Setting : System Menu Setting
ENGLISH Initial Setting : System Menu Setting Ajuste inicial: ajuste del menú System (Sistema) Setting the Clock (Clock Set) ✤ Clock setup works in <Camera>/<Player>/<M.Cam>/<M.Player> modes. ➥page 19 ✤ The Date/Time is automatically recorded onto a tape. Before recording, please set the <Date/Time>. ➥page 30 1. -
Page 24: Setting The Wireless Remote Control Acceptance (Remote) (Sc-D364/D366 Only)
ENGLISH Initial Setting : System Menu Setting Ajuste inicial: ajuste del menú System (Sistema) Setting the Wireless Remote Control Acceptance (Remote) (SC-D364/D366 only) ✤ The Remote function works in <Camera>/<Player>/<M.Cam>/<M.Player> modes. ➥page 19 ✤ The Remote function allows you to enable or disable the remote control for use with the Camcorder. -
Page 25: Setting The Beep Sound (Beep Sound)
ENGLISH Initial Setting : System Menu Setting Ajuste inicial: ajuste del menú System (Sistema) Setting the Beep Sound (Beep Sound) ✤ The Beep Sound function works in <Camera>/<Player>/<M.Cam>/<M.Player> modes. ➥page 19 ✤ You can turn the Beep Sound on or off, when on, each press of a button sounds a beep. -
Page 26: Setting The Shutter Sound (Shutter Sound) (Sc-D363/D364/D365/D366 Only)
ENGLISH Initial Setting : System Menu Setting Setting the Shutter Sound (Shutter Sound) (SC-D363/D364/D365 /D366 only) ✤ The Shutter Sound function works in both <Player> and <M.Cam> modes. ➥page 19 ✤ You can turn the Shutter Sound on or off, when on, with each press of the [PHOTO] button the Shutter will sound. -
Page 27: Selecting The Osd Language (Language)
ENGLISH Initial Setting : System Menu Setting Selecting the OSD Language (Language) ✤ The Language function works in <Camera>/<Player>/<M.Cam>/<M.Player> modes. ➥page 19 ✤ You can select the desired language to display the menu screen and the messages. 1. Set the [Power] switch to [CAMERA] or [PLAYER]. 2. -
Page 28: Viewing The Demonstration (Demonstration)
Exit [ Notas ] ■ La función de demostración se activa automáticamente SAMSUNG Camcorder is... cuando la videocámara se deja inactiva durante más de 10 minutos tras cambiar al modo <Camera> (Si no se inserta ninguna cinta en la videocámara). -
Page 29: Initial Setting : Display Menu Setting
✤ El ajuste de la pantalla LCD está operativo en los modos <Camera> /<Player>/<M.Cam>/<M.Player>. ➥pág. 19 ✤ La videocámara está equipada con una pantalla de cristal líquido (LCD) en color de 2,5 pulg. (SC-D263/D362/D363/D364) / 2,7 pulg. (SC-D365/D366), que permite ver directamente lo que está grabando o reproduciendo. -
Page 30: Displaying The Date/Time (Date/Time)
ENGLISH Initial Setting : Display Menu Setting Displaying the Date/Time (Date/Time) ✤ The Date/Time function works in <Camera>/<Player>/<M.Cam>/<M.Player> modes. ➥page 19 ✤ The date and time are automatically recorded on a special data area of the tape. 1. Set the [Power] switch to [CAMERA] or [PLAYER]. 2. -
Page 31: Setting The Tv Display (Tv Display)
ENGLISH Initial Setting : Display Menu Setting Setting the TV Display (TV Display) ✤ The TV Display function works in <Camera>/<Player>/<M.Cam>/<M.Player> modes. ➥page 19 ✤ You can select the output path of the OSD (On Screen Display). - <Off>: The OSD appears in the LCD Screen and Viewfinder only. - <On>: The OSD appears in the LCD Screen, Viewfinder and TV. -
Page 32: Basic Recording
ENGLISH Basic Recording Using the Viewfinder ✤ In the [PLAYER] mode, the Viewfinder will work when the LCD Screen is closed. ✤ In the [CAMERA] mode, the Viewfinder will work when the LCD Screen is closed or rotated counterclockwise 180°. Adjusting the Focus The focus adjustment knob of the Viewfinder enables individuals with vision problems to see clearer images. -
Page 33: Various Recording Techniques
ENGLISH Basic Recording Various Recording Techniques ✤ In some situations different recording techniques may be required. 1. General recording. 2. Downward recording. Making a recording with a top view of the LCD Screen. 3. Upward recording. Making a recording viewing the LCD Screen from below. -
Page 34: Making Your First Recording
ENGLISH Basic Recording Making your First Recording 1. Connect a power source to the Camcorder. ➥page 19 (A Battery pack or a AC Power adapter) Insert a cassette. ➥page 32 2. Remove the Lens Cover. I C K 3. Set the [Power] switch to [CAMERA]. -
Page 35: Recording With Ease For Beginners (Easy.q Mode)
Digital Zoom, COLOR NITE or Visual Effect is not available in the EASY.Q mode. ■ 16:9 Wide is not available in the EASY.Q mode. (SC-D263/D362/D363/D364 only) Grabación básica Grabación con borrado para principiantes (Modo EASY.Q) ✤ La función EASY.Q sólo está operativa en el modo <Camera>. ➥pág. 19 ✤... -
Page 36: Reviewing And Searching A Recording (Rec Search)
ENGLISH Basic Recording Reviewing and Searching a Recording (REC SEARCH) ✤ The REC SEARCH function works only in <Camera> mode. ➥page 19 ✤ To be used to review previously recorded images or to find a point to record a new image in the STBY mode. Record Search (REC SEARCH) 1. -
Page 37: Searching A Quickly For A Desired Scene (Setting The Zero Memory) (Sc-D364/D366 Only)
ENGLISH Basic Recording Searching a quickly for a desired scene (Setting the ZERO MEMORY) (SC-D364/D366 only) ✤ The ZERO MEMORY function works in both <Camera> and <Player> modes. ➥page 19 ✤ You can mark a point on a tape that you want to return to following playback. -
Page 38: Self Record Using The Remote Control (Setting The Self Timer) (Sc-D364/D366 Only)
ENGLISH Basic Recording Self Record using the Remote Control (Setting the Self Timer) (SC-D364/D366 only) ✤ The SELF TIMER function works only in <Camera> mode. ➥page 19 ✤ When you use the SELF TIMER function on the remote control, the recording begins automatically in 10 seconds. -
Page 39: Zooming In And Out
ENGLISH Basic Recording Zooming In and Out ✤ The Zoom function works in both <Camera> and <M.Cam> modes. ➥page 19 ✤ Zooming is a recording technique that lets you change the size of the subject in a scene. ✤ You can zoom using variable zoom speeds. ✤... -
Page 40: Using The Fade In And Out
ENGLISH Basic Recording Using the Fade In and Out ✤ The Fade function works only in <Camera> mode. ➥page 19 ✤ You can give your recording a professional look by using special effects such as fade in at the beginning of a sequence or fade out at the end of a sequence. -
Page 41: Using Back Light Compensation Mode (Blc)
ENGLISH Basic Recording Using Back Light Compensation Mode (BLC) ✤ BLC works in both <Camera> and <M.Cam> modes. ➥page 19 ✤ Back lighting exists when the subject is darker than the background: - The subject is in front of a window. - The person to be recorded is wearing white or shiny clothes and is placed against a bright background;... -
Page 42: Using The Color Nite (Color Nite)
3. Press the [COLOR NITE] button. 4. Each time you press the [COLOR NITE] button, shutter speed is changed to; √ <Color N. 1/30>, <Color N. 1/15> and <OFF>. (SC-D263/D363) √ <Color N. 1/30>, <Color N. 1/15>, <Color N. 1/15( )> and <OFF>. -
Page 43: Using The Light (Sc-D362/D364/D365/D366 Only)
ENGLISH Basic Recording Using the LIGHT (SC-D362/D364/D365/D366 only) ✤ LIGHT function works only in <Camera> mode. ➥page 19 ✤ The LIGHT enables you to record a subject in dark places without sacrificing color. ✤ The LIGHT can be used with COLOR NITE function only. 1. -
Page 44: Advanced Recording
ENGLISH Advanced Recording Selecting the Record Mode & Audio Mode ✤ The Record Mode function works in both <Camera> and <Player> (DV IN or AV IN (SC-D365/D366)) modes. ➥page 19 ✤ This Camcorder records and plays back in SP (standard play) mode and in LP (long play) mode. -
Page 45: Eliminación Del Ruido Del Viento (Windcut Plus)
ENGLISH Advanced Recording Cutting Off Wind Noise (WindCut Plus) ✤ The WindCut Plus function works in both <Camera> and <Player> (Audio dubbing) modes. ➥page 19 ✤ Use the WindCut Plus when recording in windy places such as the beach or near buildings. ✤... -
Page 46: Selecting The Real Stereo Function
ENGLISH Advanced Recording Selecting the Real Stereo ✤ The Real Stereo function works only in <Camera> mode. ➥page 19 ✤ Real Stereo enhances the left and right input signals when using the Internal or External MICs. 1. Set the [Power] switch to [CAMERA]. 2. -
Page 47: Setting The Shutter Speed & Exposure
ENGLISH Advanced Recording Setting the Shutter Speed & Exposure ✤ The Shutter Speed function works only in <Camera> mode. ➥page 19 ✤ The Exposure function works in both <Camera> and <M.Cam> modes. ➥page 19 ✤ The Shutter Speed and Exposure functions can be set in the QUICK MENU. -
Page 48: Auto Focus / Manual Focus
Auto Focus ✤ If you are inexperienced in the use of Camcorders, we recommend that you make use of Auto Focus. Manual Focus ✤ In the following situations, you may obtain better results by adjusting the focus manually. -
Page 49: Programed Automatic Exposure Modes (Program Ae)
ENGLISH Advanced Recording Programed Automatic Exposure Modes (Program AE) ✤ The Program AE function works only in <Camera> mode. ➥page 19 ✤ The Program AE mode allows you to adjust shutter speeds and apertures to suit different recording conditions. ✤ They give you creative control over the depth of field. ■... - Page 50 ENGLISH Advanced Recording Setting the Program AE 1. Set the [Power] switch to [CAMERA]. 2. Set the [Mode] switch to [TAPE]. (SC-D363/D364/D365/D366 only) 3. Press the [MENU] button. ■ The menu list will appear. 4. Move the [Zoom] lever to the up or down to select <Camera>, then press the [OK] button.
-
Page 51: Setting The White Balance
ENGLISH Advanced Recording Setting the White Balance ✤ The White Balance function works in both <Camera> and <M.Cam> modes. (SC- D363/D364/D365/D366 only) ➥page 19 ✤ The White Balance is a recording function that preserves the unique image color of the object in any recording condition. -
Page 52: Applying Visual Effects
ENGLISH Advanced Recording Applying Visual Effects ✤ The Visual Effect function works only in <Camera> mode. ➥page 19 ✤ The Visual Effects enable you to give a creative look to your recording. ✤ Select the appropriate Visual Effect for the type of picture that you wish to record and the effect you wish to create. - Page 53 Emboss2, Pastel2, Mirror or Mosaic mode will be released. ■ Emboss2, Pastel2, Mirror or Mosaic mode is not available in the 16:9 Wide mode. (SC-D263/D362/D363/D364 only) ■ Digital Zoom is not available in the Emboss2, Pastel2, Mirror or Mosaic mode.
-
Page 54: Setting The 16:9 Wide Mode
You can directly access the 16:9 Wide function using the [QUICK MENU] button. ➥page 20 ■ The 16:9 Wide mode is not available while Visual Effect, DIS, EASY. Q is in use. (SC-D263/D362/D363/D364 only) ■ Once COLOR NITE is set, 16:9 Wide mode will be released. ■... -
Page 55: Setting The Digital Image Stabilizer (Dis)
Mirror or Mosaic is not available in the DIS mode. ■ 16:9 Wide is not available in the DIS mode. (SC-D263/D362/D363/D364 only) ■ When you press the [PHOTO] button while the DIS function is enabled, the DIS will be released shortly and resume automatically after the still image recording. -
Page 56: Zooming In And Out With Digital Zoom (Digital Zoom)
✤ La función de zoom digital máxima sólo está operativa en el modo <Camera>. ➥pág. 19 ✤ Un zoom por encima de 33x (30x; SC-D263/D363) se logra digitalmente hasta 1200x cuando se combina con el zoom óptico. ✤ La calidad de la imagen puede deteriorarse dependiendo de cómo se aplique el zoom digital en el objeto. -
Page 57: Still Image Recording
ENGLISH Advanced Recording Still Image Recording ✤ Still image recording works only in <Camera> mode. ➥page 19 ✤ A tape must be inserted as Still Images are recorded on a tape. 1. Set the [Power] switch to [CAMERA]. 2. Set the [Mode] switch to [TAPE]. (SC-D363/D364/D365/D366 only) 3. -
Page 58: Playback
ENGLISH Playback Playing Back a Tape You have recorded on the LCD Screen Reproducción en la pantalla LCD de una cinta grabada ✤ The Playback function and speaker works only in <Player> mode. ➥page 19 ✤ You can monitor the playback picture on the LCD Screen. 1. -
Page 59: Various Functions While In Player Mode
ENGLISH Playback Various Functions while in Player Mode ✤ This function works only in <Player> mode. ➥page 19 ✤ The [PLAY], [STILL], [STOP], [FF], and [REW] buttons are located on the Camcorder and the remote control. (SC-D364/D366 only) ✤ The [F.ADV] (Frame advance), [X2], and [SLOW] buttons are located on the remote control only. - Page 60 ENGLISH Playback Frame Advance (To play back frame by frame) (SC-D364/D366 only) ■ Press the [F.ADV] button on the remote control while in still mode. - Video sequence advances frame by frame each time you press the [F.ADV] button. - The F.ADV function works in still mode only. ■...
-
Page 61: Zooming During Playback (Pb Zoom)
ENGLISH Playback Zooming during Playback (PB ZOOM) ✤ The PB Zoom function works in <Player> mode. ➥page 19 ✤ The PB Zoom function enables you to magnify the playback or still image. 1. Set the [Power] switch to [PLAYER]. 2. Set the [Mode] switch to [TAPE]. (SC-D363/D364/D365/D366 only) 3. -
Page 62: Audio Dubbing (Sc-D364/D366 Only)
■ To utilize an external MIC or sound source, connect a microphone to the MIC jack or use the Multi-AV Cable (or AV JACK; SC-D263/D363 only) to connect external sound source input. ■ To dub an external sound source, set the <AV In/Out> function to <AV In>... -
Page 63: Dubbed Audio Playback
ENGLISH Playback Dubbed Audio Playback ✤ The dubbed Audio Playback function works only in <Player> mode. ➥page 19 1. Set the [Power] switch to [PLAYER]. 2. Set the [Mode] switch to [TAPE]. (SC-D363/D364/D365/D366 only) 3. Insert the dubbed tape and press the [MENU] button. 4. -
Page 64: Tape Playback
(SC-D362/D364/D365/ (Sólo SC- D366 only) D362/D364/D365/D366.) AV Cable (SC-D263/D363) Camcorder IC K Signal flow AV Cable ■ Si conecta el cable al terminal de Audio/Video o al terminal de AV/S, oirá sonido en los parlantes de la videocámara. - Page 65 ✤ Pude conectar la videocámara a un TV a través de una video casetera. Multi Cable (SC-D362/D364/ D365/D366) Camcorder Signal flow Multi Cable Antenna AV Cable (SC-D263/D363) Camcorder Signal flow AV Cable Antenna [ Notas ] ■ ■ ■ ■...
-
Page 66: Audio Effect
ENGLISH Playback Audio Effect ✤ Audio Effect function works only in <Player> mode. ➥page 19 ✤ Audio Effect provides various playback effects to audio signals stored on a tape. 1. Set the [Power] switch to [PLAYER]. 2. Set the [Mode] switch to [TAPE]. (SC-D363/D364/D365/D366 only) 3. -
Page 67: Setting The Av In/Out (Sc-D365/D366 Only)
ENGLISH Playback Setting the AV In/Out (SC-D365/D366 only) ✤ AV In/Out function works only in <Player> mode. ➥page 19 ✤ AV In/Out setting enables you to record signal from external sources and display it on LCD Screen. Also, you can send your video or image to external devices to record or play back. -
Page 68: Digital Still Camera Mode (Sc-D363/D364/D365/D366 Only)
ENGLISH Digital Still Camera Mode (SC-D363/D364/D365/D366 only) Using the Memory Card (Usable Memory Card) (not supplied) ✤ The Memory Card stores and manages photo images recorded by the Camcorder. ✤ Before inserting or ejecting the Memory Card, set the [Power] switch to [OFF]. -
Page 69: Structure Of Folders And Files On The Memory Card
The data stored on the Memory Card may be changed or lost as a result of misuse, static electricity, electric noise or repair. Save important images separately. Samsung is not responsible for data loss due to misuse. ■ RS-MMC, Mini SD (SC-D363/D364/D365/D366) or Memory Stick Duo type (SC-D365/D366 only) should be inserted by using the Adaptor (not supplied). -
Page 70: Selecting The
ENGLISH Digital Still Camera Mode (SC-D363/D364/D365/D366 only) Selecting the Memory Type ( SC-D366 only ) ✤ The Memory Type setting works in <Player>/<M.Cam>/<M.Player> modes. ➥page 19 (SC-D366: 32MB) ✤ Images can be stored and played back using the built-in memory (Int. Memory), or on a Memory Card.(Tipo Memoria) (Sc-D366 Only) -
Page 71: Selecting The
ENGLISH Digital Still Camera Mode (SC-D363/D364/D365/D366 only) Selecting the Photo Quality ✤ Photo Quality function works in both <Player> and <M.Cam> modes. ➥page 19 ✤ You can select the quality of a photo image to be recorded. Select the Image Quality 1.(Calidad Foto) -
Page 72: Setting The File Number
ENGLISH Digital Still Camera Mode (SC-D363/D364/D365/D366 only) Setting the File Number ✤ File Number setting works only in <M.Cam> mode. ➥page 19 ✤ File Numbers are given to images in the order they were recorded when they are stored on the Memory Card. ✤... -
Page 73: Taking A Photo Image (Jpeg) On The Memory Card
ENGLISH Digital Still Camera Mode (SC-D363/D364/D365/D366 only) Taking a Photo Image (JPEG) on the Memory Card ✤ You may take photo images while in <M.Cam> mode and store the images on the Memory Card. ➥page 19 ✤ You can take photo images using the remote control. (SC-D364/D366 only) ✤... -
Page 74: Viewing Photo Images (Jpeg)
ENGLISH Digital Still Camera Mode (SC-D363/D364/D365/D366 only) Viewing Photo Images (JPEG) ✤ This function works only in <M.Player> mode. ➥page 19 You can play back and view photo images recorded on the Memory Card. ✤ Be sure that the <M.Play Select> is set to <Photo> in the Menu. ➥page 80 1. -
Page 75: Protection From Accidental Erasure
ENGLISH Digital Still Camera Mode (SC-D363/D364/D365/D366 only) Protection from accidental Erasure ✤ The Protection function works only in <M.Player> mode. ➥page 19 ✤ You can protect important images from accidental erasure. If you format the Camcorder, all images including protected images will be erased. -
Page 76: Deleting Photo Images And Moving Images
ENGLISH Digital Still Camera Mode (SC-D363/D364/D365/D366 only) Deleting Photo Images and Moving Images ✤ The Delete function works only in <M.Player> mode. ➥page 19 ✤ You can erase the photo images and moving images recorded on the Memory Card. ✤ If you want to delete protected images, you must first deactivate the image protection. - Page 77 ENGLISH Digital Still Camera Mode (SC-D363/D364/D365/D366 only) Deleting All Images at Once 6. Move the [Zoom] lever to the up or down to select <Delete All>, then press the [OK] button. ■ A message <Do you want to delete all?> is displayed.
-
Page 78: Formatting A Memory Card
ENGLISH Digital Still Camera Mode (SC-D363/D364/D365/D366 only) Formatting the Memory Card ✤ The Format function works only in <M.Player> mode. ➥page 19 ✤ You can use the Format functions to completely delete all images and options on the Memory Card, including protected images. ✤... -
Page 79: Recording Moving Images (Mpeg) On A Memory Card
ENGLISH Digital Still Camera Mode (SC-D363/D364/D365/D366 only) Recording a Moving Images (MPEG) on the Memory Card ✤ You may record moving images while in <M.Cam> mode and store the images on the Memory Card. ➥page 19 ✤ You can record moving images with audio on the Memory Card. -
Page 80: Playing Moving Images (Mpeg) On A Memory Card (M.play Select)
ENGLISH Digital Still Camera Mode (SC-D363/D364/D365/D366 only) Playing the Moving Images (MPEG) on the Memory Card (M.Play Select) Reproducción de secuencias de video (MPEG) en la ✤ The Moving Images Playback function works only in <M. Player> mode. ➥page 19 ✤... -
Page 81: Recording Still Images From A Cassette
ENGLISH Digital Still Camera Mode (SC-D363/D364/D365/D366 only) Recording a Moving Image from a Cassette as a Photo Image ✤ This function works only in <Player> mode. ➥page 19 ✤ You can capture a frame on a tape and save it as a Photo on a Memory Card. -
Page 82: Copying Still Images From A Cassette To A Memory Card (Photo Copy)
ENGLISH Digital Still Camera Mode (SC-D363/D364/D365/D366 only) Copying Still Images from a Cassette to Memory Card (Photo Copy) Copia de imágenes fijas desde un casete a una tarjeta de memoria <Photo Copy> (Copia Foto) ✤ The Photo Copy function works only in <Player>... -
Page 83: Copying Files From A Memory Card To The Built-Inmemory (Copy To) (Sc-D366 Only)
ENGLISH Digital Still Camera Mode (SC-D363/D364/D365/D366 only) Copies Files from the Memory Card to the Built-in Memory (Copy to) (SC-D366 only) ✤ The Copy to function works only in <M.Player> mode. ➥page 19 ✤ You can copy selected or all images stored in the Memory Card to the built-in memory. -
Page 84: Marking Images For Printing (Print Mark)
ENGLISH Digital Still Camera Mode (SC-D363/D364/D365/D366 only) Marking Images for Printing (Print Mark) ✤ The Print Mark function works only in <M.Player> mode. ➥page 19 ✤ This Camcorder supports the DPOF (Digital Print Order Format) print format. ✤ You can automatically print images recorded on a Memory Card with a printer supporting DPOF. -
Page 85: Pictbridge (Sc-D363/D364/D365/D366 Only)
ENGLISH PictBridge (SC-D363/D364/D365/D366 only) Printing Your Pictures – Using the PictBridge ✤ PictBridge function works only in <M.Player> mode. ➥page 19 ✤ By connecting the Camcorder to printers with PictBridge support (sold separately), you can send images from the Memory Card directly to the printer with a few simple operations. -
Page 86: Selecting Images
ENGLISH PictBridge (SC-D363/D364/D365/D366 only) Selecting Images 1. In the <PictBridge> settings menu, press the [œ œ œ œ /√ √ √ √ (REV/FWD)] buttons to select an image to print. Setting the Number of Prints 2. Move the [Zoom] lever to the up or down to select <Copies>, then press the [OK] button. -
Page 87: Ieee 1394 Data Transfer
ENGLISH IEEE 1394 Data Transfer Transferring IEEE1394 (i.LINK)-DV Standard Data Connections Connecting to a DV Device (DVD Recorder, Camcorder, etc.) ■ Connecting to other DV standard products. - A standard DV connection is quite simple. - If a product has a DV jack, you can transfer data by connecting to the DV jack using the correct cable. -
Page 88: Recording With A Dv Connection Cable
ENGLISH IEEE 1394 Data Transfer Recording with a DV Connection Cable 1. Set the [Power] switch to [PLAYER]. 2. Set the [Mode] switch to [TAPE]. (SC-D363/D364/D365/D366 only) 3. Connect the DV cable (not supplied) from the DV jack of the Camcorder to the DV jack of the other DV device. -
Page 89: Usb Interface (Sc-D362/D363/D364/D365/D366 Only)
ENGLISH USB Interface (SC-D362/D363/D364/D365/D366 only) Using USB Interface (SC-D362/D363/D364/D365/D366 only) Transferring a Digital Image through a USB Connection ✤ The Camcorder supports both USB 1.1 and 2.0 standards. (Depends on the PC specification) ✤ You can transfer a recorded file in Memory Card to a PC via a USB connection. -
Page 90: Selecting The Usb Device (Usb Connect) (Sc-D363/D364/D365/D366 Only)
ENGLISH USB Interface (SC-D362/D363/D364/D365/D366 only) Selecting the USB Device (USB Connect) (SC-D363/D364/D365/D366 only) ✤ USB Connect function works only in <M.Player> mode. ➥page 19 ✤ Using the USB cable, you can connect your Camcorder to a computer to copy your moving images and photo images from the Memory Card (or built-in memory;... -
Page 91: Installing Dv Media Pro Program
1) Esta función sólo está operativa en el modo Camera. 2) Conecte la videocámara al PC utilizando el cable USB. 3) En el PC se inicia la instalación del controlador de captura A/V de SAMSUNG. ■ Haga clic en DirectX 9.0. -
Page 92: Connecting To A Pc
ENGLISH USB Interface (SC-D362/D363/D364/D365/D366 only) Connecting to a PC 1. Connect a USB cable to the USB jack on the PC. ■ If a USB cable is connected to the Camcorder's USB jack, the Audio/Video Cable and Multi Cable are disabled. 2. -
Page 93: Using The Pc Camera Function
ENGLISH USB Interface (SC-D362/D363/D364/D365/D366 only) Using the PC Camera Function ✤ This function works only in <Camera> mode. ➥page 19 ✤ To use the PC Camera function, DV Driver, Video Codec and DirectX 9.0 programs must be installed in the PC. ✤... -
Page 94: Using The Usb Streaming Function
ENGLISH USB Interface (SC-D362/D363/D364/D365/D366 only) Using the USB Streaming Function ✤ This function works in both <Camera> and <Player> modes. ➥page 19 ✤ To use USB streaming, the DV Driver, Video Codec and DirectX 9.0. programs must be installed in the PC. ✤... -
Page 95: Maintenance
ENGLISH Maintenance After Finishing a Recording ✤ At the end of a recording you must remove the power source. ✤ When recording with a Battery Pack, leaving the pack on the Camcorder can reduce the life span of the battery. The Battery Pack should be release after recording is completed. -
Page 96: Cleaning And Maintaining The Camcorder
Algunos productos de cintas de limpieza se detienen automáticamente. Consulte las instrucciones de la cinta de limpieza para obtener más detalles. Si el problema persiste tras la limpieza, consulte al distribuidor más cercano de Samsung o al Centro de servicio autorizado. (Pantalla azul) ESPAÑOL... -
Page 97: Using Your Camcorder Abroad
ENGLISH Maintenance Using Your Camcorder Abroad ✤ Each country or region has its own electric and color systems. ✤ Before using your Camcorder abroad, check the following items. Power sources ■ You can use your Camcorder in any country or area with the supplied AC Power adapter within 100V to 240V, 50/60 Hz. -
Page 98: Troubleshooting
ENGLISH Troubleshooting Troubleshooting ✤ Before contacting a Samsung authorized service center, perform the following simple checks. They may save you the time and expense of an unnecessary call. Self Diagnosis Display Display Blinking Informs that... slow the Battery pack is almost discharged. Change to a charged one. -
Page 99: Self Diagnosis Display In M.cam/M.player Modes (Sc-D363/D364/D365/D366 Only)
ENGLISH Troubleshooting Self Diagnosis Display in M.Cam/M.Player Modes (SC-D363/D364/D365/D366 only) Display Blinking Informs that... No Memory slow There is no Memory Card Card! in the Camcorder. slow There is not enough Memory full! memory to record. There are no images slow No image! recorded on the Memory... - Page 100 ENGLISH ENGLISH Troubleshooting ✤ If these instructions do not solve your problem, contact your nearest Samsung authorized service center. Symptom Explanation/Solution You cannot switch the Check the Battery pack or the AC Power adapter. Camcorder on. Start/Stop button does not Check the Power switch is set to CAMERA.
-
Page 101: Setting Menu Items
ENGLISH Troubleshooting Setting menu items Main Sub Menu Functions Menu Camera Program AE Selecting the Program AE Function White Balance Setting the White Balance Visual Effect Setting the Digital special effect 16:9 Wide Setting the 16:9 Wide Function Selecting the Digital Image Stabilizing Digital Zoom Selecting the Digital Zoom... - Page 102 ENGLISH Troubleshooting Main Sub Menu Functions Menu Display LCD Bright Setting the Brightness tone of the LCD Screen LCD Color Setting the Color tones of the LCD Screen Date/Time Setting the Date and Time TV Display Selecting OSD on/off of TV System Clock Set Setting the Clock Set...
-
Page 103: Specifications
150 segundos aprox. (con una cinta DVM60) CCD (Charge Coupled Device) (680 mil píxeles) F1.6 30x: SC-D263/D363, 33x: SC-D362/D364/D365/D366, 1200x(Digital) Objetivo de zoom electrónico Ø27 2,5 pulg. 112K(sólo SC-D263/D362/D363/D364) / 2,7 pulg. (ancha) 230K(sólo SC-D365/D366) LCD TFT LCD Color 1Vp-p (terminación 75Ω) Y: 1Vp-p, 75Ω, C: 0. -
Page 104: Index
ENGLISH ENGLISH Index - A - Accessories ...8 Memory Card ... 68 AF/MF ... 48 Memory Stick ... 68 Audio Dubbing ... 62 Moving Image Recording... 79 Audio Mode ... 44 OSD ... 21, 22 - B - Battery Pack ... 16 BLC ... - Page 105 Africa U.A.E 800SAMSUNG (7267864) Póngase en contacto con SAMSUNG WORLD WIDE Si tiene algún comentario o pregunta en relación con los productos de Samsung, póngase en contacto con el Centro de atención al cliente de SAMSUNG. Web Site Region Country Customer www.samsung.com/ca...
- Page 106 ENGLISH ESPAÑOL THIS CAMCORDER IS MANUFACTURED BY: VIDEOCÁMARA FABRICADA POR:...