Table of Contents
Advertisement
Thank you, and congratulations on your choice of BOSS EQ-20 Graphic Equalizer.
Before using this unit, carefully read the sections entitled: "USING THE UNIT SAFELY"
and "IMPORTANT NOTES" (p. 24–26; p. 2–3).
These sections provide important information concerning the proper operation of the unit.
Additionally, in order to feel assured that you have gained a good grasp of every feature
provided by your new unit, Owner's manual should be read in its entirety. The manual should
be saved and kept on hand as a convenient reference.
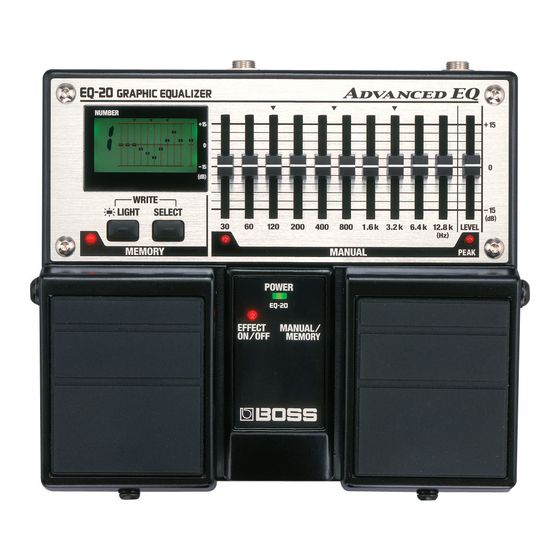
Main Features
This is a 10-band graphic equalizer that lets you vary levels by +/-15 dB from 30 Hz to 12 kHz.
You can use pedal operations to switch between "MANUAL," which offers equalization based
on the positions of the controls; and "MEMORY," which can store nine different equalization
setups in memory. The superior functionality of the unit really becomes evident at those times
when you need to change settings instantly, such as for lead guitar, for cutting, or for booster.
Features an LCD screen for graphic display of the equalization setups stored in "MEMORY."
The screen has a handy backlit for use on stage and in dark locations.
Supports guitar amp send/return (+4 dBu input and output). This makes preamp sound
correction possible.
Uses a diecast body offering outstanding strength and durability.
Can run on battery power (six AA type).
Copyright © 2000 BOSS CORPORATION
All rights reserved. No part of this publication may
be reproduced in any form without the written
permission of BOSS CORPORATION.
Advertisement
Table of Contents

Related Manuals for Boss EQ-20


Summary of Contents for Boss EQ-20
-
Page 1: Main Features
Thank you, and congratulations on your choice of BOSS EQ-20 Graphic Equalizer. Before using this unit, carefully read the sections entitled: “USING THE UNIT SAFELY” and “IMPORTANT NOTES” (p. 24–26; p. 2–3). These sections provide important information concerning the proper operation of the unit. -
Page 2: Important Notes
IMPORTANT NOTES In addition to the items listed under “USING THE UNIT SAFELY” on page 24, please read and observe the following: Power Supply: Use of Batteries • Do not use this unit on the same power circuit with any device that will generate line noise (such as an electric motor or variable lighting system). - Page 3 • Unfortunately, it may be impossible to restore the contents of data that was stored in the unit’s memory once it has been lost. Roland Corporation assumes no liability concerning such loss of data.
-
Page 4: Installing Batteries
When replacing the batteries, use six AA type. * Since the EQ-20’s current consumption is relatively high, we recommend the use of alkaline batteries. * Do not mix fresh batteries with used ones, or mix batteries of different types. Doing so can result in fluid leakage. -
Page 5: Making The Connections
Making the Connections Connecting to the Guitar/Bass Amplifier * When the unit is running on battery power, the power comes on when you insert the connector plug into the INPUT jack. * Before connecting or disconnecting the cord, be sure to lower the volume on the amp. * To prevent malfunction and/or damage to speakers or other devices, always turn down the volume, and turn off the power on all devices before making any connections. - Page 6 Making the Connections Connecting to SEND/RETURN on the Guitar Amp The unit’s equalization effects are obtained after the preamp. fig.02 Electric Guitar * Match the send output level on the guitar amp and the level setting on the unit. If the PEAK indicator lights up frequently, turn down the output on the guitar amp.
-
Page 7: Operation
Operation When you switch on the power, the unit is set to the state it was in when the power was last switched off (MANUAL/MEMORY, Memory Number). Pedal Operation fig.04 This lights up when set to “MEMORY.” This lights up when effects are on. - Page 8 Operation Panel Operation When Set to “MANUAL” fig.05 Equalizer Sliders The sliders (30, 60, 120, 200, 400, 800, 1.6 k, 3.2 k, 6.4 k, and 12.8 k [Hz]) adjust the sound quality. * If the PEAK indicator lights up frequently, switch the LEVEL switch on the rear panel of the unit.
- Page 9 When Set to “MEMORY” fig.07 SELECT Button Pressed to select a memory location (1 through 9). Holding down the button makes the memory number change automatically. When the unit is shipped from the factory, equalization settings are stored in memories 1 through 9. For information about the settings, refer to “Factory Default Settings”...
- Page 10 Operation Storing Settings (Write Operation) Even when you carry out a write operation while the MEMORY indicator is lighted (“MEMORY”), settings made for “MANUAL” are not stored. Be sure to carry out such operations when the MANUAL indicator is lighted (in the “MANUAL” mode). Do not switch off the power while a write operation is in progress.
- Page 11 Press the SELECT button to choose the number of the memory (1 through 9) to store the settings. To avoid deleting previously stored settings, check the display before overwriting. fig.11 Again press the LIGHT button and the SELECT button at the same time. “OK”...
- Page 12 Operation Changing What Is in Memory Before Storing Do not switch off the power while a write operation is in progress. Press the MANUAL/MEMORY pedal to change to the “MEMORY.” fig.14 Illuminated Press the SELECT button to choose the number of the memory you want to change. * Holding down the SELECT button makes the memory number change automatically.
- Page 13 fig.16 Flashing The unit enters a state where you can make changes from when the positions of the sliders stored in memory and the present slider positions match, and the sound quality and levels start to change. * It only flashes once, even if you move more than one slider at the same time. Move the sliders one at a time to make the settings.
-
Page 14: Part Names And Functions
Part Names and Functions Front Panel fig.18 Display This displays the memory number (1 through 9) and the settings in it. This lights up when you turn on the power or manipulate the memory section, then goes dark about 20 seconds after you stop operation. -
Page 15: Rear Panel
Rear Panel fig.20 INPUT Jack This is the input jack for connecting to the output of an electric guitar/bass or other instrument or effects processor. * The INPUT jack also doubles as the power switch when the unit is running on battery power. The power comes on when a plug is inserted into the INPUT jack, and goes off when it is unplugged. - Page 16 Returning Settings to Their Factory Defaults You can return the settings in memories 1 through 9 to their factory defaults. When this operation is carried out, everything that is now in memory is lost. Switch off the power. When running on battery power: Disconnect the connection plug from the INPUT jack.
-
Page 17: Factory Default Settings
Factory Default Settings NUMBER 1 Guitar Clean Cutting NUMBER 2 Mid Boost for the Lead NUMBER 3 Slash/Metal CLEAN Guitar Amp EQ-20 Electric Guitar Guitar Amplifier OverDrive/ EQ-20 Distortion Guitar Amplifier EQ-20 Electric Guitar OverDrive/ Electric Guitar Distortion... - Page 18 Factory Default Settings NUMBER 4 Acoustic NUMBER 5 Jazz Guitar NUMBER 6 Enhancer NUMBER 7 For Slap Bass NUMBER 8 For Standard Rock (for Bass) NUMBER 9 Metal (for Bass)
-
Page 19: Frequency Response
Frequency Response fig.23 1.6k 3.2k 6.4k 12.8k FREQUENCY (Hz) -
Page 20: Sample Settings
Sample Settings Settings for Guitar Booster (connection order: EQ-20 Crunch Sound Pickup Simulation Pickup Simulation OverDrive/Distortion) (connection order: OverDrive/Distortion (Single-coil Humbacking) (Humbacking Single-coil) EQ-20) - Page 21 Sample Settings Settings for Bass Mid Booster Fat Sound Booster (using the overdrive of the bass amplifier) Tight Sound...
-
Page 22: Specifications
Specifications EQ-20: Graphic Equalizer Memories Nominal Input Level -20 dBu (GUITAR/BASS) +4 dBu (GUITAR AMP SEND/RETURN) Input Impedance Nominal Output Level -20 dBu (GUITAR/BASS) +4 dBu (GUITAR AMP SEND/RETURN) Output Impedance Recommended Load Impedance 10 k Residual Noise Level -100 dBu or less (IHF-A typ.) (All Sliders max.) -
Page 23: Sound Is Distorted
Check the settings on the connected equipment (p. 5–6). Is the LEVEL slider on the EQ-20 lowered? Operate the LEVEL slider to adjust the volume (p. 8). Is the LEVEL switch on the rear panel... - Page 24 (except when this manual provides specific instructions directing you to do so). Refer all servicing to your retailer, the nearest Roland Service Center, or an authorized Roland distributor, as listed on the “Information” page. instructions or warnings.
- Page 25 • Before using the unit in a foreign country, consult with your retailer, the nearest Roland Service Center, or an authorized Roland distributor, as listed on the “Information” page.
- Page 26 • Batteries must never be recharged, heated, taken apart, or thrown into fire or water. 101b • The unit and the AC adaptor should be located so their location or position does not interfere with their proper ventilation. 102d • Always grasp only the plug or the body of the AC adaptor when plugging into, or unplugging from, an outlet or this unit.
- Page 27 This product complies with the requirements of European Directive 89/336/EEC. FEDERAL COMMUNICATIONS COMMISSION RADIO FREQUENCY INTERFERENCE STATEMENT This equipment has been tested and found to comply with the limits for a Class B digital device, pursuant to Part 15 of the FCC Rules.
- Page 28 G6017291...