Pioneer Super Tuner III DEH-P930 Operation Manual
Multi-cd/dab control dsp high power cd player with fm/am tuner
Hide thumbs
Also See for Super Tuner III DEH-P930:
- Installation manual (6 pages) ,
- Service manual (91 pages)
Table of Contents
Advertisement
Available languages
Available languages
Quick Links
Advertisement
Chapters
Table of Contents

Related Manuals for Pioneer Super Tuner III DEH-P930


Summary of Contents for Pioneer Super Tuner III DEH-P930
- Page 1 Multi-CD/DAB control DSP high power CD player with FM/AM tuner Syntoniseur FM/AM et lecteur de CD, “Puissance élevée”, processeur de signal numérique (DSP) et contrôleur CD/DAB Operation Manual Operation Manual DEH-P9100R DEH-P930 Manual de Operación Mode d’emploi...
-
Page 2: Table Of Contents
About this product ... 5 About this manual ... 5 Important ... 5 Precaution ... 5 After-sales service for Pioneer products ... 6 About the XM READY mark ... 6 Resetting the microprocessor ... 7 About the demo mode ... 7 About basic displays ... - Page 3 TV Tuner ... 29 Display and indicators ... 29 Basic operation ... 29 Storing and recalling broadcast stations ... 29 Changing a band ... 30 TV tuner function menu ... 30 Selecting channels from the preset channel list ... 30 Audio Adjustments ...
-
Page 4: Dear Customer
Selecting fine audio equipment such as the unit you’ve just purchased is only the start of your musical enjoyment. Now it’s time to consider how you can maximize the fun and excitement your equipment offers. This manufacturer and the Electronic Industries Association’s Consumer Electronics Group want you to get the most out of your equipment by playing it at a safe level. -
Page 5: Key Finder
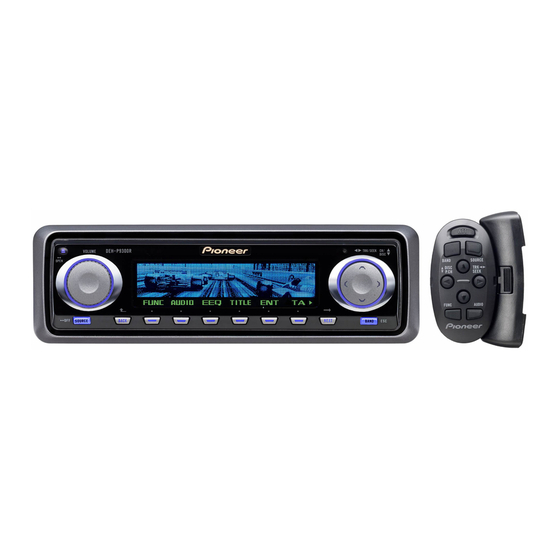
Key Finder Head unit VOLUME EJECT button SOURCE button BACK button Steering remote controller A steering remote controller that enables remote operation of the head unit is supplied. Operation is the same as when using buttons on the head unit. BAND button 5/∞... -
Page 6: Before Using This Product
Before Using This Product bout this product The tuner frequencies on this product are allo- cated for use in North America. Use in other areas may result in improper reception. bout this manual This product features a number of sophisticated functions ensuring superior reception and oper- ation. -
Page 7: After-Sales Service For Pioneer Products
Warranty sheet included with your product. bout the XM READY mark The “XM READY” mark printed on the front panel of this product indicates that the Pioneer XM tuner (sold separately) can be controlled using this product. Please inquire of your dealer or nearest autho- rized Pioneer service station regarding the XM tuner that can be connected to this product. -
Page 8: Resetting The Microprocessor
Before Using This Product esetting the microprocessor The microprocessor must be reset under the following conditions: When using this product for the first time after installation. When the machine fails to operate properly. When strange (incorrect) messages appear on the display. •... -
Page 9: Remote Controller And Care
emote controller and care Install the lithium battery • Remove the cover on the back of the steering remote controller and insert the battery with the (+) and (–) poles pointing in the proper direction. Replacing the lithium battery • Remove the lithium battery. Precaution: •... -
Page 10: Using The Steering Remote Controller
Before Using This Product sing the steering remote con- troller Precaution: • Do not operate this unit while manipulating the steering wheel as this might result in a traffic acci- dent. • If you have to operate this unit unavoidably when driving, pay careful attention to the road ahead to avoid the risk of being involved in a traffic accident. -
Page 11: Basic Operation
4. Press and hold SOURCE to turn the source off. Note: • External unit refers to a Pioneer product (such as one available in the future) that, although incompat- ible as a source, enables control of basic functions by this product. Two external units can be con- trolled by this product, although “External”... - Page 12 Basic Operation Switching the function of the multi-func- tion buttons The “3” indicator shows that the multi-function buttons have functions other than those current- ly displayed. When this indicator is visible, press NEXT to switch through the functions of the multi-function buttons. •...
-
Page 13: Key Guidance Indicator
Display example (e.g., built-in CD player) ey guidance indicator This product’s display features key guidance indicators. These light to indicate which of the 5/∞/2/3 buttons you can use. When you’re in the function menu, audio menu or the other menus, they also make it easy to see which 5/∞/2/3 buttons you can use to switch func- tions on/off, switch repeat selections and per- form other operations. -
Page 14: Tuner
Tuner isplay and indicators FORM 1 FORM 2 qBand wLOC indicator ePreset number rFrequency tStereo indicator asic operation 1. Press SOURCE to select the tuner. Press SOURCE until “Tuner” appears. 2. Press VOLUME to extend the VOLUME outward. • When you press VOLUME, it extends out- ward so that it becomes easier to turn. -
Page 15: Tuner Function Menu
Recalling broadcast stations 1. Press NEXT to display “1” – “6”. Press NEXT until “1” – “6” appears. 2. Press any of the buttons 1 – 6 to recall a station preset under that button. Note: • You can also use 5 or ∞ to recall broadcast sta- tions memorized in the buttons 1 –... -
Page 16: Built-In Cd Player
Built-in CD Player isplay and indicators FORM 1 FORM 2 qSource name wTrack number eDisc title rPlay time tTrack title asic operation The built-in CD player plays one standard 12 cm or 8 cm (single) CD at a time. Do not use an adapter when playing an 8 cm CD. -
Page 17: Switching And Scrolling The Title
witching and scrolling the title When playing a CD TEXT disc, you can switch text display such as artist name and track title. With text longer than 32 letters, you can scroll to see the rest of the text. 1. Press TITLE to switch the title mode. 2. -
Page 18: Playing Tracks In Random Order
Built-in CD Player laying tracks in random order Random play lets you play back tracks on the CD in random order. 1. Press FUNC and then press RDM to select the random mode. 2. Press RDM to turn random play on. The light illuminates. -
Page 19: Pausing Cd Playback
ausing CD playback Pause lets you temporarily stop playback of the 1. Press FUNC and then press PAUSE to select the pause mode. 2. Press PAUSE to turn the pause on. The light illuminates. Play of the current track pauses. •... -
Page 20: Multi-Cd Player
Multi-CD Player isplay and indicators FORM 1 FORM 2 qSource name wDisc number eTrack number rDisc title tPlay time yTrack title -disc multi-CD player Only those functions described in this manual are supported for 50-disc multi-CD players. asic operation This product can control a multi-CD player, which is sold separately. -
Page 21: Switching And Scrolling The Title
witching and scrolling the title When playing a CD TEXT disc on a CD TEXT compatible multi-CD player, you can switch text display such as artist name and track title. With text longer than 32 letters, you can scroll to see the rest of the text. 1. -
Page 22: Playing Tracks In Random Order
Multi-CD Player laying tracks in random order Random play lets you play back tracks in ran- dom order within the repeat range: multi-CD player repeat and disc repeat. 1. Select the repeat range. Refer to “Repeating play” on page 20. 2. -
Page 23: Selecting Discs From The Disc Title List
electing discs from the disc title list The disc title list lets you see the list of disc titles and select one of them for playback. Displayed disc titles are those which have been entered into the multi-CD player or recorded on a CD TEXT disc. -
Page 24: Using Compression And Dynamic Bass Emphasis
Multi-CD Player 5. Press 3 3 to move the cursor to the next character position. • Press 2 to move backwards in the display. 6. Press 3 3 to move the cursor to the last position and then press 3 3 one more time after entering the title. - Page 25 Playback from ITS memory ITS play lets you listen to the tracks that you have entered into ITS memory. When you turn on ITS play, tracks from ITS memory in the multi-CD player will begin to play. 1. Select the repeat range. Refer to “Repeating play”...
-
Page 26: Dab Tuner
DAB Tuner The following explains how to use this product to control a DAB tuner, which is sold separately. For details of DAB tuner-specific operation/fea- tures, see your DAB tuner’s manual. • This product does not have the language filter function. -
Page 27: Storing And Recalling Services
toring and recalling services Storing services 1. Press NEXT to display “1” – “6”. Press NEXT until “1” – “6” appears. 2. When you find a service that you want to store in memory, press and hold any of the buttons 1 – 6 until the preset number stops flashing. -
Page 28: Dynamic Label Function
DAB Tuner ynamic label function Displaying dynamic labels 1. Press NEXT to display “D.TEXT”. Press NEXT until “D.TEXT” appears. 2. Press D.TEXT to switch to the dynamic label mode. 3. Press 2 2 or 3 3 to recall the three latest dynamic label broadcasts from the tuner’s memory. -
Page 29: Setting The Announcement Support Interruption
etting the announcement sup- port interruption 1. Press FUNC and then press AS to select the announcement support mode. 2. Press the corresponding button to turn the desired announcement support on. Button Announcement NEWS News flash WTHR Area weather flash ANNC Announcement Note:... -
Page 30: Tv Tuner
TV Tuner The following explains how to use this product to control a TV tuner, which is sold separately. For details of TV tuner-specific operation/fea- tures, see your TV tuner’s manual. • With this product, you can operate preset chan- nel list as one additional function. -
Page 31: Tv Tuner Function Menu
Recalling broadcast stations 1. Press NEXT to display “1” – “6” (or “7” – “12”. Press NEXT until “1” – “6” (or “7” – “12”) appears. 2. Press any of the buttons 1 – 6 (or 7 – 12) to recall the station preset under that but- ton. -
Page 32: Audio Adjustments
Audio Adjustments djusting the audio easily The following functions let you easily adjust your audio system to match the car interior acoustic characteristics which vary depending on the type of car. • Recalling equalizer curves (EEQ) • Using position selector (POSI) •... -
Page 33: Audio Menu
udio menu The audio menu has the following functions: Note: • If you do not operate the function within about 30 seconds, the display is automatically returned. (When you select the 13-band graphic equalizer mode (EQ2) or the time alignment adjustment mode (T.AL2), the display is not returned automatically.) •... -
Page 34: Adjusting Equalizer Curves
Audio Adjustments Recalling sound field programs 1. Press AUDIO and then press SFC to select the sound field control mode. 2. Press the corresponding button to select the desired sound field program. Button Effect STUDIO Studio CLUB Club HALL Concert hall DOME Dome Octaver 1 and 2... -
Page 35: Using Automatic Sound Levelizer
1. Recall the equalizer curve you want to adjust. Refer to “Recalling equalizer curves” on page 31. 2. Press AUDIO and then press EQ2 to select the 13-band graphic equalizer mode. 3. Press 2 2 or 3 3 to select the equalizer band to be adjusted. -
Page 36: Using Time Alignment
Audio Adjustments sing time alignment The time alignment lets you adjust the distance between each speaker and the listening posi- tion to match the type of car. There are five types of car stored which you can easily recall at any time. 1. -
Page 37: Using The High Pass Filter
Adjusting subwoofer settings When the subwoofer output is on, you can adjust the cut-off frequency and the output level of the subwoofer. 1. Press AUDIO and NEXT and then press SW2 to select the subwoofer setting mode. 2. Press 2 2 or 3 3 to select the cut-off fre- quency. -
Page 38: Adjusting Source Levels
Audio Adjustments djusting source levels SLA (source level adjustment) lets you adjust the volume level of each source to prevent radi- cal changes in volume when switching between sources. • Settings are based on the FM tuner volume level, which remains unchanged. 1. - Page 39 PRECAUTION: • Carrying out auto-equalizing under the follow- ing conditions may damage the speakers. Be sure to check conditions thoroughly before carrying out auto-equalizing. – When speakers are incorrectly connected. (e.g., When a rear speaker is connected to a subwoofer output.) –...
- Page 40 Audio Adjustments 3. Turn the ignition switch to ON or ACC. If the car’s air conditioner or heater is turned on, turn it off. Noise from the fan in the air conditioner or heater may prevent correct auto-equalizing. • Press SOURCE to turn the source on if this product is turned off.
-
Page 41: Detaching And Replacing The Front Panel
Detaching and Replacing the Front Panel heft protection The front panel of the head unit is detachable to discourage theft. Precaution: • Never use force or grip the display tightly when removing or replacing the front panel. • Avoid subjecting the front panel to excessive shocks. -
Page 42: Initial Settings
Initial Settings nitial settings menu The initial settings menu has the following func- tions: Note: • “MUTE.S” is displayed only when you select “Mute” in the voice interrupt selection mode (VOICE). • “STNDBY” is displayed only when you select “Telephone” in the voice interrupt selection mode (VOICE). -
Page 43: Switching The Telephone Connection Setting
When you select telephone muting, “Mute” appears in the display. About this product’s handsfree system By combining the optional Pioneer handsfree system kit with this product, you can talk on the phone with no need to hold the phone received in your hand. -
Page 44: Setting The Warning Tone
Initial Settings etting the warning tone The warning tone sounds to remind you to detach the front panel. (Refer to page 40.) You can turn the warning tone function on or off. 1. With the source turned off, press and hold 2. -
Page 45: Other Functions
Other Functions ttenuating volume The attenuator lets you lower the volume level quickly (by about 90%). • Press ATT to turn the attenuator on. “ATT” appears in the display. • Press ATT again to turn the attenuator off and return to the original volume level. isplaying and setting the clock You can turn the time display on or off and set the time. -
Page 46: Changing The Display Form
Other Functions Matching the time to a time signal 1. Press NEXT to display “CLK”. Press NEXT until “CLK” appears. 2. Press CLK and then press JUST to match the time to a time signal. • If the minute is “00” – “29”, the minutes are rounded down. - Page 47 1. Press ENT and then press MOVIE to select the movie mode. 2. Press any of the buttons MOVIE1 – MOVIE4 or ALL to select the desired movie. • When you press ALL, you can display movies 1 to 4 sequentially. Note: •...
-
Page 48: Using The Aux Source
Other Functions sing the AUX source An IP-BUS-RCA interconnector such as the CD-RB20 or CD-RB10 (sold separately) lets you connect this product to auxiliary equipment featuring RCA output. For more details, refer to the IP-BUS-RCA interconnector’s owner’s man- ual. Selecting AUX as the source •... -
Page 49: Additional Information
Additional Information player and care • Use only CDs that carry either of the two Compact Disc Digital Audio marks shown below. • Use only normal, round CDs. If you insert irregular, non-round, shaped CDs they may jam in the CD player or not play properly. •... -
Page 50: Understanding Built-In Cd Player Error Messages
If the error cannot be corrected, contact your dealer or your near- est Pioneer service center. Display... -
Page 51: Specifications
pecifications General Power source ... 14.4 V DC (10.8 – 15.1 V allowable) Grounding system ... Negative type Max. current consumption ... 10.0 A Dimensions (DIN) (chassis) ... 178 (W) 50 (H) 157 (D) mm [7 (W) 2 (H) 6-1/8 (D) in.] (nose) ... - Page 52 Quelques mots sur cet appareil ... 5 Quelques mots sur ce mode d’emploi ... 5 Précaution ... 5 Service après-vente des produits PIONEER ... 6 À propos de la marque XM READY ... 6 Réinitialisation du microprocesseur ... 7 Quelques mots sur le mode démonstration ... 7 Quelques mots sur les pages écran de base ...
- Page 53 Syntoniseur de télévision ... 29 Affichages et témoins ... 29 Opérations de base ... 29 Mise en mémoire et rappel de la fréquence d’une station ... 29 Choix de la gamme d’onde ... 30 Menu des fonctions du syntoniseur de télévision ...
-
Page 54: Cher Client
Cher Client: La sélection d’un équipement audio de qualité comme l’unité que vous venez d’acheter n’est que le début de votre plaisir musical. Maintenant, il est temps de penser à la manière de profiter au maximum des plaisirs que vous offre votre équipement. Ce fabricant et le Groupe “Consumer Electronics Group”... -
Page 55: Disposition Des Touches
A Title (English) Disposition des touches Appareil central Bouton Volume Touche EJECT Touche SOURCE Touche BACK Boîtier de télécommande de volant Un boîtier de télécommande qui se monte sur le volant est fourni avec l’appareil. Les touches de ce boîtier de télécommande jouent le même rôle que celles de l’appareil lui-même. Touche BAND Touches 5/∞... -
Page 56: Avant D'utiliser Cet Appareil
Avant d’utiliser cet appareil A Title (English) uelques mots sur cet appareil Les fréquences d’accord de cet appareil sont attribuées pour une utilisation en Amérique du Nord. Il s’ensuit que l’utilisation de l’appareil dans d’autres régions peut donner lieu à des anomalies de réception. -
Page 57: Service Après-Vente Des Produits Pioneer
Pioneer (vendu séparément) peut être com- mandé à l’aide de cet appareil. Veuillez vous renseigner auprès de votre reven- deur ou du centre de service autorisé Pioneer le plus proche en ce qui concerne le tuner XM pouvant être connecté à cet appareil. -
Page 58: Réinitialisation Du Microprocesseur
Avant d’utiliser cet appareil éinitialisation du microprocesseur Si une des conditions suivantes se présente, le microprocesseur doit être réinitialisé: Avant d’utiliser l’appareil pour la première fois après son installation. L’appareil ne fonctionne pas convenablement. Des informations erronées (ou fantaisistes) s’af- fichent sur l’écran. -
Page 59: Présentation Et Soin Du Boîtier De Télécommande
A Title (English) résentation et soin du boîtier de télécommande Installation de la pile au lithium • Retirez le couvercle au dois du boîtier de télécommande de volant et mettez en place la pile en respectant les polarités (+) et (–) indiquées. Remplacement de la pile au lithium •... -
Page 60: Volant
Avant d’utiliser cet appareil tilisation du boîtier de télécom- mande de volant Précaution: • Ne faites pas fonctionner le boîtier de télécom- mande tandis que vous tournez le volant car cela peut entraîner un accident. • Si vous devez absolument faire fonctionner le boîti- er de télécommande tandis que vous conduisez, surveillez attentivement la route devant vous pour éviter tout risque d’accident. -
Page 61: Opérations De Base
4. Maintenez la pression d’un doigt sur la touche SOURCE pour mettre hors service la source. Remarque: • “Appareil extérieur” désigne un appareil Pioneer (qui pourra être disponible dans le futur) qui n’est pas à proprement parler une source mais dont la gestion des fonctions de base peut être assurée par... - Page 62 Opérations de base Choix du rôle des touches multifonctions L’indication “3” signale que les touches multi- fonctions jouent des rôles autres que ceux indiqués sur l’écran. Lorsque ce témoin est affiché, appuyez sur la touche NEXT pour faire défiler la liste des rôles joués par les touches multifonction.
-
Page 63: Témoins D'utilisation Des Touches
Exemple d’écran (par exemple, le lecteur de CD intégré) émoins d’utilisation des touches Cet appareil affiche des témoins d’utilisation des touches. Ces témoins s’éclairent pour sig- naler celles des touches 5/∞/2/3 que vous pouvez employer. Grâce à ces témoins, vous savez aisément quelles touches 5/∞/2/3 utiliser quand est affiché... -
Page 64: Syntoniseur
Syntoniseur A Title (English) ffichages et témoins FORM 1 (Ecran type 1) FORM 2 (Ecran type 2) qGamme d’onde wTémoin LOC eNuméro de présélection rFréquence tTémoin de réception stéréophonique pérations de base 1. Appuyez sur la touche SOURCE pour choisir le syntoniseur. Appuyez sur la touche SOURCE jusqu’à... -
Page 65: Menu Des Fonctions Du Syntoniseur
Rappel d’une station dont la fréquence est en mémoire 1. Appuyez sur la touche NEXT pour affich- er “1” – “6”. Appuyez sur la touche NEXT jusqu’à ce que “1” – “6” apparaisse sur l’écran. 2. Appuyez sur la touche 1 à 6 dont la mémoire contient la fréquence de la sta- tion. -
Page 66: Lecteur De Cd Intégré
Lecteur de CD intégré ffichages et témoins FORM 1 (Ecran type 1) FORM 2 (Ecran type 2) qNom de la source wNuméro de la plage musicale eTitre du disque rDurée de lecture tTitre de la plage musicale pérations de base Le lecteur de CD intégré... -
Page 67: Affichage Et Défilement Du Titre
ffichage et défilement du titre Lors de la lecture d’un disque CD TEXT, vous pouvez afficher diverses informations telles que le nom de l’interprète ou le titre de la plage musicale. Si le texte comporte plus de 32 car- actères, vous pouvez le faire défiler. 1. -
Page 68: Sélection D'un Plage Musicale Par Son Titre Sur La Liste Des Plages
Lecteur de CD intégré ecture des plages musicales dans un ordre quelconque Les plages musicales du CD sont jouées dans un ordre quelconque. 1. Appuyez sur la touche FUNC puis sur la touche RDM pour choisir le mode de lec- ture au hasard. -
Page 69: Pause De La Lecture D'un Cd
ause de la lecture d’un CD La pause est un arrêt momentané de la lecture du CD. 1. Appuyez sur la touche FUNC puis sur la touche PAUSE pour choisir la pause. 2. Appuyez sur la touche PAUSE pour met- tre en service la pause. -
Page 70: Lecteur De Cd À Chargeur
Lecteur de CD à chargeur ffichages et témoins FORM 1 (Ecran type 1) FORM 2 (Ecran type 2) qNom de la source wNuméro du disque eNuméro de la plage musicale rTitre du disque tDurée de lecture yTitre de la plage musicale ecteur de CD à... -
Page 71: Affichage Et Défilement Du Titre
ffichage et défilement du titre Lors de la lecture d’un disque CD TEXT grâce à un lecteur de CD compatible CD TEXT, vous pouvez afficher diverses informations telles que le nom de l’interprète ou le titre de la plage musicale. Si le texte comporte plus de 32 car- actères, vous pouvez le faire défiler. -
Page 72: Lecture Des Plages Musicales Dans Un Ordre Quelconque
Lecteur de CD à chargeur ecture des plages musicales dans un ordre quelconque Les plages musicales sont jouées dans un ordre quelconque, c’est-à-dire au hasard, à l’intérieur du mode de répétition adopté: répétition des dis- ques d’un lecteur de CD à chargeur ou répétition d’un disque. -
Page 73: Sélection D'un Disque Par Son Titre Sur La Liste Des Disques
élection d’un disque par son titre sur la liste des disques Vous pouvez choisir un disque sur la liste des disques et en commander la lecture. Les titres des disques sont ceux que vous avez frappés ou qui sont gravés d’origine dans le cas des CD TEXT. -
Page 74: Utilisation De La Compression Et De
Lecteur de CD à chargeur 5. Appuyez sur la touche 3 3 pour placer le curseur sur la position suivante. • Appuyez sur la touche 2 pour placer le curseur sur la position précédente. 6. Appuyez sur la touche 3 3 pour placer le curseur sur la dernière position puis appuyez une nouvelle fois sur la touche 3 3 après la frappe du titre. - Page 75 Lecture commandée par la mémoire ITS La fonction ITS vous donne le moyen de n’en- tendre que les plages musicales qui appartien- nent à la liste établie. Lorsque vous mettez en service la fonction ITS, la lecture des plages musicales des disques du lecteur de CD à chargeur qui figurent sur la liste, commence.
-
Page 76: Syntoniseur Dab
Syntoniseur DAB Les explications qui suivent permettent d’utilis- er cet appareil pour commander un syntoniseur DAB, vendu séparément. Pour de plus amples détails concernant le syntoniseur DAB, reportez- vous au mode d’emploi du syntoniseur DAB. • Cet appareil n’est pas pourvu de la fonction de filtrage de langue. -
Page 77: Mise En Mémoire Et Rappel Des Services
ise en mémoire et rappel des services Mise en mémoire des services 1. Appuyez sur la touche NEXT pour affich- er “1” – “6”. Appuyez sur la touche NEXT jusqu’à ce que “1” – “6” apparaisse sur l’écran. 2. Lorsque se présente un service que vous désirez mettre en mémoire, maintenez la pression d’un doigt sur une des touches 1 à... -
Page 78: Fonction D'étiquette Dynamique
Syntoniseur DAB onction d’étiquette dynamique Affichage des étiquettes dynamiques 1. Appuyez sur la touche NEXT pour affich- er “D.TEXT”. Appuyez sur la touche NEXT jusqu’à ce que “D.TEXT” apparaisse sur l’écran. 2. Appuyez sur la touche D.TEXT pour met- tre en service l’affichage des étiquettes dynamiques. -
Page 79: Mise En Oeuvre De L'interruption De Support D'annonce
ise en oeuvre de l’interruption de support d’annonce 1. Appuyez sur la touche FUNC puis sur la touche AS pour choisir le support d’an- nonce. 2. Appuyez sur la touche correspondant au support d’annonce que vous désirez met- tre en service. Touche Annonce NEWS... -
Page 80: Syntoniseur De Télévision
Syntoniseur de télévision Les explications qui suivent permettent d’utilis- er cet appareil pour commander un syntoniseur de télévision, vendu séparément. Pour de plus amples détails concernant le syntoniseur de télévision, reportez-vous au mode d’emploi du syntoniseur de télévision. • Cet appareil permet de considérer la liste des canaux préréglés comme une fonction complé- mentaire. -
Page 81: Choix De La Gamme D'onde
Rappel de la fréquence d’une station 1. Appuyez sur la touche NEXT pour affich- er “1” – “6” (ou “7.” – “12”). Appuyez sur la touche NEXT jusqu’à ce que “1” – ”6” (ou “7” – “12”) apparaisse sur l’écran. 2. -
Page 82: Réglages Sonores
Réglages sonores églages sonores rapides Les fonctions suivantes vous permettent de régler rapidement les paramètres sonores en tenant compte des caractéristiques acoustiques de l’habitacle du véhicule. • Rappel des courbes d’égalisation (EEQ) • Utilisation du sélecteur de position (POSI) • Utilisation de la différence de marche (T.AL1) •... - Page 83 enu des réglages sonores Le menu des réglages sonores propose les fonctions suivantes: Remarque: • Si vous ne procédez à aucun réglage de paramètre de la fonction pendant environ 30 secondes, la page écran précédente est rétablie. (La page précédente n’est pas automatiquement rétablie si vous choisis- sez les réglages de l’égaliseur graphique à...
- Page 84 Réglages sonores Rappel d’une correction de champ sonore 1. Appuyez sur la touche AUDIO puis sur la touche SFC pour choisir le mode permet- tant la commande de champ sonore. 2. Appuyez sur la touche correspondant à la correction de champ sonore que vous désirez utiliser.
- Page 85 1. Rappelez la courbe d’égalisation à modifier. Reportez-vous à la page 31, “Rappel des courbes d’égalisation”. 2. Appuyez sur la touche AUDIO puis sur la touche EQ2 pour choisir l’égaliseur graphique à 13 bandes. 3. Appuyez sur la touche 2 2 , ou sur la touche 3 3 , pour choisir la bande d’égali- sation à...
-
Page 86: Utilisation De La Différence De Marche
Réglages sonores tilisation de la différence de marche La différence de marche permet de tenir compte de la distance qui sépare chaque haut- parleur de la position d’écoute à l’intérieur du véhicule. La mémoire de l’appareil contient cinq types d’habitacle de véhicule, que vous pouvez rappeler à... -
Page 87: Utilisation Du Filtre Passe-Haut
Réglage de la sortie pour le haut-parleur d’extrêmes graves Lorsque la sortie vers le haut-parleur d’ex- trêmes graves est en service, vous pouvez en régler la fréquence de coupure et l’amplitude. 1. Appuyez sur la touche AUDIO puis sur la touche NEXT et enfin sur la touche SW2 pour choisir le mode permettant de régler la sortie pour le haut-parleur d’extrêmes... -
Page 88: Réglage Du Niveau Des Sources
Réglages sonores A Title (English) églage du niveau des sources Le réglage du niveau des sources au moyen de la fonction SLA, évite que ne se produisent de fortes variations d’amplitude sonore lorsque vous passez d’une source à l’autre. • Le réglage est basé sur le niveau du signal FM qui, lui, demeure inchangé. - Page 89 A Title (English) PRÉCAUTION: • Procéder à l’égalisation automatique dans les conditions suivantes peut endommager les haut-parleurs. Vérifiez soigneusement les conditions d’installation avant d’effectuer l’é- galisation automatique. – Les haut-parleurs ne sont pas correctement raccordés. (Par exemple, un haut-parleur arrière est connecté à la sortie pour un haut- parleur d’extrêmes graves.) –...
- Page 90 A Title (English) Réglages sonores 3. Placez le contacteur d’allumage sur la position ON ou ACC. Si le chauffage ou le climatiseur sont en marche, arrêtez-les. Le bruit du ventilateur du chauffage ou celui du climatiseur peuvent empêcher l’égalisation automatique cor- recte.
-
Page 91: Dépose Et Pose De La Face Avant
A Title (English) Dépose et pose de la face avant rotection contre le vol Le panneau de commande de cet appareil peut être déposé dans le but de décourager le vol de l’appareil. Précaution: • N’exercez aucune force excessive lorsque déposez ou posez la face avant. -
Page 92: Réglages Initiaux
Réglages initiaux enu des réglages initiaux Le menu des réglages initiaux vous propose les paramètres suivants: Remarque: • L’indication “MUTE.S” n’apparaît sur l’écran que si vous avez choisi la valeur “Mute” pour la sélection d’interruption de la voix (VOICE). • L’indication “STNDBY” n’apparaît sur l’écran que si vous avez choisi la valeur “Telephone”... -
Page 93: Choix Du Réglage D'interruption Pour Le Téléphone
“Mute” apparaît sur l’écran. Quelques mots concernant le téléphone mains libres En associant le lot Pioneer de téléphone mains libres (en option) à cet appareil, vous pouvez avoir une conversation téléphonique sans être obligé de tenir le combiné téléphonique. -
Page 94: Utilisation Du Signal D'avertissement
Réglages initiaux tilisation du signal d’avertisse- ment Le signal d’avertissement vous rappelle de déposer la face avant. (Reportez-vous à la page 40.) Vous avez la possibilité de mettre en service, ou hors service, le signal d’avertissement. 1. La source étant hors service, maintenez la pression d’un doigt sur la touche 2. -
Page 95: Autres Fonctions
Autres fonctions tténuation du niveau sonore L’atténuateur permet d’abaisser (environ 90%) rapidement le niveau sonore. • Appuyez sur la touche ATT pour mettre en service l’atténuateur. L’indication “ATT” apparaît sur l’écran. • Appuyez une nouvelle fois sur la touche ATT pour mettre hors service l’atténuateur et rétablir le niveau d’origine. -
Page 96: Choix De La Présentation D'affichage
Autres fonctions Réglage de l’heure en fonction d’un sig- nal horaire 1. Appuyez sur la touche NEXT pour afficher “CLK”. Appuyez sur la touche NEXT jusqu’à ce que “CLK” apparaisse sur l’écran. 2. Appuyez sur la touche CLK puis sur la touche JUST pour régler l’heure en fonc- tion d’un signal horaire. - Page 97 1. Appuyez sur la touche ENT puis sur la touche MOVIE pour choisir le mode con- venable. 2. Appuyez sur une des touches MOVIE1 à MOVIE4 ou ALL pour choisir la page écran cinéma désirée. • Si vous appuyez sur la touche ALL, les pages 1 à...
-
Page 98: Utilisation De La Source Aux
Autres fonctions tilisation de la source AUX Grâce à un interconnecteur IP-BUS-RCA tel que le modèle CD-RB20 ou le modèle CD- RB10 (vendus séparément), vous pouvez relier cet appareil à un équipement auxiliaire doté d’une sortie Cinch (RCA). Pour de plus amples détails concernant cette question, reportez- vous au mode d’emploi de l’interconnecteur IP- BUS-RCA. -
Page 99: Informations Complémentaires
Informations complémentaires oins à apporter au lecteur de CD • N’utilisez que les disques portant la marque Compact Disc Digital Audio. • N’utilisez que des disques standard circu- laires. L’utilisation de disques ayant une forme différente peut provoquer une anomalie du lecteur, ou encore leur lecture peut être impossible. -
Page 100: Signification Des Messages D'erreur Du Lecteur De Cd Intégré
Si l’erreur ne peut pas être corrigée, consultez le reven- deur ou le service d’entretien agréé par Pioneer. Messages ERROR- 11, 12, 17, 30... -
Page 101: Caractéristiques Techniques
A Title (English) aractéristiques techniques Généralités Alimentation ... 14,4 V CC (10,8 à 15,1 V possibles) Mise à la masse ... Pôle négatif Consommation maximale ... 10,0 A Dimensions (DIN) (Châssis) ... 178 (L) 50 (H) 157 (P) mm (Panneau avant) ... - Page 104 TEL: (03) 9586-6300 PIONEER ELECTRONICS OF CANADA, INC. 300 Allstate Parkway, Markham, Ontario L3R OP2, Canada TEL: (905) 479-4411 PIONEER ELECTRONICS DE MEXICO, S.A. de C.V. San Lorenzo 1009 3er. Piso Desp. 302 Col. Del Valle Mexico, D.F. C.P. 03100 TEL: 5-688-52-90 <KMMUF/01D00001>...