
Related Manuals for Pharos GPS 600

Summary of Contents for Pharos GPS 600
- Page 1 HAROS GPS Phone 600 Series Hardware Quick Start Guide Travel with ease and confidence...
-
Page 2: Quick Start Guide
Pharos GPS Phone 600 Series Quick Start Guide... - Page 3 GPRS / EDGE Settings for AT&T / Cingular 1. Tap Start, Settings > Connections tab > Connections > Tasks tab. Tap Add a new modem connection. 2. Enter a new connection name (i.e. AT&T GPRS). Select Cellular Line (GPRS). Tap Next.
- Page 4 GPRS / EDGE Settings for AT&T / Cingular cont’d 3. Enter Access point name: wap.cingular. Tap Next. 4. Tap Finish.
- Page 5 GPRS / EDGE Settings for T-Mobile 1. Tap Start, Settings > Connections tab > Connections > Tasks tab. Tap Add a new modem connection. 2. Enter a new connection name (i.e. T-Mobile GPRS). Select Cellular Line (GPRS). Tap Next.
- Page 6 GPRS / EDGE Settings for T-Mobile cont’d 3. Enter Access point name: wap.voicestream.com. Tap Next. 4. Tap Finish.
- Page 7 MMS Settings for AT&T / Cingular 1. Tap Start, Programs > Messaging > MMS > Menu > MMS Settings. Tap on Profile Cingular MMS. Tap Edit. 2. Enter Profile Settings: MMSC: http://mmsc.cingular.com Data Connection: My ISP Gateway: WAP 1.0 Gateway IP Address: 66.209.11.61 Port: 9201 Tap Done.
- Page 8 MMS Settings for T-Mobile 1. Tap Start, Programs > Messaging > MMS > Menu > MMS Settings. Tap on Profile T-Mobile MMS. Tap Edit. 2. Enter Profile Settings: MMSC: http://216.155.174.84/servlets/mms Data Connection: My ISP Gateway: WAP 1.0 Gateway IP Address: 216.155.165.50 Port: 9201 Tap Done.
-
Page 9: What's In The Box
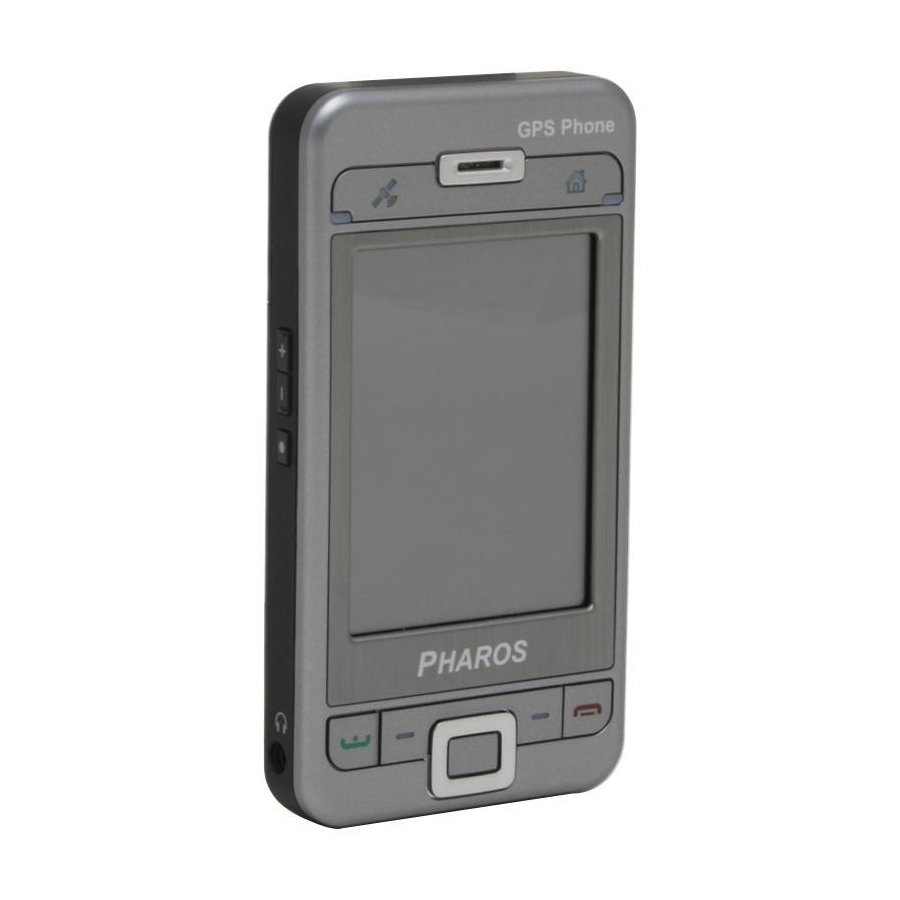
What’s in the box? Battery Car Mount /Holder* Car Charger* Micro SD Card* Stereo Earphones *These items and Ostia navigation software are not included in the 600e package. Getting Started Disc Manuals CD Quick Reference Guide* Quick Start Guide GPS Phone 600 AC Charger HAROS GPS Phone 600 Series... - Page 10 Headset Jack *Not applicable to GPS Phone 600e Today Returns to the Today screen Power Button Power / Cell Phone Active LED Indicator Reset Button Today Screen Provides information for the day. Tap an item to view or edit details.
-
Page 11: Insert The Sim Card
Getting Your GPS Phone 600 Ready to Go 1. Insert the SIM card T urn over the GPS Phone 600 and remove the back cove r . Insert the SIM card in the back of the GPS Phone 600 with the gold contacts facing down. -
Page 12: Default Settings
4. Default Settings Start > Settings > the System tab > Default Settings. 1. If this application is inadvertently accessed, please select the to the upper right of the screen to exit, the system will not be affected. 2. If you are certain that you wish to perform this action, please select the data input block on the right and enter the authorized code in the block to the left. -
Page 13: Charging The Battery
Charging the Battery Unlock Insert the main battery Follow the steps 1 and 2 shown to the left. Caution: Make sure the battery is locked before you use the GPS Phone 600. Lock... - Page 14 Connecting the USB Cable or AC Charger with the GPS Phone 600 AC Charger GPS Phone 600 USB Cable PC or Notebook Home or Office Configuration...
- Page 15 Connecting the Car Charger to the Car Mount GPS Phone 600 W indshield Pedestal Car Mount Car Charger V ehicle Configuration...
- Page 16 Important Notes When Using the GPS When using this device, please use with matching car mount. Affix the device securely to the car mount. Please be aware that the areas shown below can be dangerous areas to place the device. 1.
- Page 17 T urning on and Customizing Your GPS Phone 600 1. T urn on your GPS Phone 600 Disconnect the AC charger from the Mini USB port and press the Power button. 2. Set the time and date Start > Settings > System > Clock & Alarms. Adjust the time zone as needed.
-
Page 18: Secure Your Phone
Securing Your GPS Phone 600 Secure your phone Use a personal identification number (PIN) to protect your phone from unauthorized use. Your first PIN will be given to you by your mobile operator. From the Phone keypad, tap Menu > Options, then tap the Phone tab. Select Require PIN when phone is used. -
Page 19: Status Indicators
Status Indicators Status indicators are displayed at the top of the screen. Active connection to computer ActiveSync is synchronizing Speaker is on Speaker is off or in mute position GPRS available GPRS in use EDGE available EDGE in use WLAN active WLAN data calling WLAN in use New instant message... -
Page 20: Making A Phone Call
Making a Phone Call 1. T urn on your GPS Phone 600 Disconnect the AC charger from the Mini USB port and Power Button press the Power button. 2. Make a phone call Press . On the phone key pad, enter the number you want to call, and tap T alk or press T o delete a digit, tap T ap and hold... -
Page 21: Making And Receiving Calls
Making and Receiving Calls Make a call: Press to bring up the dialer screen. Enter the phone number, and tap Talk or press Receive a call: Press or tap Talk on the dialer screen. End a call: Press or tap End on the dialer screen. Make an emergency call: Press . -
Page 22: Enabling The Speakerphone Mode
Enabling the Speakerphone Mode Enabling the speakerphone: On an incoming phone call, tap Answer to receive the call, then tap Speaker on to turn on the speakerphone. On an outgoing phone call, tap Speaker on to turn on the speakerphone. Disabling the speakerphone: Tap Speaker off to turn off the speakerphone. -
Page 23: Synchronizing Outlook Information
Synchronizing Outlook Information If you use Outlook on a desktop PC, you can synchronize e-mail, contacts, calendar, and more with your GPS Phone 600. 1. Install Active Sync on the desktop PC Do not connect your desktop PC and your GPS Phone 600 with the USB cable until after you have installed ActiveSync. - Page 24 Setting Up an E-mail Account or Using a Web-based E-mail If you have an e-mail account with an Internet service provider, you can send and receive e-mail from your GPS Phone 600. If you can access your e-mail account from a webpage on your desktop PC, you can also access this account on your GPS Phone 600.
- Page 25 T aking a Picture or Video and Sending It via E-mail T ake a picture T ap Start > Programs > Multimedia >Camera. The camera screen will display what the lens is capturing. Press the Camera Shutter button, the lower left side of the GPS Phone 600, to take a picture.
- Page 26 Connecting to the Internet by GPRS / EDGE You can use GPRS / EDGE wireless network connection. Make sure that your telecom company provides this service and apply for a SIM with GPRS / EDGE function. Start > Settings, tap the Connections tab > Connections > tap the Tasks tab. 1.
- Page 27 Starting GPRS / EDGE Connection 1. Tap at the top of the screen and when a message window appears tap Turn off flight mode and input the PIN to turn on the phone. icon will change to icon will change to 2.
- Page 28 Disconnecting GPRS / EDGE 1. Disconnect GPRS / EDGE: and the message window appears. Tap Disconnect. 2. Turn off Phone: and the message window appears. Tap Turn on flight mode.
-
Page 29: Using Wlan Connection
Using WLAN Connection This section teaches you how to use a WLAN connection. You can use the GPS Phone 600 to browse websites, read or send e-mail, SMS or MSN messages at places where a WLAN is accessible. You will be able to obtain an IP, DSN, Proxy and other essential information to access a network when you purchase the service, or have permission from the network administrator. - Page 30 Changing an Available WLAN If you would like to change to another available WLAN, just tap on the bottom right of the Today screen Start > Programs > Wireless Manager, or tap and then tap the icon on the Wi-Fi tab. Tap Configure.
-
Page 31: Entering Information
Entering Information Your GPS Phone 600 offers several input methods: Use the Soft Keyboard to enter typewritten characters. The Block Recognizer and Letter Recognizer render individual characters as “typed”. Transcriber converts handwritten words and symbols into typed characters. The following screen shows the Keyboard input panel. For more information on using Block Recognizer and Letter Recognizer, and demonstrations... -
Page 32: Starting Voice Commander
Starting Voice Commander Start > Programs > Voice Commander, and then tap Voice Commander. 1. Show the format of voice command. 2. Re-Start Button: Restart Voice Commander. 3. Menu Button: Settings: Voice Commander Settings. About: About Voice Commander. Exit: Exit Voice Commander. -
Page 33: Need Help
Need Help? Last-minute updates, detailed technical information, news, and tips: http://www.microsoft.com/windowsmobile Assistance using the Pharos Ostia navigation software with the GPS Phone 600: http://www.pharosgps.com... - Page 34 www.pharosgps.com...