Table of Contents
Advertisement
Quick Links
Advertisement
Table of Contents

Related Manuals for Nokia C5


Summary of Contents for Nokia C5
- Page 1 Nokia C5–03 User Guide Issue 1.5...
-
Page 2: Table Of Contents
Switch the device on Lock the keys and touch screen Home screen Access the menu Touch screen actions Change the ringing tone Ovi by Nokia About Ovi Store Your device Device setup Settings wizard Transfer content for the first time... -
Page 3: Contents
Share online About Share online Subscribe to services Manage your accounts Create a post Post files from Gallery Nokia Video Centre View and download video clips Video feeds My videos Transfer video clips from your PC Video centre settings Web browser... - Page 4 Contents Synchronise data with Ovi Sync Bluetooth connectivity Transfer data using a USB cable PC connections Administrative settings Search About Search Start a search Other applications Clock Calendar File manager Quickoffice Application manager RealPlayer Recorder Write a note Make a calculation Converter Dictionary Settings...
-
Page 5: Safety
Safety Read these simple guidelines. Not following them may be dangerous or illegal. Read the complete user guide for further information. SWITCH OFF IN RESTRICTED AREAS Switch the device off when mobile phone use is not allowed or when it may cause interference or danger, for example, in aircraft, near medical equipment, fuel, chemicals, or blasting areas. -
Page 6: Find Help
• Update your device software. • If your issue remains unsolved, contact Nokia for repair options. Go to www.nokia.com/ repair. Before sending your device for repair, always back up the data in your device. Software updates over the air Select... -
Page 7: Update Device Software Using Your Pc
Disclaimer — View the Nokia licence agreement. Update device software using your PC You can use the Nokia Ovi Suite PC application to update your device software. You need a compatible PC, a high-speed internet connection, and a compatible USB data cable to connect your device to the PC. -
Page 8: Access Codes
If you forget the code and your device is locked, your device will require service. Additional charges may apply, and all the personal data in your device may be deleted. For more information, contact a Nokia Care Point or your device dealer. Prolong battery life Many features in your device increase the demand on battery power and reduce the battery lifetime. -
Page 9: Increase Available Memory
If the signal strength of the cellular network varies much in your area, your device • must scan for the available network repeatedly. This increases the demand on battery power. If the network mode is set to dual mode in the network settings, the device searches for the 3G network. -
Page 10: Get Started
Get started Get started Insert the SIM card and battery Safe removal. Always switch the device off and disconnect the charger before removing the battery. Important: Do not use a mini-UICC SIM card, also known as a micro-SIM card, a micro-SIM card with an adapter, or a SIM card that has a mini-UICC cutout (see figure) in this device. - Page 11 Lift the SIM card holder up. Make sure the contact area of the SIM card is facing toward the device, and slide the SIM card into the SIM card holder. Lower the SIM card holder into place. Slide the SIM card holder, to lock it. Line up the battery contacts, and insert the battery.
-
Page 12: Insert The Memory Card
If the SIM card is not properly in place, the device can only be used in the offline profile. Insert the memory card Use only compatible memory cards approved by Nokia for use with this device. Incompatible cards may damage the card and the device and corrupt data stored on the card. -
Page 13: Remove The Memory Card
Make sure the contact area of a compatible memory card is facing down, and insert it into the memory card slot. Push the card in, until you hear a click. Replace the back cover. Remove the memory card Important: Do not remove the memory card when an application is using it. Doing so may damage the memory card and the device, and corrupt data stored on the card. -
Page 14: Charge The Battery
Get started When Remove memory card? Some applications will be closed. select Yes. When Remove memory card and press 'OK' of the device, and push the card in, until you hear a click. Pull out the memory card, and replace the back cover. If the device is switched on, select OK. -
Page 15: Keys And Parts
If the device is switched on, select the appropriate USB mode. Only connect your device to products that have USB-IF logo. Keys and parts Wrist strap hole Nokia AV connector (3.5 mm) Micro USB connector Volume/Zoom key Lock key Earpiece... -
Page 16: Switch The Device On
Get started Switch the device on Press and hold the power key. If the device asks for a PIN code or lock code, enter it, and select OK. To delete a number, select . The factory setting for the lock code is 12345. Select your location. -
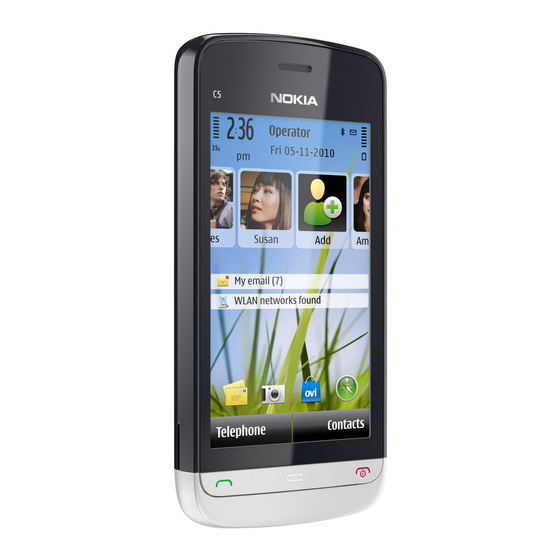
Page 17: Home Screen
Get started The screen and keys may be locked automatically after a period of inactivity. To change the settings for automatic screen and key locking, select Menu Settings > Phone Phone mgmt. Auto. keyguard Keypad autolock period. > > > Home screen The home screen is your starting point where you can collect all your important contacts or application shortcuts. -
Page 18: Access The Menu
Get started Start using the contacts bar To add a contact to the contacts bar, in the home screen, select and a contact, and follow the displayed instructions. Contacts need to be saved in the phone memory. To add a new contact to your contacts list, select Options contact, and >... -
Page 19: Change The Ringing Tone
Get started For example, to select Options > Help, tap Options, and then tap Help. Drag an item Tap and hold the item, and slide your finger across the screen. The item follows your finger. To scroll up or down on a web page, drag the page with your finger. Swipe Place a finger on the screen, and steadily slide your finger in the desired direction. -
Page 20: Ovi By Nokia
To personalise a profile, go to the profile, and select Personalise. Ovi by Nokia With Ovi by Nokia, you can find new places and services, and stay in touch with your friends. You can do, for example, the following: Download games, applications, videos, and ringing tones to your device •... -
Page 21: Settings Wizard
Sign up for the My Nokia service to receive free tips, tricks, and support for your • Nokia device. You will also receive notifications when new software updates are available for your device. Activate Ovi services. • When you switch on your device for the first time, the Phone setup application opens. -
Page 22: Network Indicators
Your device The touch screen and keys are locked. The device alerts silently for incoming calls or messages. You have set a clock alarm. You are using a timed profile. Call indicators Someone has tried to call you. You have set your device to divert incoming calls to another number (network service). -
Page 23: Contacts Bar
You have a 3G packet data connection (network service). that the connection is suspended and established. You have a high-speed downlink packet access (HSDPA) connection (network service). that a connection is being established. A WLAN connection is available (network service). the connection is encrypted and encrypted. -
Page 24: Antenna Locations
Your device To close the view, select Options > Exit. Antenna locations Avoid touching the antenna area unnecessarily while the antenna is transmitting or receiving. Contact with antennas affects the communication quality and may cause a higher power level during operation and may reduce the battery life. GPS antenna Bluetooth and WLAN antenna... -
Page 25: Shortcuts
Shortcuts To switch between open applications, press and hold the menu key. Leaving applications running in the background increases the demand on battery power and reduces the battery life. To change the profile, press the power key, and select a profile. To call your voice mailbox (network service), in the dialler, tap and hold 1. -
Page 26: Remote Lock
Your device Select from the following: Sensors — Activate the sensors. Turning control — Select snooze alarms by turning your device so that the display faces down. Select display to rotate the display content automatically when you turn the device on its left side or back to a vertical position. -
Page 27: Attach A Wrist Strap
Attach a wrist strap Make calls Calls In the home screen, select number, including the area code. To remove a number, select For international calls, select * twice for the + character (which replaces the international access code), and enter the country code, area code (omit the leading zero if necessary), and phone number. -
Page 28: Voice Mailbox
Make calls Activate the loudspeaker Select . If you have attached a compatible headset with Bluetooth connectivity, to route the sound to the headset, select Switch back to the handset Select End a call Select Switch between active and held calls Select Options >... -
Page 29: Answer Or Reject A Call
Answer or reject a call Answer a call Press the call key. Mute the ringing tone of an incoming call Select Send a reject call text message Select Send msg., edit the message text, and press the call key. With the reply message you can inform the caller that you cannot answer the call. -
Page 30: Speed Dial A Phone Number
Make calls Drop a participant from a conference call Select , go to the participant, and select End an active conference call Press the end key. Speed dial a phone number To activate speed dialling, select dialling. To assign a phone number to one of the number keys, select Calling Speed dialling. -
Page 31: Voice Dialling
End both calls Select Options End all > Voice dialling Your device automatically creates a voice tag for contacts. Listen to a voice tag for a contact Select a contact and Go to a contact detail, and select Make a call with a voice tag Note: Using voice tags may be difficult in a noisy environment or during an emergency, so you should not rely solely upon voice dialling in all circumstances. - Page 32 Make calls Tip: To open the dialled numbers list in the home screen, press the call key. Select Options and from the following: Save to Contacts — Save a phone number from a recent calls list to your contacts. Clear list — Clear the selected recent calls list. Settings —...
-
Page 33: Write Text
View the packet data connection details Go to an incoming or outgoing packet data connection event indicated with GPRS, and select the connection event. Copy a phone number from the log Select and hold the number, and from the pop-up menu, select You can, for example, paste the phone number to a text message. -
Page 34: Handwriting
Write text Virtual keyboard Shift and caps lock - To enter an uppercase character when writing in lowercase, or vice versa, select the key before entering the character. To activate the caps lock, select the key twice. A line under the key indicates that the caps lock is activated. Letters Numbers and special characters Character accents... -
Page 35: Enter Text With The Virtual Keypad
To insert a space, swipe forwards (see Figure 2). Enter text with the virtual keypad Virtual keypad With the virtual keypad (Alphanumeric would with a traditional physical keypad with numbers on the keys. Close - Closes the virtual keypad Input menu - Opens the touch input menu, which includes commands such as Activate predictive text Text input indicator - Opens a pop-up window, in which you can activate or deactivate predictive text input modes, change the character case, and switch... -
Page 36: Touch Input Settings
To write the desired word, use the keys 2-9. Select each key only once for one letter. For example, to write "Nokia" when the English dictionary is selected, select 6 for N, 6 for o, 5 for k, 4 for i, and 2 for a. -
Page 37: Contacts
Writing language — Define which language-specific characters in your handwriting are recognised and how the virtual keyboard is laid out. Writing speed — Select the writing speed. Guiding line — Display or hide the guiding line in the writing area. The guiding line helps you write in a straight line, and it also helps the device recognise your writing. -
Page 38: Assign Default Numbers And Addresses
Contacts To delete several contacts at the same time, select the desired contacts, and to delete, select To listen to the voice tag assigned to a contact, select the contact and tag details Options > > When entering contacts or editing voice commands, do not use very short or similar names for different contacts or commands. -
Page 39: Copy Contacts
Contacts Add an image for a contact Select a contact saved in the device memory and Options image, and select an > image from Gallery. Define a call text for a contact Select the contact and Options Add call alert text. -
Page 40: Messaging
Messaging Select the default memory where to save the new contacts Select Options Settings > memory. Contacts stored in the device memory can contain more than one phone number and an image. Fixed dialling With the fixed dialling service, you can restrict calls from your device to certain phone numbers. -
Page 41: Write And Send Messages
Mailbox — Connect to your remote mailbox to retrieve your new e-mail messages, or view your previously retrieved e-mail messages offline. Drafts — Draft messages that have not been sent. Sent — The last messages that have been sent, excluding messages sent using Bluetooth connectivity. -
Page 42: Messaging Inbox
Messaging Enter the number or mail address manually Tap the field. Enter the subject of the mail or multimedia message Enter it in the Subject field, . If the Subject field is not visible, select header fields to change the fields that are visible. Write the message Tap the message field. -
Page 43: Set Up E-Mail
Reply to a received message Select Options > Reply. Multimedia messages Select Menu > Messaging. Retrieve multimedia messages Select Options > Retrieve. A packet data connection is opened to retrieve the message to your device. You may receive a notification that a multimedia message is waiting in the multimedia message centre. -
Page 44: E-Mail Service
E-mail service The e-mail service on your Nokia device automatically transfers e-mail from your existing e-mail address to your device. You can read, respond to, and organise your e- mails on the go. The service works with a number of internet e-mail providers that are often used for personal e-mail. - Page 45 Connect to your mailbox and retrieve new e-mail headers or messages Select Yes. When you view messages online, you are continuously connected to a remote mailbox using a data connection. View previously retrieved e-mail messages offline Select No. Create a new e-mail message Select Options Create message...
-
Page 46: Mail For Exchange
Use of the Mail for Exchange is limited to over-the-air synchronisation of PIM information between the Nokia device and the authorised Microsoft Exchange server. Mail for Exchange can be set up only if your company has Microsoft Exchange Server. In addition, your company's IT administrator must have activated Mail for Exchange for your account. -
Page 47: View Messages On A Sim Card
Your office network user name • Your office network password • Your network domain name (contact your company's IT department) • Your Mail for Exchange server name (contact your company's IT department) • Depending on your company's Mail for Exchange server configuration, you may need to enter other information in addition to those listed. - Page 48 Messaging Select from the following: Message centres — View a list of all text message centres that have been defined. Message centre in use — Select which message centre to use to deliver text messages. Character encoding — To use character conversion to another encoding system when available, select Reduced support.
-
Page 49: About Ovi Contacts
With Ovi Contacts, you can make your contacts list dynamic and be confident that your contacts are stored in Ovi. You must have a Nokia account to use the service. Create an account on your mobile device, or go to www.ovi.com on your PC. -
Page 50: Connect To The Service
The Ovi Contacts service is part of Ovi, and uses the same account information. If you are new to Ovi and its services, to start using the Ovi Contacts application, you must register to Ovi by creating a Nokia account. Create a Nokia account Select Chat, and when prompted, connect to the internet. -
Page 51: Personalise Your Device
Sign in to Ovi Contacts and activate the service Select Chat, and enter your user name and password. If you have not yet provided your profile information for Ovi Contacts, do so, and select Done. Your first and last name are mandatory details. Personalise your device You can personalise your device by changing the home screen, tones, or themes. -
Page 52: Music Folder
Music folder Music folder Music player Music player supports file formats such as AAC, AAC+, eAAC+, MP3, and WMA. Music player does not necessarily support all features of a file format or all the variations of file formats. You can also use Music player to listen to podcasts. Podcasting is a method for delivering audio or video content over the internet using either RSS or Atom technologies for playback on mobile devices and computers. - Page 53 Tip: When listening to music, you can return to the home screen and leave the Music player application playing in the background. Create a playlist Want to listen to different music for different moods? With playlists, you can create selections of songs to play in a specific order. Select Menu Music...
-
Page 54: Ovi Music
Nokia Ovi Player With Nokia Ovi Player, you can download music from Ovi Music, transfer your music to your device from your computer, and manage and organise your music files. To download Nokia Ovi Player, go to www.ovi.com. -
Page 55: Nokia Podcasting
Ovi Music is not available for all countries or regions. Nokia Podcasting With the Nokia Podcasting application (network service), you can search, discover, subscribe to, and download podcasts over the air, and play, manage, and share audio and video podcasts with your device. -
Page 56: Radio
Music folder Restore default settings Select Options Restore > Download podcasts After you have subscribed to a podcast, you can download, play, and manage the podcast episodes. Select Menu Music > Podcasting. > View a list of subscribed podcasts Select Podcasts. View individual episode titles Select the podcast title. -
Page 57: Camera
Stations — View saved radio stations. Tune stations — Search for radio stations. Save — Save the radio station. Activate loudspeaker or Deactivate loudspeaker — Turn the loudspeaker on or off. Alternative frequencies — Select whether you want the radio to automatically search for a better RDS frequency for the station if the frequency level becomes low. - Page 58 Camera Zoom in or out when capturing an image Use the zoom slider. After capturing an image After you capture an image, select from the following options (available only if you have selected Options Settings > — Send the image in a multimedia or e-mail message, or through connection methods such as Bluetooth connectivity.
-
Page 59: Location Information
Copy the settings of another scene Select Based on scene mode the scenes list, select Back. Activate your own scene Select User defined > Select. Location information You can automatically add capture location information to the file details of the captured material. -
Page 60: Video Recording
Gallery Set the self-timer delay Select and the delay desired before the image is captured. > Activate the self-timer Select Activate. The stopwatch icon on the screen blinks and the remaining time is displayed when the timer is running. The camera captures the image after the selected delay elapses. -
Page 61: View Images And Videos
Select from the following: Images & videos — View images in the image viewer and video clips in Video centre. Songs — Open Music player. Sound clips — Listen to sound clips. Other media — View presentations. indicates files stored on your compatible memory card (if inserted). Open a file Select a file from the list. -
Page 62: Organise Images And Video Clips
To subscribe to an online sharing service, go to the service provider's website, and check that your Nokia device is compatible with the service. Create an account as instructed on the website. You receive a user name and password needed to set up your device with the account. -
Page 63: Manage Your Accounts
Manage your accounts To view your accounts, select To create a new account, select To change the user name or password for an account, select and hold the account name, and from the pop-up menu, select Edit. To set an account as the default when sending posts from your device, select and hold the account name, and from the pop-up menu, select To remove an account, select and hold the account name, and from the pop-up menu, select Delete. -
Page 64: Nokia Video Centre
Nokia Video Centre Nokia Video Centre With Nokia Video Centre (network service), you can download and stream video clips over the air from compatible internet video services using a packet data or WLAN connection. You can also transfer your video clips from a compatible PC to your device and view them in Video centre. -
Page 65: Video Feeds
My videos is a storage place for all video clips in the Video centre application. You can list downloaded video clips and video clips recorded with the device camera in separate views. Manual download Video centre. > Video feeds. Via Video directory Nokia Video Centre Options > as the download method. to select a feed from... -
Page 66: Transfer Video Clips From Your Pc
Nokia Video Centre To open a folder and view video clips, select the folder. When a video clip is playing, to use the control keys for controlling the player, tap the screen. To adjust the volume, press the volume key. -
Page 67: Web Browser
Preferred memory — Select whether downloaded videos are saved in the device memory or on a compatible memory card. Thumbnails — Select whether to download and view thumbnail images in video feeds. Web browser With the web browser, you can view hypertext markup language (HTML) pages on the web as originally designed (network service). -
Page 68: Subscribe To A Web Feed
Browse the available services, and for more information, select the service. Some content is generated by third parties and not Nokia. The content may be inaccurate and is subject to availability. Some services may not be available in all countries, and may be provided only in selected languages. -
Page 69: About Gps
With the help of assisted data, your device can obtain the GPS position faster. Your device is preconfigured to use the Nokia A-GPS service, if no service provider- specific A-GPS settings are available. The assistance data is retrieved from the Nokia A- GPS service server only when needed. -
Page 70: Tips On Creating A Gps Connection
Positioning (GPS) The GPS receiver draws its power from the device battery. Using the GPS receiver may drain the battery faster. Tips on creating a GPS connection Check the satellite signal status Select Menu Applications > If your device has found satellites, a bar for each satellite is shown in the satellite info view. -
Page 71: Position Requests
Establishing a GPS connection may take from a couple of seconds to several minutes. Establishing a GPS connection in a vehicle may take longer. The GPS receiver draws its power from the device battery. Using GPS may drain the battery faster. Position requests You may receive a request from a network service to receive your position information. -
Page 72: Positioning Settings
Maps Positioning settings Positioning settings define the methods, server, and notation settings used in positioning. Select Menu Applications > Define positioning methods Use only the integrated GPS receiver of your device Select Integrated GPS. Use Assisted GPS (A-GPS) to receive assistance data from a positioning server Select Assisted GPS. -
Page 73: View Your Location And The Map
Almost all digital cartography is inaccurate and incomplete to some extent. Never rely solely on the cartography that you download for use in this device. Some content is generated by third parties and not Nokia. The content may be inaccurate and is subject to availability. -
Page 74: Map View
Maps If you browse to an area not covered by the street maps that are stored on your device, and you have an active data connection, new street maps are automatically downloaded. To prevent downloading new street maps automatically, in the main menu, select Internet Connection >... -
Page 75: Download And Update Maps
If you have an older version of the Maps application installed on your device, when you update to the latest version, the country or region maps are deleted. Before using Nokia Ovi Suite to download new country or region maps, open and close the Maps application. -
Page 76: Find A Location
Maps The availability and quality of GPS signals may be affected by your location, satellite positions, buildings, natural obstacles, weather conditions and adjustments to GPS satellites made by the United States government. GPS signals may not be available inside buildings or underground. Do not use GPS for precise location measurement, and never rely solely on the location information provided by GPS and cellular networks. -
Page 77: View Location Details
When you find a place that does not exist or contains inappropriate information or incorrect details, such as the wrong contact information or location, it is recommended that you report it to Nokia. Report incorrect place information Select the place, its information area, Report, and the appropriate option. -
Page 78: Send A Place To A Friend
Select Menu Maps > To view the place on the map, your friends don't need to have a Nokia mobile device, but an active internet connection is required. Select a place and its information area. Select Share Share via SMS >... -
Page 79: Synchronise Your Favourites
To synchronise places or routes between your mobile device and the Ovi Maps internet service, you need to be signed in to your Nokia account. Synchronise saved places and routes... -
Page 80: Use The Compass
Maps Select Menu Maps > When you use drive or walk navigation for the first time, you are asked to select the language of the voice guidance, and download the appropriate files. If you select a language that includes street names, also the street names are said aloud. Voice guidance may not be available for your language. -
Page 81: Drive To Your Destination
The compass has limited accuracy. Electromagnetic fields, metal objects, or other external circumstances may also affect the accuracy of the compass. The compass should always be properly calibrated. Drive to your destination When you need turn-by-turn directions while driving, Maps helps you get to your destination. -
Page 82: Navigation View
Maps Change views during navigation Swipe left to select view, Obey all local laws. Always keep your hands free to operate the vehicle while driving. Your first consideration while driving should be road safety. Navigation view Route Your location and direction Information bar (speed, distance, time) Get traffic and safety information Enhance your driving experience with real-time information about traffic events, lane... -
Page 83: Walk To Your Destination
The location of speed cameras may be shown on your route during navigation, if this feature is enabled. Some jurisdictions prohibit or regulate the use of speed camera location data. Nokia is not responsible for the accuracy, or the consequences of using speed camera location data. - Page 84 Maps Create a route Tap the location of your starting point. To search for an address or place, select Search. Tap the location's information area. Select Add to route. To add another route point, select option. Change the order of the route points Select a route point.
-
Page 85: Connectivity
Use the faster or shorter driving route Open the Settings tab, set the transportation mode to Drive, and select selection Faster route > Use the optimised driving route Open the Settings tab, set the transportation mode to Drive, and select selection >... -
Page 86: Wireless Lan
Connectivity Network mode — Select which network to use. If you select uses the GSM or UMTS network automatically, according to the network parameters and the roaming agreements between the wireless service providers. For details and roaming costs, contact your network service provider. This option is shown only if supported by the wireless service provider. - Page 87 Important: Use encryption to increase the security of your WLAN connection. Using encryption reduces the risk of others accessing your data. WLAN connections To use a wireless LAN (WLAN) connection, you must create an internet access point (IAP) for WLAN. Use the access point for applications that need to connect to the internet. A WLAN connection is established when you create a data connection using a WLAN internet access point.
- Page 88 Connectivity Filter out WLANs from the list of found networks Select Options Filter WLAN > next time the WLAN wizard searches for WLANs. View the details of a network Select the network, and from the pop-up menu, select Details. If you select an active connection, the connection details are displayed.
-
Page 89: Access Points
Access points Create a new access point Select Menu Settings > You may receive access point settings in a message from a service provider. Some or all access points may be preset for your device by your service provider, and you may not be able to change, create, edit, or remove them. - Page 90 Connectivity Copy an existing access point from another group Select the group, and select and hold the access point to copy, and from the pop-up menu, select Copy to other dest.. Change the priority of an access point within a group Select and hold the access point, and from the pop-up menu, select Change priority.
-
Page 91: Close A Network Connection
Connectivity DNS addresses — Enter the IP addresses of the primary and secondary DNS servers, if required by your service provider. To obtain these addresses, contact your internet service provider. Proxy server address — Enter the address of the proxy server. Proxy port number —... -
Page 92: Synchronisation
Connectivity View details for a connection Select and hold the connection, and from the pop-up menu, select Details. Details, such as the amount of transferred data and connection duration, are displayed. Close a connection Select and hold the connection, and from the pop-up menu, select Disconnect. Synchronisation With the Sync application, you can synchronise your notes, messages, contacts, and other information with a remote server. -
Page 93: Bluetooth Connectivity
Generic Access, Generic Object Exchange, Handsfree, (Human Interface Device) Headset, Object Push, Phone Book Access, Serial Port, and SIM Access. To ensure interoperability between other devices supporting Bluetooth technology, use Nokia approved accessories for this model. Check with the manufacturers of other devices to determine their compatibility with this device. - Page 94 Connectivity Security tips Select Menu Settings > When you are not using Bluetooth connectivity, to control who can find your device and connect to it, select Bluetooth the Bluetooth function does not affect other functions in your device. Do not pair with or accept connection requests from an unknown device. This helps to protect your device from harmful content.
- Page 95 Select Menu Settings > Open the Paired devices tab. Select Options New paired > Select the device. Enter the passcode on both devices. indicates a paired device in the device search view. Connect to an accessory after pairing Select the audio device, and from the pop-up menu, select Some audio accessories connect automatically to your device after pairing.
-
Page 96: Transfer Data Using A Usb Cable
Connectivity If you reject a pairing request from another device, you are asked if you want to add the device to the list of blocked devices. Remote SIM mode With remote SIM mode, you can use a compatible car kit accessory. Before remote SIM mode can be activated, the two devices must be paired and the pairing initiated from the other device. -
Page 97: Pc Connections
Ask on connection during an active connection, select PC Suite — Use Nokia PC applications such as Nokia Ovi Suite or Nokia Software Updater. Mass storage — Transfer data between your device and a compatible PC. Image transfer — Print images using a compatible printer. -
Page 98: Search
Search SIP settings Session Initiation Protocol (SIP) settings are needed for certain network services using SIP. You may receive the settings in a special text message from your service provider. You can view, delete, or create these setting profiles in SIP settings. Select Menu Settings... -
Page 99: Other Applications
To change the default search provider, select To change the country or region setting, to find more search providers, select Options Settings Country or > > Other applications Clock Set time and date Select Menu Applications > Select Options Settings >... -
Page 100: Calendar
100 Other applications Change the alarm tone Select Options Settings > World clock With the world clock, you can view the current time in different locations. Select Menu Applications > View the time Select World clock. Add locations to the list Select Options location. -
Page 101: File Manager
New meeting — Add a new meeting reminder. New to-do note — Add a new to-do note. File manager About File manager Select Menu Applications > With File manager, you can browse, manage, and open files on your device or a compatible external drive. -
Page 102: Quickoffice
102 Other applications Tip: If you have DRM-protected content, use Nokia Ovi Suite to back up both the licences and the content to your computer. Quickoffice Work with files Select Menu Applications > Open a file Open the files tab, and select the file from the list. -
Page 103: Other Applications
The installation files are located in the Installation files folder, and the installed applications in the Installed apps. folder. Icons indicate the following: SIS or SISX application Java application Widget Application installed on the memory card Before installing an application, check the following: View the application type, version number, and the supplier or manufacturer of the •... -
Page 104: Realplayer
The files may use large amounts of memory and prevent you from storing other files. To maintain sufficient memory, use Nokia Ovi Suite to back up installation files to a compatible PC, then use the file manager to remove the installation files from the device memory. - Page 105 Select Menu Applications > RealPlayer toolbar Select Menu Applications > In the Video clips, Streaming links, and Recently played views, the following toolbar icons may be available: Send — Send a video clip or streaming link. Play — Play a video clip or video stream. Delete —...
-
Page 106: Recorder
106 Other applications Recorder You can use the recorder to record voice memos and telephone conversations. You can also send sound clips to your friends. Select Menu Applications > Record a sound clip Select Stop recording a sound clip Select Listen to the sound clip Select Send a sound clip as a message... -
Page 107: Converter
Converter With Converter, you can convert measures from one unit to another. The converter has limited accuracy, and rounding errors may occur. Select Menu Applications > Dictionary Select Menu Applications > To translate words from one language to another, enter text in the search field. As you enter text, suggestions of words to translate are displayed. - Page 108 108 Settings Time separator — Select the symbol that separates hours and minutes. Clock type — Select the clock type. Clock alarm tone — Select the tone for the alarm clock. Alarm snooze time — Adjust the snooze time. Workdays — Select your working days. You can then set an alarm only for working day mornings, for example.
- Page 109 To view the list of voice commands, select commands. Select Options and from the following: Settings — Adjust the settings. Voice command tutorial — Open the tutorial for voice commands. Change or play a command Select and hold the command, and from the pop-up menu, select Playback.
- Page 110 Avoid using access codes similar to the emergency numbers to prevent accidental dialling of the emergency number. If you forget the PIN or PIN2 code, contact your service provider. If you forget the lock code, contact a Nokia Care point or your service provider.
- Page 111 Closed user group — Specify a group of people to whom you can call and who can call you (network service). Confirm SIM services — Set the device to display confirmation messages when you are using a SIM card service (network service). Manage certificates Digital certificates protect your content when transferring confidential information.
-
Page 112: Call Settings
112 Settings Protected content Digital rights management (DRM) protected content, for example some media files, such as images, music, or video clips, comes with an associated licence that defines your rights to use the content. You can view the details and status of the licences, and reactivate and remove licences. Manage digital rights licences Select Menu... - Page 113 Send my caller ID — Select calling. To use the setting agreed upon with your service provider, select network) (network service). Send my internet call ID — Select are calling. Call waiting — Set your device to notify you of incoming calls while you are in a call (network service), or check whether the feature is activated.
-
Page 114: 114 Green Tips
Recycle All materials of this device can be recovered as materials and energy. For information on how to recycle your old Nokia products, go to www.nokia.com/werecycle, or using a mobile device, nokia.mobi/werecycle. Recycle packaging and user guides at your local recycling scheme. -
Page 115: Product And Safety Information 115
Warning: Use only batteries, chargers, and accessories approved by Nokia for use with this particular model. The use of any other types may invalidate any approval or warranty, and may be dangerous. In particular, use of unapproved chargers or batteries may present a risk of fire, explosion, leakage, or other hazard. - Page 116 Digital rights management (DRM) protected content comes with an associated licence that defines your rights to use the content. If your device has OMA DRM-protected content, to back up both the licences and the content, use the backup feature of Nokia Ovi Suite.
- Page 117 Only use the charger indoors. Nokia battery authentication guidelines Always use original Nokia batteries for your safety. To help ensure that you are getting an original Nokia battery, purchase it from a Nokia authorised service centre or dealer, and check the hologram label.
- Page 118 However, this is not a total assurance of the authenticity of the battery. If you cannot confirm authenticity or if you have any reason to believe that your Nokia battery with the hologram on the label is not an authentic Nokia battery, stop using the battery and take it to the nearest Nokia authorised service centre or dealer.
- Page 119 • application at a time. Using more may affect performance and operation of the device and/or computer. If you access preinstalled bookmarks and links to third party internet sites, take the appropriate precautions. Nokia does • not endorse or assume liability for such sites.
-
Page 120: Copyright And Other Notices
© 2010 Nokia. All rights reserved. Nokia and Nokia Connecting People are trademarks or registered trademarks of Nokia Corporation. Nokia tune is a sound mark of Nokia Corporation. Other product and company names mentioned herein may be trademarks or tradenames of their respective owners. - Page 121 Nokia reserves the right to revise this document or withdraw it at any time without prior notice.