NEC VT45 User Manual
Nec vt45: users manual
Hide thumbs
Also See for VT45:
- User manual (43 pages) ,
- Installation data (8 pages) ,
- Specifications (2 pages)
Table of Contents
Advertisement
Quick Links
Advertisement
Table of Contents

Related Manuals for NEC VT45


Summary of Contents for NEC VT45
- Page 1 LCD Projector User’s Manual...
-
Page 2: Garanzia Limitata
LIMITED WARRANTY Except as specified below, the warranty that may be provided by the dealer covers all defects in material or workmanship in this product. The following are not covered by the warranty: 1. Any product on which the serial number has been defaced, mod- ified or removed. - Page 3 NEC Technologies Projectors Product Registration Card PLACE CORRECT POSTAGE HERE ATTN: CUSTOMER SERVICE & SUPPORT NEC TECHNOLOGIES, INC. VISUAL SYSTEMS DIVISION 1250 N. ARLINGTON HEIGHTS RD. ITASCA, IL 60143-1248...
- Page 4 NEC Technologies, the NEC Technologies Spirit icon and InstaCare are registered trademarks, and InstaCare Xpress and TravelCare are service marks of NEC Technologies Inc. NEC is a registered trademark of NEC Corporation. SMARTer Kids is a trademark of the SMARTer Kids Foundation. DLP is a trademark of Texas Instruments Inc. GT Series projectors are covered by InstaCare three-day repair/return service only.
-
Page 5: Limited Warranty
5. In the event a product is returned to NEC Solutions for warranty service, and it is determined that there is no product defect or that the product condition is not covered by this limited warranty, a diagnostic service fee may be charged to the customer. -
Page 6: Declaration Of Conformity
Type of Product: Equipment Classification: Models: We hereby declare that the equipment specified above conforms to the technical standards as specified in the FCC Rules. NEC Technologies, Inc. 1250 N. Arlington Heights Road Itasca, Illinois 60143 (630) 467-5000 LCD Projector... - Page 7 Eco 1 Eco 2 • The projector will not turn on if you continue to use the lamp 100 hours after the lamp life has reached the end of its usable life in each Lamp mode. • The lamp is warranted for 2200 hours of operation time within 6 months.
- Page 8 Información para el uso del proyector VT45K En comparación con el VT45 convencional, la vida útil de la lámpara del VT45K se ha ampliado como se muestra en la tabla siguiente. Los procedimientos de operación y reemplazo de la lámpara para el VT45K son los mismos que para el convencional VT45.
-
Page 9: Lcd Projector
VT45 LCD Projector User’s Manual English E–1... -
Page 10: Important Information
NEC VT45 Projector and keep the manual handy for future reference. Your serial number is located under the name plate label on the right side of your VT45. Record it here: CAUTION To turn off main power, be sure to remove the plug from power outlet. -
Page 11: Important Safeguards
Installation 1. For best results, use your projector in a darkened room. 2. Place the projector on a flat, level surface in a dry area away from dust and moisture. 3. Do not place your projector in direct sunlight, near heat- ers or heat radiating appliances. -
Page 12: Lamp Replacement
If something should fall into your projector, disconnect it immediately and have the object removed by a qualified NEC service personnel. 3. Do not place any liquids on top of your projector. • Do not look into the lens while the projector is on. Seri- ous damage to your eyes could result. -
Page 13: Table Of Contents
Introduction to the VT45 Projector ... E-6 Getting Started ... E-6 What’s in the Box ... E-7 Getting to Know Your VT45 Projector ... E-8 Front / Side Features ... E-8 Rear / Side Features ... E-8 Bottom / Side Features ... E-9 Top Features ... -
Page 14: Introduction
Congratulations on Your Purchase of The VT45 Projector The VT45 is one of the very best projectors available today. The VT45 enables you to project precise images up to 300 inches across (measured diagonally) from your PC or Macintosh com- puter (desktop or notebook), VCR, DVD player, document cam- era, or even a laser disc player. -
Page 15: What's In The Box
What's in the Box? Make sure your box contains everything listed. If any pieces are missing, contact your dealer. Please save the original box and packing materials if you ever need to ship your VT45 Projector. S- VI VI DE... -
Page 16: Getting To Know Your Vt45 Projector
Getting to Know Your VT45 Projector Front / Side Features Controls Ventilation (outlet) Terminal Panel AC Input Connect the supplied power cable’s three-pin plug here. Main Power Switch Rear / Side Features Air-Filter (inlet) Air-Filter (inlet) Remote Sensor TR O... -
Page 17: Bottom / Side Features
MicroSaver ® is a registered trademark of Kensington Microware Inc.The logo is trademarked and owned by Kensington Microware Inc. NOTE:When moving the projector or when it is not in use, cover the lens with the lens cap. Using the protective lens pad To protect the Lens Shift mechanism, a hard polyurethane protective lens pad is attached to the lens. -
Page 18: Top Features
If this light blinks red rapidly, it indicates that the lamp cover or filter cover is not attached properly or the projector is over- heated. See the Power / Status Light Messages on page E-40 for more details. -
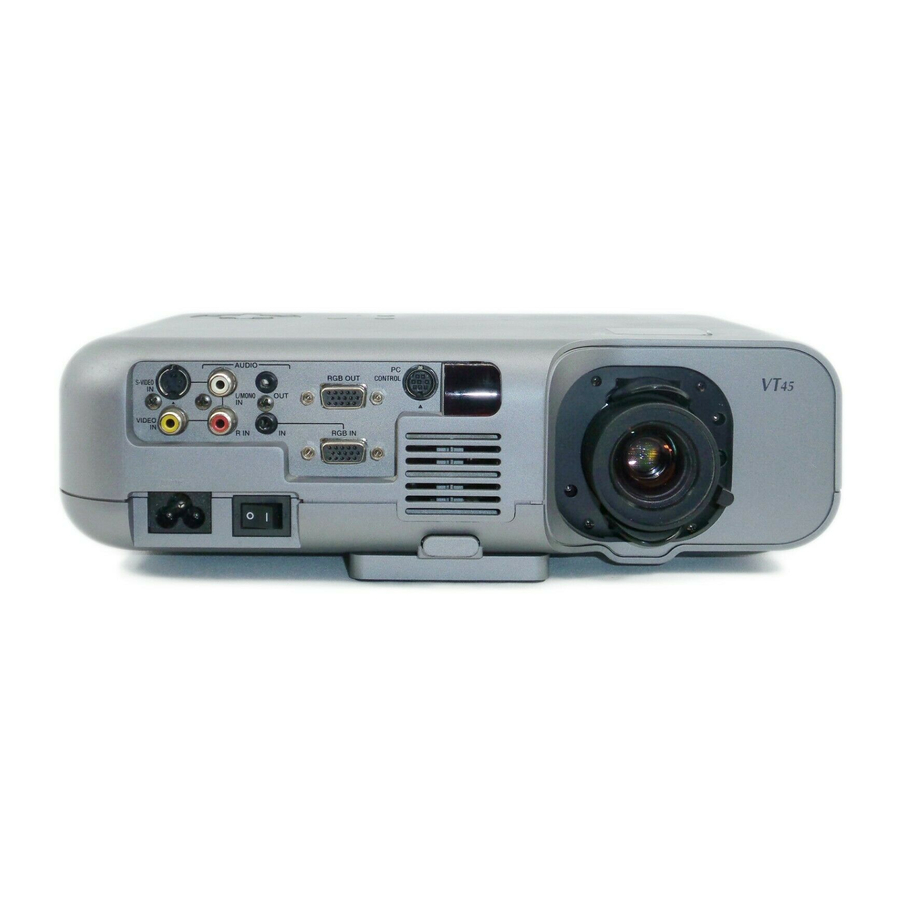
Page 19: Terminal Panel Features
Connect the S-Video input from an external source like a VCR. 8. PC Control Port (Mini DIN 8 Pin) Use this port to connect your PC to control your projector. This enables you to use your PC and serial communication protocol to control the projector. -
Page 20: Remote Control Features
4. Power OFF Button If the main power is applied, you can use this button to turn your projector off. NOTE: To turn off the projector, press and hold the POWER OFF button for a minimum of two seconds. 5. VIDEO Button Press this button to select a video source from a VCR, DVD player, laser disc player or document camera. -
Page 21: Remote Control Battery Installation
Operating Range 30˚ 30˚ 22 feet ˚ 22 feet ˚ Remote Control Battery Installation 1. Push to open the battery cover. 30˚ 30˚ 22 feet 2. Remove both old batteries and install new ones (AA). Ensure that you have the batteries’ polarity (+/–) aligned correctly. ˚... -
Page 22: Using Remote Mouse Receiver
The remote mouse receiver enables you to operate your computer’s mouse functions from the remote control (Computer mode). It is a great convenience for clicking through your computer-generated presentations.To return to the Projector mode, press the PJ button (lit red). -
Page 23: Switching Operation Mode Between Computer And Projector
• When any one of the POWER ON, OFF, MENU, HELP, or MAGNIFY button is pressed, the PJ button lights red to indicate that you are in the Projector mode, which allows the projector menu operation using the SELECT, ENTER or CANCEL buttons. -
Page 24: Installation
This section describes how to set up your VT45 projector and how to connect video and audio sources. Setting up Your Projector Your VT45 Projector is simple to set up and use. But before you get started, you must first: 1. Determine the image size. -
Page 25: Distance Chart
80" In this example the projector is upside down with the lens shift maximum position. When the projector is positioned upside down in a place such as a tall cabinet or shelf, follow the below. • Place the projector on a flat and level surface. -
Page 26: Ceiling Installation
Reflecting the Image Using a mirror to reflect your projector’s image enables you to enjoy a much larger image. Contact your NEC dealer if you need a mirror. If you’re using a mirror and your image is inverted, use the “Menu” and “Select” buttons on your projector cabinet or LM buttons on your remote control to correct the orientation. -
Page 27: Wiring Diagram
To video, S-video, and audio inputs on the projector. NOTE: When using with a notebook PC, be sure to connect between the projector and the note- book PC before turning on the power to the notebook PC. In most cases signal cannot be output from RGB output unless the notebook PC is turned on after connecting with the projector. -
Page 28: Connecting Your Pc
IBM VGA or Compatibles (Desktop type) Connecting your PC to your VT45 projector will enable you to project your computer’s screen image for an impressive presentation. To connect to a PC, simply: 1. Turn off the power to your projector and computer. -
Page 29: Connecting Your Macintosh Computer
(supplied) V ID NOTE: The new Macintosh computer such as G3 will have the 15 pin HD connector. The VT45's "Plug and Play" data will be downloaded to the Macintosh. Therefore, the Mac adapter will not be necessary. To connect to a Macintosh, simply: 1. -
Page 30: Connecting An External Monitor
External monitor D I O You can connect a separate, external monitor to your VT45 to simultaneously view on a monitor the image you're projecting. To do so: 1. Turn off the power to your projector, monitor and computer. 2. Use a 15-pin cable to connect your monitor to the RGB Monitor Output (Mini D-Sub 15 pin) connector on your projector. -
Page 31: Connecting Your Dvd Player
Audio Equipment White You can connect your projector to a DVD player with component outputs or Video output. To do so, simply: 1. Turn off the power to your projector and DVD player. 2. If your DVD player has the component video (Y,Cb,Cr) output, use a commercially available component video cable (RCA 3) -
Page 32: Connecting Your Vcr Or Laser Disc Player
2. Connect one end of your RCA cable to the video output connector on the back of your VCR or laser disc player, connect the other end to the Video input on your projector. Use an audio cable (not supplied) to connect the audio from your VCR or laser disc player to your audio equipment (if your VCR or laser disc player has this capability). -
Page 33: Operation
POWER Flashing green light Steady orange light IMPORTANT: • The projector should be unplugged if it will not to be used for an extended period. • To turn off the image and sound briefly (five minutes or less), use the “Mute” button instead of turning the projector off and on. -
Page 34: About Startup Screen
About Startup screen (Menu Language Select screen) When you first turn on the projector, you will get the Startup screen.This screen gives you the opportunity to select one of the seven menu languages: English, German, French, Itilan, Span- ish, Swedish and Japanese. -
Page 35: Enlarging And Moving A Picture
Raise the projector height using the adjustable tilt-foot. Rotate the projector to make the image square to the screen. Each of the feet height can be changed up to 1 mm or at angles up to 1 degree. -
Page 36: Using The Menus
Adjusting the Tilt Foot 1) Press and hold the Tilt button on the front of the projector. 2) Lift the front edge of the projector to the height you want, and release the button to lock the Adjustable Tilt Foot. -
Page 37: Menu Tree
MENU Tree Basic/ Advanced Menu Sub Menu Basic Menu Video Source Select S-Video Picture Volume Image Options Picture Projector Options Brightness Information Contrast Color Advanced Menu Source Select Sharpness Picture Volume Image Options Volume Color Management Projector Options Information Keystone... -
Page 38: Menu Elements
Menu Elements Title bar Highlight Menu Menu mode Basic Language English Source Display No Input Display Volume Bar Keystone Bar Filter Clean Message Menu Display Time Auto 45 Sec Menu windows or dialog boxes typically have the following elements: Title bar: Indicates the menu title. -
Page 39: Menu Descriptions & Functions
Press the “Select” button on the projector cabinet or LM buttons on your remote control to highlight the menu for the item you want to adjust. -
Page 40: Lamp Mode
NOTE: During the first one minute of operation the light output from the projector will be brighter than during normal use. The user will notice a slight drop off in brightness after the projector has completed the start-up mode. Advanced Options (Advanced mode) Allows for adjustments of image position and stability. -
Page 41: Factory Default
The items can be reset except Language, Communication Speed, Lamp Remaining Time, Lamp Hour Meter, Filter Usage, and Projector Usage. To reset the lamp usage time, see “Clear Lamp Hour Meter” and “Clear Filter Usage” page E-37. -
Page 42: Color Management
You can turn on and off the information for input name such as VIDEO and RGB. When this option is on, the current input will be displayed each time you switch sources or turn on the projector. E–34 White Balance... -
Page 43: No Input Display
Clean Filter: This option turns on or off the “Please clean the filters” message each time you turn on the projector if the projector has been used in excess of 100 hours of use. The message to clean the filters will be dis- played. -
Page 44: Auto Adjust
When “Auto Adjust” is set to “On”, the projector automati- cally determines the best resolution for the current RGB in- put signal to project an image using NEC’s Advanced AccuBlend Intelligent Pixel Blending Technology. The image can be automatically adjusted for geometry and stability;... -
Page 45: Clear Lamp Hour Meter
“Yes”. NOTE: The projector will turn off and go into standby mode after 1100 hours (up to 1600 hours in Eco 1 mode / 2100 hours in Eco 2 mode) of service. If this happens, press the “Help” button on the remote control for ten seconds to reset the lamp clock back to zero. -
Page 46: Maintenance
3. Insert a new lamp housing until the lamp housing is plugged into the socket. CAUTION Do not use a lamp other than the NEC replacement lamp (VT45LP). Order this from your NEC dealer. Secure it in place with the two screws. -
Page 47: Cleaning Or Replacing The Filters
STATUS indicator goes out. Cleaning or Replacing the Filters The air-filter sponge keeps the inside of the VT45 Projector free from dust or dirt and should be cleaned after every 100 hours of operation (more often in dusty conditions). If the filter is dirty or clogged, your projector may overheat. -
Page 48: Troubleshooting
• Stand within 22 feet (7 m) of the projector. See page E-13. • Make sure that you are in the Projector mode or the PJ button lights in red. If not, press the PJ button. Status indicator is lit or •... -
Page 49: Specifications
Meets EMC Directive (EN55022, EN55082-1, EN61000-3-2, EN61000-3-3) Meets Low Voltage Directive (EN60950, TUV GS Approved) We provide more information about our projectors through the World Wide Web at http://www.nec-pj.com/ LCD panels are inherently susceptible to bad pixels. The LCD panel may have pixel failures at the rate of 0.01%or less. -
Page 50: Cabinet Dimensions
Cabinet Dimensions VT45 STAND POWER STATUS SELECT ADJUST AUTO SOURCE MENU 299(11.77") AUDIO RGB OUT CONTROL S-VIDEO L/MONO VIDEO RGB IN AC IN 4.6(0.18") E–42 47(1.85") 117(4.61") 4.6(0.18") 78(3.07") Unit = mm (inch) -
Page 51: D-Sub Pin Assignments
D-Sub Pin Assignments Mini D-Sub 15 Pin Connector Signal Level Video signal : 0.7Vp-p (Analog) Sync signal : TTL level Pin No. RGB Signal (Analog) Green or Sync on Green Blue Ground Ground Red Ground Green Ground Blue Ground No Connection Sync Signal Ground Bi-directional DATA (SDA) Horizontal Sync or Composite Sync... -
Page 52: Timing Chart
Timing Chart Signal Resolution ( Dots ) NTSC SECAM VESA VESA VESA VESA VESA VESA VESA VESA VESA VESA VESA 1024 VESA 1024 VESA 1024 1024 1024 VESA 1024 VESA 1024 VESA 1152 1152 1152 1152 VESA 1280 1280 VESA 1280 1280 1280... -
Page 53: Pc Control Codes
Stop bit: One bit X on/off: None Full duplex Communications procedure: PC Control Connector (DIN-8P) To GND of PC NOTE: Pins 2, 3, 5, 6 and 8 are used inside the projector. E–45 To RxD of PC To TxD of PC... - Page 54 Printed in Japan 7N8P0562...