Table of Contents
Advertisement
Quick Links
ENGLISH
Operating Instructions for Your
GPS 500
GLOBAL POSITIONING SYSTEM RECEIVER
Nothing comes close to a Cobra
®
Important Information
CAUTIONS
The user is responsible for operating this product wisely.
The product is intended for use only as a navigational aid
and should not be used when precise measurement of
direction, location, distance or topography is required.
GPS (Global Positioning System) is operated by the U.S.
government, which is solely responsible for its accuracy and
maintenance. The system is subject to changes, which could
affect the accuracy and performance of GPS equipment.
Remove the batteries from the unit if you do not expect to
use it for months at a time. As with any batteries, leakage
can occur. When re-installing batteries, observe proper polarity.
WARNINGS
If you choose to use this device in a vehicle, it is the sole
responsibility of the operator of the vehicle to use this device
in a safe manner. Be careful to avoid being
distracted from safe and proper driving practices.
If you choose to use this device in a vehicle, it is the sole
responsibility of the operator to secure the GPS unit so that it
will not cause damage or personal injury in the event of an
accident.
DO NOT mount the GPS receiver over airbag panels or in a
place where the driver or passengers are likely to have an
impact with the device in an accident or collision.
NOTE
Cobra Electronics Corporation reserves the right to change or
improve information in this manual without notice. Please
visit www.cobra.com for updates or questions.
A1
Customer Support
In this user's manual, you should find all the information you
need to operate your GPS 500. If you require further
assistance after reading through this manual, Cobra
®
Electronics offers the following customer support services:
In the USA:
Automated Help Desk is available in English
24 hours a day, 7 days a week at 773-889-3087.
Customer Service Operators are available in
English and Spanish at 773-889-3087 Monday
to Friday, 8:00 a.m. to 6:00 p.m. CST.
Questions can be faxed to 773-622-2269.
Automated Technical Assistance is available
in English or Spanish 24 hours, 7 days a week via
e-mail at: productinfo@cobra.com
On-line answers to frequently asked questions
(in English only) can be found at: www.cobra.com.
Outside the U.S.A., please contact your local dealer.
Non-English Manuals
The GPS 500 is equipped to communicate in the language
of your choice: English, Dutch, French, German, Italian,
Portuguese, Spanish or Swedish, (see "System Page-
Settings: Languages," page 50).
For operating instructions in Dutch, French, German,
Italian, Portuguese, Spanish or Swedish please visit
www.cobra.com/gps-manuals.html.
FCC Compliance
This device complies with Class B of the FCC rules.
Operation is subject to the condition that this device
does not cause harmful interference. It must accept any
interference received, including that which may cause
undesirable operation.
Advertisement
Table of Contents

Related Manuals for Cobra GPS 500


Summary of Contents for Cobra GPS 500
-
Page 1: Important Information
® Customer Support In this user's manual, you should find all the information you need to operate your GPS 500. If you require further assistance after reading through this manual, Cobra ® Electronics offers the following customer support services:... -
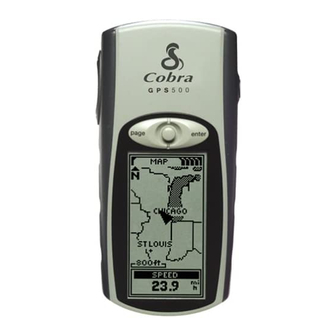
Page 2: Global Positioning System
ZOOM Congratulations! IN/OUT buttons You’ve made a smart choice by purchasing the GPS 500 Global Positioning System receiver from Cobra give you access to the most advanced satellite navigation technology available, your GPS 500 offers you these sophisticated features and capabilities:... -
Page 3: Table Of Contents
Basic Operation... 5–8 Installing Batteries ... 5 Using the Buttons and Joystick... 5–6 Turning the Power On... 6 Powersave Mode... 6 Navigating with the GPS 500... 7–8 The Five Main Pages... 9 Map Page... 10–13 Gauges Page... 14–15 Trip Meter Page... 16–17 Nav Data Page... -
Page 4: Welcome
The GPS 500 gives you the opportunity to Navigate a Route – select two or more waypoints or points of interest to create up to 20 routes. You can then use your GPS 500 to guide you in a straight line from point to Navigate Navigate point through a selected route. - Page 5 Data Field Choices Descriptions Your Cobra ® GPS 500 has the ability to display various types of information to you. In order to take advantage of the rich information available to you, it is important that you understand the meaning of certain terms. Below is a list of...
-
Page 6: Basic Operation
To turn the power off, press and hold the POWER button for 2 seconds. NOTE: When you use the GPS 500 for the first time, it will take up to approximately 50 seconds to lock on to the GPS satellites. -
Page 7: Navigating With The Gps 500
Up to 50 points may be stored in a route. Once you have created a route, your GPS 500 will guide you from point to point. As you reach each point, the unit automatically begins navigating to the next one. -
Page 8: The Five Main Pages
The Five Main Pages In the following sections of this manual, you will learn how to use five main pages to access all the features of your GPS 500: Map Page The Map page displays a map of your current position in relation to any waypoints, cities/towns, and points of interest (POI) that you have selected. -
Page 9: Map Page
M A P PA G E Using the Map Page Show/Hide Map Details Map Detail Option Details Highlight and select DETAIL to show/hide any or all of the details to be displayed on the map. Details shown include all waypoint, city/town, or POI names;... -
Page 10: Gauges Page
M A P PA G E Moving Around: Details Enter Button Utilizing Various Features in Panning Mode Arrow Cursor While in panning mode, you can access waypoints, cities/towns, points of interest, tracks or routes shown on the map. 1. While on the Map page panning mode. -
Page 11: Trip Meter Page
G A U G E S PA G E Using the Gauges Page Set Data List Data from Set Data Option Set Data List Highlight and select SET DATA to choose information about your current Displays on position or navigation that you want displayed at the bottom of the Gauges Gauges Page page. -
Page 12: Nav Data Page
The Nav Data page gives you access to the powerful navigational features of your GPS 500. From this page, you can create and store up to 500 waypoints. For each one, you can choose a name and assign a symbol. -
Page 13: Waypoints
When you select WAYPOINTS from the Nav Data page (see GPS 500 will display a list of the waypoints currently stored. You can create, save and recall up to 500 waypoints. If you want to change the location for a waypoint, its location coordinates can be edited. - Page 14 N AV D ATA PA G E Waypoints: Creating New Nav Data Creating a New Waypoint Page Waypoint To mark your current location as a new waypoint: Waypoint shortcut: To mark a new waypoint using current location, press and hold the ENTER button for 2 seconds. A confirmation window will pop up.
-
Page 15: Tracks
ETA (see “Navigate a Selected Track,” page 25). NOTE: Your GPS 500 automatically begins tracking your travel whenever it View Stored Save or is turned on and linked to satellites. -
Page 16: Routes
When you select ROUTES from the Nav Data page (see selected track: your GPS 500 to designate up to 20 separate routes consisting of up to 1. From the Nav Data page, highlight using the 50 waypoints and/or points of interest. You can later recall any of the JOYSTICK and select TRACKS by pressing the ENTER saved routes to use for navigation. - Page 17 N AV D ATA PA G E Routes: Creating New Nav Data Route Page Creating a New Route Page To create a new route consisting of up to 50 waypoints and/or points of interest: 1. From the Nav Data page, highlight and select ROUTES select the line of empty spaces at the end of the list of routes blank New Route screen appears with the current date shown as the default name for the route...
- Page 18 N AV D ATA PA G E Routes: Editing Nav Data Route List Editing a Route Page Inserting a Waypoint/POI into a Route To add a waypoint or point of interest to an existing route: 1. From the Nav Data page select the route you wish to add a point to screen appears 2.
- Page 19 N AV D ATA PA G E Routes: Navigate Nav Data Highlight Navigate a Selected Route Page Route To make the map show the navigational path along a selected route: 1. From the Nav Data page, highlight using the JOYSTICK and select ROUTES by pressing the ENTER button 2.
-
Page 20: Cities/Towns
When you select CITIES from the Nav Data page, you have access to the coordinates for hundreds of cities/towns worldwide already stored in your GPS 500’s memory. You can ask the unit to show you the "GoTo" direction of travel to reach any city/town you select. -
Page 21: Points Of Interest
Page You can use optional computer software and an interface cable to connect your GPS 500 to a computer. This allows you to take advantage of powerful mapping programs and to transfer data back and forth between the computer and your unit. (See “Using the Data Interface,” page 48.) Points of interest transferred from a computer can be used as points within routes for navigation purposes. -
Page 22: Delete Options
N AV D ATA PA G E Points of Interest: GoTo Nav Data POI List “GoTo” a Selected POI Page To make the map show the navigational path to a selected POI: 1. From the Nav Data page POINTS OF INTEREST and press the ENTER button to display the POI screen 2. - Page 23 N AV D ATA PA G E Delete Options: Summary All Option Routes Option Highlight and select ROUTES to delete any or all of the routes you have stored. Highlight and select ONE-BY-ONE to delete routes individually (see “Deleting Individual Waypoints, Tracks, Routes, or Points of Interest,” page 40).
-
Page 24: Editing Text
N AV D ATA PA G E Editing Text Joystick Highlight Editing Text Space To enter or change the information displayed for a waypoint, track or route: 1. From any screen that allows you to enter letters, numbers or symbols (names of waypoints/tracks/routes, dates, etc.), push the JOYSTICK up or down to move to the field you want to edit and press the ENTER button. -
Page 25: System Page
The System page gives you various options for changing the system settings used by your GPS 500. From this page you can turn GPS navigation on and off, and adjust the settings for the display, sounds, time, compass, map, method of navigation, etc. - Page 26 Defaults Option Highlight and Select DEFAULTS to restore all original default settings for the entire GPS 500 system. Highlight and select YES to restore original settings (see chart below). Highlight and select NO to maintain all current settings. Map Page Defaults...
- Page 27 PAGE button Using the Data Interface Your GPS 500 is designed to let you exchange data with computer mapping programs. With optional software and interface cable (see “Optional Accessories,” page 63) you will be able to: .
- Page 28 S Y S T E M PA G E Setting Screen Using the Settings Screen System Page Select Data Field From the Settings screen, you can change the various settings listed below. To change settings: 1. From the System page and select SETTINGS by pressing the ENTER button.
- Page 29 Using the Advanced Screen Page Fields From the Advanced screen, you can change the advanced operational parameters used by your GPS 500. To change advanced parameters: 1. From the System page and select ADVANCED by pressing the ENTER button. A menu of advanced parameters appears.
-
Page 30: Alerts
Alerts LOST SATELLITES As you use your GPS 500, you may see the following alert messages. LOST SATELLITES CONTINUE SEARCHING? You will see this alert if, for any reason, satellite lock is lost. When you see this message, the unit is automatically trying to re-acquire satellite signals. If... - Page 31 G E N E R A L I N F O R M AT I O N World City Time Zones Longitudinal Zone Offset E007.50 to E022.50 ...+1 E172.50 to W172.50 ...-12 Rome IDLW (International Date Line West) E022.50 to E037.50 ...+2 W172.50 to W157.50 ...-11 Cairo Nome...
-
Page 32: What Is Waas
G E N E R A L I N F O R M AT I O N What is WAAS? About North Reference Wide Area Augmentation System (WAAS) is a GPS-based The vertical grid lines on any map can be aligned in one of navigation system that provides precision above and beyond three different ways. -
Page 33: Specifications
Battery Life:...Up to 20 hours in battery Maintenance of Your GPS 500 PERFORMANCE Your GPS 500 is designed and built to give you years of trouble-free performance without the need for service. No routine maintenance is required. Approximately 35 sec. (cold) If your unit does not appear to be operating properly, please Approximately 50 sec. -
Page 34: Index
I N D E X Daylight Saving Time...44, 49 Default Option About Option ...45, 52 Gauges...15 Accessories...63 Map...11 Accuracy ...4, 10, 15, 17 System...45 Adjusting the Display ...44, 47 Trip Meter ...17 Advanced Options...45, 51-52 Degrees Compass...51 Alerts...53 Delete All Data Option ...39 Average Speed ...4, 10, 15, 17 Delete Options ...38-40 Auto Zoom Option ...11... -
Page 35: Optional Accessories
Cobra will, without charge, repair or replace, at its option, ® and fitness for a particular purpose are limited in duration to defective GPS 500, products or component parts upon delivery the length of this warranty. to the Cobra ®... -
Page 36: Safety Alert
The Cobra For more information or to order any of our products, Nothing comes close to a Cobra Printed in China Part No. 480-037-P revise 8.03 ® line of quality products includes: CB radios microTALK radios ® Radar/Laser Detectors Safety Alert ®...