Konica Minolta PagePro 1350W User Manual
Konica minolta pagepro 1350w: users guide
Hide thumbs
Also See for PagePro 1350W:
- Technical manual (18 pages) ,
- Warranty exchange manual (12 pages) ,
- Installation manual (4 pages)
Table of Contents
Advertisement
Quick Links
Advertisement
Table of Contents

Related Manuals for Konica Minolta PagePro 1350W


Summary of Contents for Konica Minolta PagePro 1350W
- Page 1 PagePro 1350W User’s Guide ™ 1800715-001A(1) 4136-7745-02A...
-
Page 3: Table Of Contents
Contents 1 Introduction ... 1 Getting Acquainted with Your Printer 2 Printer Parts Front View 2 Rear View 2 About the Indicator Functions 3 Indicator Functions Continuing a Print Job after an Error Message 3 Cancelling a Print Job 3 Status Message 2 Software Installation ... - Page 4 3 Working with the Printer Driver ...11 Displaying Printer Driver Settings 12 Displaying Settings under Windows XP Displaying Settings under Windows 2000/Me/98SE Using the Printer Driver 13 Common Buttons OK 13 Cancel 13 Apply 13 Help 13 Easy Set 13...
- Page 5 Manual Duplexing 31 How do I manually duplex? 6 Replacing Consumables ... 33 Replacing the Toner Cartridge 34 Replacing the Drum Cartridge 38 7 Maintaining the Printer ... 43 Cleaning the Printer 44 Exterior Pick-up Roller 8 Troubleshooting ... 47...
- Page 6 For United States Users 71 For Users in All Countries 72 For Denmark Users 72 For Norway Users 72 For Finland, Sweden Users 72 Contents...
-
Page 7: Introduction
Introduction... -
Page 8: Getting Acquainted With Your Printer
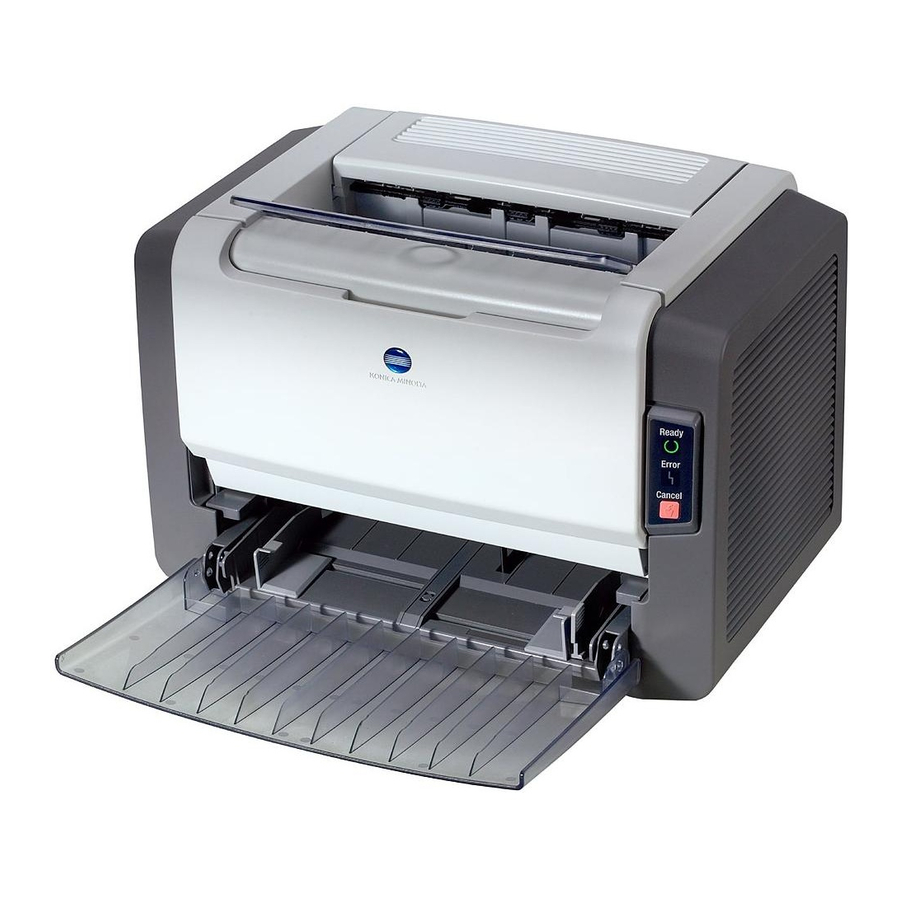
Printer Parts The following drawings illustrate the parts of your printer referred to through- out this guide, so please take some time to become familiar with them. Front View 1—Top cover 2—Output tray 3—Control panel 4—Imaging cartridge (Toner cartridge plus Drum car- tridge) 5—Front cover... -
Page 9: About The Indicator Functions
When the print job is too complex and the memory capacity of the printer is inadequate When there is no more paper in the tray When paper of a different format than that set in the printer driver was fed into the printer Check that one of the above errors has occurred. -
Page 10: Status Message
Blinking—1 blink per second Rapid blinking—2 blink per second Status Message Status messages indicate the current condition of the printer. The printer sta- tus also can be checked on the Status Display. (Refer to the “Working with the Status Display” on page 16.) - Page 11 Slow blinking Toner near empty Blinking Toner empty Rapid blink- Toner out No toner cartridge is installed. A toner cartridge other than a genuine KONICA MINOLTA toner cartridge has been detected. Action Prepare the toner cartridge. Replace the toner cartridge. Replace the toner cartridge.
- Page 12 About the Indicator Functions...
-
Page 13: Software Installation
Software Installation... -
Page 14: Installing The Usb Device Driver
When connecting the printer to your computer with a USB cable, install the USB device driver according to the following instructions before installing the printer driver. Note In Windows 2000/XP, you do not have to install the USB device driver. -
Page 15: Installing The Printer Driver
Note Do not use the “Found New Hardware” or “Add New Hardware” wizard to install the PagePro 1350W driver and utilities. Installing from the CD-ROM Insert the CD-ROM in the CD-ROM drive of your computer. The CD-ROM installer automatically starts. - Page 16 Installing the Printer Driver...
-
Page 17: Working With The Printer Driver
Working with the Printer Driver... -
Page 18: Displaying Printer Driver Settings
In Pick a category, click Printers and Other Hardware. In Pick a task…, click View installed printers or fax printers. In the Printers and Faxes directory, select the KONICA MINOLTA PagePro 1350W printer icon. To display the printer driver settings, from the File menu, click Printing Preferences... -
Page 19: Using The Printer Driver
Page Layout Check this option button to display a sample of the page layout in the figure area. Printer Figure Check this option button to display an image of the printer in the figure area. Using the Printer Driver... -
Page 20: Setup Tab
Specify the resolution Adjust the contrast and brightness of the printed document Turn on/off Toner Save mode Device Options Setting Tab The Device Options Setting tab allows you to View version and copyright information about the printer driver Using the Printer Driver... -
Page 21: Working With The Status Display
Working with the Status Display... -
Page 22: Working With The Status Display
Status Use one of the following steps to open the Status Display. Windows XP—Choose Start, All Programs, then KONICA MINOLTA PagePro 1350W Utilities, and then KONICA MINOLTA PagePro 1350W Status. Windows Me/2000/98SE—From the Start menu, choose Programs, then KONICA MINOLTA PagePro 1350W Utilities, and then KONICA MINOLTA PagePro 1350W Status. -
Page 23: Recognizing Status Display Alerts
When the Status Display detects a printing problem, several actions occur at the same time, depending on your settings. First, the icon changes from green to yellow or red, depending on the severity of the printer problem. Refer to the online help for further information on these settings. -
Page 24: Closing The Status Display
To close the Status Display from the File menu, choose Exit. " # If you click the X button in the upper-right corner of the Status Display window to close the window, the Status Display remains available at the bottom right of the taskbar. Double-click the icon to open it again. Closing the Status Display... -
Page 25: Using Media
Using Media... -
Page 26: About Media
What sizes/weights of media can I use? Media B5 (JIS) Legal Letter Statement Executive Folio Letter Plus UK Quarto Foolscap G. Letter G. Legal Chinese 16 Chinese 32 B5 (ISO) Envelope #10 Envelope C5 Envelope DL Envelope Monarch Envelope C6 Envelope Cho #3 Envelope Cho #4 Japanese Postcard... -
Page 27: What Type And Amount Of Media Can I Load
Media Type Plain Paper 60–90 g/m Special Media Envelopes Label sheets Letter head Postcards (Japanese Size) Thick paper 91–163 g/m Transparencies Note Do not allow media to go above the fill limit mark inside the tray or the media may not be fed correctly. Media Storage Keep media on a flat, level surface in its original wrapper until it is time to load it. -
Page 28: Media Not Suitable For Printing
Note Do not use the media types listed below. These could cause poor print quality, media jams, or damage to the printer. Also, using them will void your warranty. Coated with a processed surface (such as carbon paper, digitally gloss-... -
Page 29: What Is The Guaranteed Imageable (Printable) Area
Suitable for plain-paper laser printers, such as standard paper What Is the guaranteed imageable (printable) area? Each media size has a specific imageable area, the maximum area on which the printer can print clearly and without distortion. 4 mm (0.157 in.) 4 mm (0.157 in.) -
Page 30: Loading Media
Load letterhead with the side to be printed facing up and the pre- printed letterhead at the top (fac- ing the printer). Squeeze the right paper guide and adjust the paper guides so that both the left and right sides of the media are secure. -
Page 31: Printing On Media
Width: 76 mm (3 in.) up to 216 mm (8.5 in.) Length: 127 mm (5 in.) up to 356 mm (14 in.) In the printer driver (Setup tab/Media Type option), select plain paper. Set the media size (Paper tab/Original Document Size/Edit Custom...) Load the custom media lengthwise and printing-side up in Tray 1. - Page 32 Common office envelopes with diagonal joints, sharp folds and edges, and ordinary gummed flaps Approved for laser printing In the printer driver (Setup tab/Media Type option), select Envelope. Select the size of the envelope (Paper tab/Original Document Size option). Place the envelopes on a flat surface, and flatten them by pressing down the corners.
-
Page 33: How Do I Load And Print Labels
Recheck the paper guides to make sure they are adjusted to the width of the envelopes. Note Improperly adjusted guides may cause poor print quality, media jams, or printer damage. Print the envelopes. Open the flap of each envelope immediately (before it cools) after the envelope is delivered to the output tray. -
Page 34: How Do I Load And Print Postcards
Use label sheets that are Recommended for laser printers In the printer driver (Setup tab/Media Type option), select Thick Paper. Select the size of the label (Paper tab/Original Document Size option). Load the label media lengthwise and printing-side up in Tray 1. -
Page 35: How Do I Load And Print Thick Stock
Test all thick stock to ensure acceptable performance and to ensure that the image does not shift. Do not use thick stock that is Mixed with any other media in the media trays (as this will cause printer jamming) Note Do not mix thick stock with any other media in the same tray, as this will cause printer jamming. -
Page 36: How Do I Load And Print Transparencies
Note Using unsupported transparency media such as coated color transparencies will result in damaging the printer and in voiding your warranty. Remove transparency media as soon as possible from the output tray to avoid static buildup. If you touch the face of transparencies with your bare hands, print quality may be affected. -
Page 37: Manual Duplexing
" # Media jams may occur if the printed sheet(s) reinserted are not entirely flat. In the printer driver (Setup tab/Duplex/Booklet option), select the appro- priate setting from Short Edge Binding, Long Edge Binding, Booklet Left Binding, or Booklet Right Binding. - Page 38 Manual Duplexing...
-
Page 39: Replacing Consumables
Replacing Consumables... -
Page 40: Replacing The Toner Cartridge
When it is time to replace the toner cartridge, "Toner Low" displays in the Sta- tus Display. The supplies status indication in the Status Display is only a ref- erence. Printing can continue even though the warning appears. However, printing gradually fades out, so replace the toner cartridge as soon as possi- ble. - Page 41 Move the lever on the toner car- tridge in the direction of the arrow. Using both hands, separate the toner cartridge and drum car- tridge. Note When separating the toner cartridge and drum cartridge, keep them level. Do not touch the OPC drum under the flap of the drum cartridge, otherwise decreased image quality may result.
- Page 42 Remove a new toner cartridge from its box. " # Do not throw away the box. It may be used to pack the used toner car- tridge. Holding it firmly with both hands, rock the toner cartridge left and right, to distribute the toner evenly.
- Page 43 Align the imaging cartridge with the guides in the printer, and then insert the cartridge. Note Do not insert the imaging cartridge at an angle or with extreme force, otherwise the printer may be damaged.
-
Page 44: Replacing The Drum Cartridge
When the printed documents become faint or blurred, the drum cartridge may be at the end of its life. The drum cartridge has a capacity of about 16,000 (one-page jobs) to 20,000 (continuous printing) letter/A4 pages (at an average of 5% or less toner cov- erage). - Page 45 Pull the handle of the imaging cartridge toward you, and then pull out the imaging cartridge. Move the lever on the toner car- tridge in the direction of the arrow. Using both hands, separate the toner cartridge and drum car- tridge.
- Page 46 Do not touch any metal parts of the drum cartridge and toner cartridge, otherwise damage from static electricity may result. Align the imaging cartridge with the guides in the printer, and then insert the cartridge. Note Do not insert the imaging...
- Page 47 Press on the front cover grip and close the front cover. Place the used drum cartridge into the box that came with the new drum cartridge. Replacing the Drum Cartridge...
- Page 48 Replacing the Drum Cartridge...
-
Page 49: Maintaining The Printer
Maintaining the Printer... -
Page 50: Cleaning The Printer
CAUTION Do not spill water or detergent into the printer; otherwise the printer will be damaged and an electric shock may occur. Cleaning the Printer... -
Page 51: Pick-Up Roller
Turn off the printer, unplug the power cord, and disconnect all interface cables before cleaning. Grab the front cover grip and open the front cover. Pull the handle of the imaging cartridge toward you, and then pull out the imaging cartridge. - Page 52 Wipe the pick-up roller with a soft, dry cloth. Align the imaging cartridge with the guides in the printer, and then insert the cartridge. Note Do not insert the imaging cartridge at an angle or with extreme force, otherwise the printer may be damaged.
-
Page 53: Troubleshooting
Troubleshooting... -
Page 54: Indicator Messages
The control panel indicators (Ready, Error) provide information about your printer and help you locate each problem. Error Messages These messages indicate errors which you must correct before a print job can continue or the printer status returned to “Ready”. Ready Error indicator... -
Page 55: Service Messages
Clear the jam, close the front cover, and then continue with the print job. Close the front cover or top cover. Action Turn the printer off, then on again. If the problem persists, contact your vendor or authorized ser- vice provider. -
Page 56: Clearing Jams
Understanding the printer’s media path will help you locate media jams. Grab the front cover grip and open the front cover. Pull the handle of the imaging cartridge toward you, and then pull out the imaging cartridge. Note Do not expose the imaging... - Page 57 CAUTION The fusing unit is extremely hot. Touching any part near the fusing unit may result in burns. Do not touch the image transfer roller inside the printer, otherwise decreased image quality may result. Clearing Jams...
- Page 58 Align the imaging cartridge with the guides in the printer, and then insert the cartridge. Note Do not insert the imaging cartridge at an angle or with extreme force, otherwise the printer may be damaged. Press on the front cover grip and close the front cover.
-
Page 59: Solving Problems-Printing Quality
If the problem persists, replace the toner cartridge. Remove the toner cartridge and check it for damage. Replace the toner cartridge, if necessary. In the printer driver, select the Quality tab and adjust the Contrast and Brightness and try printing again. - Page 60 Solution Remove the toner cartridge and check it for damage. Replace the toner cartridge, if necessary. In the printer driver, select the Quality tab and adjust the Contrast and Brightness and try printing again. Remove the toner cartridge and check it for damage.
- Page 61 Symptom Cause White or black The toner cartridge may be lines defective. Dark lines on The transfer roller is dirty. the edges. Toner The toner may be unevenly smudges distributed inside the toner cartridge. The toner cartridge may be defective. Smudges on the media indi- cate a dirty feed roller.
- Page 62 The media is moist from ficient fusing humidity. or the image Media with specifications not comes off covered by the printer warranty when rubbed. is being used. The media type may be incor- rectly set. Solution Remove the moist media and replace it with new, dry media.
-
Page 63: A Appendix
Appendix... -
Page 64: Safety Specifications
EN 61000-3-3 China model GB 9254 class B, GB 17625.1 Australian model AS/NZS 3548 class B Desktop laser beam printer Electrostatic dry powder imaging system Laser diode + polygon mirror scanning Electrophotographic printing system 1200dpi × 1200dpi (at half speed), 600dpi ×... - Page 65 Standby: 35 dB or less Height: 283 mm (11.1 in.) Width: 387 mm (15.2 in.) Depth: 291 mm (11.5 in.) Printer: approximately 6kg (13.2 lb.) Drum cartridge: approximately 0.3kg (0.7 lb.) Toner cartridge: approximately 0.5kg (1.1 lb.) IEEE 1284 compliant type B (Compatible/Nib- ble/ECP) USB Revision 1.1 compliant...
-
Page 66: Parallel Interface Connectors And Cable
Cable type Pin assignments Consumables Life Expectancies Chart Item Toner Cartridge Drum cartridge Printer: Parallel 36-pin connector Computer: EIA 25-pin connector Shielded Each signal and earth pair should be twisted IEEE 1284 compliant type B connector Printer: Series B plug... -
Page 67: Our Concern For Environmental Protection
As an ENERGY STAR the ENERGY STAR Guidelines for energy efficiency. What is an ENERGY STAR product? An ENERGY STAR product has a special feature that allows it to automati- cally switch to a “low-power mode” after a period of inactivity. An ENERGY STAR product uses energy more efficiently, saves you money on utility bills and helps protect the environment. -
Page 68: Fcc Part 15 - Radio Frequency Devices
! Connect the equipment into an outlet on a circuit different from that to which the receiver is connected. ! Consult the dealer or an experienced radio/TV technician for help. Laser Beam Printer PagePro 1350W FCC Part 15 - Radio Frequency Devices... -
Page 69: Ce Marking (Declaration Of Conformity)
WARNING! The design and production of this unit conform to FCC regulations, and any changes or modifications must be registered with the FCC and are subject to FCC control. Any changes made by the purchaser or user without first contacting the manufacturer will be subject to penalty under FCC regulations. -
Page 70: Safety Information
This section contains detailed instructions on the operation and maintenance of this machine. To achieve optimum utility of this device, all operators should carefully read and follow the instructions in this manual. Please read the next section before using this device. It contains important information related to user safety and preventing equipment problems. -
Page 71: Warning
WARNING • Do not modify this product, as a fire, electrical shock, or breakdown could result. If the product employs a laser, the laser beam source could cause blindness. • Do not attempt to remove the covers and panels which have been fixed to the product. - Page 72 • Do not place a flower vase or other container that con- tains water, metal clips or other small metallic objects on this product. Spilled water or metallic objects dropped inside the product could result in a fire, electrical shock, or break-down.
-
Page 73: Caution
• Do not touch the electrical contacts that are located inside the top cover and underneath the cartridge as an electrostatic discharge may damage the printer. • The inside of this product has areas subject to high tem- perature, which may cause burns. When checking the... -
Page 74: Working Safely With Your Laser Printer
Notes on your Safety and Operating Safety Working improperly with the printer can result in health hazards, electric shocks and even fires. Before you unpack the laser printer, you should make yourself familiar with this information on your safety and operating safety. - Page 75 Do not move the unit unless the power cord has been removed from the socket. Otherwise you may damage the cord. The result could be a short-circuit or a fire. Do not place any heavy objects on the power cord. Do not pull or kink the cord as this can result in damage to the cord.
-
Page 76: Laser Safety
Inform your customer support technical specialist. Laser Safety This printer is a page printer which operated by means of a laser. There is no possibility of danger from the laser, provided the printer is operated according to the instructions in this manual. -
Page 77: Laser Safety Label
For United States Users CDRH Regulations This printer is certified as a Class 1 laser product under the Regulation Performance Standard according to the Food, Drug, and Cosmetic Act of 1990. Compliance is mandatory for laser products marketed in the United States, and is reported to the Center for Devices and Radiological Health (CDRH) of the U.S. -
Page 78: For Users In All Countries
For Users in All Countries CAUTION Use of controls, adjustments or performance of procedures other than those specified in this manual may result in hazardous radiation exposure. This machine is certified as a Class 1 laser product. This means that the machine does not produce hazardous laser radiation. - Page 79 Betrakta ej strålen. Ozone release During printer operation, a small quantity of ozone is released. This amount is not large enough to harm anyone adversely. However, be sure the room where the machine is being used has adequate ventilation, especially if you are printing a high volume of materials, or if the machine is being used contin- uously over a long period.
- Page 80 Safety Information...
- Page 81 Index CE Marking 63 Cleaning Exterior 44 Pick-up Roller 45 Drum cartridge Replacing 38 Duplex 31 Indicator 3 Error messages 48 Service messages 49 Status message 4 Index Installing USB Device driver 8, 9 Interference-causing equipment standard 61 Laser CDRH 71 Internal laser radiation 70 Laser safety 70 Laser safety label 71...
- Page 82 Size 20 Storage 21 Type 21 Weight 20 Page margins 23 Paper tab 14 Printable area 23 Printer Parts 2 Printer driver 13 Paper tab 14 Quality tab 14 Setting 12 Setup tab 14 Printing Envelope 25 Label 27 Postcard 28...