
Related Manuals for Haier HWM60-10


Summary of Contents for Haier HWM60-10
- Page 1 Full Automatic Washing Machine User's manual This manual is for HWM60-10 Please read this manual carefully before using. 0030807260 Retain it for future reference.
-
Page 2: Table Of Contents
Contents Names of the parts...1 Safety precautions ...2 Installation and adjustment ...4 Install the water inlet hose...6 Preparation before washing ...7 Put in the laundries ...8 Put in the detergent ...9 Use the operation buttons ...10 Close the top lid ...14 Finish washing ...15 Disposal after washing ...15 Trouble shooting Answer to question...16... -
Page 3: Names Of The Parts
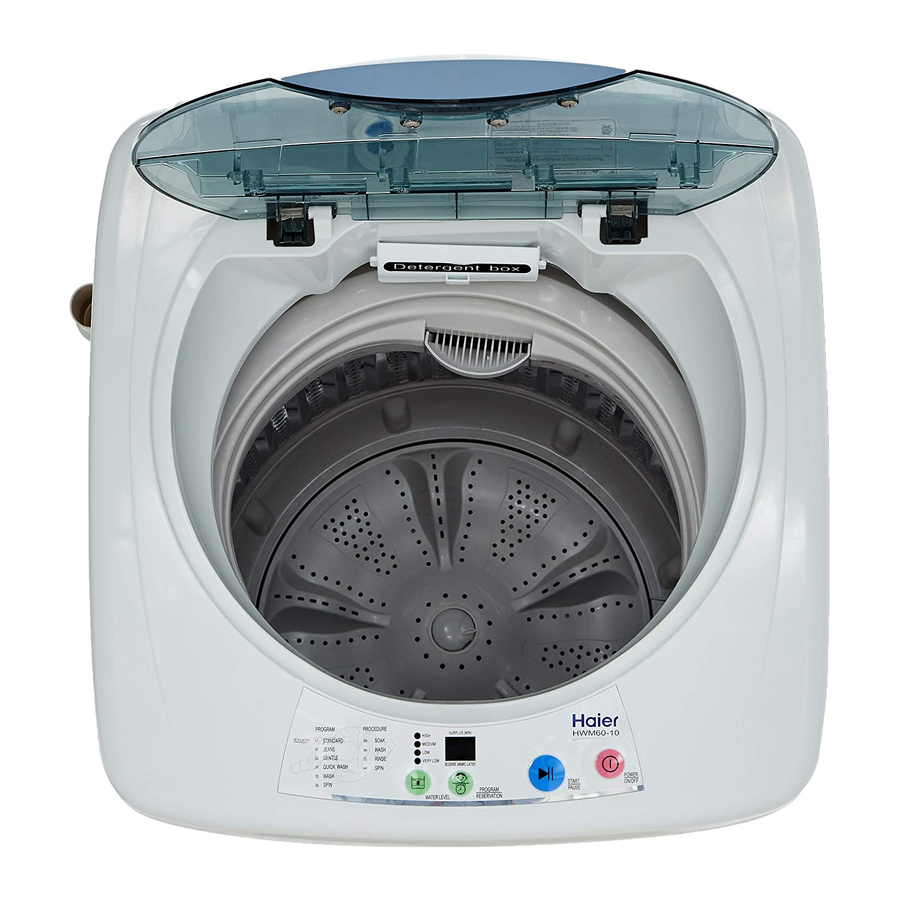
Names of the parts Top lid B Detergent box (Installed by user) Lint filter Control panel Filter cover Inner tub Control panel film Pulsator Cabinet base frame Accessories The end connecting to the washing machine The end connection to the water inlet hose Top lid A Sop mat... -
Page 4: Safety Precautions
Safety precautions Please plug the plug on special 220V AC receptacle.Please guarantee that the earthing wire is ear-thed reliably. earth Do not bend ,extend,twist,bind by force.Do not press or nip it with weight. Keep the pin of the power plug clean,if the power plug is polluted with dust, please wipe with dry cloth carefully. - Page 5 Do not stretch hands into the working machine. It is dangerous even if the rotation is slow. Take special care of the children.Do not let the children climb the washing machine. Do not put any hot or heavy items (such as the kettle with hot water ) on the washing machine.
-
Page 6: Installation And Adjustment
Installation and adjustment Please install and adjust the machine according to the requirement of the manual. It is very important to your security and correct operating the machine. Install the lint filter 1.Press downward to assmble. 2.Pull upward to detach. Put down Put up Put down... -
Page 7: Usage Of The Drain Hose
How to change the direction of the drain hose 1.Lean the machine down gently with the front surface facing the ground. Loosen the eight screws by a cross screwdriver. Back Front 2.Pull out the drain hose from the groove at the right side. -
Page 8: Install The Water Inlet Hose
Install the water inlet hose Install the water inlet hose 1. Insert a new flat washer into each end of the inlet hoses. Firmly put the washers in the coupling. Note: Use the new hose sets supplied with the washer. -
Page 9: Preparation Before Washing
1 Preparation before washing Pay attention to followings before washing the laundries Confirm Clear the pocket. there's special Take out the requirment for coins , sand, the laundries. hairpins etc. A. Check if the laundries are applicable for washing with machine. b. -
Page 10: Put In The Laundries
2 Put in the laundries Reference weight of the laundries: working suit up,down cotton,about 1120g blanket cotton,about 900g pajamas shirt cotton,about 300g undershirt cotton,about 180g The capacity of washing and spinning of the machine refer to the largest weight of the standard laundries under dry condition that can be washed or spinned in one time. -
Page 11: Put In The Detergent
3 Put in the detergent Inlet for concentrated washing powder and detergent Detergent box How to use the whitener Fill water to decided level. Dilute the whitener with container. Pour it slowly into the washing tub. Avoid using whitener on laundries with color or pattern as they are prone to lose color. -
Page 12: Use The Operation Buttons
4 Use the operation buttons Description of the function of the buttons PROGRAM STATUS STANDARD JEANS GENTLE QUICK WASH WASH SPIN " WATER LEVEL"button The user selects a suitable water level depending on the load. SURPLUS(MIN) To indicate remaining min. During program running. - Page 13 "POWER ON/OFF"button Press "Power On/Off" button to connect power supply. After power is connected, pressing this button will cut off the supply. "START/PAUSE"button After the power is switched on, press it to start the machine During working, push it to pause working. During pause, push this button to restart and continue operation.
- Page 14 Operating procedure and explanations for the buttons PROGRAM STATUS PROGRAM STATUS PROCEDURE STATUS PROCEDURE STATUS STANDARD STANDARD SOAK SOAK JEANS JEANS WASH WASH GENTLE GENTLE RINSE RINSE QUICK WASH QUICK WASH SPIN SPIN WASH WASH SPIN SPIN 1 Press the "Power On/Off" button to switch on the power supply 2 Press the button of "Program/Reservation"...
- Page 15 Attention Even there's no water in the tub, the spinning will start after a certain period. Do not use soak process for woolen Wash the laundries that are prone to lose colors separately from other laundries. The pulsator will not rotate unless the water is filled to selected water level.
-
Page 16: Close The Top Lid
Total time: including the normal water inlet time, drain time, excluding the power off time. The total washing time may be influenced by the water inlet pressure and water level. Spin time: the time from intermittent running to finishing. The Jeans program could combine the process of soak during which the washing machine firstly soak for about 25~45 min after water filling and then begins to wash. -
Page 17: Finish Washing
6 Finish washing The washing machine cuts off the power supply automatically when wash cycle ends. Disposal after washing After using, please clean the lint and foreign materials of the lint filter etc. in time. Otherwise it may influence your using the machine. Please first pull off the power plug from the receptacle before cleaning. -
Page 18: Trouble Shooting Answer To Question
Trouble shooting Answer to question If there's breakdown, please pull off the power plug before checking Phenomena Buzzing upon reservation starts, Nixie tube indicates "E0" No or slow drain, nixie tube indicates "E1" , buzzing. Running pauses during spin, nixie tube indicates "E2" buzzing Safety switch actuates, not spin, (after self-correction... -
Page 19: Packing List
Common phenomena Phenomena The spinning is intermittent when it starts. Push the" PROGRAM RESERVATION select "Spin", but it doesn't work. There may be some water flowing out of the drain hose in the first use of the machine. While water filling in wash and rinse, the pulsator pauses rotation Packing list Name... -
Page 20: Specifications
Model Rated washing / spinning capacity(kg) Water level/Water quantity (about) Water inlet pressure(MPa) Specification Specification HWM60-10 Lowest/20L Low/30L Mid/37L High/48L 0.03-0.78...